
In the off-road lighting market, we’re starting to reach the point where affordability doesn’t always mean poor quality. The barrier to entry for off-roading, which was typically reserved for hobbyists, is getting cheaper.
Companies like Diode Dynamics and Lasfit have worked their way into the off-roading community as great-value brands. Whether out of a desire to show some teeth, connect with a new crowd, or simply take advantage of a booming market, they are here to stay.
When I spoke with the Lasfit outreach representative, she mentioned that they plan to branch further into bar/beam lighting and possibly into headlights. They currently offer lightbars, pods, interior lighting, and other lighting/mounting/security options.
I had planned on a lightbar, but I knew I needed some work on my periphery first because my lighting was more focused on medium-paced runs. So I went looking for light pods and found Lasfit’s newest offerings, the 36W pods with vehicle-specific low-profile hood mounts. They were moderately priced ($240) at the time and included the harness, mounts, and pods. The price ranges depend on the fog pocket kit, solo kit, and/or ditch light kit.
The pods are offered with clear, amber, or yellow lenses. I decided on the yellow so I could easily track the different zones when making my comparisons and also because of its sheer brightness. They’re also offered in 18W or 36W outputs. If you’re looking at ditch lights for tight cornering, spring for the 36W variant like I did. If you’re looking for a traditional fog pocket kit, opt for the lower wattage.
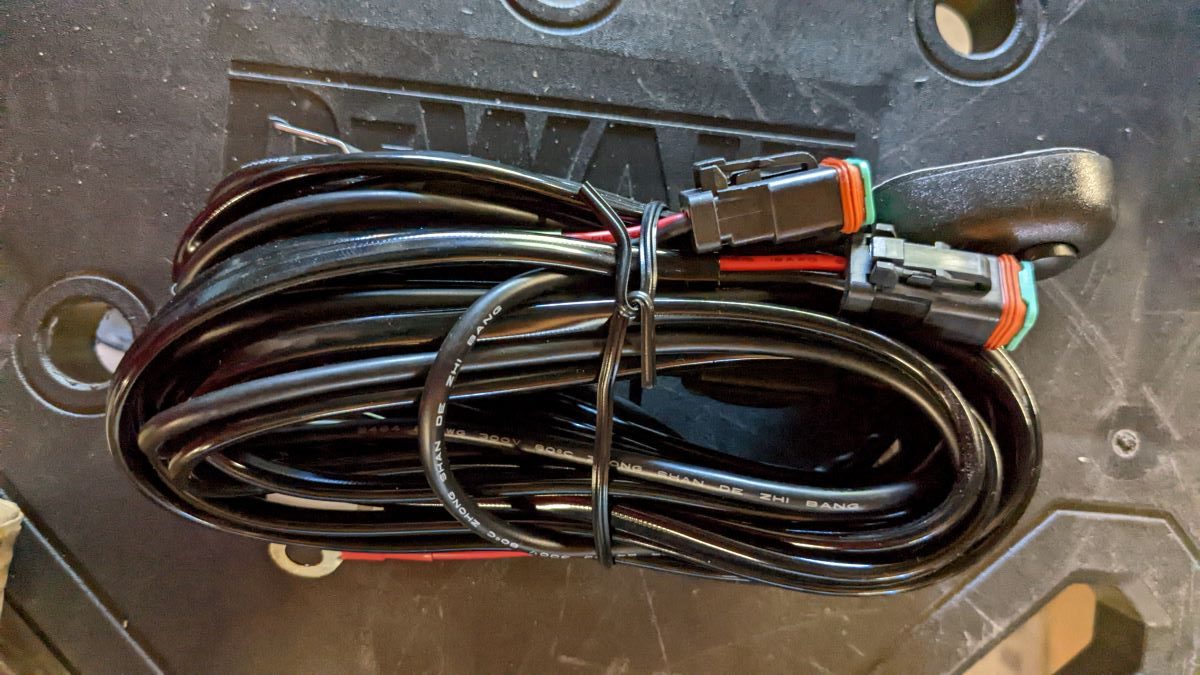
Pro-Tip: Buy an extra wiring harness for whatever you may need down the road. It’s a great price for a harness that includes a switch, relay, and a ton of wiring length.
Find It Online:
- Lasfit 3″ Podlights: Check here
- Baja Designs Squadrons: Check Price
- Diode Dynamics SS3s: Check Price
Table Of Contents
Build Comparison

The box was beautiful, matte black, and perfectly secured the light pods. The package included the brackets, hardware, and a pigtail harness to attach to other wiring systems. A second, nondescript cardboard package contained the mounts and wiring.

The pods are super heavy. I would hope this translates to heartiness. However, I’m not exactly sure how beefy you need your pods to be. Are they hitting branches at full speed?
Usually, the extra metal and heat fins are used for heat dissipation. Let’s explore that further as I compare them with a breakdown of my Baja Designs Squadron Sport IIs with fog light lenses.

When deconstructed, you get to see a lot of the time spent on R&D. The casing is cut perfectly. There are case screws that mount from the front and back, allowing for cross-pressure on the seals. Everything lines up perfectly. I dropped the light directly onto the cement ground of my garage, and nothing came loose, rattled, or shook.

However, the front and back pieces are held together using a gasket-less design. I’m all for ditching gaskets, but there should be a better design implementation than a tongue-and-groove, metal-to-metal connection. This is where Lasfit falls short compared to Baja.
Lasfit’s Board

The diode board and connections look a little sloppy compared to the Baja Designs setup, too. Glue is slapped on the backing, and the LEDs aren’t all straight.
Baja Designs’ Board
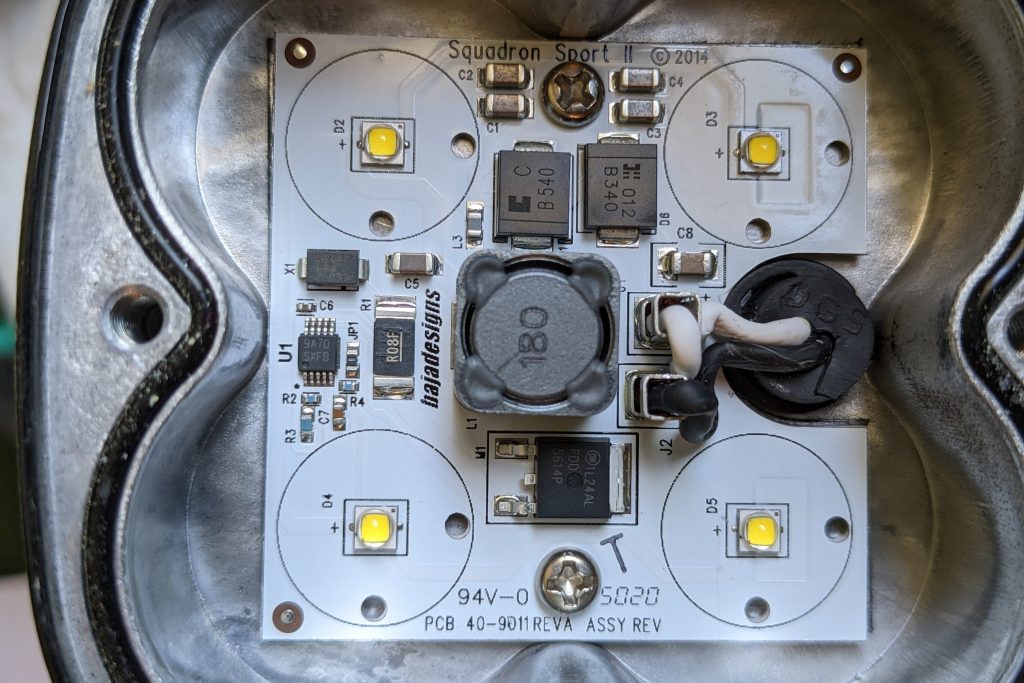
For a product that is simply a light, it almost looks as though the light was an afterthought. The lens differs, too. Baja Designs simply uses a conical design to focus the light out, whereas Lasfit seems to have used a crystallizing effect to spread the beam evenly. It should be interesting to compare the two.
There really is no comparison between the Lasfit lights on Baja Designs. Lasfit definitely falls short in terms of build quality.
Installation

You’ll need minimal tools for installation. The optional tools are for custom wiring your lights. If you intend to use the wire harness and toggle switch provided, you won’t need them.
Tools/Materials:
- 10/12mm wrenches or sockets
- 4mm Allen/hex wrench
- Needle nose pliers (optional)
- Wire cutter, stripper, crimper (optional)
- 18/22 gauge butt end connectors (optional)
Step 1. Attach Lights To Brackets

All you’ll need is a 4mm Allen wrench.
The instructions call for loosely installing the washer/ lock washer combination, so here’s a good photo of the parts assembled. I opted to use security screws (M6) in the lateral parts of the bracket to slow down would-be thieves. If you go this route, make sure to have a Torx (T30 hollow) bit handy.
Step 2. Add Low Profile Mounts To Hood

Here are the basic steps for installing ditch light brackets on the 5th Gen 4Runner. This process is pretty similar across all brands.
- Open the hood and prop it open with a 2×4 if you have one. It’ll help keep the hood from torsion when you remove the bracket screws.
- Test fit the mounts loosely to ensure correct fit and side.
- Using a 12mm socket/wrench, remove the top bolt. The mounts go directly on top of the brackets, so install (hand tight) the mount’s top hole with the factory bolt.
- Then remove the lower bolt, making sure to squeeze the hood to the bracket with one hand. You don’t want it sliding around. Pivot the mount over, line it up, and tighten the lower bolt to an acceptable pressure that will allow you to adjust if needed.
- Tighten everything down.
Step 3. Wiring Prep
The wiring harness comes with a flip-style switch, complete with double-sided tape to add anywhere in the cabin. There are so many different ways to add lighting. If you’re comfortable testing/adding different electrical components, you can follow along for engine bay photos and ideas. If you’re uncomfortable with this, I suggest skipping to the next step.
I knew I would want an OEM-style switch to control the lights using the existing bank inside the 4Runner’s cabin. That meant I wouldn’t need the switch or its harness. I tossed the switch aside, knowing the wiring harness would still have enough wire to reach the cabin. Seriously, buy the harness. It’s priced well and is a great value.
If you’re using an aftermarket switch, cut the female end off the harness attached to the relay side; otherwise, move to the next step.
Step 4. Feed The Relay End/Harness Through The Firewall

Check both sides (in the engine bay and the cabin) to find an area that won’t interfere with any existing wiring. Punch through with either a box cutter, prison shank, or large needle. I used the old “tape wires to the end of a coat hanger” method, and it took a couple of attempts.

Pro Tip: If you use a large needle or something smaller, leave it in the hole you punch. It’ll be a point of reference when you need to find the hole, and you can push the wiring behind it.
Step 5. Connect Wiring To Switch

Disconnect the battery using a 10mm wrench. Then, in the cabin, pop the dashboard loose. I usually grab the plastic on the left of the steering wheel and the left side near the door. I press in on both sides and firmly pull back.
Next, find the blank switch on the panel you’ll replace and squeeze the backside tabs to pop it loose toward you, not inward. Feed the wires through the hole you just created.
I didn’t want the switch to be lit full-time, so I opted to wire the switch as follows: the switch side is (S), and (R) is the relay:
- Black (S) to black (R)
- Red (S) & white (S) to red (R)
- Green (S) to yellow (R)
Step 6. Wire The Lights

Starting on the passenger side, slide the wire closest to the harness end alongside the plastic trim under the windshield wipers. Leave a few inches of wiring above the trim for slack. Add loom and/or zip tie the wire along the back of the engine bay until you reach the other side.
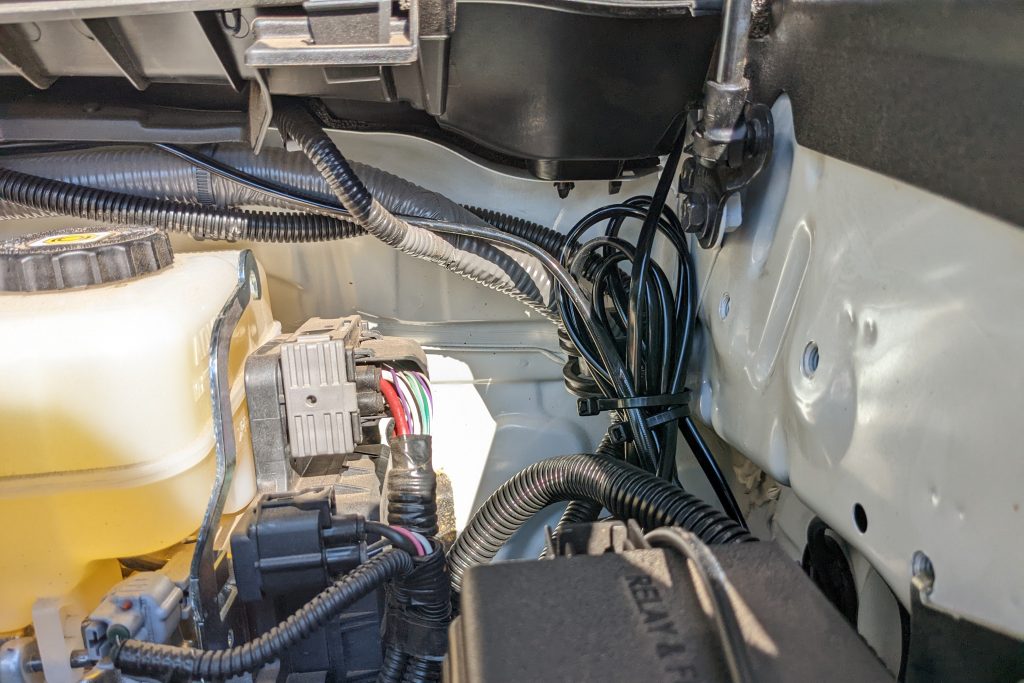
Repeat the same on the driver’s side, taking note of the slack provided. Either cut the wiring away and reconnect it or bundle and zip-tie the excess.
Step 7. Mount The Lights
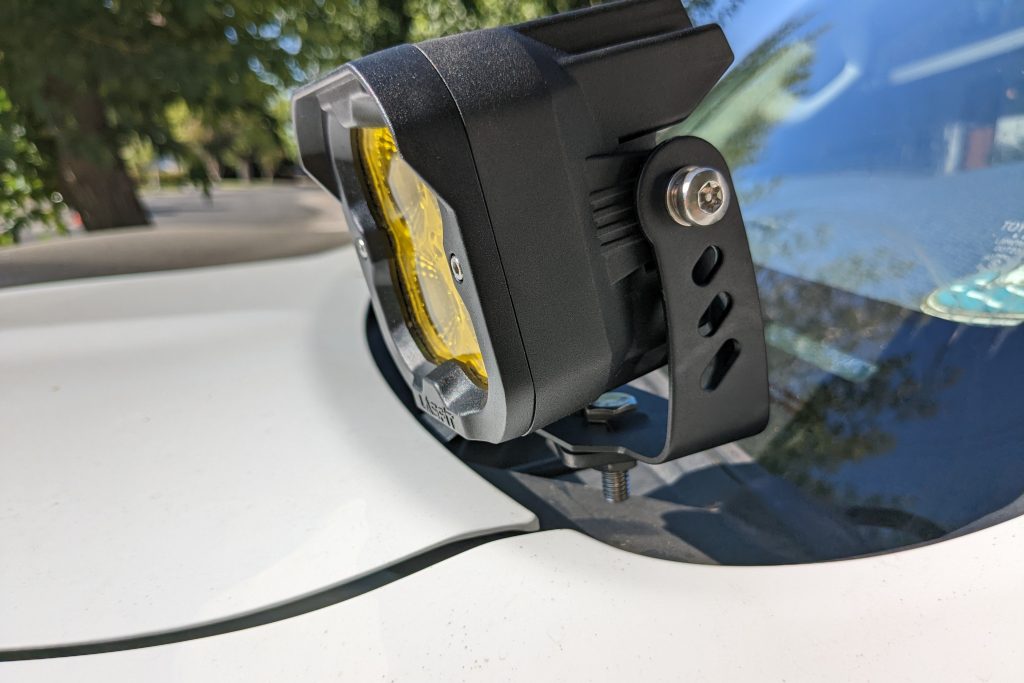
Using the provided hardware, slide the larger bolt through the top of the bracket, the hood mount, and then through the large washer and lock washer. Finally, add the large nut. I felt like there was too much bolt here, so I later took a hacksaw to it.
Pro Tip: Buy a security M8 screw and bottom mount it to the hood mount for added theft prevention.
Step 8. Connect Lights & Relay

Connect the wire harness pieces under the hood and the relay ring terminals to the battery. If you have a sPod/Auxbeam, etc., connect it now.
Status check
At first, the lights shouldn’t be on, and the switch shouldn’t be illuminated.
Now, press the switch. If the lights turn on, you’re golden. If not, check all connections: relay to the battery and switch to relay. If the switch is illuminated full-time, swap the accessory wire (usually white, blue, or green) for the red relay wire. Otherwise, use a voltmeter to check currents.
Cleanup
Tie up any cables in the cabin to static points. Pop the switch into the panel and reinstall the panel to the dash. Mount the relay to a screw inside the engine bay, and tie up any loose cables.
Final Thoughts

On the road, it was obvious the Squadrons had a longer throw. As cornering lights, though, it was hard to deny the wide, even coverage the Lasfits threw.
There weren’t any dead spots, hot spots, or defined limits of coverage. Unlike the Squadrons, which have a defined cutoff, the beam slowly fades out. There’s an impressive amount of light output, and the mounts did their job, although I may add a spacer to push them further off the hood.
The lost light wasted on the hood was an area just by my wheels, but that’s typically the case with any ditch light.

The Lasfits did, however, put off a ton of heat. I live in Sacramento, and we are constantly bombarded with heat, day in and day out. It’ll be interesting to see if this cuts their life short.
Many brands are out there trying to capture a share of the offroad community’s growing population, and Lasfit is no different. Their higher-output ditch lights have a great price point: they are a bit cheaper than Diode Dynamics and hundreds cheaper than Baja Designs. It’s a great plug-and-play solution, and frankly, I don’t see the need to spend the extra money.
thanks for the review. I too live here in the 916 and have been going between the BD and other brands. many other online folks have been recommending other products than the BDs. id like to get BDs due to some reviews but there are others that seem to perform in the same ring with them that are in some cases almost half the price. id love to try lasfit but really need to rule out BDs because I do believe they are a solid light.
The Baja Designs light tested is our SAE Squadron. This has very different design parameters than our Squadron Sport OHV solution. If you are interested in testing apples to apples beam patterns and wattage of lights please let us know. The Squadron Sport is 26w. Out of curiosity did you validate the wattage claimed by Lasfit by measure amperage?
Baja Designs: The Scientists of Lighting
Trent Kirby
Chief Executive Officer
trent@bajadesigns.com
760-560-2252
Hey Trent,
Of course I verified the draws. The installation shown was a direct connection, which, at the time, (anecdotally) was still the most common connection point for most daily driver/mild usage purposes. I later used a switch to control them and got varying results.
I’ll look through the article to see if I misspoke on the general numbers, but as far as I can remember, they stuck.
If you can tell by the cadence and loose comparison throughout the article, you can see that I make comments regarding the lack of apples to apples. It’s merely an observation of how two companies go about their business.
Also, of mention, the light board for the Squadron Sae clearly says “Squadron Sport II”, and if you notice articles online, the most common (mis)conception is that the SAEs are simply Squadrons with a diffused lens sequence that spreads the light and lowers overall lux output. Although I shouldn’t be party to furthering this, I believe that my draw, build, and design comparisons as the focus of the article remain relative.
If you’d like, I can go through the article and make sure that the model and comparison as such are noted.
i am assuming you’re comparing them to the BD in your fog light location, and from the look of the lenses the BD and the Lasfit don’t share the same lens type. Maybe that’s why the clear cut off for BD and the slowly diminishing cut of Lasfit.