
Ditch Lights are one of the most common lighting upgrades that lots of 4Runner owners will add to their vehicles. They add a unique look to your vehicle and, if you buy the right lights, can provide some serious light output.
Ditch lights are designed to provide lighting towards the front corners or sides of your vehicle to illuminate areas your headlights and lightbars can’t reach. Depending on what type of beam pattern you go with,h ditch lights can be used for most any application. Flood beams can light up the sides, or spot beams can reach further than your headlights; it’s entirely dependent on your needs.
A ditch light setup requires three components: brackets to create a mounting platform for the lights, wiring to provide power to the lights, and the lights themselves. Some companies, like Baja Designs, offer ditch light kits, while others, like Cali Raised, are more focused on the brackets. Diode Dynamics has recently come out with its line of Ditch Light kits that include brackets, lights, and wiring. I’ve had these lights installed for a few weeks now. The lights are extremely bright, and the brackets are of such high quality as well.
Diode Dynamics is blowing up the lighting game right now with their Stages Series Lighting (their line of LED Pods). With their multitude of beam patterns and extremely efficient TIR Optics, they are killing it right now!
Table Of Contents
What Makes Diode Dynamics Different

Diode Dynamics has become one of the biggest up-and-coming competitors with Baja Designs. They’ve been putting out equally impressive, if not higher-quality, lighting products on the market. Diode Dynamics is climbing to the top of the lighting game for a few reasons:
Firstly, Diode Dynamics designs all of its lights in the United States with its team of in-house engineers. They aren’t buying and reselling overseas lights, they don’t want to match the competition, they want to be better than it.
Secondly, Diode Dynamics manufactures all of its products in St. Louis, MO, which allows it to offer high-quality products that are built to last. I appreciate knowing where my lights are being produced, and the fact that they’re made in the US is very reassuring.
Thirdly, Diode Dynamics rigorously tests every product to ensure that it will withstand any environment. These tests include electrical interference, vibration, corrosion, moisture, and extreme temperature testing. They will literally stick one of their pods in a box and try to break it with heat, water, anything really, and the lights keep on shining.
Lastly, the Diode Dynamics team is automotive enthusiasts themselves; they want their products to outshine the rest just as much as the customers do. They control the process from start to finish, giving each consumer superior quality products.
All this to say, I’ve had multiple Diode Dynamics products from the footwell to fog lights, and I’m blown away every single time. That is why I chose Diode Dynamics for my Ditch Lights.
Diode Dynamics SS3 Pros vs Baja Designs Squadron Pros
Price Winner – Diode Dynamics
- Diode Dynamics 3″ Pro: $500
- Baja Squadrons: $326 (Ditch brackets not included)
The Diode Dynamics Kit (everything included) is the same cost as a set of Squadrons, factoring in a set of brackets for the ladder. If you are looking for extreme output at a fraction of the cost, Diode Dynamics is the place to go.
Lumens Winner – Diode Dynamics
- SS3 Pro: 5,796 Lumens (White)
- Squadron Pro: 4,600 Lumens
The Diode Dynamics lights clearly put out 26% more raw lumens than the Squadrons; that’s insane. Diode Dynamics doesn’t even focus on the lumen outputs; they pay more attention to Candela, which measures the intensity of the light rather than just the output. They want to make sure the lights are effective, not just bright. Baja Designs doesn’t have their candela specs, so there is no comparison we can make there.
Warranties and Durability Winner – Baja Designs
- Diode Dynamics: 8-year Warranty
- Baja Design: Limited Lifetime Warranty
Diode Dynamics SS3’s and Baja Designs Squadrons are extremely durable, and you can’t go wrong with either one. Both are torture-tested, with multiple durability test ratings for each (waterproof, pressure, etc.). As far as warranties, both are backed by extremely good warranties that ensure your products will last a very, very long time.
Overall
In my personal opinion (to each their own), the Diode Dynamics SS3’s are superior. They are both great lights, and both have been battle-tested, but the SS3’s are brighter and less expensive, and that is hard to beat. I’ll stand behind Diode Dynamics products any day.
SS3 Pod and Ditch Bracket Features

- Modern TIR optics, for the highest intensity on the market – shining light up to a half-mile away
- White (6000 K) or Yellow (3000 K) output color
- Designed, torture tested, and assembled in the USA
- 8-year warranty
- Two Power Levels: Sport & Pro (Pro is 2x power)
- Bolt-on Fitment
- Uses existing hardware and bolt locations for easy install
- Thick-Gauge Stainless Steel Brackets (won’t corrode over time, thickness prevents vibration while driving)
- CAD-Designed by in-house engineers to ensure perfect fitment for your 4Runner.
Performance Specs (Per Light)

- 35,100 cd (Peak Beam Intensity- Candela)
- 351 Lux at 10M
- 3000 Lumens (Measured Output)
- 5796 Lumens (Raw Output)
- 6000k Output Color
- 36 Watts
- Operating Voltage: 9-16v
- Current (amps @ 12.8V):2.7
- Operating Temp: -40C to 85C (-40F to 185F)
- LED Source: Cree XP-L HI
-
Materials: Polycarbonate Lens, Aluminum Casting, Rubber Gasket
-
Cooling: Passive, Pin-Fin heatsink
-
Intrusion Ratings: IP69K Waterproof, High Pressure
Combo Beam Pattern
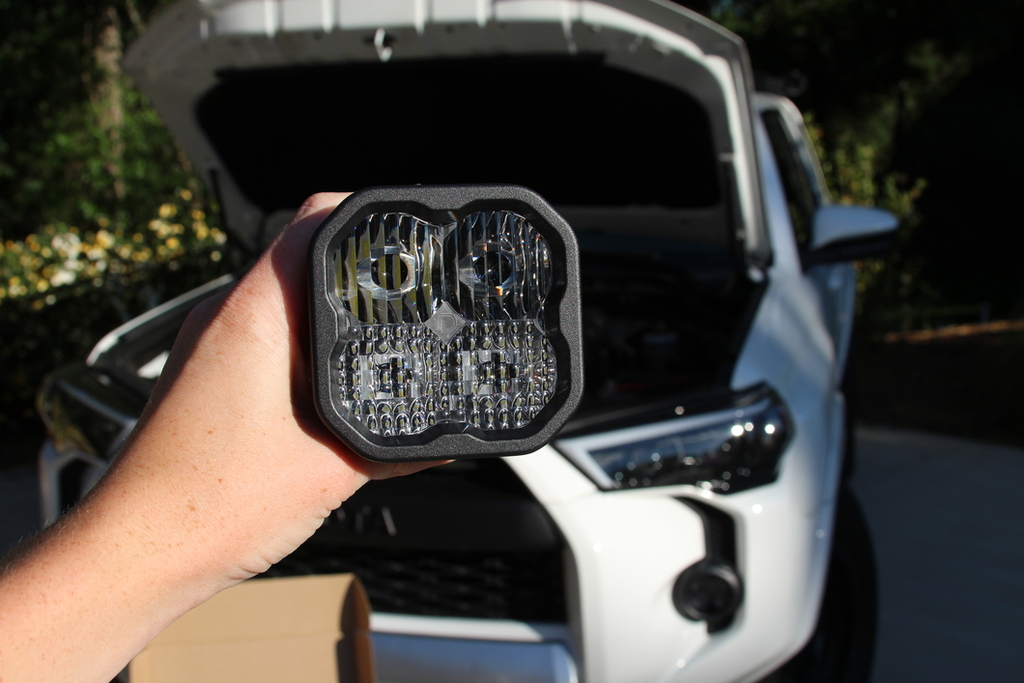
For this Ditch Light Kit, Diode Dynamics offers a combo beam pattern on the SS3’s.
Combo combines both the Driving and Flood optics. The SS3 shines light downrange in a focused, rectangular 65×25 degree pattern, while the SSC2 shines light downrange in a 40×20 degree pattern. The combo lens features a flood optic on one side and a driving optic on the other. – Diode Dynamics
Combo beam patterns are great because they focus the light far ahead and up close. Making these lights extremely versatile for anything you have in mind.
Installation

What’s In The Box
- 2 SS3 or SSC2 Standard LED Pods
- 2 Thick-Gauge Stainless Steel Ditch Light brackets
- 2 SS3 or SSC2 Mounting brackets
- Heavy-duty dual-output wiring harness
- Stainless Steel Mounting Hardware
- Mounting guide
Step 1. Pop Hood

Pop the hood to access the engine bay. Then take your tape and line it up with the outside of each bracket. The tape will help ensure that everything lines up properly once you’ve attached your brackets.
Step 2. Remove Top Bolt

On the driver’s side, only remove the top bolt on the hood bracket. Set that bolt to the side because it will be reused.
Step 3. Bolt Bracket With Top Bolt

Line the driver’s side ditch bracket up with the top bolt hole where you just removed your bolt. Put the bolt back in place and tighten down, leaving enough wiggle room to rotate the bracket into position.
Step 4. Remove Bottom Bolt

On the driver’s side, only remove the bottom bolt on the hood bracket and set it to the side. Then slide the bracket into position and, using the bolt you just removed, tighten it back down. Once both bolts are in and the bracket is attached, fully tighten both bolts.
Step 5. Detach Wire

There is a wire that runs along with the hood and comes down the passenger side hood bracket. To remove the bolts on the passenger side, you have to get around the said wire. There is a small clip on the outer side of the hood bracket. Pop the clip off, and you can gently pull the wire away from the bracket. Now you will have an easier time attaching the ditch brackets.
Step 6. Attach Passenger Side Ditch Bracket

Repeat steps 2-4 to attach the passenger bracket; the steps are the same. Once both brackets are attached, go back and make sure none of the bolts are loose. Also, clip the wire back into place on the passenger side.
Step 7. Close Hood

As a precautionary step, gently close your hood, paying attention to the clearance between your windshield and brackets. The last thing you want is to get finished and slam the hood and have something get messed up. While everything should be just fine, it can never hurt to double-check.
Step 8. Attach Pod to Mounting Bracket

Take the designated hardware and attach the pod to the mounting bracket. The nuts fit in little slots on the pod, and the bolts are tightened down with a provided hex tool.
Step 9. Attach Pod Brackets to Ditch Brackets

Taking the designated hardware, attach the pod brackets to the ditch brackets. Steps 8 and 9 can be done in whatever order you prefer. This is just how I went about the install.
The bolt fits on top of the bracket, and the washer, lock washer, and lock bolt fit on the bottom when attaching.
Step 10. Lay Out Wiring Harness

Now that the pods and brackets are all attached and secure, it’s time to begin wiring for the pods. I like to lay out the wires, so I get a better idea of how I’m going to perform my wiring. The wiring harness comes with a switch and a fuse, along with two Deutsch connectors for each pod.
Step 11. Attach Positive and Negative Wires

Secure the positive and negative wires to their corresponding terminals on the battery.

The bolts are 10mm for both. Once you have mounted each wire, tighten the bolts back down and ensure that all of your other wires/accessories are reconnected.
Step 12. Bolt Fuse to Engine Bay

There are multiple bolt holes on the walls of the engine bay. Pick the one you’d prefer and bolt the fuse to that hole. If you do end up getting multiple lighting accessories for your build I suggest you get a switch panel, these fuse blocks are very bulky and awkward causing them to take up way too much space.
Step 13. Test Lights

This step is optional but I suggest testing the lights before performing wire management, it would be a real hassle to find out the lights don’t work after you’ve already done all the wiring. It wouldn’t be a bad idea to test them before you even begin the install, either.

To test the lights, just roughly run the harness to the pods and attach the Deutsch connectors. Then, press the switch to turn them on. If the lights work, turn them off, but leave all the wires connected.
Step 14. Wire Management

One of the subtle but nice features of the ditch brackets is the little slots for zip ties that allow you to cinch the wires around the brackets. Using the provided zip ties, feed them through the holes on the brackets and around the wires.

I ran the wires for the passenger side along a thick plastic tube at the back of the engine bay. When it met the driver’s side wire, I zip-tied all of the excess wire together.
Step 15. Switch (Updated)

The harness provided by Diode Dynamics includes a switch that can be wired to the engine bay, but I now have the Pro8 Switch Panel from Rear Light Bar that I use for my accessories. So I cut off the Diode Dynamics Switch, wired the positive wire to the control module, and the negative to the ground in the engine bay.
(Earlier in the article, I mentioned attaching the negative and positive wires to the battery, which you would not do if you have a switch panel.)
LASFIT LS Plus Series (8000 LM) Low Beam- No Fog or Ditch Lights

LASFIT LS Plus Series (8000 LM) Low Beam + Diode Dynamics SS3 Fog Lights
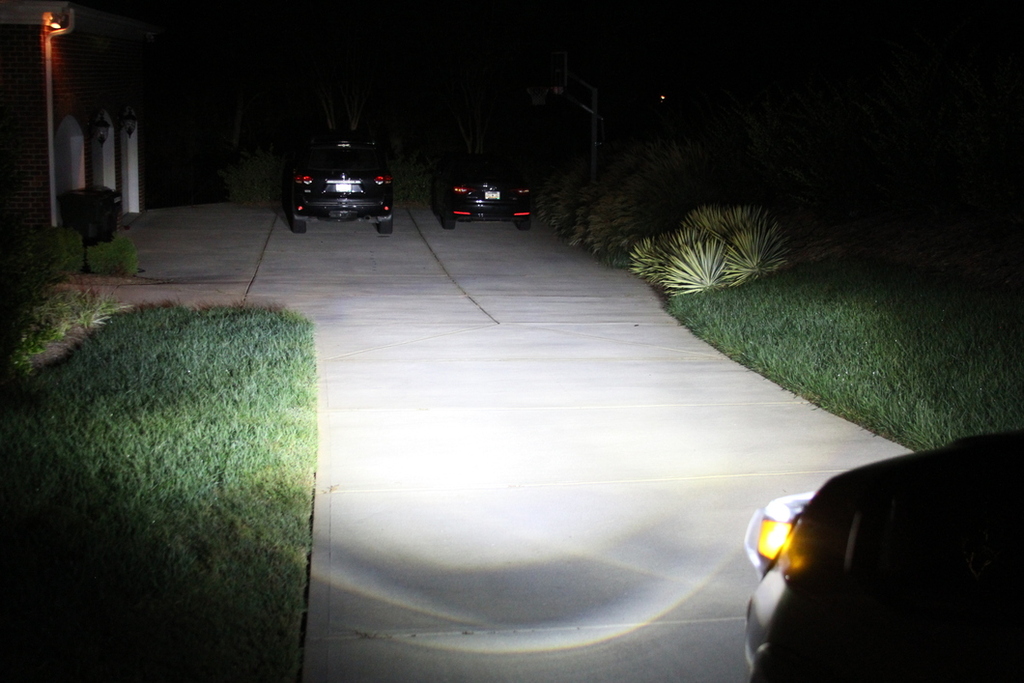
LASFIT LS Plus Series (8000 LM) Low Beam + Diode Dynamics SS3 Fog Lights + Diode Dynamics SS3 Ditch Lights

Diode Dynamics SS3 Pro Series Ditch Lights Combo Beam
Final Thoughts

These lights are so, so, so bright. I thought my SS3 Sports were bright, and then I got the SS3 Pros. The brackets for the kit are extremely durable, and they are low profile as well. Like always, Diode Dynamics thought out every part of this kit to perfection, and there isn’t anything I’d like changed. In my opinion, this is the highest quality ditch light kit on the market.
Nice set up. Did you wire the ditch lights to enable the backlight function of the ditch lights?
Im trying to figure out where to cut on the harness
Yo, those headlights have gotta go. Both your fog and ditch lights shine further than them, that’s a real problem (notice I mention DISTANCE, not BRIGHTNESS). LED bulbs in halogen housings aren’t good at anything except taking your money. Please put proper halogen bulbs back in for correct distance lighting.
Nice write-up on the ditch lights though!
Bro – time for a switch pod! I love my Auxbeam – thanks for the write up.