
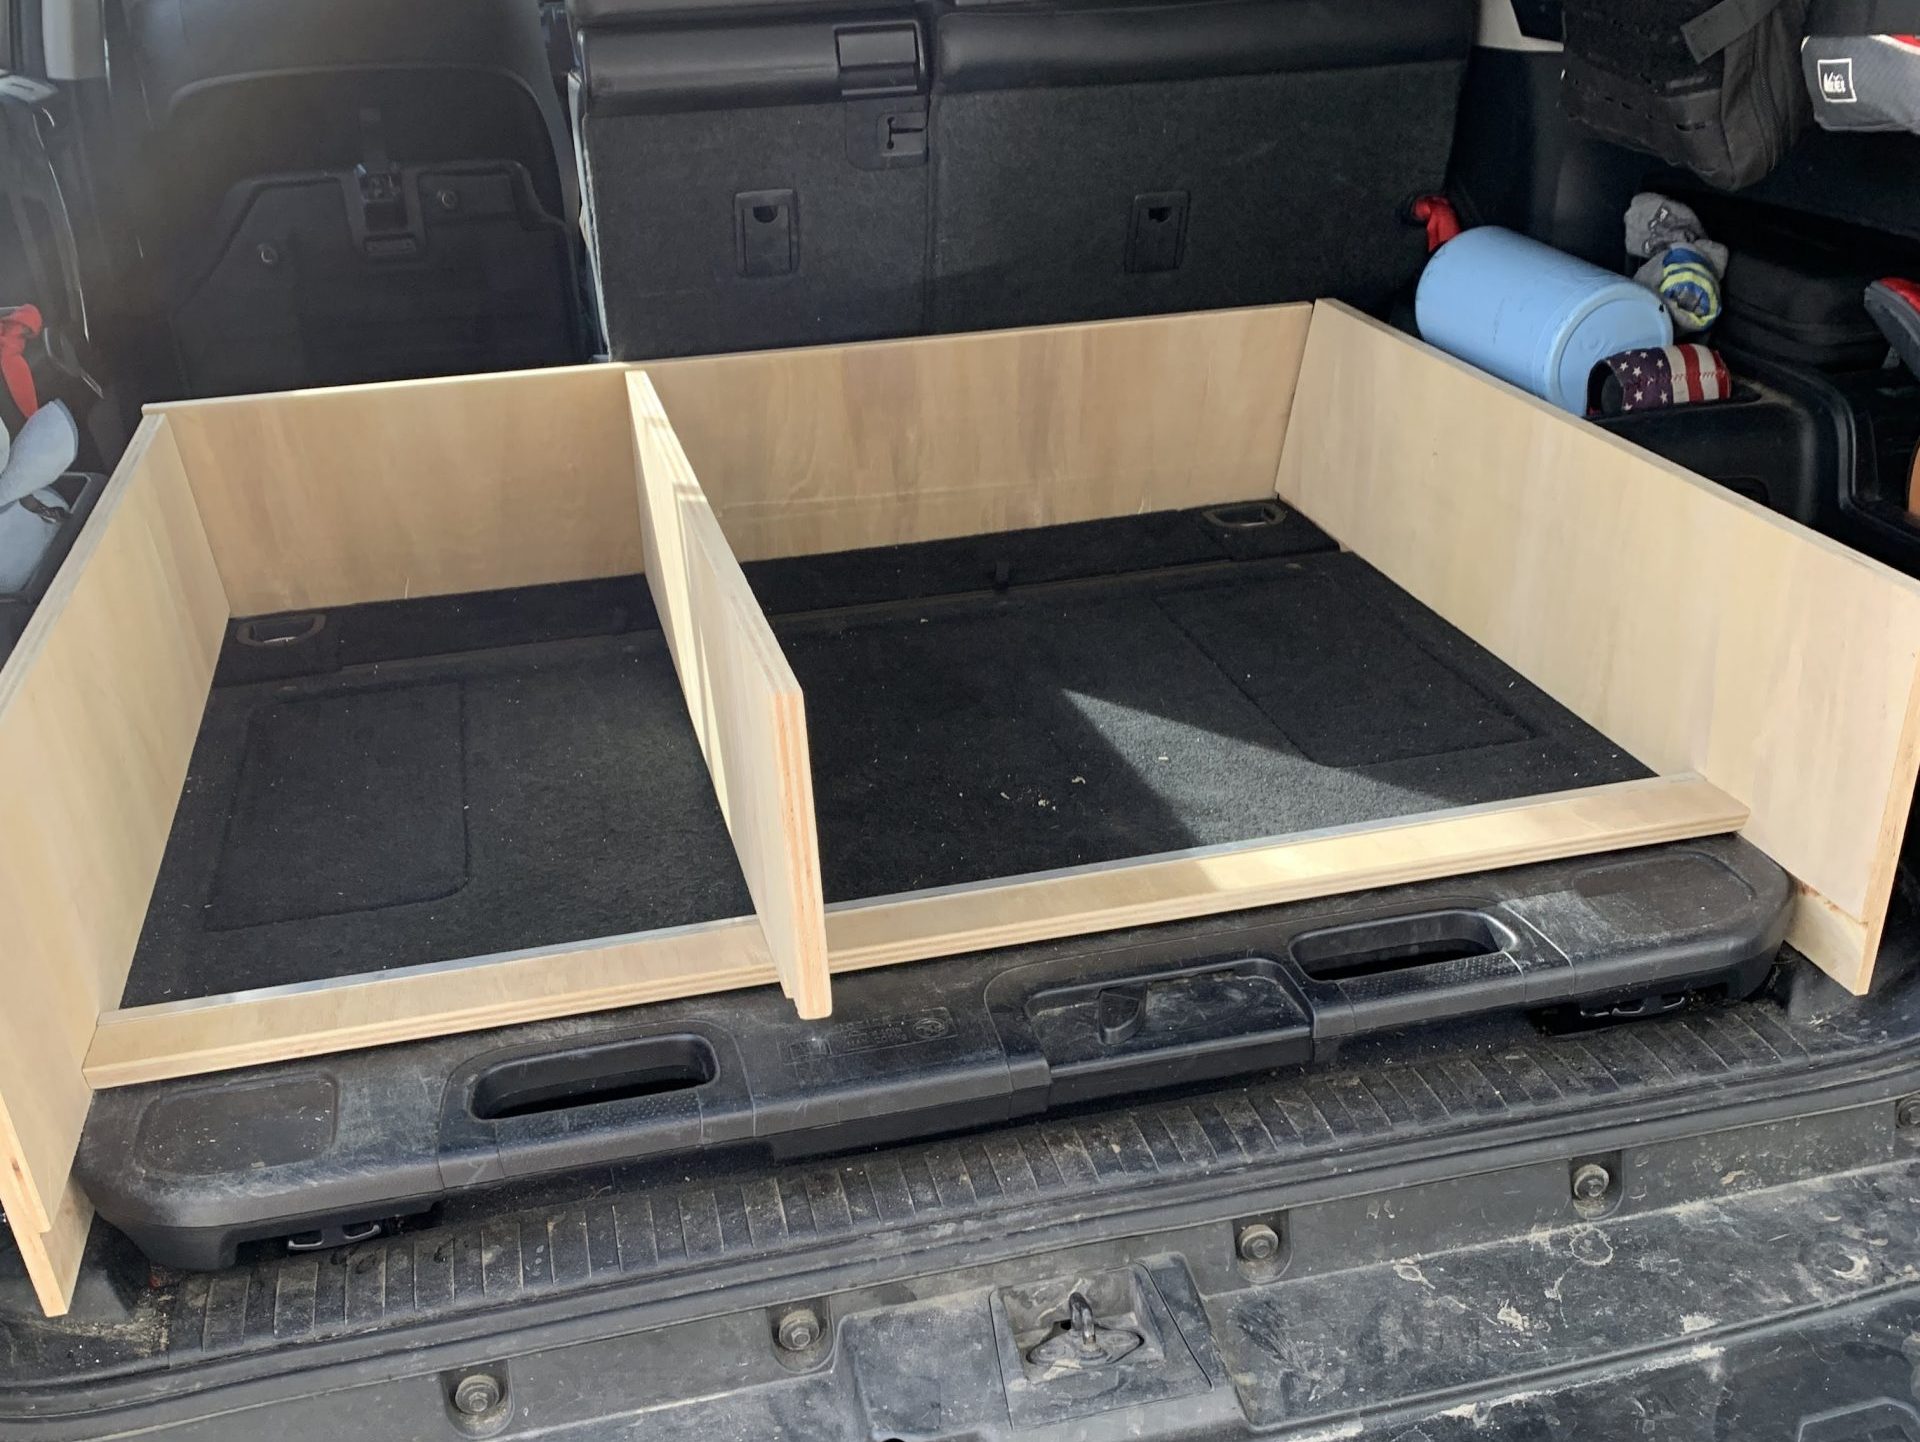
Listed on the following post are the dimensions and cut list for the storage box pictured above. All dimensions were based on my particular 4Runner and specific needs. Be sure to double-check all reference dimensions with “real-world” dimensions on your individual truck. After some real-world use of these drawers, I made some changes not specifically listed in these instructions (made cutting boards, added handles, added a removable waterproof cover), but should be able to be seen in the image gallery.
Main Materials List
- ¾” (18mm) 4’x8’ sheet of sanded plywood – $44.98
- ½” (12mm) 4’x8’ sheet of sanded plywood – $35.95
- 36” pair of full extension drawer slides (250# capacity) – $79.95 x 2 (TCH Hardware)
- Buying locking drawer slides would be the recommended approach (Locking Drawer Slides)
- 24” pair of soft-close drawer slides (75# capacity) – $21.98 (Richelieu)
- Assorted 2” screws for frame and drawers and ½” and ¾” (for slides) – recommend binding posts (linked below) instead
**In the gallery images, the green color is ¾” Baltic Birch (I had this on hand and wanted the look, but you could use ½” material if you don’t have additional on hand). The blue color is ¾” plywood, and the grey is ½” plywood.
Optional Materials List
- ½” and ¾” binding posts for attaching drawer slides instead of screws (Binding Post)
- RV Cabinet Latches (optional if not using locking drawer slides) – $5.99 (Grabber Catches)
- I used these in an “atypical” fashion to hold the drawers open. Although this works well, the installation was a pain ,and if I were to do it again, I would buy locking drawer slides (above)
- Removable waterproof cover (added later) – $25.99 (Cover)
- Tee handles (added later) – $8.24 (T-Pull)
Tool List
- Circular saw
- Drills
- Miter Saw (optional)
- Table Saw (optional)
- Jigsaw (optional)
- Router (optional)
Table Of Contents
Frame Layout

**Double-check all of these dimensions with your own specific 4Runner.
In my case, the back seats reclined at a 20-degree angle, so the back pieces are cut to that. With all angles, I measured to the longest point (the bottom of the angle) and cut square, then I cut the angle. All my pieces I cut long and then cut down to size on the square end.
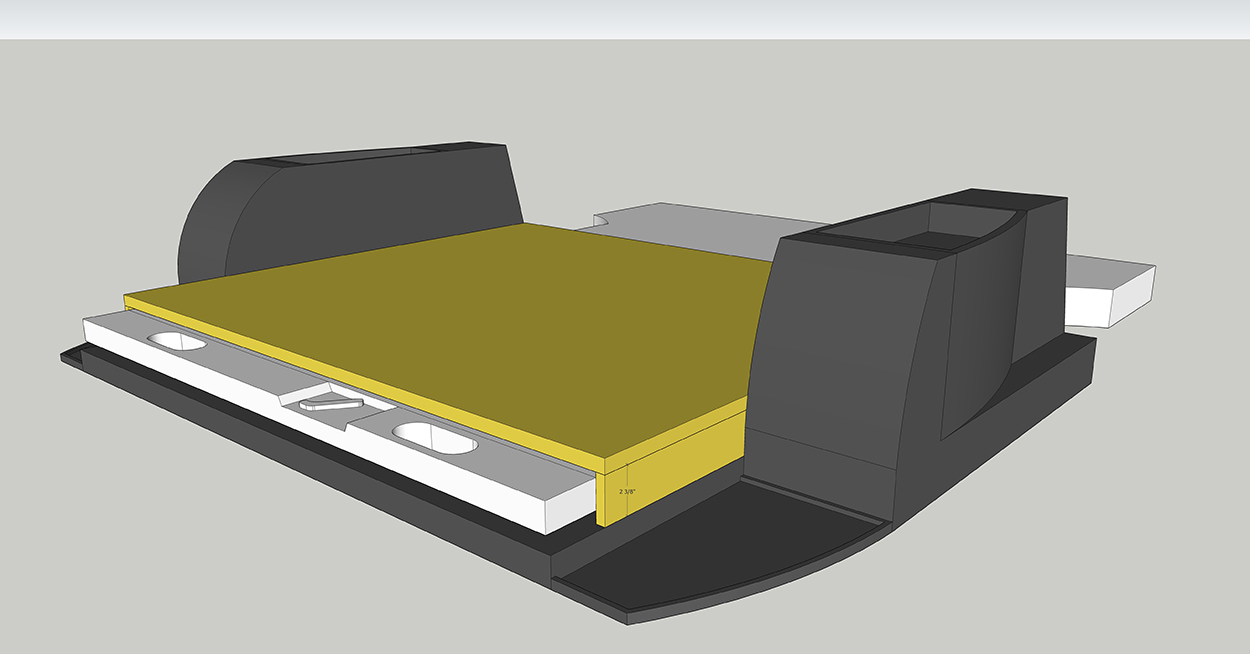
There is a ½” gap on either side of the sliding tray beside the wheel wells. On the table saw, I ripped a ¼” x 2-¼” groove out of these side pieces so that it slides in this space (see additional images in the image gallery)
**If you do not have the sliding tray, measure from your floor to the top of your wheel wells (or whatever height you desire) to get the height of your frame pieces.
In order to help support the divider between the two drawers (since I was spanning the factory pull-out tray), I added a piece of aluminum C channel to the back of the plywood stretcher, this added rigidity to help prevent sagging. This can be seen in the image above. In hindsight I would have used thin steel for extra support, but 1 year later and heavy use, I only notice minimal sagging, and it does not affect performance.
**Refer to “Alteration #1” below before proceeding if you would like to simplify the process and your cuts. If you proceed with this alteration, please adjust accordingly, as all dimensions will be altered.
**Alternatively, refer to “Alteration #2” below before proceeding if you do not feel comfortable making the table saw/router cuts listed below. This alteration will add additional plywood, but will greatly increase ease of assembly.
Frame Cut and Assembly
- Using a circular saw and a straight edge, cut three (3) pieces of ¾” plywood (FS1, FS2 & FS3) 10-½” x 48” long (48” is the width of the plywood. This makes the cuts easier, and we will cut down to exact size later).
- Using a table saw or router, cut a ¼” deep groove, 2-¼” x 48” on two (2) of the pieces (FS1 & FS2)
- On all three (3) pieces, cut a 20-degree angle as shown. No need to be too cautious on where this angle is exactly, as we will trim to length later.
- Now, on the two (2) grooved pieces, mark a 90-degree line where the angle meets the 2-¼” groove; cut this square. This will give the final profile of the back as shown.
- For the remaining piece, using the table saw, rip the piece to a final width of 7-½”.
- Cut all three (3) pieces to a final length of 3’-3” from the longest point as shown above.
- Before cutting, test fit all pieces and determine if the above-stated length is correct for your vehicle.
- Using a circular saw and a straight edge, cut one (1) piece of ¾” plywood (FB1) 9” x 48”.
- This is the back piece and will eventually have two 20 degree angles cut along the long end in order to match the angle of the seats. Cutting 9” wide should give enough play to cut these final angles.
- Using the miter saw, cut this piece to its final length of 3′ 7-½”.
- Using the table saw, rip a 20-degree angle on both of the long sides, making a parallelogram shape.
- It is best to cut one angle, then dry-fit the piece and scribe where it hits the sides; this creates the best fit. If it ends up too short, just flush the top, and the bottom will never be seen.
- Using the circular saw and a straight edge, cut two (2) pieces of ¾” plywood (FB4 & FB5) 3” x 48”
- Using the miter saw, cut these two (2) pieces to their final length of 3’ 6”.
- Assemble the sides (FS1 & FS2) and back piece (FB1) (the back overlaps the angles of the side pieces) using 2” screws, predrilling to prevent splitting. Make sure that all edges are flush at the top.
- Add the support pieces (FS4 & FS5) on the bottom. The back one should be tight against the back, the front one inset enough to clear the release lever for the factory sliding tray.
- Make sure that these pieces sit ~⅛” above the cut groove so that the tray will clear.
- With some rough math, you can go ahead and place your center divider (FS3), but I would wait to permanently attach it until your drawer slides are in and one drawer is made. That way, you can accurately place it.
- With all these pieces assembled, add a temporary brace across the top to keep the side square/vertical (a plywood top will be added later, this just maintains access to the interior).
- At this point, you should test fit the frame in the 4runner. Make any adjustments necessary before proceeding. Once the frame is complete, the rest can be done without access to the 4runner.
Drawer Slide Assembly and Install

**Follow all manufacturer guidelines or online videos for drawer slide installation. The below is merely a rough guide for this particular build, not an instructional on drawer slide installation.
When installing drawer slides, I find it is best to install the slides to the frame first, then put drawers in place (make sure the shim is slightly underneath so there is no rubbing, playing cards work great for this) then begin attaching to the drawers.
I also added temporary support on top to help support the center divider. In the end, the ¾” top will serve this purpose, but this method allowed access to the interior of the box during assembly.
- Install your two outermost slides first. These can really be placed anywhere (vertically speaking), but I chose to mount mine as low as possible because of the nature of the drawers.
- If you are doing inset drawer fronts (like I did), be sure to place the drawer slides in from the front, to the thickness of the fronts (in this case, ¾”).
- Slightly space the slides off the bottom braces. This can easily be accomplished using some playing cards.
- Make sure the drawer slides are even/level and install per directions.
- I would consider substituting binding posts in place of provided wood screws as I find they provide superior holding power.
- Following the directions or online videos, install the slides on the drawers as well.
**Personally, I built and installed one drawer before the other. This gave me the opportunity to make any adjustments necessary to make sure both drawers had a correct fit.
Drawer Box Assembly and Install
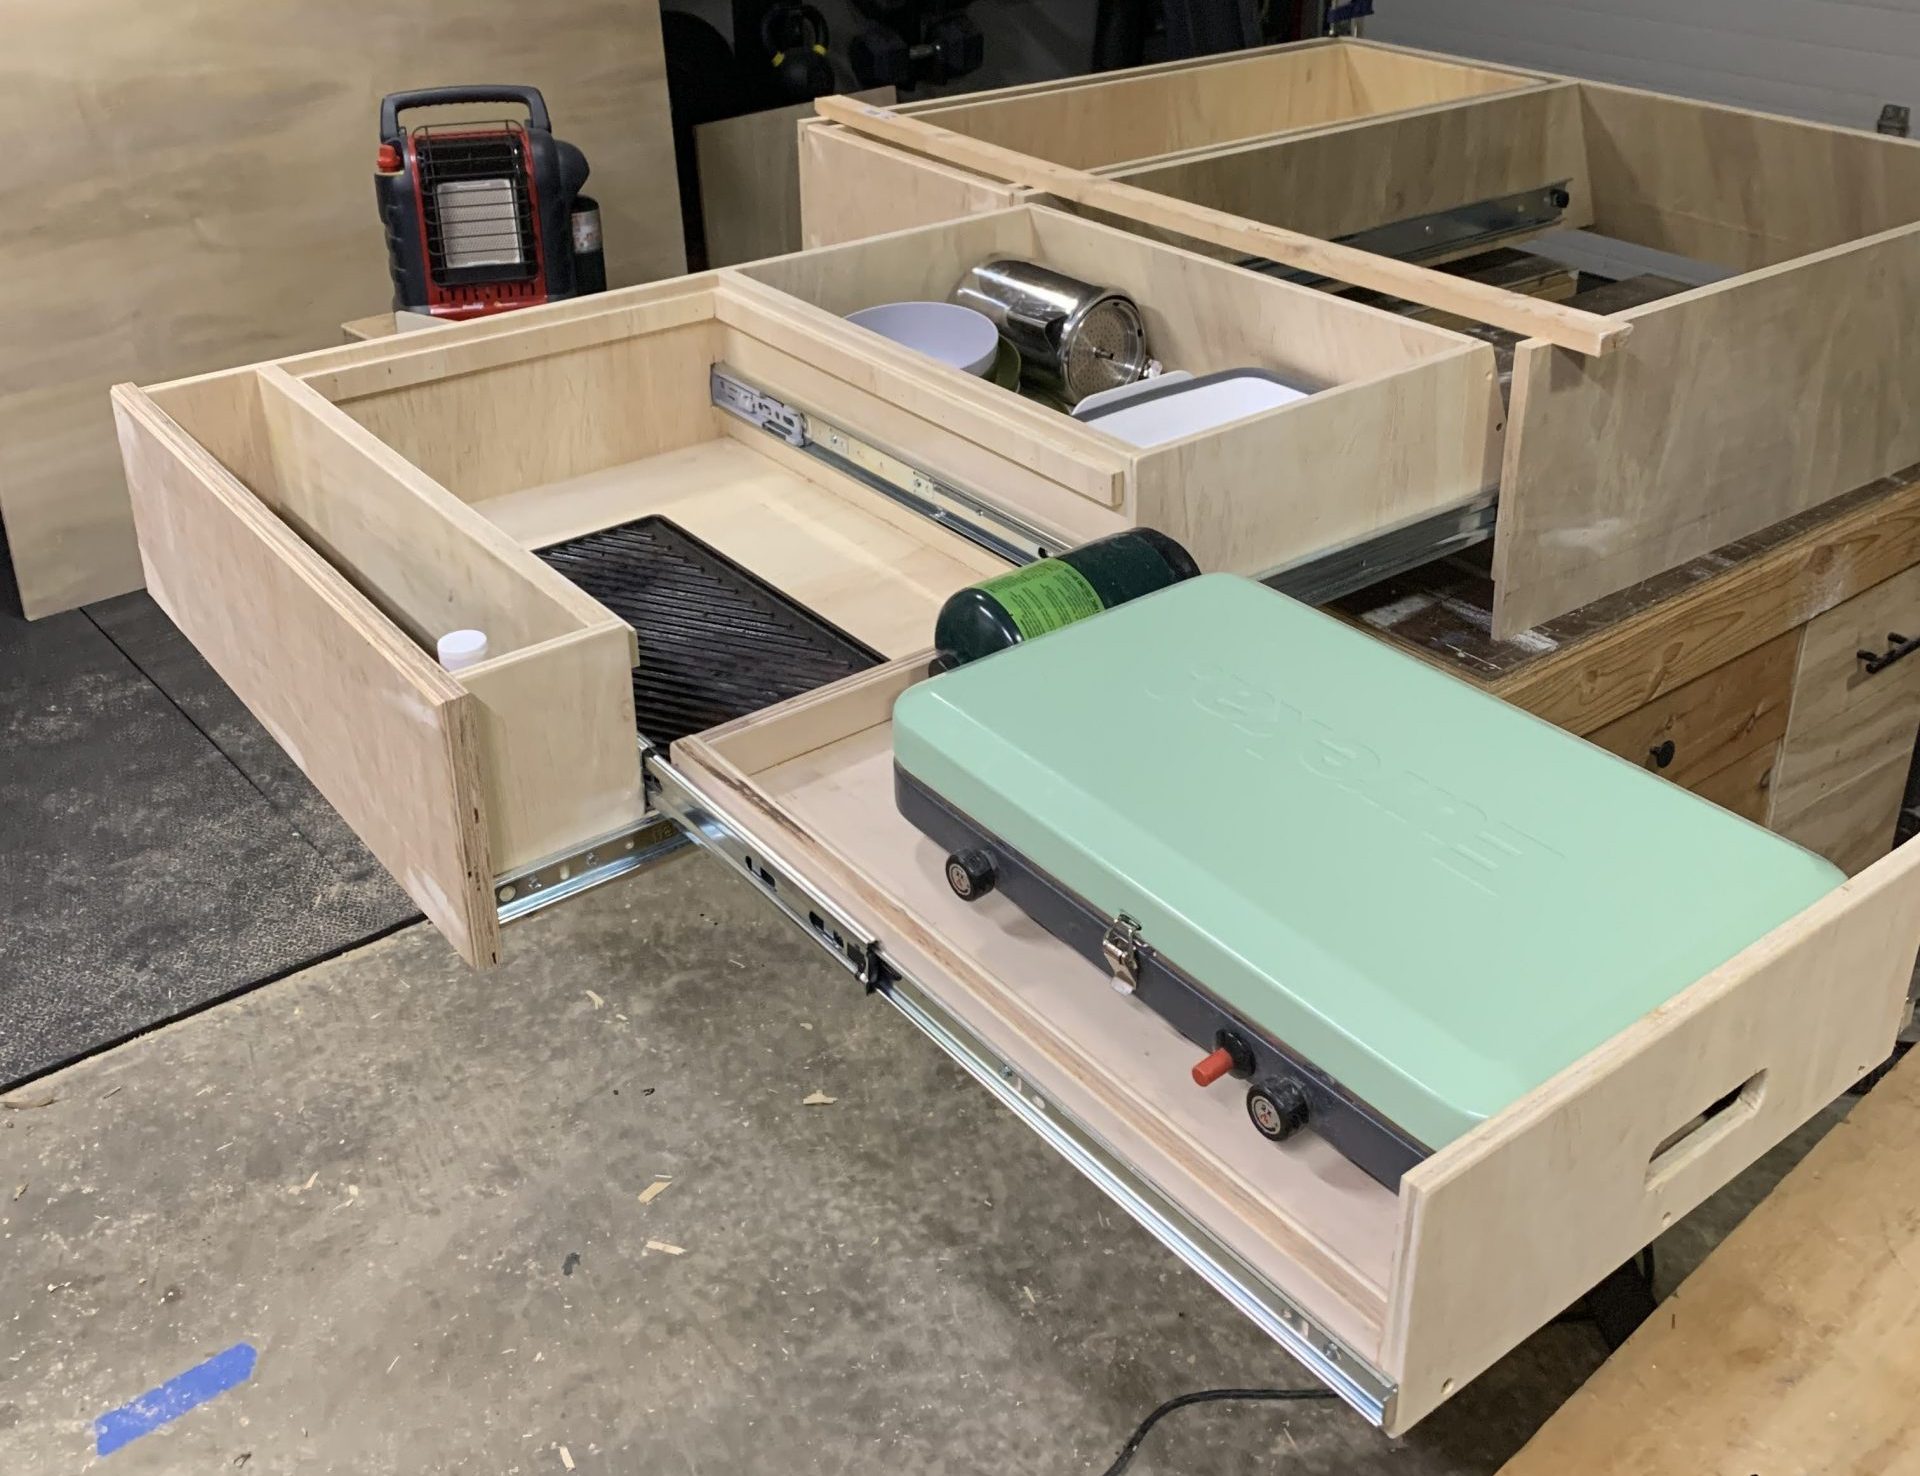
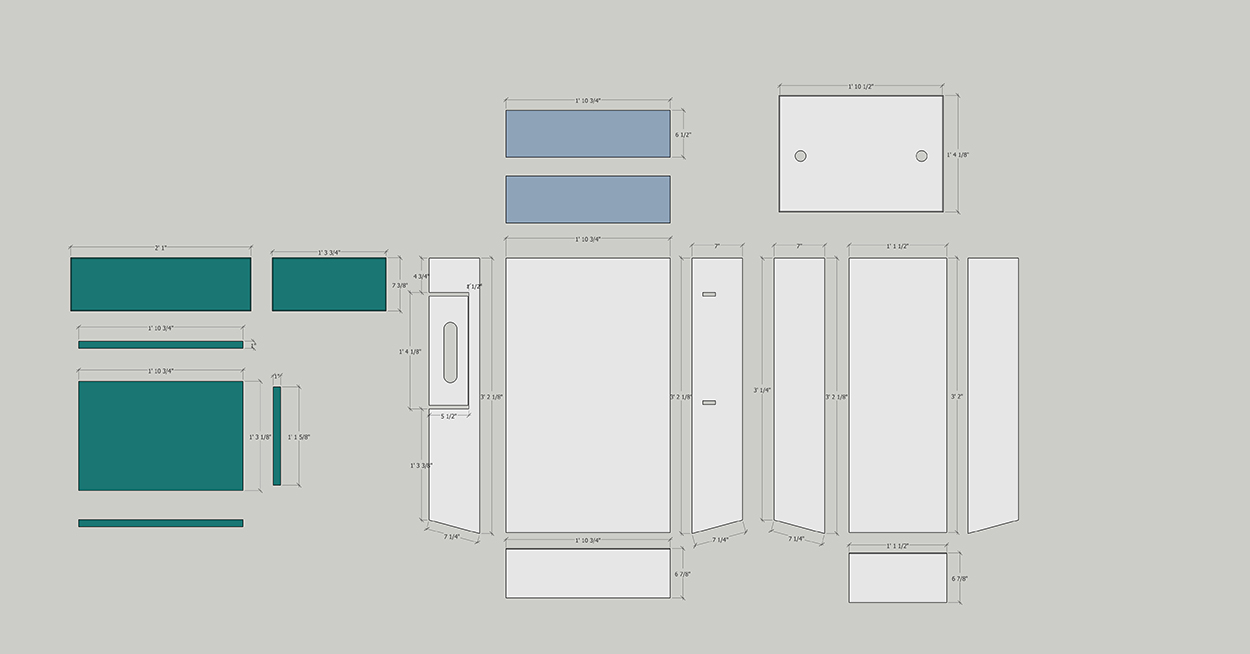
**You can cut your materials however you like. However, I laid my cuts out as shown in the image gallery on both the ¾” and ½” sheets of plywood. The gallery images will be referenced in the following steps.
**Check all these dimensions with your own specific 4Runner before committing to the cuts.
**These dimensions were designed specifically for me, my 4Runner, and my gear. You can make two even drawers, do ⅓ and ⅔, or any combination you like.
**Additionally, the extra slide-out tray for my stove is sized specifically for my stove, make sure to measure your stove (open and closed) and make sure to have access to the knobs and fuel valve.
**I built the larger drawer first; the smaller drawer was based on the leftover dimension. Make sure to lay all items out that you want to store before cutting any pieces.
**Remember to account for drawer slide thicknesses when measuring (typically ½” or ¾”)
- Using a circular saw and a straight edge, cut four (4) pieces of ½” plywood (D1B, D1C, D2B, D2C) 7” x 48”.
- Using a similar method stated above, cut a 20-degree angle at one end of all four (4) pieces.
- Cut all four (4) pieces to a final length (measured from the long end of the angle’s cut) of 3’ 2-⅛”.
- Using a circular saw and a straight edge, cut one (1) piece of ½” plywood (D1A) 1’ 10-¾” X 48” and one (1) piece of ½” plywood (D2A) 1’ 1-½” X 48”.
- Cut both pieces to a final length of 3’-2”.
- Using a circular saw and a straight edge, cut two (2) pieces of ½” plywood (D1D & D2D) 7” wide.
- Cut piece D1D to a final length of 1’ 10 -¾” and piece D2D to a final length of 1’ 1-½”.
- As mentioned with the frame back above, these back pieces will be cut to a parallelogram shape; follow the same procedure to accomplish this.
- Cut piece D1D to a final length of 1’ 10 -¾” and piece D2D to a final length of 1’ 1-½”.
- Assemble both drawers. The sides sit on the outside of the bottoms and the backs side on top of the bottoms, and inside the sides.
- Be conscious to make sure all pieces are flush and square.
** If you will be doing the side pull-out tray, make the cuts in the side D1C as shown in the image gallery and follow the steps below. These steps are not detailed, as the exact dimensions etc. depend on your stove, slides, etc.
Cut the pieces for the tray as shown in green. You can use ½” plywood here instead, just adjust dimensions accordingly.
For this, I used 24” slides which meant I had to “notch” out for them to fit in piece D1B. You could do the same, or use shorter slides and adjust dimensions accordingly. Pieces D1F & D1G will be the side supports for the drawer slides.
- Cut piece D1Ca out of piece D1C. Save this piece, it will be the pull-out front.
- Make sure to measure all clearances with your drawer slides. These dimensions are based on the slides linked above.
Drawer Front and Top Assembly

Top:
- Using a circular saw and a straight edge, cut a piece of ¾” plywood (T1) 3’ 7-½” x 3’ 1-½”.
- Confirm these dimensions with your final box. You could also cut the top wider to fill in the space over the wheel wells. I personally will be making separate inserts (T2 & T3) for this, as I do not always want this area filled.
- Attach the top (after a test fit) to the top of the box, making sure all edges are flush and square.
- I counter sunk each hole and plugged for a more finished look. However if you plan on painting or covering (like I eventually did) you can skip the plugging part.
Drawer Fronts:
- As the final step, measure and cut the drawer fronts. I cut these out of ¾” Baltic birch that I had on hand, but you can use basic painted ¾” plywood. When measuring, make sure to leave a few playing cards’ worth of spacing on all sides to prevent rubbing.
- I wanted a clean look, so there are no handles, however, there is enough of a “lip” under the drawer front to be able to pull the drawers out.
- After using these drawers on a few trips, I went back and added small “T” handles for ease of opening.
Securing to Factory Tie-Down Slots
**I will shy away from specific dimensions here for the most part as this is completely dependent on how you want to attach the box.
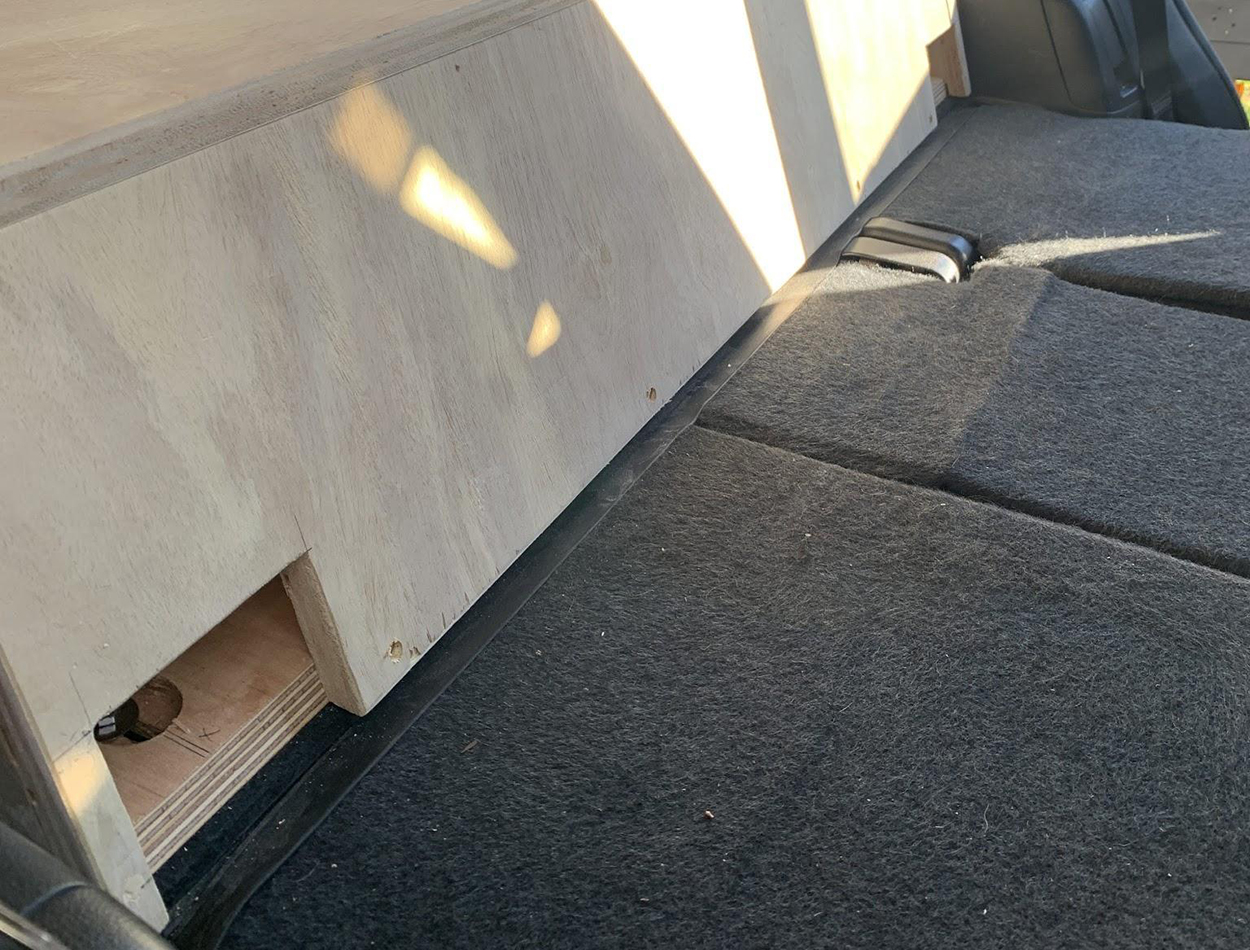
- In the back support, piece FS4, I measured out where the factory bolt holes for the rear d rings were located (see “additional notes” on the following pages).
- I then routed a groove to account for any adjustments needed when installing. Countersunk to prevent the drawers from snagging.
- In the back piece, FB1, I cut two openings large enough to fit a ratchet into, but small enough to not visually distract or take away structural stability. This allows access to the bolts once the box is in place.
- The factory bolts are M6x1.0, I believe the ones I bought are 3” long + washers for the anchoring. Buy a few lengths to see which works best.
In the image above you can see where I attached the box through the back and into the factory d ring locations (removed). If you take the alteration listed below, this process becomes much simpler.
Alteration #1 – Simplifying the Back and Drawers
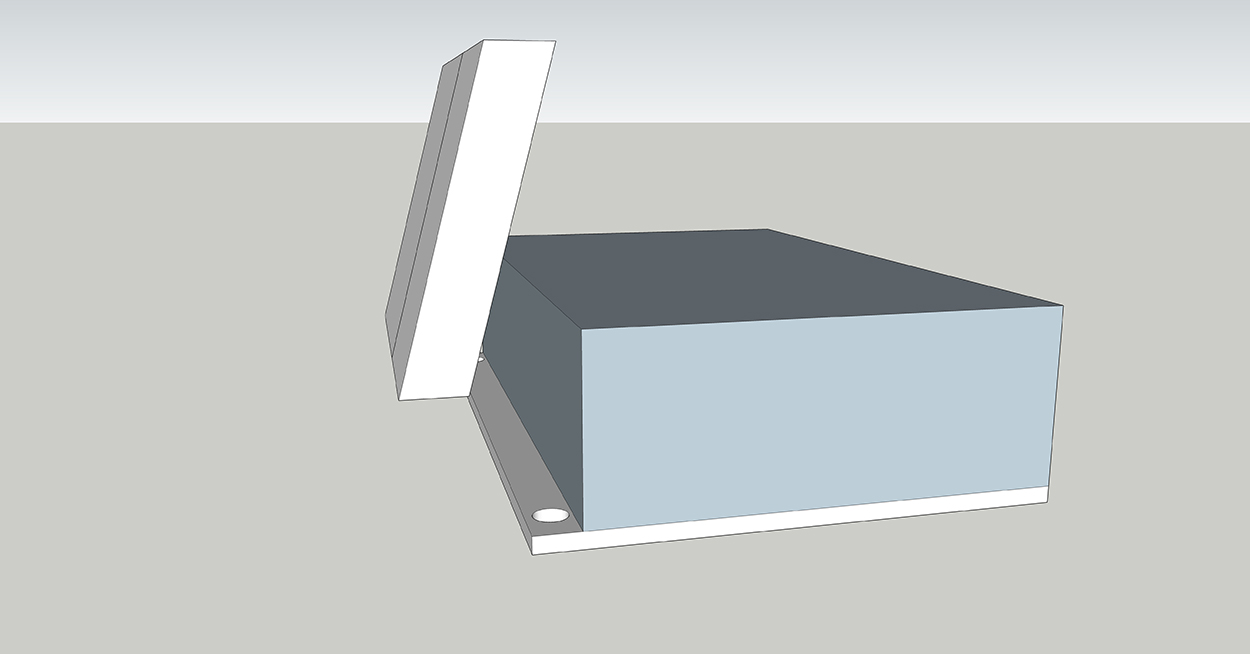
Instead of taking the time to cut the drawers and frame backs at an angle to match the seats, you could cut everything square (like the image above). This would create an easier assembly as well as easier access to securing it down.
My particular design does not have a bottom to it since it is floating over the factory slide-out tray. If you are not working with this, you can add a ½” or ¾” plywood bottom, this will ease the assembly and attachment.
Alteration #2 – Spanning the Factory Sliding Tray
Instead of taking the time to cut the channels into the sides, you could simply make a “false floor” as shown below to span the tray and create a flat bottom for your drawer boxes.
The space between the wheel wells and sliding tray is a tight ½”. For the below, cut two (2) ½” pieces of plywood to fit in this area. Make sure the final height is slightly above (⅛”) the sliding tray’s highest point. Then, cut a piece of ¾” plywood to fit on top. This should provide enough rigidity and structure to support the drawer boxes while spanning the tray.
**I obviously did not do this, if you go this route, double-check all dimensions and test (by setting something heavy on top) the functionality of the sliding tray before proceeding.
Recommended Cut Layout
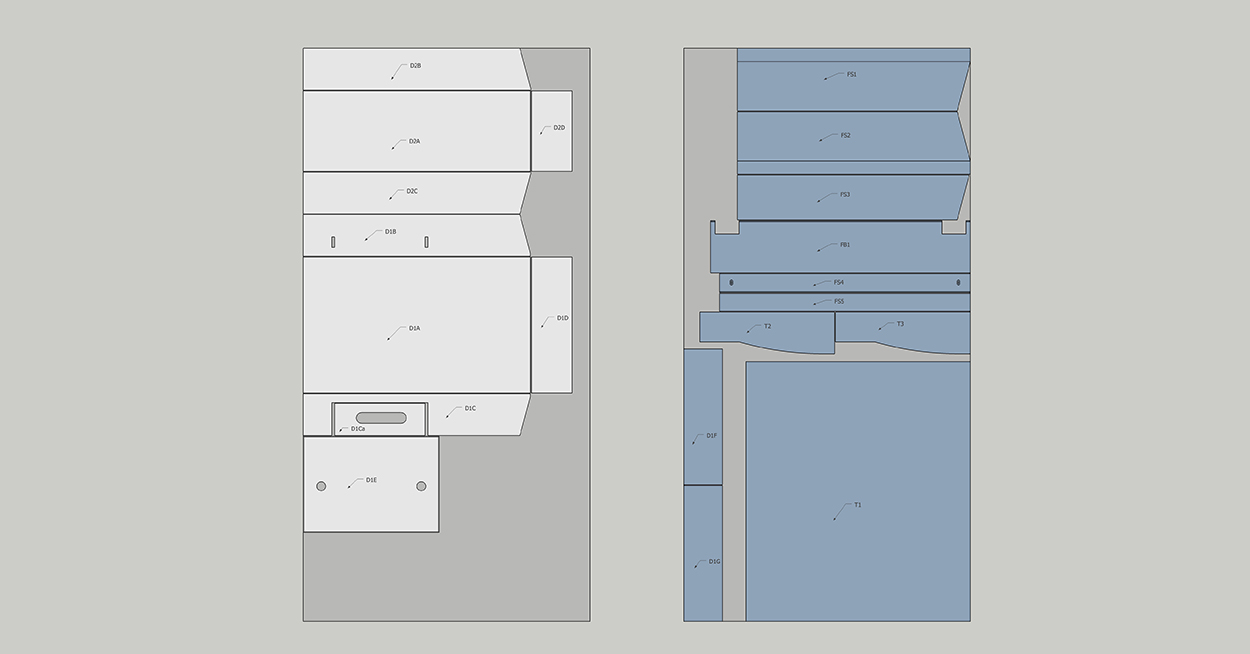
You can cut your materials however you like. However, I laid my cuts out as shown above on both the ¾” and ½” sheets of plywood. The above pieces will be referenced in the following steps. Please read the steps thoroughly before cutting so you can maximize plywood usage.
Check all these dimensions with your own specific 4Runner before committing to the cuts.
Final Thoughts
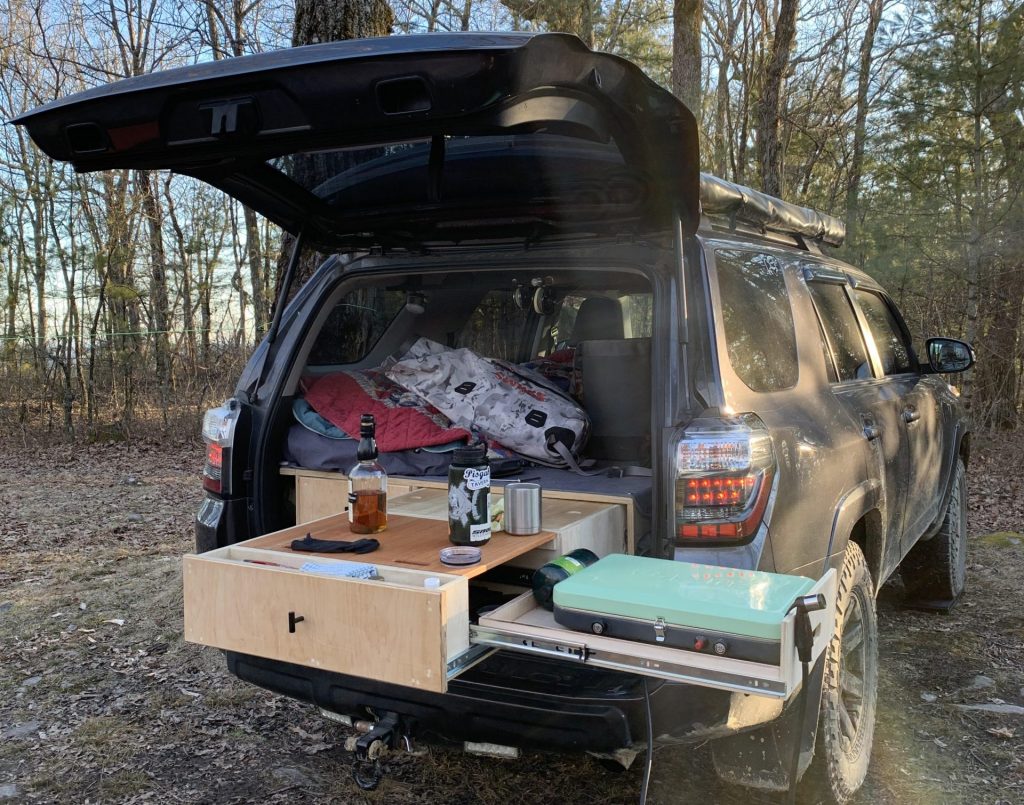
This Drawer System was a great addition to the 4Runner. Originally designed to be easily removable and used solely on camping trips, I find myself keeping them in most of the time and using them day to day. As with any DIY project, I have made changes along the way with each trip to adapt to lessons learned. The great thing about this project is that it can be adaptable/changed depending on your wants and desires. This has greatly improved my camping experience, and I can’t wait to make version 2.0 (hint, it’s in the works). No matter how you decide to go about it, just have fun and enjoy the learning process.
[/vc_column_text][/vc_column][/vc_row]


This is an awesome built! Can I also email you for plans?
Hey mitch….awesome design….do you know if there is a material that could be used that is ligjter than wood?
Hey Mitch, thanks for sharing this. Can you please share some detail plans, would like to build this for my 4runner.
Shoot me an email @ jcaldw43@gmail.com
Hello Mitch, can I join in and email you for a set of the plans? AMAZING design and build
Shoot me an email @ jcaldw43@gmail.com
Hey Mitch, I’ve read this page at least 10 times and would like to make a set of my own drawers based off your design. How can I reach you to get the plans?
Feel free to shoot me an email directly and I can help you out. jcaldw43@gmail.com
Hey Mitch, any possibility of getting a better resolution cutout sheet? I can’t read all the numbers on the website and printing at home doesn’t help any. Thx.
Shoot me an email and I can send you a better quality image. jcaldw43@gmail.com
Great build and I am late to this party but could I request the plans for this? Thank you!
Feel free to shoot me an email directly and I can help you out. jcaldw43@gmail.com
Excellent write up and very detailed. I am starting the same on my 4runner, without factory slide out. Did you use sanded pine or birch for this project. Thank you.
A little of both. Pine for the sides/drawers and birch for the top/drawer fronts.
where are you located? I’ve got a 2022 Limited
Central NC
Great Job on this. Any updates for V2? Do you mind sharing the sketchup or CAD files if you have them?
I have only made minor changes to my personal drawer, but have made 3 other sets since with different layouts. Check out my IG at @crafted.outdoors for some of those pics or reach out to me directly. jcaldw43@gmail.com
If you get a hold of them i would love to use them! Wanting to build this before Sunday 🙂
Just got through this beast. Super interested, but I didn’t see the CAD files attached. Anyone help me out?
Hey Samuel, were you able to secure the plans to this? I’m trying to reach Mitch but it looks like he hasn’t replied on here for a year…
If you would like the 3d model, you can reach out to me directly and we can work something out.
Does the factory sliding tray still work with this set up?
Yes it does, that was the main goal behind this design. You can see the tray out in some of the gallery pictures
That bottle of EW looks very fitting for such a nice drawer system. Great Job and thanks for the detailed write up.
Wow, what a beauty! Awesome write up mate
I really like the idea of the pullout slides to the side of the drawer system.
This is just amazing – thanks for sharing!
Unreal. Love how you built in a proper Coleman propane holder. Nice touch and all around very impressed!!