
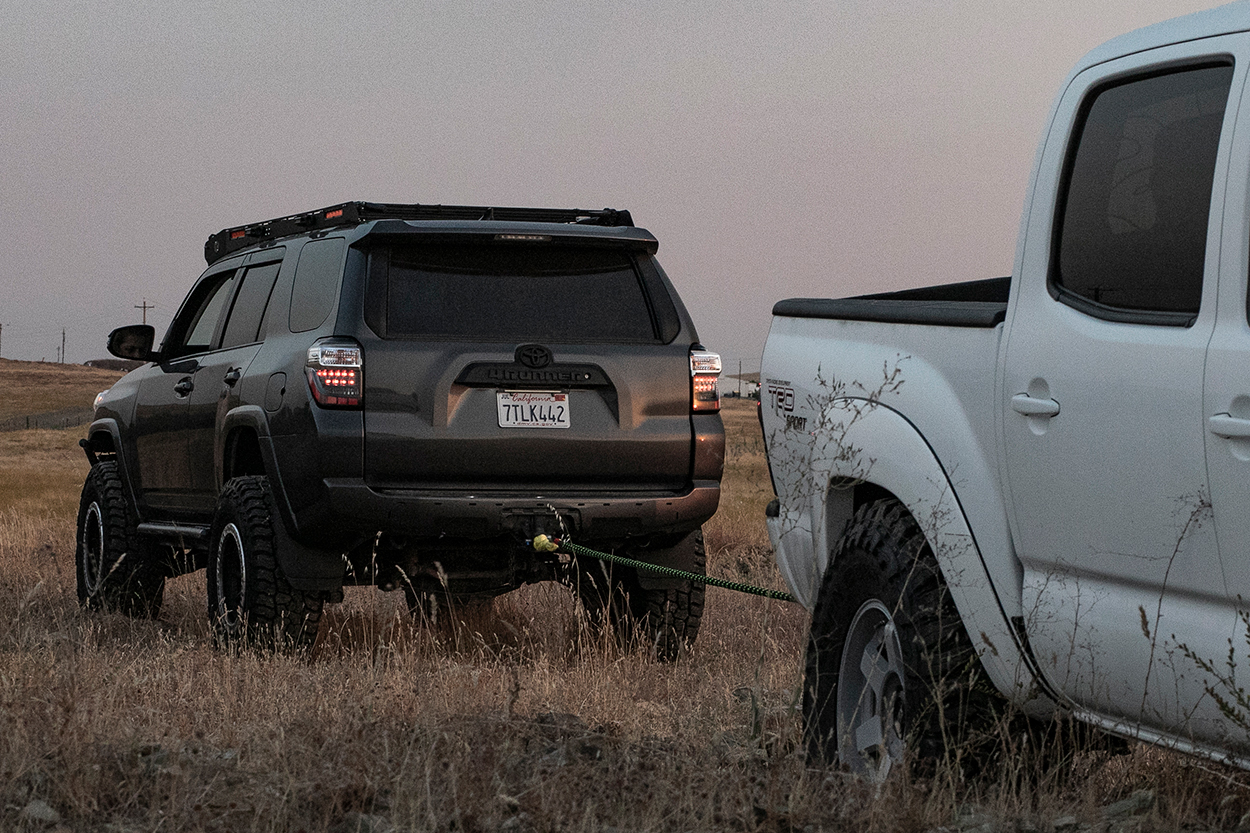
Jade Winching @AlphaFoxtrotDesign on Hells Gate
During an off-road recovery, and in a technical sense, all recovery points must be mounted to the vehicle’s frame. This allows you to connect to and pull from your snatch strap, recovery rope, or winch line safely. Failure to utilize a true recovery point may result in broken parts or injuries to bystanders.
Recovery is one of the most important areas of off-roading. Understanding where your recovery points are located and knowing how to use them correctly is the difference between making home safe at the end of the day and/or getting stuck on the trail for longer than you bargained for.
In this post, we are going to cover the factory recovery points, factory tow points, aftermarket recovery points, frame-mounted points, cross-member-mounted points, double shear, single shear, welded vs. non-welded, bow shackles, soft shackles, types of recoveries, and much more.
If you were wondering what Toyota considers a “recovery point” and what they consider a “tow point,” we also cover that in this post. We dug deep to bring you the most accurate information online on recovery points for the 5th Gen Toyota 4Runner.
Table Of Contents
Front Recovery Points

What are factory tow points and tie-down points? Are they safe for recovery?
Luckily, you have many recovery options from the front of your vehicle. None of them are necessarily cheap or easy, but you do have quite a few options. Recovery points are designed to take the load and stress put on recovery components (bow shackles, aka d-rings, soft shackles, winch shackles, etc.) during a recovery. This is why tie-down points and emergency tow points technically do not suffice as snatch points.
Keep in mind there are two types of off-road recoveries: one in which the vehicle needs to be snatched or yanked (non-tensioned kinetic energy strap/rope), and one in which the vehicle needs to be towed (pre-tensioned non-kinetic strap or chain). There are many differences between the two, and choosing the right type of recovery depends on the situation at hand.
Before we get too deep into types of recoveries, let’s first look at the actual recovery point options on the front of the 5th Gen 4Runner.
Emergency Towing Eyelets
Toyota calls them “Emergency Towing Eyelets,” not “Recovery Points.”
Before we jump into this one, many people have different opinions about whether these points are safe for recovery, so we’re going to be as literal and technical as possible.
From the factory, the 5th Gen 4Runner comes equipped with a set of non-rated tie-down/tow points welded to the crossmember. Most car manufacturers install at least one rated recovery point on the front and rear of the vehicle. That means this point is rated for a certain breaking strength or WLL (working load limit). The WLL is typically engraved onto the recovery point or called out in the owner’s manual. This is not the case with the 5th Gen 4Runner. You’ll notice there are hooks welded to the cross member in the image above. No WLL markings, and Toyota does not call out a WLL in the owner’s manual.
So what does Toyota say?
The Toyota owner’s manual states that they are emergency tow points and are called “Emergency Towing Eyelets”. These are not designed for use as an off-road recovery point where shock loading of your d-rings or soft shackles will occur. These points are not rated and are only used when the vehicle is delivered as a new car or, in the case of an accident, to be towed or tied down on a tow truck bed.
“If a tow truck is not available in an emergency, your vehicle may be temporarily towed using cables or chains secured to the emergency towing eyelet(s). This should only be attempted on hard-surfaced roads for at most 50 miles (80 km) at under 18 mph (30 km/h).” – Toyota
So while you can “tow” from this point, you cannot and should not “snatch” or “yank” from these points.
If you are unfamiliar with tow straps vs. snatch straps and their differences, check out this post on recovery straps.
So how should you proceed?
With that being said, sometimes you have no other alternative other than to snatch or yank from this point. If you are to recover from a tow point, you should tow the vehicle out of its stuck position using a tow strap. Do not attempt a kinetic recovery with a snatch strap or kinetic recovery rope with a metal D-ring or soft shackle connected to this tow point.
We recommend buying rated aftermarket recovery points like the ones from ARB USA, APEX Overland, Ironman 4×4, Treaty Oak Offroad, or any other frame-mounted double shear WLL-rated recovery points. If you’re stuck deep in sand, mud, or snow and “towing” to become unstuck will not suffice, then proceed with “yanking” at your own risk.
I have never seen any factory tow points fail under yanking and shock loading kinetic straps/ropes (and I have seen about 10+ years’ worth now), but that doesn’t mean it can’t happen. Again, these points were not designed to take that kind of stress, so why risk it? If you do find yourself in a situation where you MUST use those tie-down points as kinetic snatch points, I would first try to locate a winch, as it would be much more controlled than any yanking.
I have seen many people with bow shackles mounted to their tow points, and although they work as tow points and for towing from, they are not technically “recovery points”. Do yourself a favor and buy a WLL-rated recovery point if you plan on being snatched from the front, or get an aftermarket bumper with gussets welded to steel.
Aftermarket Recovery Points

If you’re serious about wheeling your rig, upgrade your recovery points.
Frame-Mounted Recovery Points
Not ready to make the jump to a full-width bumper? No problem. Many companies I just mentioned above have the perfect solution: WLL-rated frame-mounted recovery points. These recovery points bolt directly to the frame with double shear, triple, or even up to four mounting points, as seen in the Ironman 4×4 recovery points. The Ironman 4×4 recovery points also come with a listed WLL (11,000 lbs) and can fit 7/8″ screw pin bow shackles and soft shackles. It’s an easy bolt-on mod, and most of them can be installed without taking off your front bumper.
Front Bumper
Another option for front recovery points is an aftermarket bumper. Something like a LoPro or a full-width front bumper would be a great option. They are definitely not the most budget-friendly option, but they offer safe and secure recovery points to snatch and tow from. Bumpers are great because they can also run a winch, which is the most important recovery tool to carry.
Hidden Winch
Speaking of winches, if you don’t choose to run an aftermarket front bumper, you can always run a hidden winch. Hidden winches are great if you are looking to keep your weight down while still adding a ton of off-road functionality and performance. If I had a daily driver and weekend warrior rig, I would highly consider running only a hidden winch and something like a high clearance cut for the life of the build.
Rear Recovery Points
Depending on the situation, sometimes a recovery from the rear of the vehicle is the best option. Much like the front, there are a couple of different ways to recover from the rear of your 4Runner safely.
Unlike the front of your truck, the rear has a couple of recovery points. On the driver’s side frame rail on the back of the 4Runner, you’ll see a “D-shaped” eyelet similar to those in the front.
One of the differences is that this eyelet is much thicker than the one in the front. Another important difference is that this point in the rear is double shear with grade-8 bolts. Double shear means there are two bolts that would have to shear simultaneously in order for them to fail during a snatch or yank recovery.
Rear Tie Down Hook

Typically, tie-down points will be single-shear (one bolt) because they are not intended to withstand large shock loads. On the 4Runner, the front eyelet is welded directly to the outside of the crossmember. After seeing quite a few snatches from this eyelet in person, I would feel comfortable snatching from it in a pinch (that means I have ZERO other options), but after too many yanks, the welds will weaken over time, causing a failure (potentially).
The rear eyelet gives you more peace of mind knowing that it’s larger in diameter, is double shear, and finally, rests in line with the frame rail (it’s not sitting directly on the fascia of a crossmember).
Toyota doesn’t refer to either of these points as “Recovery Points”. The front is referred to as an “Emergency Towing Eyelets,” and the rear is a “Hook Sub-Assembly” and “Tie Down Hook”.
Adding Secondary Tie Down Hook
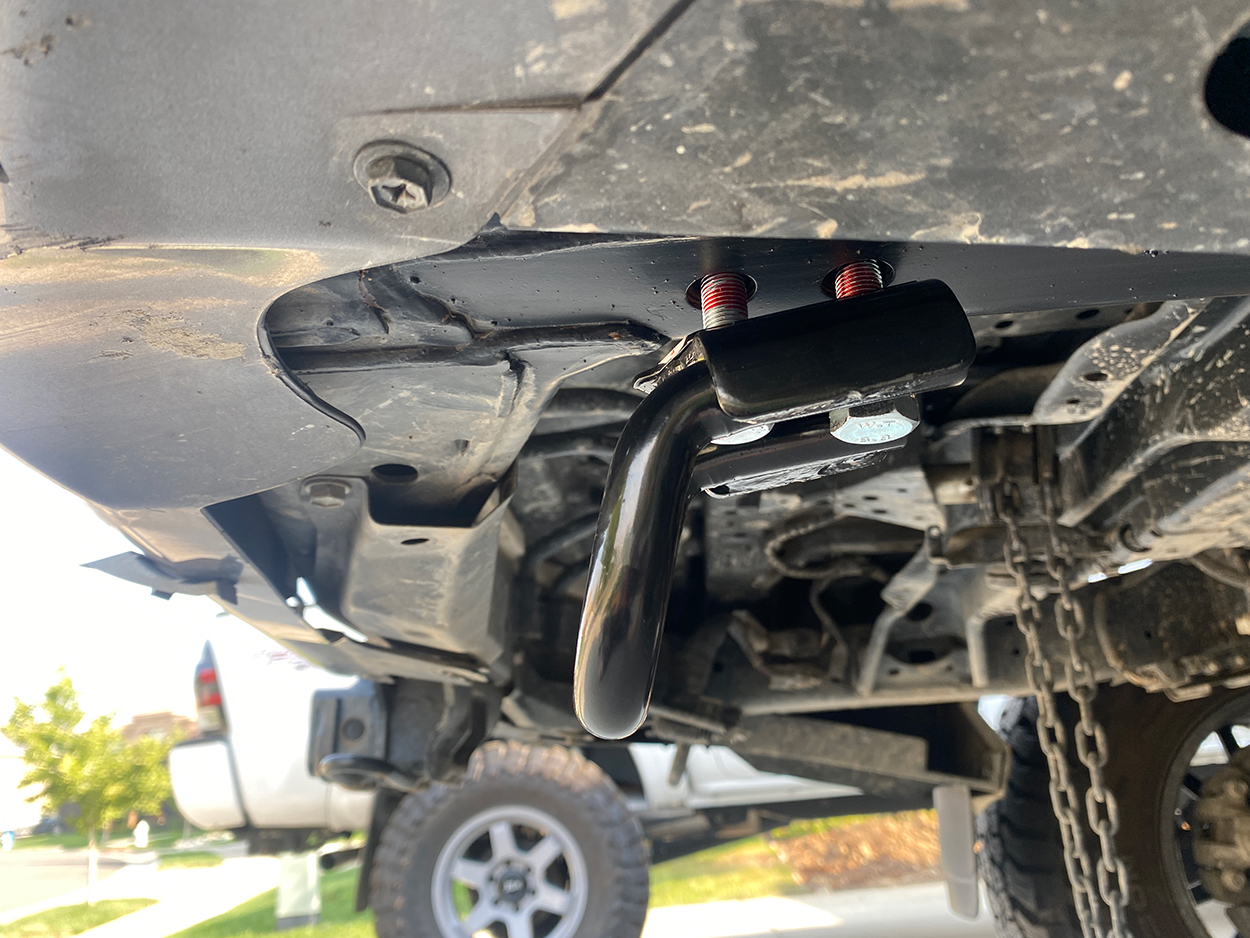
Pictured is the Toyota part number 51095-60030. It’s also referred to as the Hook Sub-Assembly, Right Rear (passenger side), and is shown here mounted with a bit of red/permanent Loctite. This is being bolted to the frame with two grade 8 bolts, just the same as the driver side. This is recommended for anyone looking to run dual recovery points in the rear without buying anything “aftermarket”.
Adding this recovery point makes it easy to connect a bridle to both points, which is a really nice tool for off-road recovery. It’s also nice to have a recovery point on the passenger side because it opens up the possibility of a safer pull, depending on where your vehicle is stuck. Sometimes, in a stuck situation, pulling from the passenger side is the best option. If you add this recovery point in addition to the hitch receiver recovery point, you are really set up for recovery points.
This is an incredibly simple modification anyone can and should do to their 4Runner.
Factory Rear Recovery Point
Hitch Reciever

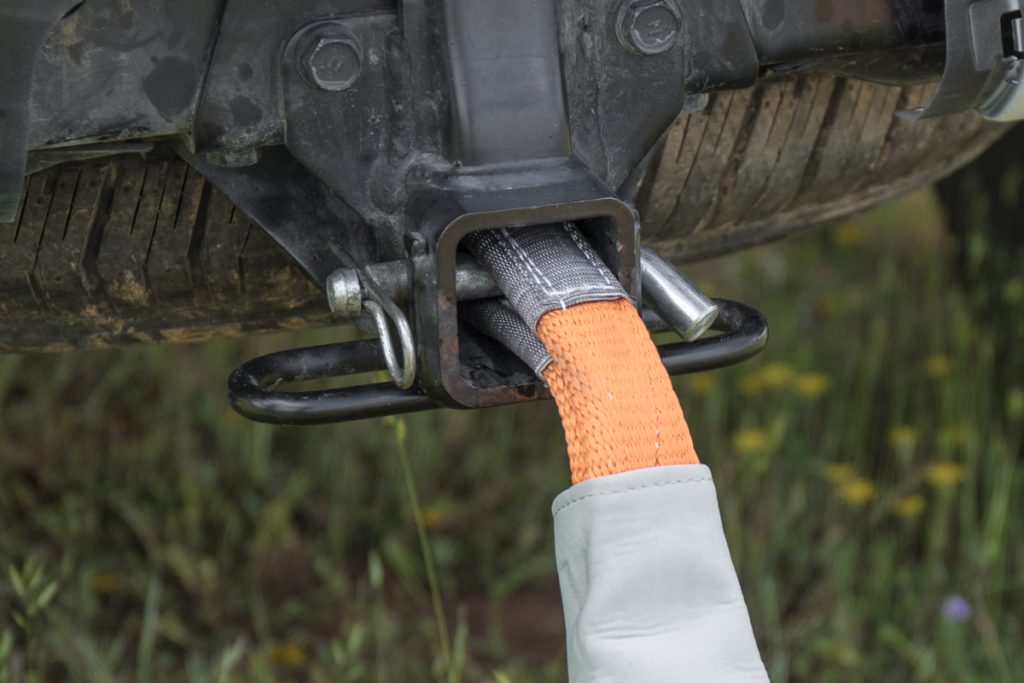
One of the safest ways to recover from the rear is to use the hitch receiver recovery point. Factor 55 makes an awesome Hitchlink 2.0, and Agency 6 makes a great Shackle Block. Both are USA-made products. This method connects both sides of the frame so the load is essentially divided.
This handy piece of recovery equipment plugs into the hitch receiver and is then connected to a strap using a shackle, Bow Shackle (aka D-ring), or soft shackle. Since both the hitch block and shackle have a WLL, this is a safe recovery method as long as you stay within the load limit.
To use the hitch effectively, it’s important to use the proper tools during the recovery process. Just make sure the equipment you buy is clearly marked with a WLL. Do not use any tow straps, snatch straps, recovery ropes, or winch lines without a WLL.
Hitch pins are another alternative method to recover a vehicle from the back. It’s important to note that many hitch pins will not have a WLL marking, so proceed at your own risk if you are attempting a recovery using a hitch pin. Nonetheless, hitch pins are definitely a viable option for recoveries for a couple of reasons. For starters, hitch pins are double shear. Secondly, they plug directly into the hitch, which is mounted to the frame at four other points. If you are looking for a hitch pin for recovery, look for a grade-8 hitch pin or class 3, 4, or 5 – that is 5/8 inch in diameter.
Hitch pins class I and II are not designed for weight distribution. For a recovery situation, you want hitch pins with class III, IV, and V. If the hitch pin you are buying does not have a class associated with it, do not buy it. – Guide to Hitch Pin Recovery
Single Shear vs Double Shear
How much stronger is double shear over single shear? The simplest equation to find the average shear stress for a double shear is τave= F/2A (τave being the average shear stress). You’ll need to know the tension force applied (F), the material thickness (A), and, for other equations, you’ll need the pin thickness (d).
With that being said, using a standard 5/8 hitch pin and the weight of a 4Runner (6,000lbs), the shear stress of a double shear should come out to 9,778.48 pounds per square inch. Given that the amount of tension force is that high, the amount of stress on a double shear is roughly 9,800 pounds.
Why is that number significant? Let’s do the same thing, but for single shear, and see if there is a difference. The equation we’re going to use for single shear is going to be τave= F/A. With the same hitch pin and the same tension force (yes, 6,000 is a lot), we get 19,556.95 pounds per square inch. Now, this doesn’t mean that a shingle shear can withhold that much weight, but what it does mean is that in a shingle shear application, there is that much stress on the bolt or pin.
All this simple math confirms that there is less stress involved in double shear than in single shear.
What Not To Do

Pictured: Using a screwdriver to connect a tow strap to the hitch receiver.
As I mentioned above, there are some things you definitely should not do when it comes to recovery. Safety should be your #1 priority when it comes to any recovery. The reason is pretty obvious… recoveries often have a lot of dangerous, if not lethal, forces at work.
Hitch Receiver Loops

Pictured: Tow strap hooked to a hitch receiver loop. Not a good idea.
Hitch receivers are a great way to recover a stuck vehicle from the back; however, the small loops on the sides of the receiver should NEVER be used for recovery. Those loops are meant for safety chains on towing trailers and are very weak, so they will break and/or bend under any load at all. Do not recover from these points; that includes snatching, yanking, and/or towing.
Ball Hitch

Hitch balls should also not be used in a recovery.
Ball joints use a single-shear mounting point, which we learned is much weaker than a double-shear mounting point. The ball will not withstand the horizontal load that is present during a snatch or yank. Additionally, there is nothing for a strap to lock onto or into.
Looping the strap around the side of a ball will cause it to creep up and around the ball, forcing it to fly off. People are still doing this, and it blows my mind. Do not recover from these points; that includes snatching, yanking, and/or towing.
Tie-Down Points

Tie-down points should be avoided when it comes to recovery. Stock 5th Gens don’t really have any recovery points up front, just tie-down points. If you’re in a pinch and need to use these points, they will most likely hold up, but I would definitely use a winch or a strap with no slack. If you bend one of these points during a recovery, I would avoid using it in the future, and to be on the safe side, invest in some rated recovery points in the first place.
Can you snatch and yank vehicles from this point? Yes. Will it work? Yes. Would Toyota recommend it? Probably not.
Do not recover from these points; that includes snatching, yanking, and/or towing. If you do so, do it at your own risk.
Final Thoughts

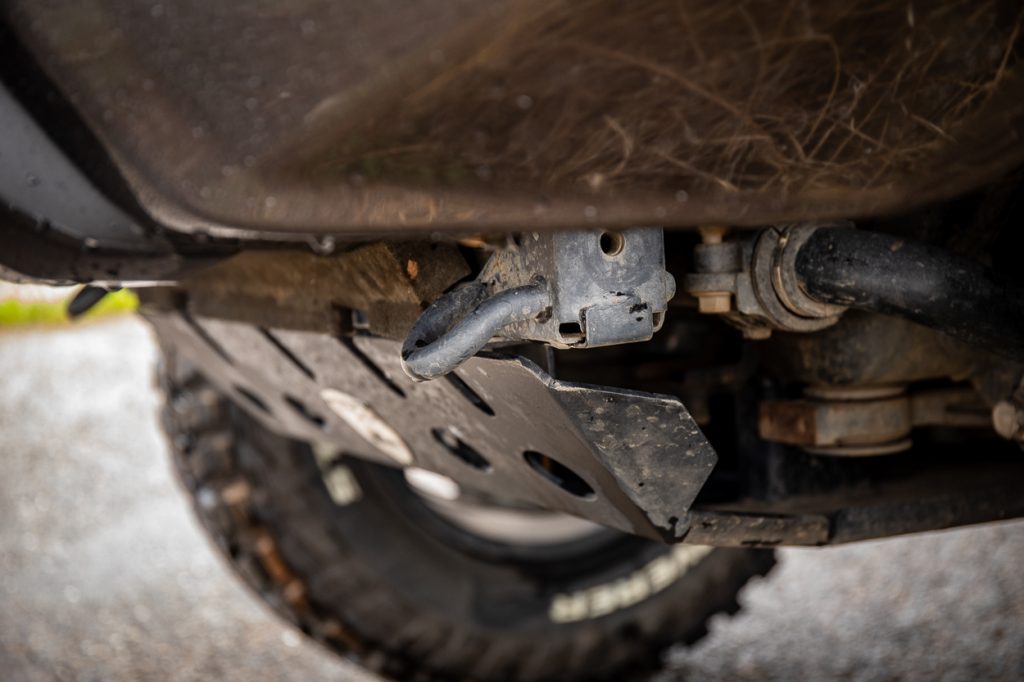
I think it goes without saying that you should avoid tying any straps to anything. If you have to tie your strap around something, chances are it was not made to recover from. This includes stingers on bumpers, B-pillars, sliders, etc. That also includes looping straps around your suspension components, such as lower control arms, tie rods, CV axles, steering knuckles, and factory skid plates, etc.
Know Your Recovery Points
It’s important to know where your recovery points are before you get stuck. The last thing you want to do is accidentally hook up a snatch strap to a tie-down point and send it flying to the next county over.
Again, we recommend buying some actual WLL-rated recovery points for the front of your 5th Gen since Toyota only includes “tie-downs”. It’s best to be prepared for any worst-case scenario.
Are you prepared to get yanked out of mud, sand, snow, or a deep water crossing? Are your recovery points able to withstand countless recovery attempts? If you answered no to both of these, then it’s time to invest in some rated recovery points if you’re serious about getting into off-roading.
If you’re reading this right now and have ZERO recovery points, the best item to buy is a hitch-mounted recovery point, like a Factor55 Hitchlink 2.0 or an Agency6 Shackle Block. Easy, affordable, durable, both made in the USA, and they work great for recoveries.
Good luck, everyone! Just use your common sense and rated recovery points, and you will be just fine!
Honda parts encompass a vast array of components that contribute to the renowned performance, reliability, and innovation associated with Honda parts now vehicles. From engines to brakes, from electronics to body panels, Honda parts are engineered with precision and built to exacting standards, reflecting the brand’s commitment to quality and longevity.
I have a ‘22 Limited 4-Runner so what’s the easily purchased recovery point/location to install? I tow a Seadoo trailer in the summer so don’t want to use the hitch area for such!
Toss out this idea: put together a short chain that connects the two tie down loops at the front. In that length of chain include a ring at the center of the span. THAT would be where you attach the recovery device. The idea being to spread the load between the two tie downs- lessening the stress on just one.
What do you all think?
Nice article, thanks for all the info. Now I’m disappointed that what I thought were recovery points are just tie down hooks. To your point of adding a secondary tie down hook in the rear, not as easily done as it looks because the exhaust tip runs right under the point to bolt on to. So, if you go this route, you will need to re-route the exhaust tip to make clearance for the tie down hook.
Great article.
Do you have info on the same topic for Gen 3 4runner? 2000 sr5
Also: Would really appreciate any info on best places front and rear to attach straps from roof carry of a canoe, without straps rubbing and damaging paint or the strap getting cut or worn through.
Thanks
For the added/secondary rear tie down hook, is there any interference with the stock exhaust pipe/tip? Looking underneath my 2021 SR5 (with stock exhaust), it appears the exhaust pipe tip is directly under the frame on the passenger side where the “Hook Sub-Assembly” would get bolted. Did you need to relocate or modify your exhaust to get this added rear tie down hook to fit or to facilitate the installation?
Jeff, yeah great question! Yes, the factory exhaust tip blocks that location for adding the additional rear tow hook. You can probably make it work but it’s not going to be very functional when you go to use it. I would suggest cutting off your factory exhaust at the crossmember (which is what I did to my old 4Runner), buy the Overland Series exhaust from MF (which is what I did to this 4Runner), or buy any exhaust system that features a side-exit exhaust. Regardless, you will need to modify the exhaust somehow in order for the secondary tow hook to be used properly.
I watched one of the Matt’s Off road recovery videos recently on youtube (next cry baby – toyota 4runner) where they recovered a 4th gen 4runner from a front tie-down point, turning it around 180 degrees from the passenger side. It looks almost identical to the 5th gen. If it could handle that i’m thinking the “front tie-down points” should do fine.
The rear points are definitely stronger than the front points. I have also recovered from those front points using my ARB snatch strap under a controlled environment (everyone was safe, clear of trajectory, and had attempted many recoveries) many times and the recovery was successful. I wouldn’t say that snatching from these points indefinitely is a good idea because, as mentioned, they can weaken overtime. In fact, when faced with a recovery, we try to avoid using these front-mounted cross member points if we can. Instead, we try snatching from the hitch receiver using our Smittybilt recovery hitch point and a Bubba Rope soft shackle (both of which you forgot to mention and are great tools for recovery). All in all a good read but you really should be including all the tools; soft shackles, hard shackles, hitch recovery points, ropes, straps, and also list why and how these recovery tools differ.
Good call, I can jump back in there and add links to all the best products out there for each category. Will do eventually.
Apexoverland.com has great recovery points and they aren’t expensive either.
I’ve got the Apex front recovery points and they not only add piece of mind, but look great 👍
Smart, great mod!