
The Trail Standard Off-Road center console MOLLE panels are a great way to keep gear that you use frequently right next to you without cluttering your center console area.
Unlike MOLLE panel options that go over the rear windows in the cargo area, these ones don’t require you to leave the driver’s seat. This comes in handy for those long trail days or even longer road trips. The best part is that it keeps the rest of your center console area looking neat and organized.
Find it Online
- TSO MMS 4Runner Center Console: Check Price
- Tactical MOLLE Pouch: Check Price
Table Of Contents
Why MOLLE Panels?

MOLLE panels are a great way to conveniently store your gear while you’re out on the trail—not to mention they look badass.
The possibilities are endless when it comes to choosing which gear to mount to your MOLLE panels. There are a ton of bags out there that are designed to be mounted to MOLLE panels…it’s just a matter of finding the right size.
My favorite use for them is for handheld radios. Since the MOLLE panel sits right next to you, it is super easy to store a handheld there and communicate more efficiently on the trail. Other popular items include flashlights, air down tools, and even cellphone mounts.
Trail Standard Off-Road

Trail Standard Off-Road is well known for its grille replacements for 5th Gen 4Runners. These grilles are extremely high quality and fit much better than knock-off replacement grills from China.
The MMS panels from TSO are no different. The quality is exceptional, and it shows. These panels come powder-coated and ready to install. Even though the install requires drilling into your center console, TSO makes this as painless as possible by providing a full-sized template.
TSO also offers bags at checkout. They offer 3 different colors so that you can do all your shopping in one place. These bags are designed to be mounted to a MOLLE panel, so you don’t have to worry about doing any further modifications.
Features
- Durable powder coat
- Full-sized template
- MOLLE bags available
Install Overview

The installation process for the TSO MOLLE panels is very straightforward. Even though there is drilling involved, the templates provided make it very hard to mess anything up. Still, it wouldn’t hurt to double-check your marks before you start drilling.
Tools and Materials
- Scissors
- 3/8″ drill bit
- Smaller drill bit (for pilot hole)
- Screwdriver
- Sharpie or paint pen
- Tape
- 3mm Allen key
- Drill
Step 1. Cutout MOLLE Panel Template
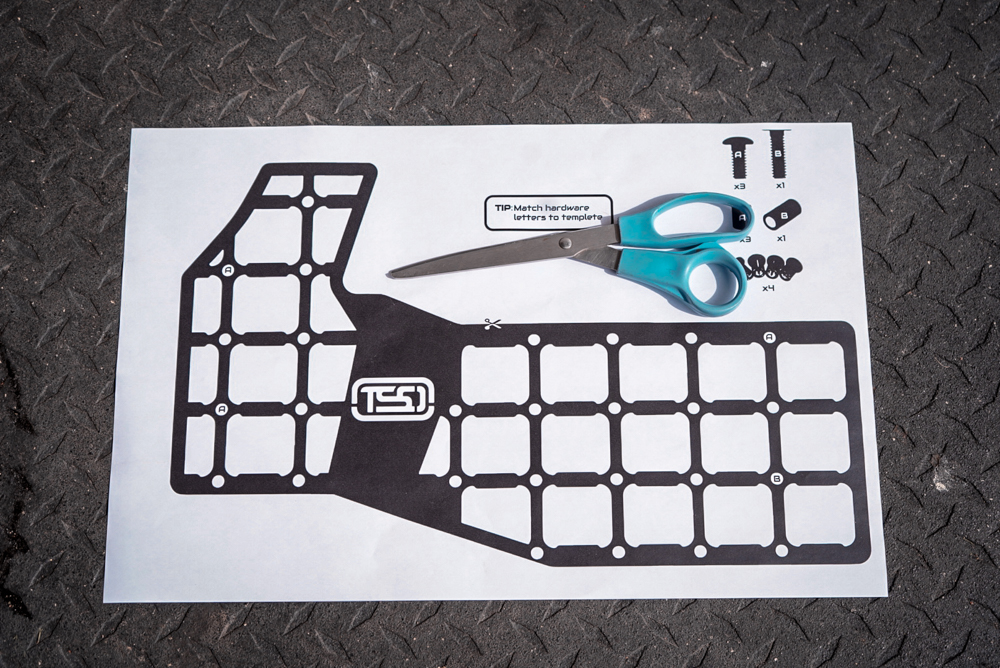
The first step is to cut out the provided template for the MOLLE panels. The template is the same size as the MOLLE panels, so for the best results, cut the template out as close to the edge of the pictured panel as you can.
Step 2. Poke Holes in Template
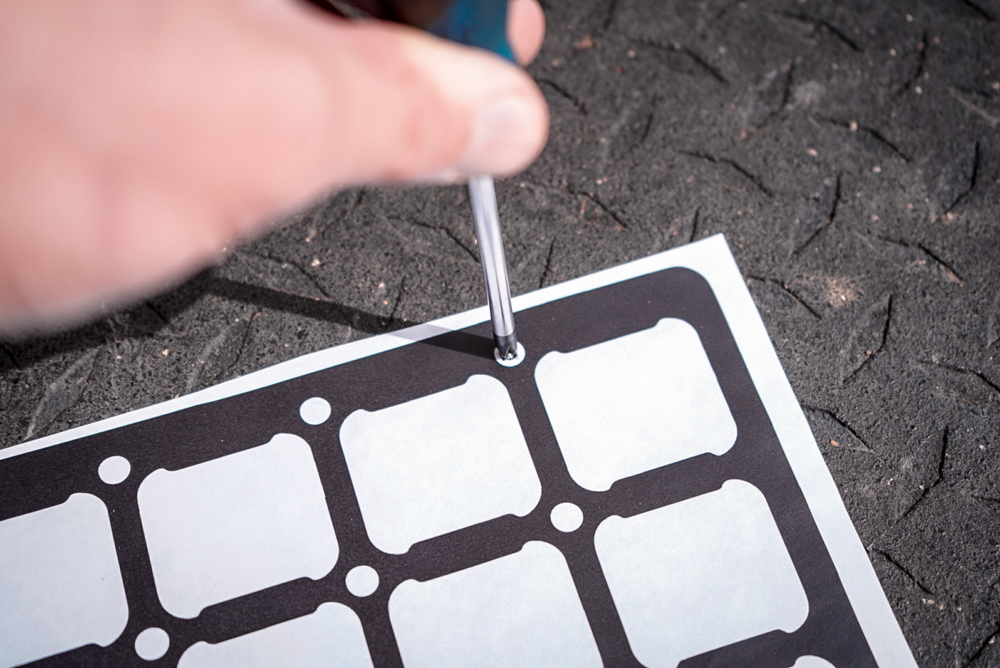
You’ll notice there are letters on some of the holes on the MOLLE panels. These holes are going to be where you drill into the center console and where the hardware for the MOLLE panel screws into. There are three holes marked with the letter A and one marked with the letter B. Use a punch (or screwdriver) to poke out all those holes. Remember which letters go where; take a picture if you have to.
Step 3. Mock Up Template

Once you poked the four total holes, mock the template up to the center console. According to TSO, the top part of the panel should be parallel to where the two different trim pieces meet. It’s really up to you where you want to position it, but it’s important to choose a landmark so that both sides are the same. Then use painter’s tape to hold the template in place.
Step 4. Mark Holes on Center Console

Next, use a Sharpie or paint pen to mark those four holes you punched out on the template.
Step 5. Drill Pilot Holes

Now is the time for the point of no return. Use a smaller drill bit (size doesn’t matter) and drill pilot holes where you just marked with the Sharpie. I found it best to hold the bottom of the panel with my hand while I pushed into it with the drill.
Step 6. Drill 3/8″ Holes

Once you’ve drilled four pilot holes, use the 3/8″ drill bit to drill the holes required to mount the MOLLE panel. The drill will go right through the panel since you already have pilot holes, so go slow and try not to punch through it and risk damaging something behind the center console panels.
Step 7. Install Hardware on MOLLE Panel

Once the holes are drilled, it’s time to start assembling your MOLLE panel. If you hold your template up to the MOLLE panel, the holes that you punched out are where the hardware is going to go on the MOLLE panel.
The holes marked with the letter A get the shorter hardware (3 per side), and the holes marked B get the longer hardware (2 total). Assembly is super easy; all you do is slide the bolt through the MOLLE panel, slide the spacer over the bolt, and then install the threaded grommet. Do not tighten the black grommet; just put it on enough so that it won’t fall off.
Step 8. Apply Grease to Grommets

Once all of the hardware is installed, take a little bit of the provided grease and put some on the grommets. Use your finger to spread it around the entire grommet. A little bit goes a long way with this stuff, so don’t overdo it unless you want a big, greasy mess.
Step 9. Install MOLLE Panel

Next, it’s time to install the MOLLE panel to the center console. Start by inserting the two front screws into the console, then insert the rear ones.
Step 10. Tighten Hardware
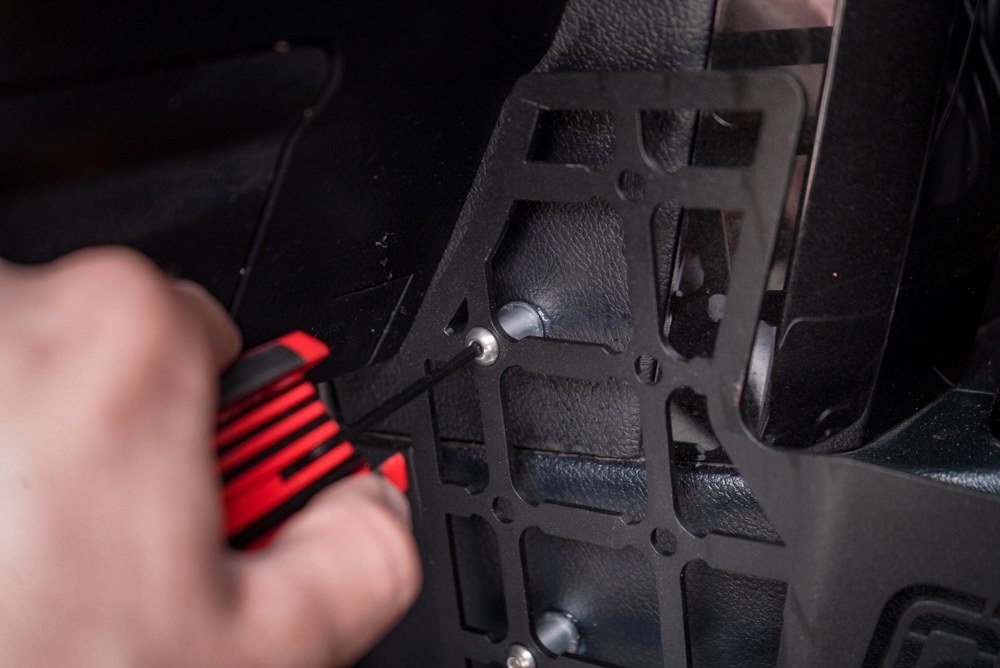
Once the MOLLE panel is in, tighten the screws with a 3mm Allen key. Tighten until snug; there is such a thing as over-tightening.
Final Thoughts
These MOLLE panels are a great first mod for any 5th Gen 4Runner owner. I love the way they look in my interior without being too obnoxious, plus they’re very functional. These panels don’t break the bank, and even though they require drilling, the installation is very easy.
So far, I have a small flashlight and a tire pressure gauge mounted full-time on my MMS panels. The Glock fits very well on the panel without rubbing against my leg while I drive, and it will give me some peace of mind while cruising fire roads by myself. Eventually, I would like to come up with a way to mount my camera on the passenger side panel, as well as find something useful to put in a bag or two.
Overall, I’m extremely impressed with these MOLLE panels and would recommend them to anyone. Let me know in the comments what everyone is keeping on their center console MOLLE panels!
So how badly does the material you have mounted on this panel interfere with your leg as you’re driving?
Great question, so far it hasn’t interfered at all, I even have a Cargo Pouch attached and it’s still not hitting my leg.
Hope that helps,
Heath
Do the screws secure into the trim plastic or do the black pieces expand or something to create more pressure so it’s more secure?
The rubber well nut expand behind the center console panels. It is a very secure fitment.