
Rhino-Rack Vortex Stealthbar + Stow It Utility Holder For Shovels, Axes, Tools, General Offroad Accessories, and Gear – Install and Review for the 5th Gen 4Runner
Based out of Australia and founded over 21 years ago is Rhino-Rack which has proven itself to be a world contender in creating strong and durable outdoor gear. Very well known for their roof rack systems, Rhino-Rack also has an array of products in the categories of sport & leisure as well as trade & work solutions.
Today, I will be showing you how to install a couple of their products onto my own 2018 Toyota 4Runner TRD Off-Road. I would like to show you that not everyone needs a full roof rack system on their off-road vehicle as it really depends on what your lifestyle is. For me, as a young father of a rambunctious son, I decided to start with throwing up a couple of crossbars and clips and see where it takes me. Family adventures, here we come!
Oh, did you want to know exactly what I am installing and reviewing today?
I will be looking into Rhino-Rack’s Vortex Stealthbars and new to the North American market, the Stow It Utility Holder. FYI something to note here is that the Rhino-Rack Stow It has been recognized with a Red Dot Award: Product Design 2021!
Find It Online
- Rhino-Rack Vortex Stealthbar: Check Price
- Rhino-Rack Stow It Utility Holder: Check Price
Tools & Materials
- 4mm Allen Key (included)
- Screws, washers, etc. (included)
- RSB Locking Strap Short (included)
- Locking Barrel (included)
- Metal Key (included)
- RSB Gasket(included)
- 4 clean cloths
- Measuring tape
- Step ladder
Rhino-Rack Vortex Stealthbar + Stow It Utility Holder
Step 1. Lay Out Materials & Parts, Prep Roof & Stealthbars

The first thing you want to do is make sure you have all the components that come with the products and lay them out so that you have everything at your fingertips.
It is recommended to place some soft cloths or towels under each section of your roof rails just to prevent possible scratches. If you aren’t super tall like me, it’s always handy to have a step ladder to ensure balance and safety. Of course, you can just open your door and step on the running board if you have them (I still prefer the step ladder as you can balance better).
As you will see in the pictures below for reference, there are a few things you need to put together when preparing your Vortex Stealthbars for install.
Here are the simple steps to prep them:
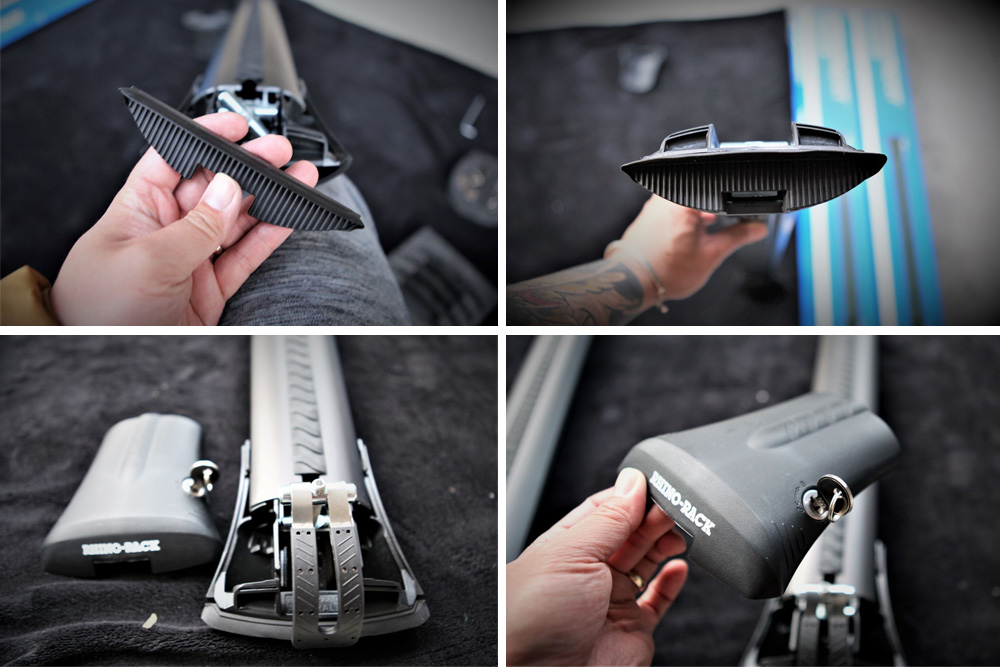
- Remove the cover plate from both ends of the crossbar
- Insert the key into the barrel and put it into the cover plate; line the wafer on the barrel up with the ramp in the units barrel housing then push the barrel home into the housing and the wafer will click into position locking the barrel in place
- Insert RSB gaskets into the ends of the leg assemblies
- Insert vortex generating (rubber) strips into the crossbars
- Turn the crossbar over, using the Allen key loosen the dome head bolt and flat washer at the rear underside of the mount leg
- Slide the leg assembly toward the end of the crossbar
- Turn the crossbar upright. Rotate the locking hardware upwards which will expose the locking securing screw under it.
- Remove the locking security screw with the Allen key
- Slide the locking strap into the underside of the leg assembly (I used the first hole [fixture point] giving me the longest range to wrap around the roof rails)
- Secure back in place with the hardware you just removed from those points
- **Repeat all steps for 2nd crossbar
Now you are ready to attach your Vortex Stealthbars onto your roof!

Step 2. Install Vortex Stealthbars to Roof Rails

Before you place the crossbars on your roof, it’s a good idea to measure out exactly where you want to mount them. The reason I wanted to flag this part is that even if the instructions say to install them in certain measurements on the roof, it may change depending on what equipment you are wanting to mount on your crossbars afterward.
For me, I will be later installing some recovery traction boards so I need the distance between the crossbars to be a certain length depending on how long and where the mounting holes on the recovery boards are (just something to keep in mind). Other than that, mount where you want them to go!
Okay, back to the steps:
- Place the crossbar onto your factory roof rails
- Flip the locking hardware back down to its original position
- Pull the locking tab (rubber strap) under the factory roof rails
- Slide both of the loops on the arms of the locking strap over the locking hardware one at a time shown in the picture above (this part might take some loosening of the hardware to get them to reach) — if the strap is too short to reach the pre-assembled barrel, you can remove the barrel from the stud first then attach them.
- Make sure the gasket on the ends of the crossbars sit flush with the rail
- Using the Allen key, tighten the locking hardware (**make sure the crossbars are positioned evenly on the vehicle before locking down)
- Once everything is aligned to your liking, using the Allen key tighten the dome head and flat washer on the underside of the mount leg
- Finally, put your cover plate back onto the front of the leg (**make sure the lock is set to an ‘unlocked’ position) – then slide the cover plate into place and lock it
- **Rhino-Rack advises for optimal spacing keep bars at a minimum distance of 700mm center to center
- **Always check the bars are set securely before driving. If crossbars can slide, please go back and tighten the mounts
Rhino-Rack Stow It

How cool are these utility holders!? Easily one of the coolest and more convenient utility holders/clips on the market today.
Not only are they extremely handy, but they are also super simple to install too! They are premium quality powder coated and lightweight with aluminum bodies.
They also have a spring release for quick lock and release plus a secure ratchet locking mechanism. These are perfect for offroad accessories, shovels, axes, and many other pieces of offroad or overland gear. If you’re looking for a good daily driver roof rack cross setup for accessories like these and many others, these secure ratchet-style locking mounts are incredibly useful.
Here are a few more of their features:
- Load capacity of 8 kg
- MasterKey compatible
- Holds 10-50mm diameter items
- All hardware included
- Sold as a pair
Tools & Materials
- 5mm Allen Key (included)
- M6 x 16mm socket head screw X 2 (included)
- M6 x 20mm socket head screw X 2 (included)
- M6 x 16mm flat washer X 2 (included)
- M6 channel nut X 2 (included)
- Metal Key (included)
- 4 clean cloths
- Measuring tape
- Step ladder
How To Install Rhino-Rack Stow It

Follow these steps:
- Press the two side buttons on the clips and it will snap open
- As we are installing on the Vortex Stealthbars, you take the M6 x 16mm socket head screw and put a flat washer through it
- Put the screw through the hole that you see at the bottom of the clip and place the M6 channel nut on the bottom and screw in loosely
- Now for the Vortex Stealthbars, you want to slide the clip into the channel in line with the crossbars.
- Note: When you are sliding the clip into the channel, you will need to remove some of the rubber vortex sealing. strip and cut as much as you need room for the clips to fit
- Note: You will need to unlock and remove the crossbar cover plate
- Next, take the 5mm Allen key and tighten the screw down tight
- Repeat steps for the other clip on the other crossbar
- Put crossbar cover plate back on and lock
- You are done!
- Note: It is up to you if you want to place the clips flat or use the angled holes to mount for tools that have a diameter of 10mm or larger
Initial Impressions & Final Thoughts

First off, they don’t call them Stealthbars for anything. They are sleek and sit flush on your stock roof rails! I would say they are the most stylish crossbars I’ve seen on the market so far.
Installing both the Vortex Stealthbars and the Stow It clips are a very straightforward and simple process which is great. As I have had the chance to test them out for a few weeks now on and off the road, I can confidently say that they definitely are sturdy and do their jobs well. As far as zero bolt-on crossbars go, they are extremely sturdy and will not move at all even under light off-road conditions if installed properly. I was able to literally unclip and re-clip my shovel with one hand. I will be using these clips for a very long time.
Specifically, it took me about 30 minutes to install both Stealthbars securely onto my roof. Add an additional 5 minutes for the Stow It clips, and voila, all done!
I recommend it!
I would definitely recommend these new Vortex Stealthbars to anyone using their vehicles for leisurely activities and getting outdoors with the family. You can still put a few items up there like a storage box, recovery boards, etc. But if you are looking to add a lot of gear up top, you will want to go with a full-size tactical roof rack setup especially if you are wanting a rooftop tent in the future. The Stow It Utility Holders are awesome.
They have been designed to provide the most secure load-carrying solution for all shovels, axes, paddles, and even fishing rods. You can literally put almost anything that has a handle in them. Highly recommend these to anyone that doesn’t want to throw their shovels or axes and things inside their vehicle.
Finally, it is time for Luke’s 5 Star Rating on both of these Rhino-Rack products:
- Vortex Stealthbars: 4.5/5 Stars
- Stow It Utility Holder: 5/5 Stars
Again, thank you for tuning in to my review on the Rhino-Rack Vortex Stealthbars and Stow It Utility Holder. Until next time, have some amazing adventures out there and stay safe.