
Introducing the New Smittybilt XRC GEN3 Winch – Assembly Guide + New Features That Stand Out
Smittybilt makes two versions of this winch, the Steel and Comp Series. The Comp series has a Synthetic Cable with Hawse Fairlead.
Since 1956, Smittybilt has made just about every piece of off-road gear essential you can imagine. From rooftop tents to trail axes, they do it all. What they’re really known for are their affordable, yet high-quality winches. One look at the new XRC GEN3 and you’ll see what I’m talking about.
Smittybilt has released many winches over the years and they’re only getting better with each release.
I previously ran the Smittybilt X20 on one of my other 4Runners and it has been flawless. It’s done everything I’ve needed it to for every recovery I’ve been in. It’s never failed me and for that reason, I went ahead and moved forward with another Smittybilt Winch.
I ran that Smittybilt X20 for well over three years through many types of terrain and have put it through some extreme pulls while loaded down. Not once did that winch show signs of weakness or fatigue. When it needed to show up and get the job done, it did without complaints. I’ve been sold on the Smittybilt winch line for a while now.
For Jade, our 2016 TEP 4Runner we installed a GEN3 Smittybilt Winch on our C4 Fabrication Hybrid Bumper. Without any more introduction, let’s see what this winch has to offer and see how the assembly process went.
Find it online:
- Comp Series (Synthetic Cable with Hawse Fairlead – Amazon): Check Price
- Comp Series (Synthetic Cable with Hawse Fairlead – 4WP): Check Price
I recommend the 9.5k GEN3 winch for most mid-size trucks and SUVs. You’ll likely want to opt for a 12K winch if you have a full-size truck.
GEN3 Vs. GEN2 – What Changed?

The Smittybilt XRC GEN2 is probably the most popular winch out there. It’s affordable, durable, and works without question time and time again. Needless to say, the GEN2 has some big shoes to fill, but the GEN3 filled them and some.
The new GEN3 is stronger (7hp motor with forged steel gears), new stack motor which will be noticeably faster, is easier to use, and comes loaded with new features. They redesigned the winch from top to bottom.
This thing will perform for you whether it’s night or day – just like your dependable af Toyota.
GEN2 Vs. GEN3 Comparison:
| Specs: | Gen3 | Gen2 |
|---|---|---|
| Rated Line Pull: | 9500lbs | 9500lbs |
| Motor: | 7.0hp | 6.6hp |
| Line Speed at 0 pounds: | 27.3 feet/sec | 23.4 feet/sec |
| Line Speed at load (6,000lbs) | 12.8 feet/sec | 10.8 feet/sec |
| Motor Amp Draw at Load (6,000lbs) | 280 | 320 |
| Line Type: | Synthetic | Synthetic |
| Waterproof Rating: | IP67 | IP67 |
| Electrical Warranty: | 5 years | 3 years |
| Mechanical Warranty: | Lifetime | Lifetime |
New Features

It’s clear that the GEN3 has a couple of key upgrades from the GEN2. The GEN3 also has some really unique features that make it stand out not only from the GEN2 but other competitors as well.
Key Features & Benefits:
- Load Indicator System
- Know when your winch is overloaded, prolonging the life of your winch.
- In/Out Indicator
- An indicator letting you know whether you are spooling in or out.
- Detachable Body Armor
- Customize until your heart’s content. The removable body armor allows you to take off panels and paint them if you choose to.
- Controller Flashlight
- Built-in flashlight in the controller.
- 12v Accessory Post
- Run additional accessories up to 50amps off your winch.
- Daytime Running Light on the Control Box
- High Visibility Clutch Lever
- Dual Magnet Controller Mount
- Mount your controller anywhere on your 4Runner with this magnetic mount.
Load Indicator System

The new remote control handles much more than in/out drum spooling. Their exclusive load indicator system is built-in providing the operator with constant feedback on the winch’s operating status with a series of built-in LEDs preventing damage from overloading the motor or line.
Color Meanings on the GEN3 XRC:
- Blue: Ready Winch Is Ready to Start
- Green: Loading Winch Is Operating Within Safe Levels
- Yellow: Max Load Winch Is Operating at Maximum Load
- Red: Overload Stop!!! Time to Use Snatch Block or Other Assistance
In/Out Indicator

You have two indicators on the remote that tells you whether your drum is spooling in or spooling out. This is nice because, at a glance, you can quickly tell which direction your winch is going to pull. The winch remote features a very ergonomic design that lets you toggle between in/out spooling at the press of a button – left and right on the controller.
Controller Flashlight
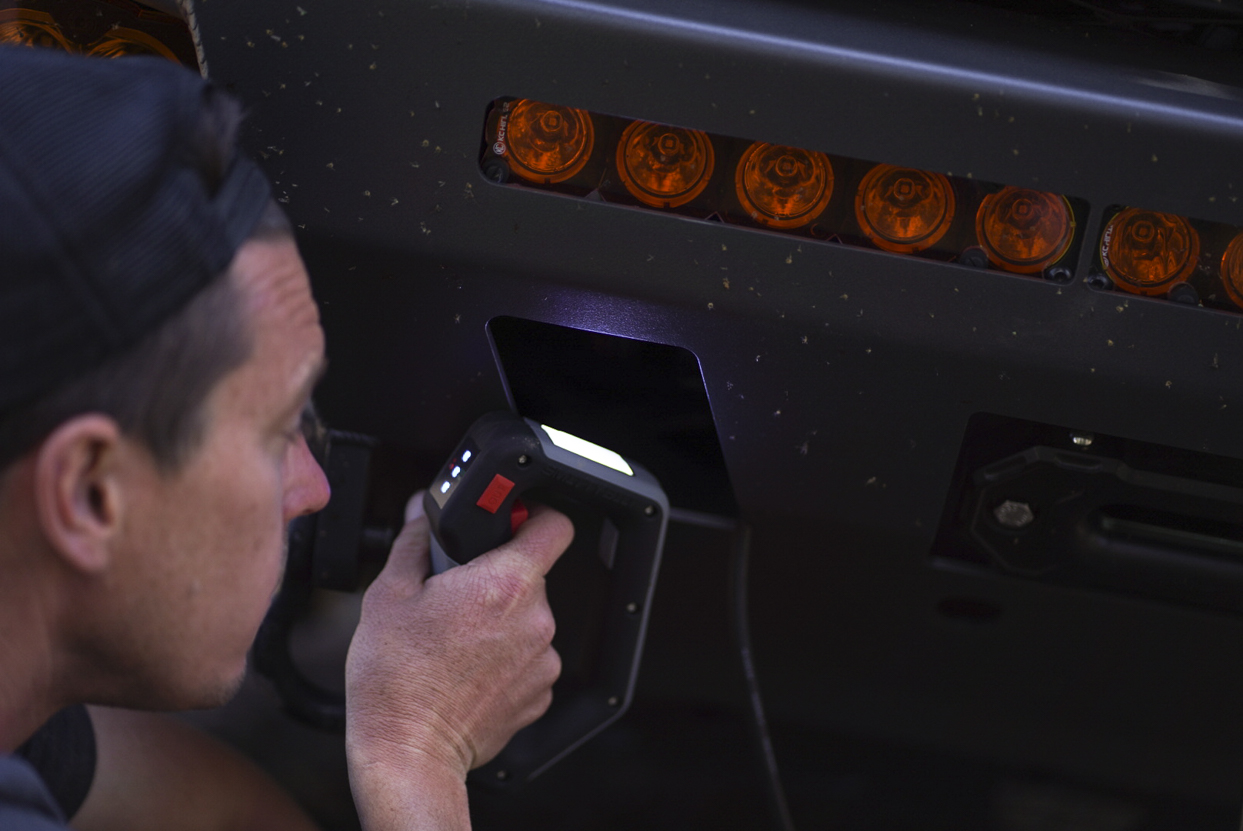
Smittybilt paired their LED DRL backlight on the actual winch with an LED light on the controller. The all-new Smittybilt GEN3 has been designed to function incredibly well at night. Reaching up into a closed-off bumper to access your winch at night can be difficult, well not anymore. The new GEN3 solves that problem for us Toyota guys by packing this product with LEDs, both on the control box and the remote as well.
The controller also has a built-in magnet that you can attach to any metal surface (your bumper) which makes it easy to keep your controller out of the dirt. This is a super small yet incredibly important feature.
Tools & Materials For Installation & Assembly

This is a general overview of the tools and materials you might need, however, this is relative as you can do this install with less. For example, you do not need alligator clips, Tesa tape, or any electrical tools if don’t intend on using the DRL feature of the winch. We slightly modified our wiring harness because we wanted waterproof terminals. If you intend on wiring up the DRL lighting, then you will in fact need all these electrical tools.
Tools and Materials:
- Vice grips
- GearWrench 3/8 drive ratchet
- Tesa Tape
- 14 and 16 mm gear wrenches
- Phillips Head screwdrivers (Milwaukee long)
- Dykes (diagonal cutting pliers)
- Klien Tools Crimps
- IRWIN Wire Cutter
- Alligator clamps (optional)
- Waterproof ring terminals (optional)
- Gear-Aid work light
Installation Overview

Unpack everything that came with your new winch and lay it all out. This should help you organize everything and determine where to start.
Winch Assembly & Install Guide
Step 1. Control Box Brackets

Screw the brackets into the bottom of the control box.
Step 2. DRL Wire

The GEN3 features an optional daytime running light (DRL). We decided to go without out it since our winch is hidden behind the bumper. We cut the wire flush and then used the Tesa tape to tape it to the power wire to ensure it doesn’t go anywhere.
Step 3. Install Control Box

Install the control box to the top of the winch by screwing in the brackets from step one into the corresponding holes.
Step 4. Waterproof Ring Terminals

This part is optional. The ground wire for the control box does not come with any type of heat shrink or waterproof ring terminal. We fixed that by cutting the old o-ring off, installing a waterproof ring terminal, and finished by sliding heat shrink over it. This will provide peace of mind when hitting big water crossings and having the winch blast through rushing water.
Step 5. Connect Control Box

Smittybilt makes this part super easy by color-coding all the wires as well as putting letters on the wires and where they go. Go ahead and tighten them (not too tight) and make sure none of the wires are binding.
Step 6. Spool Winch Line

Screw the beginning of the winch line into the drum.
Step 7. Power Winch & Spool Line

This is a good time to double-check that the winch has power. Hook up some alligator clamps on the positive and negative wires coming off of the winch. Once everything is temporarily connected to a battery, start to spool in your line. You will want to re-spool the line later according to the spooling recommendations according to Smittybilt. You should have roughly 500 pounds of load on the end of the line when you do so. Spooling the line before you put it in the bumper makes your life a lot easier though.
Step 8. Rubber Caps

Install the rubber caps on the main wires and double-check the tightness one more time. You do not want any wires coming loose and/or causing short circuits.
Step 9. Mount Winch on Bumper

This part takes patience. To properly mount the winch, you’re going to have to thread the bolt into the square nuts that sit inside the winch. The problem is those nuts are not held in by anything and there isn’t a whole lot of wiggle room. So just take your time because it is crucial that all four of these bolts are in and tightened down. Failure to do so will eventually cause the winch to fail.
Winch Maintenance 101

Like most things on your 4Runner, winches require maintenance. You need to get in the habit of running the winch at least once every couple of months. This is important, especially if you don’t actually use your winch that often; running the winch allows you to make sure the line is still in good order, as well as lubricating the internals.
Spooling Maintenance
The first thing I do when I get home from a wheeling trip is re-spool my winch (if I used it). One of the reasons I do this is because if you use your winch on the trail it’s probably dirty and chances are you didn’t re-spool it the way Smittybilt recommends.
Smittybilt recommends using at least 500lbs of tension on the line while you’re spooling the winch in. I found it easiest to use a tree and a slight incline while the truck is in neutral, or have a buddy hook up to the end and reel them in on a flat surface in neutral.
Proper re-spooling helps preserve the life of your winch line and it ensures the line won’t bind up on you while on the trail.
Difficult to free the spool?
During the break-in process, the line may be difficult to spool out. This is normal, and the more you use your winch, the easier it will be.
If you need to, power out the winch with the clutch engaged. Do this in short 15-foot bursts as this allows the winch to remain cool and not overheat. Overheating is one of the worst things that can happen during the break-in process. This is a good habit to get into while on the trail as well.
Attempting long-distance Recoveries?
It’s important to always keep at least 10 wraps of line on the winch drum. A good rule of thumb is you should never be able to see the drum. There should always be at least one layer of line covering the entire drum. If you can see the drum, then you need to extend your winch line using a winch line extension rope, tree saver, bridle, or other rated forms of recovery equipment.
Initial Spooling

You have a few options for spooling in your synthetic line for the first time. Regardless of how you spool your line onto the winch at first, you will eventually need to put a load on it before heading out and attempting a recovery.
1. Manually spool without power
This involves hand-rolling the drum until the synthetic line has been wrapped around the drum. The problem is that this is slow and can be frustrating to accurately line up each wrap. Also, without any load on the line, you may not be able to fit the whole line on the drum.
2. Spool line with power
Temporarily hook your winch up to a battery and with one person holding/guiding the winch and another on the remote/in trigger – begin to spool the line on the drum. You can also mount it to your bumper and use the weight of your bumper against your foot to create some pressure. Then using your free hands, trigger/in and feed the line onto the drum. With this option, you may only be putting 100lbs+ of pressure on the winch line but at least you can fit the whole line on the drum for a successful install.
Re-Spool Winch Line
Keep in mind that with either option one or two above, you will need to eventually put 500lbs of pressure on the line/drum before attempting any off-road recoveries.
Weight Load Recommendation When Spooling Synthetic Rope on the Drum?
A cable must be wound onto the drum under a load of at least 500Ibs (230kgs) or the outer wraps will draw into the inner wraps and severely damage the cable during winching. The first winch use should be a familiarization run while in a relaxed, non-recovery situation. Spool out the cable until the red cable mark appears (about 5 wraps on the drum), then rewind the cable on the drum under a load of 500Ibs (230kgs) or more. – Smittybilt
Final Thoughts

Overall we are stoked with the new Smittybilt’s new XRC GEN3. Not only are the specs on this winch better than the GEN2, but the new features it comes with are next level.
The install went very smoothly and the first time we tested this out on the trail, it performed as expected. This winch is a beast.
I have this same winch on my Gladiator and the bumper also, all from Smittybuilt, but both of them , the paint is flaking off, looks like crap going down the road, i have contacted Smittybuilt, and without a receipt they can do anything, I enclosed a pic, and i have sent them a bunch of pics, anyone know what else I can do.
Todd
I recently bought this winch and I have a c4 low pro. Will this work with the wired controller cable?
Does this winch work with Jeep Wrangler?
Does the Gen 3 have the same foot print in as the Gen 2 ?
I have a gen 2 that is only 6 months old, with problems that you’re company won’t fix, would like to update but afraid I will run into same problem, good until you need warranty
is there a wireless remote option for the gem 3 ? Even aftermarket?
Nice review. Been running the Gen 3 for a year and have been very pleased with it. I really like the overload indicator and the magnetic controller.
Is the GEN3 XRC better than the X20? If so, why pick the GEN3 XRC over the X20? Thanks!
On paper yeah it’s “better” but the only specs that really matter here are the 7hp motor vs. the old 6.5, redesigned controller (way more features), redesigned body, and a few other features. The X20 is very similar to the GEN2. I actually ran the X20 before the GEN3. Changes are big for sure but if you are running the X20 now – no need to pull your winch off your bumper just to upgrade. That would be a lot of work for .5 hp and a badass controller. Awesome winch but if it ain’t broke don’t fix it.
Nice article!! Can you wire it directly to the battery without any kind of protection? (fuse/switch) What is your setup?
We wired our leads directly to the battery. You (ALWAYS) want to wire a winch to the + and – terminals directly to your battery for the least resistance possible. The power lead has a built-in fuse that hides in the control box – so there’s your protection. If your winch does not power on then you want to check that for a circuit short. The switch is handled by the actual remote that Smittybilt provides. When you plug the remote into the winch, that triggers and controls the winch. No relays or anything needed, that’s all built into the control box.