
Cali Raised LED Rock Sliders Installation Overview & Review For the 5th Gen 4Runner
Cali Raised LED is another option for a great set of off-road sliders for your 5th Gen 4Runner. Coming standard with the rear kick-outs and made from 1.75” DOM tubing makes these a really nice set of rock sliders to consider.
At the time of writing this article, they will set you back about $620 and add $150 for the filler plates. Add $200-$250+ for any coating that you want to add or check out the article I wrote for how to get a professional coating on the cheap.
Find It Online:
- Cali Raised LED Rock Sliders For 5th Gen 4Runner: Check Price
From there, you can configure multiple Kick Out Options, Filler Plates, Slider Coating Options, and Shipping Options.
Cali Raised Rock Slider Install Guide
Unboxing & What’s Included

There is a bit of manufacturing lead time with the Cali Raised LED Armor so be sure to check with them to see what the current lead time is. It’s typically very reasonable and they work to get things out to you quickly. I ordered around the holidays, so I had to wait a little bit longer. They ship each slider to you with all the parts individually packaged.
Each Slider Shipped Separately

Once opening the box, the packaging left a little more to be desired. I was fine with it since I ordered them bare metal and wanted to coat them myself. However, if this is the standard for all packaging, coated and uncoated, the finish on the sliders would have probably been pretty banged up. The thick foam pieces were nice, but they just slid all to one side of the box. The filler plates were wrapped in a thin foam with plastic wrap holding them together, so they were good to go.
Unboxing the Filler Plates

The construction of the sliders looks amazing. The welds are beautiful with full coverage and no lag to be seen. They will definitely stand up to some serious abuse on the trail and provide a solid jacking point for and emergency repairs.
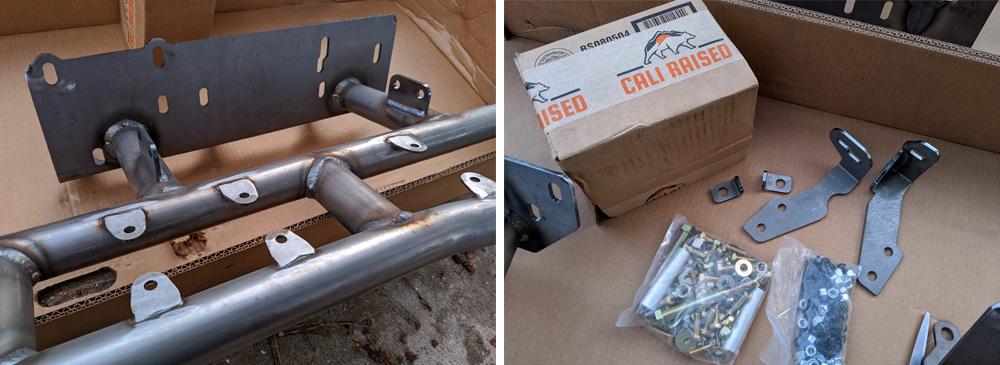
The hardware comes nicely packaged up in its own box inside so even if it gets banged up a bit, they won’t spill all over the place. However, there are no instructions included in the box or on the website. They have an instructional video on the website that does a decent job.

Laser-Cut Filler Plates

The filler plates look to be laser cut with the center holes depressed in order to give you the option of some additional traction if you intend to use them as a step. You can either install these facing downwards or upwards. More on that later in the install.
Install Guide Overview

Before you begin the installation, I would recommend washing your 4Runner and in particular the undercarriage/frame. You need to make sure to clean out all the areas that the screws will thread into. A good indicator if everything is clean is just to hand thread a bolt into all the holes. If it doesn’t go in freely, you need to clean more. Spraying some WD-40 or other lubricants in each of the holes wouldn’t hurt either.
Now getting to the actual installation!
Tools Needed:
- Metric Sockets
- Metric Open End Wrench Set
- Optional: WD-40
- Optional (clean frame): Engine & Chassis Cleaner
- Optional: Light Duty Jack or Pro Eagle
- Optional: Jack Stands
Step 1. Remove All KDSS or Brake Lines

You will first need to remove all of the KDSS (if equipped) or brake lines. I have a 2019 TRD Offroad, so the KDSS lines on mine aren’t routed to the outside of the frame. You may have to remove the KDSS module on earlier models.
Step 2. Remove Bolts On Gas Tank Skid Plate

The 3 bolts on the gas tank skid plate will also need to be completely removed. The slider will fit between the skid plate and the frame.
Note: I installed these myself and luckily had some boxes in my garage that were just a little shorter than the frame itself. A helping hand would work if you can bribe a friend to come help out. Place the boxes at the edge of the right under the door panels and place the slider on it. Position the slider as close to the frame as possible and get it lined up. Lift up either the front or rear and screw the end most bolt halfway in by hand. Repeat this step with the other end. The slider will be held up and should wiggle pretty freely.
It’s easier if you start with the bolts that face the ground first before you do the sides. There is no real order to which ones to do, you can just wiggle the slider back and forth to line up all the holes.
Depending on which side that you install first, you will need to pay attention to which reinforcement bracket that you need to use. Just make sure that you install these AFTER you tighten the other bolts down to prevent any alignment issues.
Step 3. Install Driver’s Side Brackets

There are two driver side brackets, the one with the “S-shaped” hole in the forward bracket. They are both simple 3-bolt installs with 2 supporting the tubing and one bolted into the frame. The “S-Shaped” hole is where the brake line bracket reattaches.
Step 4. Install Passenger Side Bolts

The passenger side large bolts are a little more tricky to install.
The forward one will be easier to start with that one. You have the bracket itself, a small tab for the frame, and a long bolt with a spacer.
Note: The spacer that I received was extremely tight on the bolt and I couldn’t get it to slip on freely. I had to deburr the ends and check to make sure it was still around after they cut it (sometimes if you cut round tubing too quickly it will deform a little). After messing with it for a few minutes, it was tight but I could get it on.
Step 5. Remove Plastic Plug

There will be a plastic plug that you need to remove to install these bolts.
Be careful with the small tab, you don’t want to drop it into the frame. The “J” portion slips in pointing upwards and then goes onto the bolt. While holding all of this, you need to place a nut on top and tighten it down.

You can see that the second bolt is in a tighter space. Take your time so you don’t drop that tab into the frame.

Once this is all complete, you can go ahead and check all the bolts to make sure nothing has shifted and they are all flush and tight.
Go ahead and now reattach all the brake and KDSS brackets to the frame as well. There should be no kinks or bends in any of the lines to ensure they will function properly.
Step 6. Attaching Filler Plates (Optional)

I attached the filler plates at the end in order to give me some places to grab the sliders and not have the plates blocking anything I needed to get to.
Note: You can choose the “dimples” facing up for more traction/more aggressive or down for a smoother look. Since the coating provides most of the traction on mine anyway, I decided to install them facing downwards. The screws for the plates come coated black from the factory so you don’t need to go out and find matching hardware.
This is a nice touch as typically this is an upcharge for some places. Just wiggle a locking nut underneath and tighten them down with a hex key.
The Finished Product

And there we have it. All finished and ready to go. With the 0-degree option, you can see how much of a “step” they serve as. I wear a size 11 for reference. The kick-outs are definitely a nice touch and give people in the backseat even more area to step on or to access gear on the roof rack.
Final Thoughts

I ended up with some spare hardware so don’t worry if you have some extra. Overall, I think these were a very easy install and could be installed by anyone.
I did wish these had some sort of instructions but it’s straightforward to figure out and the video on the site helps a little. These are definitely some quality sliders at a good price that will stand up to anything you want to throw at it.
Real talk, this was my most hated mod to install. Lying on the ground listening to a socket wrench I can only get 1/3 a rotation out of, for 3 hours. You will want some WD40 and a tap, in case you cant thread some bolts through. I installed on a 2 year old PRO and it was still a bitch.
Set all your hardware up before hand.
Read a guide like this several times, and have it ready to reference.
Be patient, and strategic with your bolt placement to hold up sliders while working on them.
Have some time to burn.
I don’t have any attachments to my impact gun that will hit the angles needed in here. Also, the torque required to move some of these bolts would work with most small impact setups.
Easy install. Boring as fuck. Glad its over with. Never again.
I just dove in and then backed out with cold temps and sunlight fading. It is not as simple as it states and I blame Cali-Raised for really missing the boat on solid instructions. Not even a diagram or description on where the bolts go. Kinda lame.
The torque required WOULD NOT WORK with small impact setups as it is quite high.
what torque did you use or what is required? i cant find that info thank you for your time
Does this fit GX460?
Just installed mine an hour ago. 2021 ORP. KDSS lines are routed outside as well as the KDSS pump module. what a pain to work around. Go very slow and I would highly recommend having a helping hand. I did mine by myself with 2 jack stands. Passenger side is way easier (took 45 mins because it’s a lot of ratcheting), but go slow when it comes to the L Brackets. I dropped the rear one into the frame ;x. Driver side took about 2.5 hours because I had to work around all the KDSS lines and modules and plates.
Just installed these and I was pressed for time. Had to get to work but I managed to get everything in and tightened except the long “clamp/sleeve” bolts on the passenger side. Do I really need those? I’m trying to figure out what purpose they serve with a dozen other carriage bolts on the slider. What are your thoughts please…
Pretty sure my east coast undercarriage never looked that clean. Nice write-up!