
Steering Rack Replacement Step-By-Step DIY Guide: The Ultimate Quarantine Project For Your 5th Gen 4Runner
During a recent wheeling trip, I noticed that my steering fluid started to run really low.
It got so bad I had to hobble back to civilization with a whining power steering pump to find the nearest auto parts store. Topped off my fluid and thought all was well. When I returned home and walked back to my rig the next day I found this…

Not something you like to see when walking back to your prized possession. It was clear to me that my steering rack was toast. Like many other 5th Gen 4Runner owners out there my truck spends a considerable amount of time playing on rocks and dirt. This means a lot of bouncing off of rocks and hard impacts on the steering system.
Toyota’s Independent Front Steering system is known to be a weak point for the 120 platforms. You can find many reports of FJ Cruiser and 4th Gen 4Runner owners having problems with their racks after a good amount of time off-road. So it was only a matter of time that I had to pay the piper.
After scouring the internet for hours, it was clear that no one had replaced a steering rack on a 5th Gen as a DIY.
Most had their dealers do the work because of how invasive this procedure was. You see, Toyota engineers never really thought it to be a priority to make replacing a steering rack straight forward or easy for the 5th Gen. The factory service manual actually calls for the entire engine assembly to be removed to access the rack.
Oh boy, I think I found the perfect quarantine project.
Tools Needed For Install:
- Assorted Shallow + Deep Metric Sockets (10mm, 12mm, 17mm, 19mm, 22mm)
- Assorted Metric Wrenches (10mm, 12mm, 17mm, 19mm, 22mm)
- 17mm Flare Wrench
- Adjustable Plumber’s Wrench
- Blue Loctite
- Pipe/hose Clamps
- Quart of Dex 3 ATF Fluid
- PB Blaster or Equivalent
- 7 Quarts of 0W-20 Oil
- New OEM Oil Filter
- Drain Pan for Oil
- Drain Pan for Power Steering Fluid
- (2) Steering Rack Mounting Bolts Toyota Part# 90119-14138
- (2) Steering Rack Mounting Nuts Toyota Part# 90178-A0058
- Steering Rack Assembly Toyota Part# 44200-35094
Step 1. Preparing Your Vehicle

I won’t go into this with too much detail but you obviously want to get your front end up in the air and truck on jack stands.
Note: Make sure your steering wheel is completely centered and wheels are straight. Remove your front skid plates and wheels so you have all the access you need. I would also take the time and spray copious amounts of PB Blaster on any bolt that you will be touching.
Step 2. Remove Front Suspension Components

To clear up some room you will need to remove some key components.
With the skid plates off, remove the driver and passenger side sub-frame structural components (17mm deep socket). You will also need to remove the front swaybar for additional clearance. Start with the end links (17mm deep socket and 6mm hex key) and then remove the swaybar bushing frame bracket (17mm).
Repeat on the passenger side and remove the swaybar from the vehicle.
Step 3. Remove Outer Tie Rods + Boots

Next up you will need to remove the outer tie rods from the steering rack.
First, loosen the outer tie rod adjustment nut (19mm open wrench) then remove the outer tie rod nut from the steering knuckle by cutting the cotter pin and removing the nut (19mm deep socket). To separate the steering knuckle from the tie rod I like using a brass hammer to shock the assembly to pop the components apart.
Once the tie rod end is separated remove it from the inner tie rod by spinning it counterclockwise.
Note: Make sure you count how many rotations it takes to remove the outer tie rod and document it. This will be important to know when you reinstall your new rack. With the outer tie rod removed you can now remove the inner tie rod boots. Use a needle nose plier to remove the outer clamp and a screwdriver to pop off the inner clamp. You will not be able to reuse the inner boot clamps so no need to be gentle. Remove the boot and repeat this process on the passenger side.
Step 4. Remove Inner Tie Rods

Not going to lie to you this part may be a little tricky.
Before you do anything confirm that your steering wheel is straight. Take a measuring tape and record the distance from the edge of the rack housing to the inner tie rod repeat on the passenger side. Document this distance,It is extremely important that you have these measurements as well as the outer tie rod rotations down so when you install the new rack you can effectively “center it” when attaching it to your steering wheel.
Ok, now you are ready to remove the inner tie rods.

I found it the easiest to turn the steering wheel out to the side I was working on for better access. Just remember to count how many rotations of the steering wheel you did to achieve this because you will need to center the wheel later on.
Once you have enough access use an adjustable plumbers wrench to loosen and remove the inner tie rod.
Repeat this on the passenger side and when done center the steering wheel again.
Step 5. Separate Steering Shaft From Steering Rack

Place match marks on the intermediate steering shaft assembly no.2 and where the steering shaft assembly and steering column meet in the cab.
- Remove the bolt securing the int steering shaft assembly no.2 to the steering rack (12mm socket).
- Remove the bolt securing the int steering shaft assembly no.2 to the int.steering shaft (12mm socket).
- Remove the bolt securing the int steering shaft assembly to the steering column (12mm socket).
Pull down on the intermediate steering shaft separating it from the steering column. Using a long pry bar and hammer separate the int steering shaft assembly no.2 from the steering rack. This step usually gives folks a really hard time. Having a California based truck meant that I didn’t have to deal with a lot of rust so mine came off relatively easy.
Supposedly an air chisel also helps if you really need some muscle.
Step 6. Detach Power Steering Lines

Using a 12mm socket, detach the high pressure steering fluid line from the steering rack.
Next, use a 17mm flare wrench to remove the high-pressure line from the steering rack and let the power steering fluid drain into a pan.
Once the fluid has been evacuated, use your 17mm wrench to remove the low-pressure return line. Separate the fitting from the rubber hose and put it aside for reinstallation later.
Step 7. Unbolt AC Compressor
Unfortunately, there really isn’t a ton of space around the front of the engine to make getting the rack out easy.
So you will need to loosen a lot of components and hoses to make room.
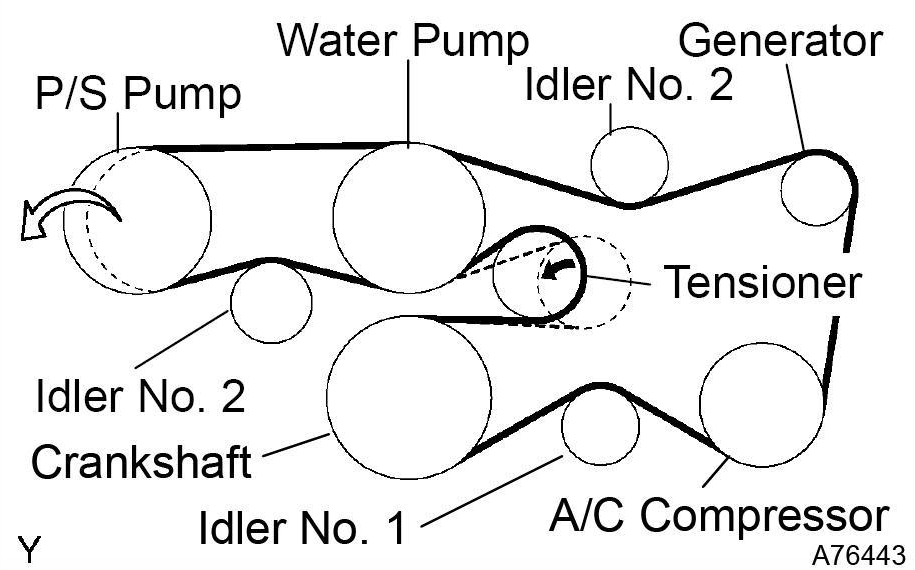
Let’s first start by removing the serpentine belt from the AC compressor. Use a 14 mm socket and a long breaker bar to turn the tension pulley counterclockwise. This will allow you to have enough slack to remove the serpentine belt from the AC Compressor. Use the diagram shown above as a reference.
Once the serpentine belt is removed, you will need to unbolt the AC Compressor from the engine block. There are three bolts and one nut attaching it to the engine block. Use a 12 mm socket, extensions and swivels to remove this.
Finally, unbolt the AC feed line from the front of the engine block (Ref. Diagram) with a 10mm socket.

There is also a second bracket holding these AC lines towards the passenger side of the engine block. You will need to remove that bolt with a 10mm socket.
Step 8. Unbolt Front Differential Carrier

It’s all about clearing as much room as possible from the front of the steering rack.
So next, we need to unbolt two of the three bolts holding the front differential to the frame. Use a 22 mm socket and 19 mm wrench for this.
Step 9. Unbolt Oil Filter Bracket + Feed Lines
The Oil Filter Bracket is exactly in the wrong place for this. So we will need to unbolt it and the feed lines to give enough wiggle room for the rack to come out. Before we can do this you get a bonus! You will need to remove your oil filter and drain your engine oil. I won’t go into detail here because I would assume you know how to change your oil.
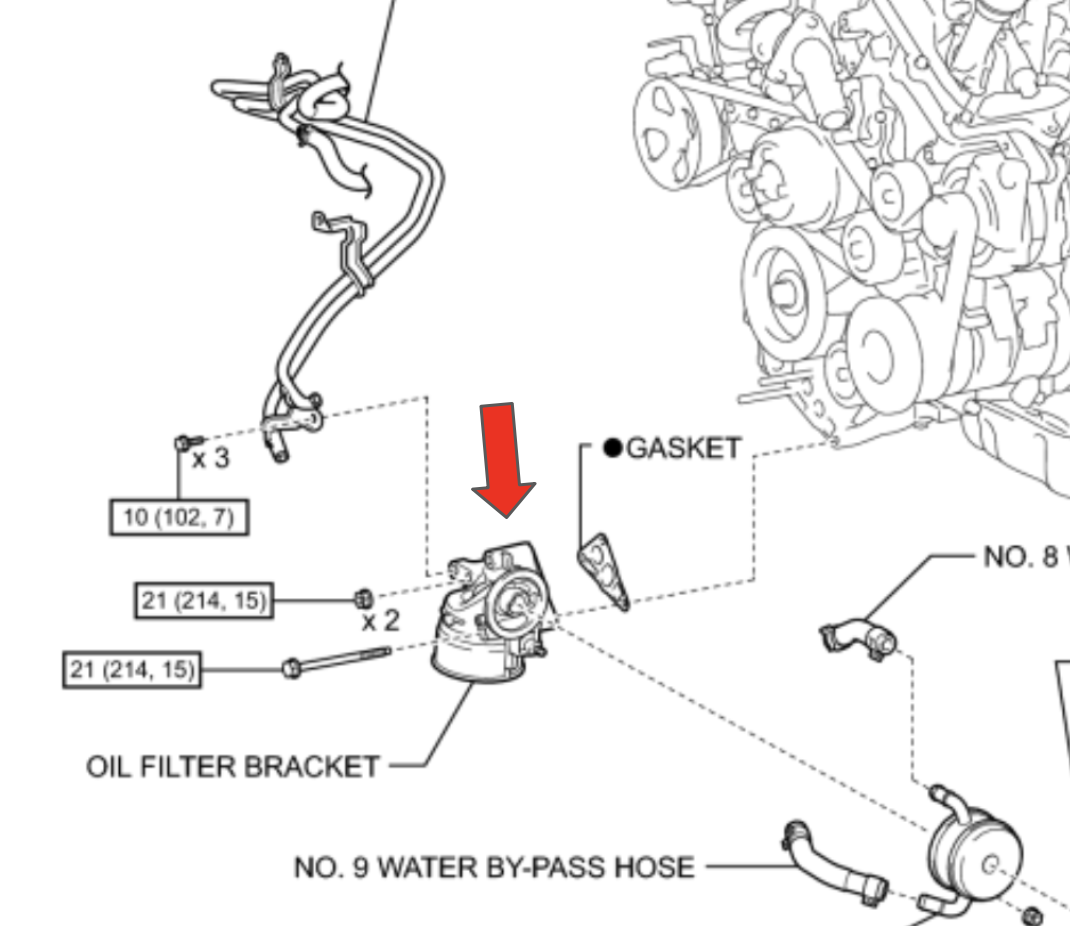
After the oil is all drained remove the oil filter. Next, remove the (x2) nuts and bolt holding the oil filter bracket onto the engine block with a 12mm socket (as shown above).
Remove Bracket Bolts Connecting Feed Lines + Engine
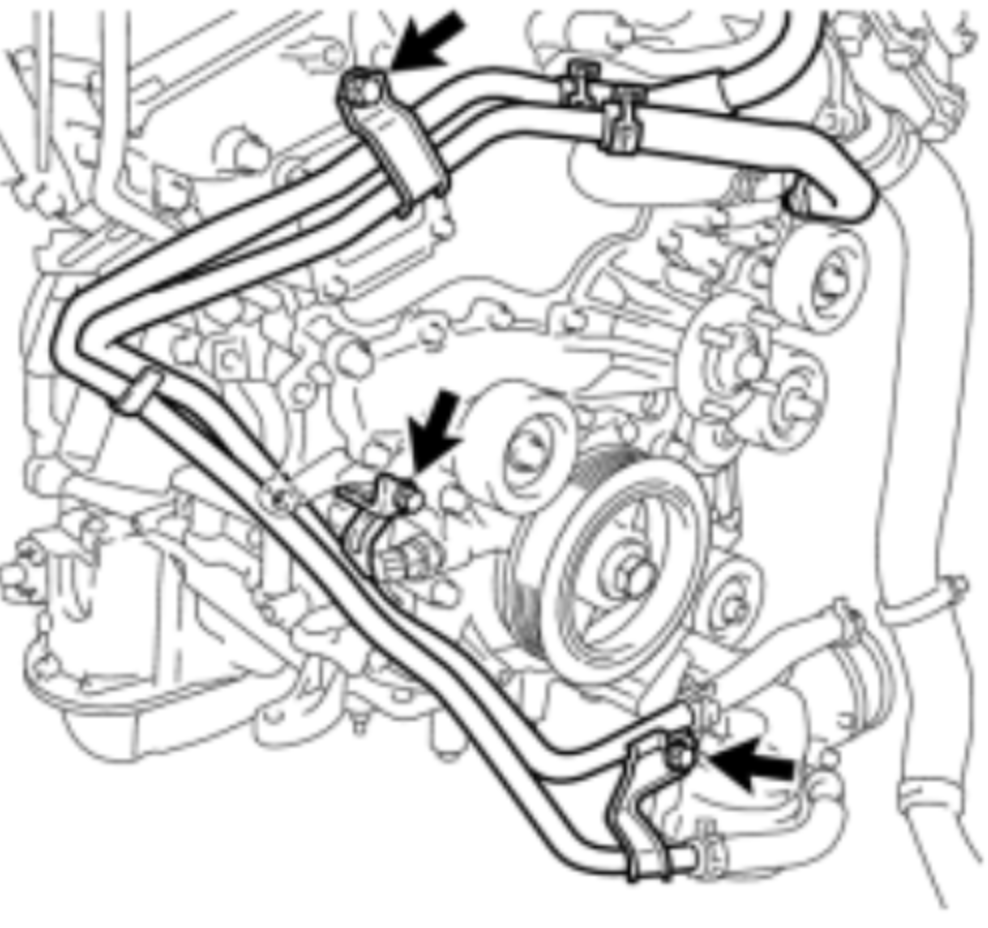
Next, remove the (x3) bolts on the brackets holding the feed lines to the engine, pictured above.
Step 10. Remove Steering Rack
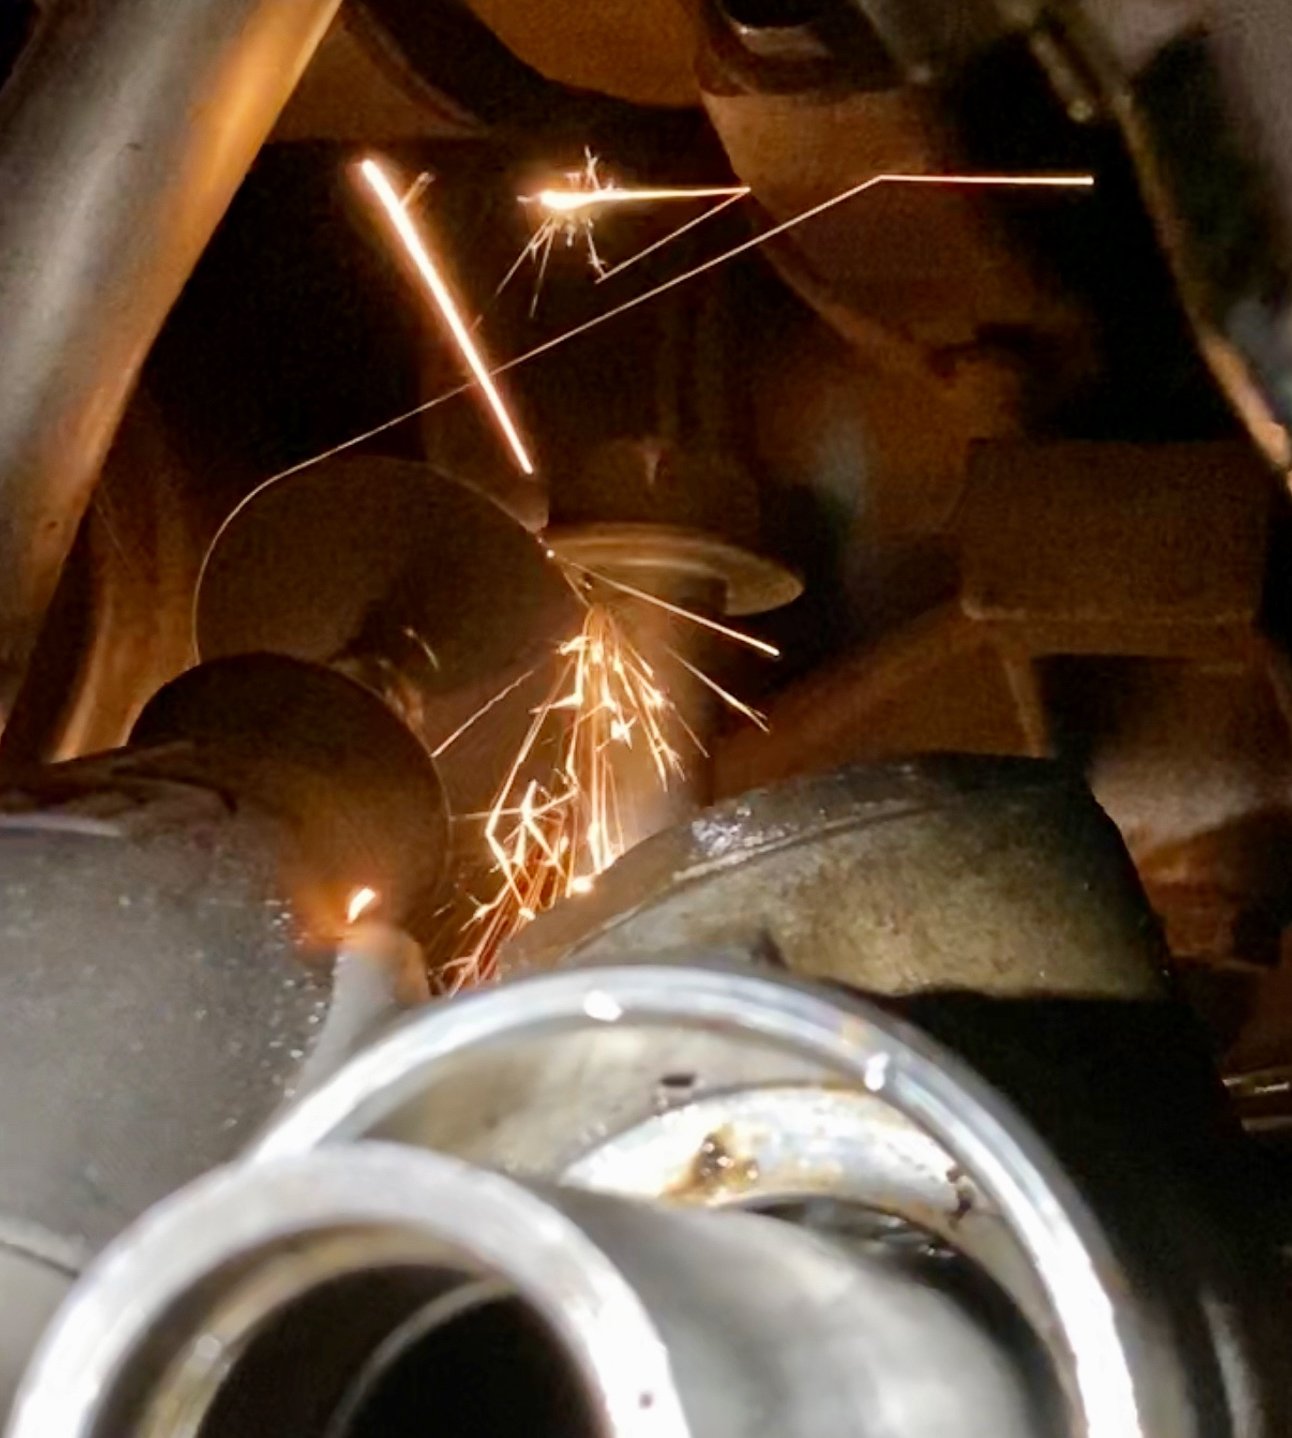
It’s the moment you’ve been waiting for, time to remove the rack! Using a 19mm socket and wrench loosen and remove the passenger side steering rack bolt. For the driver side do the same but you will probably notice that you can’t remove the bolt because it is blocked by the AC compressor. Using your preferred method, in my case a Dremel with metal cutting disc. Cut the top of the bolt so it drops right out.

Once the bolt is removed you should be able to slide the rack out. I pushed it towards the passenger side and used a pry bar to gently pry on the AC compressor feed lines.
Step 11. Prepare New Rack

We will now need to disassemble your shiny new rack so we can slide it in. Using a bench vise to secure the new rack. Follow the process in Step 3 and Step 4 to remove the inner and outer tie rods.
Step 12. Install New Rack
Reversing what you did in Step 10 slide the new steering rack into place.
This time reverse the orientation of the steering rack bolts so you are sliding them in from the bottom up. This will make it much easier if you ever have to remove the rack again. With a 19mm socket and wrench add thread locker and tighten the bolts to factory spec 89 ft/lb. Leave a witness mark to make it easier to see if the bolts ever back themselves out.
Next, using a 12mm socket reinstall the high-pressure steering line bracket back onto the steering rack. Once that is secure use your 17mm wrench to reinstall the high pressure and return lines back onto the rack.
Step 13. Attach Steering Shaft to New Steering Rack

This is where those measurements you took in Step 4 are going to be supercritical. Temporarily hand tighten the inner tie rods onto the steering rack. You will need to “Center” the rack at this point so attach the steering wheel and manipulate the steering rack until it matches the inner tie rod measurements you took in Step 4. Once that is achieved disconnect the steering shaft from the rack.
Have a helper center the steering wheel in the cab, apply anti-seize on the steering shaft splines, and reattach the steering shaft to the rack. Tighten the two steering shaft bolts and the steering column bolt with a 12mm socket to 27ft/lb.
Step 14. Reassemble
At this point, you are going to need to reassemble a lot of the things that you took apart or loosened in previous steps. To make things nice and easy here is a punch list for you to use.
- AC Compressor: Reattach the AC compressor to the engine block using a 12mm socket and swivel. Torque to 18ft/lb. Using a 10mm socket reattach the AC feed lines back to the engine block and also reinstall the serpentine belt using the diagram in Step 7.
- Oil Filter Bracket: Reattach the oil filter bracket using a 12mm socket and reattach the feed lines with a 10mm socket. Install a new oil filter and don’t forget to fill up your engine with oil!
- Front Differential Carrier: Reattach the front differential carrier assembly by using a 22mm socket and 19mm wrench to tighten the front mounting bolts to 101 ft/lb.
- Inner and Outer Tie Rods: Add Loctite to the inner tie rods and using an adjustable pipe wrench tighten them onto the steering rack snug at 77 ft/lb. Next, slide the tie rod boots back on and attach using your new pipe clamps and original OEM end clamps. Install the outer tie rods using the rotations you counted in Step 3 as a reference. Tighten down the tie rod lock nut using a 19mm open wrench. Repeat on the passenger side.
- Steering Knuckle: Attach the outer tie rod with the steering knuckle using a 19mm socket and tighten to 67 ft/lb. Use a new cotter pin to finish things off.
- Front Suspension Components: Reinstall the swaybar and front suspension braces you removed in Step 2.
Step 15. Fill + Bleed Steering System

All that steering fluid you had in the system before has been drained out so you will need to add new fluid.
Using your favorite DEXIII compatible fluid (I used Mobil 1 ATF), fill the reservoir until you hit the cold MAX line. Next, without starting the engine turn the wheels lock to lock a couple of times and check the fluid level. Keep repeating this until the fluid level stays stable.
Once that is the case, start the engine and turn the wheels a few cycles. You will notice that the power steering fluid may get a little frothy. That is totally normal and just the system working out the air, it will eventually stabilize.
Step 16. Finishing Touches
At this point, you’re in the home stretch. Re-attach the wheels and get that truck off the jack stands for a test drive.
More than likely your alignment will be pretty off. Mine was toed out badly on the driver side requiring me to turn the steering wheel 15% to the right to keep straight. Luckily this was easily corrected when I took my truck to my local alignment shop. So make sure you get a front end alignment as soon as possible. Congratulations, crack a beer open you’re all done!
Did you consider upgrading the steering rack to a one from Tundra/Land Cruiser?
I’m in the process of replacing the rack on my 2014 SR5 4×4 right now. Dremel quit working halfway through the bolt cut. I decided to remove the AC compressor bolts and nut which allowed me to wrestle the bolt out of the frame and rack. The compressor slides to thw driver side but does not fall off the one stud. I then rotated the counter clockwise and just wrestled the bolt up out of the frame. Then I had to readjust the rack wrestle the bolt head so it was on the passenger side of the compressor. Boom! Got it! I suggest attempting to wrestle the bolt out before cutting it. Good luck to all who attempt!
Edit: “rotated the RACK” and “readjust the rack AND wrestle”
Also, thank you for the write-up Pete. Much appreciated.
Hey! Great write up. I am wondering…if you are taking the AC compressor off the block, why is it still in the way of that driver side bolt? Wouldn’t you be able to get enough room to get the bolt out w/ the compressor off the engine? Thanks though, really great work 🙂
Hey Pete I had a quick question for ya did you have to replace the gasket on the oil filter housing?
Sorry for the late response. I didnt replace mine either and it hasn’t been leaking at all. Just be careful when you separate the oil filter bracket from the engine block
Thanks guys
I didn’t and it hasn’t leaked. Just be careful with the gasket and make sure there’s nothing on it and the housing when reassembling
just want to say that’s a nice e90 m3 you got there
Haha thanks man. It’s actually a pretty rare configuration: Competition Package, Cloth Seats, 6MT and no sunroof. I use it as my track car and grocery getter!
yeah that combo is pretty rare! i really want one myself LOL
Thanks for the write-up, Pete! I’ll be performing this repair next week! I do have KDSS so it will be interesting to see if that helps or further hinders the removal. Cheers
So I replaced steering rack today and was able to skip, somehow, the removal of the AC compressor. I actually tried to remove the compressor but could not for the life of me get to the upper RH bolt (the one near the alternator behind the lines to the starter), just couldn’t get enough bite on the bolt! So I went back to wrestling out the rack using a prybar and carefully prying between the rack and the lower frame which pushed the AC line up quite a bit (I did loosen the AC line bracket) and it eventually popped out! Going back in was way easier. Got the fluids back in and idled the vehicle for a bit tonight, will check levels and button up things tomorrow morning. Also KDSS wasn’t an issue, just removed the front sway. I know KDSS is a royal pain to get back on though!
Awesome, congrats! Glad you got it out easily. To confirm you do not need to remove the AC compressor you just need to loosen it. This gives you the ability to move the AC lines a bit more making it pretty easy to slide the rack in and out. I wrestled with a pry bar for a long time trying to get the rack out and didn’t want to damage things so that is why I decided to loosen the compressor. It made things super easy after I did that.
That’s correct, sorry I didn’t word my response more accurately! Thanks for the awesome write-up!
It shouldn’t be terribly different, just a little more complex to get that swaybar out of the way. Definitely leave a comment on your experiences after so we can help other KDSS folks!