
Running Baja Designs S2 Chase Lights on 4Runners Roof or Bumper – An Overview and Review
When it comes to lighting Baja Designs is one of the most respected names in the market, and it shouldn’t be a surprise their newly released S2’s are living up to the Baja standard. If you are looking to light up a specific area or fit a powerful light in a small spot, the Baja Designs S2’s are likely going to be your answer.
Who is Baja Designs?
If you haven’t heard of Baja Designs by now, which is highly unlikely as just about everyone in the off-road and overland game run their lights, Baja Designs is an off-road lighting company based out of California and are known around the world for their lighting applications.
Founded in 1992, they have been producing some of the baddest lights for off-road racing, and just about all trophy trucks run them.
From ATV’s, Baja Racing, and the weekend warrior, Baja Designs has a light for your need.
Baja Designs S2 (Different Lens Types)

The S2 produced by Baja Designs comes in a tiny 3”x2” housing and produces between 1,130-2,450 lumens, depending on whether you purchase the Sport or Pro. Ultimately this allows you to mount the lights practically anywhere you see fit. Tight sections of bumpers, sides of roof rack gaps, motorcycles, etc.
Like all of their lights, you have the options of white, amber, red, blue, and green colors, flush mounts, and flood, spot, and wide cornering beam patterns.
Lighting Zones
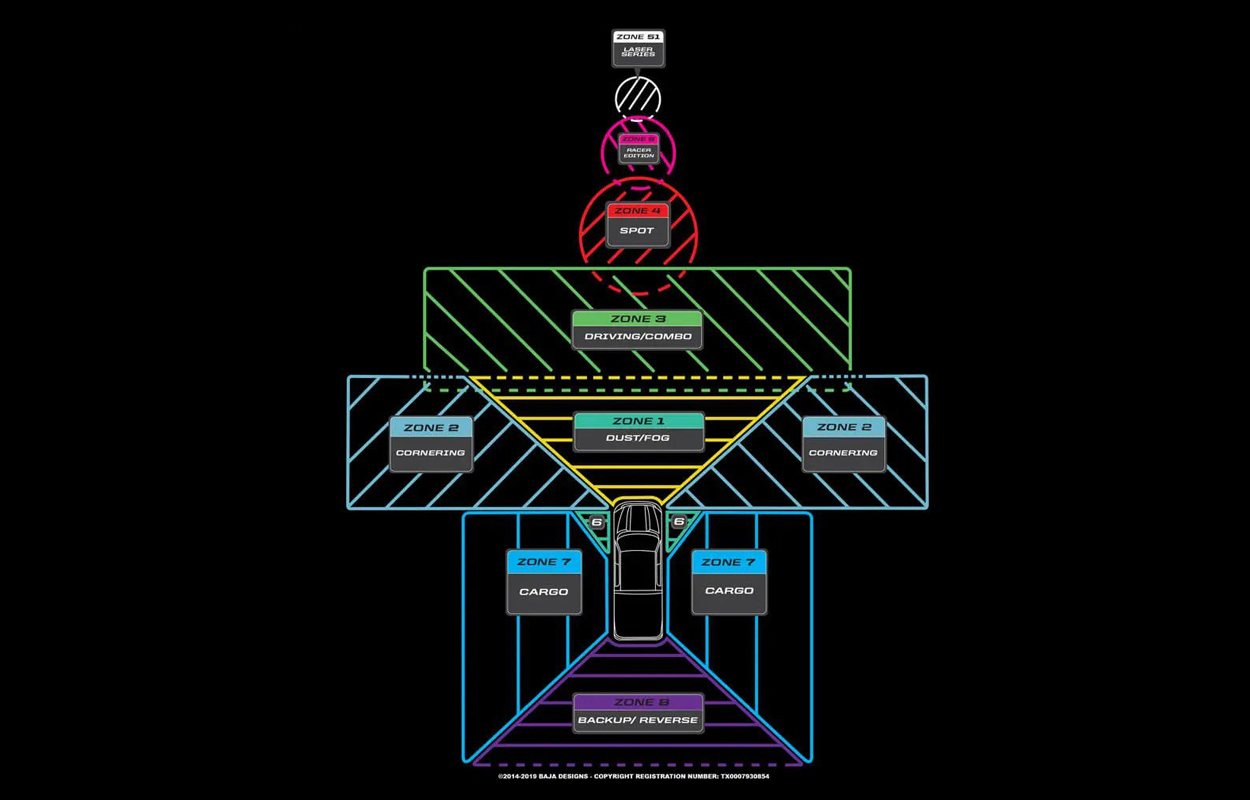
Above you will see their different beam pattern lens options. It may be confusing if you are not familiar with their line of lights so I have drafted the patterns right next to each other.
Different Patterns:
- Wide Corning: Wide and low
- Driving/Combo: Forward-facing driving light
- Work/Scene: Flood pattern – smooth and round
- Spot: Far reaching tight pattern
Pro or Sport?
- Universal Sport: Check Price
- Universal Pro: Check Price
- Flush Mount Sport: Check Price
- Flush Mount Pro: Check Price
For chase lights, the choice is up to you but for the most part, the sports in either wide cornering or driving/combo lens are a great choice. The Sports are plenty of light for secondary reverse lights and more than enough light output for chase light to signal someone behind you.
Decision On S2

I had been looking for a light to run as not only chase lights, but also as a reverse light. This is where the Baja S2’s came into play. While a lot of guys run a pod, I felt that was going to be overkill for what I needed. Not to mention fitting a Squadron in my OEM rear bumper was going to be a little more challenging, especially if I ever went a rear bumper where I needed to trim. That would leave me with a hole still in the plastic closer to the tail light; something I obviously didn’t want.
Due to their size, I knew I could not only run it in the lower section of the bumper to light up everything behind me, but it wouldn’t cause any issues down the road with a rear bumper. Additionally, with my roof rack, I would be able to mount them horizontally or vertically and wouldn’t have any issues, as both ways they would sit flush.
Ultimately I decided to go with a pair of Baja Designs S2 Pro’s for the rear bumper, as I wanted the most throw there for when backing up on the trail or setting up camp, to where they wouldn’t be blinding in the eyes. For the roof rack I went with Baja Designs S2 Sports as they would be used for chase lights, as well as an additional light for setting up camp if necessary.
Installation

Installing the S2 lights is like any light from Baja. You can either run their wiring harnesses that come with everything or run the wiring yourself directly from the connection on the light. Because I’m not the best wire person, I normally go with the wiring harnesses.
While I had the S2 Pro’s in the bumper installed awhile ago by my shop, the process was fairly simple. Use a piece of sticky note paper to measure how you want the light to sit, and keep it parallel with the top molding of the lower bumper. Screw it into the bumper (the bumper is thick enough to hold it), and run the wires along the frame to the battery, cabin, or sPod style setup. Unfortunately, I didn’t photograph the steps, but that is what was done.
For the roof rack, the process is a little more complicated, but it can be done within an hour or two depending on your skill level.
Wiring Chase Lights from Roof Rack Through D-Pillar

The first thing you’re going to want to do is set your lights up.
- Do you want them vertical?
- Do you want them horizontal?
- Do you want them at the widest parts, the center parts?
This is all up to you. Maybe you are only running an S1, or maybe you are running Squadrons, regardless this step will work.
The main thing to keep in mind is you want the wire to enter the cabin via the left side of the truck. It can be done on the right side, but it’s a little more complicated to do.
You want to run the wire from the roof rack, following the weather stripping (it does not need to go under this), down through the gap between the hatch (where the wiper blade is) and the body itself. The easiest way to spot this is by opening and closing the hatch and spotting the gap that is between an angled section. That is where you want to run the wire.
Any closer to the outside of the vehicle you risk pinching the wires and causing issues over time.
Channeling the Wire Down D Pillar

This is where the hardest part of the install process comes in. You need to run the wire through a channel, which comes out above the headliner. A nice tip here is to use some sort of wire lubricant to help it glide easier. If that doesn’t work, using a long screwdriver, or a wire pulling tool (fisher tape) to get it through can help.
You may also want to go ahead and put a slice in the outer circular seal as that will be necessary to put the seal back in place. Don’t worry, it doesn’t need to be done at this step as you can’t forget it. When trying to reinstall it you’ll remember then why it isn’t going back in.
Go ahead and pop off the three clamps in the headliner at the back of the 4Runner. A simple flat head or plastic pry tool will work fine here. The wire will eventually come out through here.
Once your wire is underneath and in-between the gap made between the body and hatch, you will see a rubber seal on the left side of the hatch. You want to pop that out, as well as the longer hose looking tube to the right of it (there are two seals for it). You will run the wire into the circular rubber seal hole, and then out the other hole which the rubber hose connects to.
This is where you may need to run the screwdriver and lubricant as it’s a tight fit, and the wires tend to get stuck on each other. While I have seen it done, running the wiring harness with its heat shrink or loom may not be possible. Here I chose to run just standard gauge wire to help make the most of the room.
Once you spot the wire be sure to pull it through entirely, as this is the last step for bringing it into the cabin. I always leave a little slack for opening and closing the hatch, as well as if any major body flexing occurs. Remember this is going to be running down the entire vehicle.
Run Wire Along the Floor To Firewall

Once you have all the wire through and enough slack in place, you will begin to run it along the left side of the vehicle. There are a few ways to do this, I chose to run it directly down the d pillar. It can be done without popping it out, but it’s much easier to see what you are doing with it off, or at least somewhat moved out.
From there I ran it through the rear taillight and jack stand access spots, and underneath the wheel well cubby. You will need to pop off the top of the plastic cubby to channel it down to the wiring channel which leads to the front of the vehicle.
This could be the second hardest part, as the channel from the wheel well to the door isn’t exactly massive.
Pro-tip: If you have a buddy helping you as I did (thanks Nate), or a wire puller, use them here.
From there follow the channel that goes at the bottom of the door frame. You just need to pull up the plastic molding and that will expose the entire channel. There are already a few wires running through it so you shouldn’t be confused.
Power Up

From here is where you need to decide how you are going to power the light. Whether you are going directly to the battery and setting up a switch inside, or are using a setup such as an sPod or switch-pros. You will want to follow the directions for your application.
That’s it, you are done and are free to use your lights however you want. Chase lights, reverse lights, you name it.
Don’t forget to put everything back in place. The headliner, but more importantly the rubber seals in back to prevent any possible water hitting the wiring.
Conclusion

The S2’s are a powerful light, whether you get them in the Pro or Sport models.
They are great as a backup light as well as a chase light. On one of the more popular dusty trails here in California, one of the guys behind me told me if it weren’t for my lights he would have never seen me nor known where to go.
That’s how good and effective they are. I’ve used them numerous times since then, and backing up on the trail, or making sure to be seen in extremely foggy weather in the mountains, the Baja S2’s are a lifesaver, literally.
If you are looking for a lot of punch from a light that comes in a super small size, these are the ones for you.
Questions or Comments, Leave them below!
What did you do after running the wires along the door? Did you go through the firewall? What if there are already too many wires going through the firewall?
Is there a step by step installation write up for the bumper lights? This MOD has been on my to do list, but I don’t know exactly where to begin.
this is rad – I am leaning towards the bumper install – switched. Nice work.
Just bought a set of S2’s for my new bumper. Awesome review!