
Metal Oil Filter Housing Upgrade and Motivx Tools Oil Filter Wrench
Common sense dictates that metal is stronger than plastic, and I’m not a fan of plastic in an important part, like the oil filter housing in my 5th gen 4Runner.
Thankfully, upgrading to a metal oil filter housing using OEM Toyota parts can be done without a lot of effort or expense.
Another chunk of metal that this project involves is an oil filter wrench from Motivx Tools, which can be used for future, DIY oil and filter changes.
Items for this project
- Toyota oil filter housing (part # 15620-31060) – Check today’s price
- Toyota 04152-YZZA5 oil filter element (or aftermarket equivalent) – Check today’s price
- Motivx Tools MX2320 oil filter wrench – Check today’s price
Tools required for installation
- 3/8” drive ratchet
- 4-6 inch 3/8” drive socket extension
- Oil drain pan:
- 27 mm socket (optional)
- 1/2″ drive ratchet (optional)
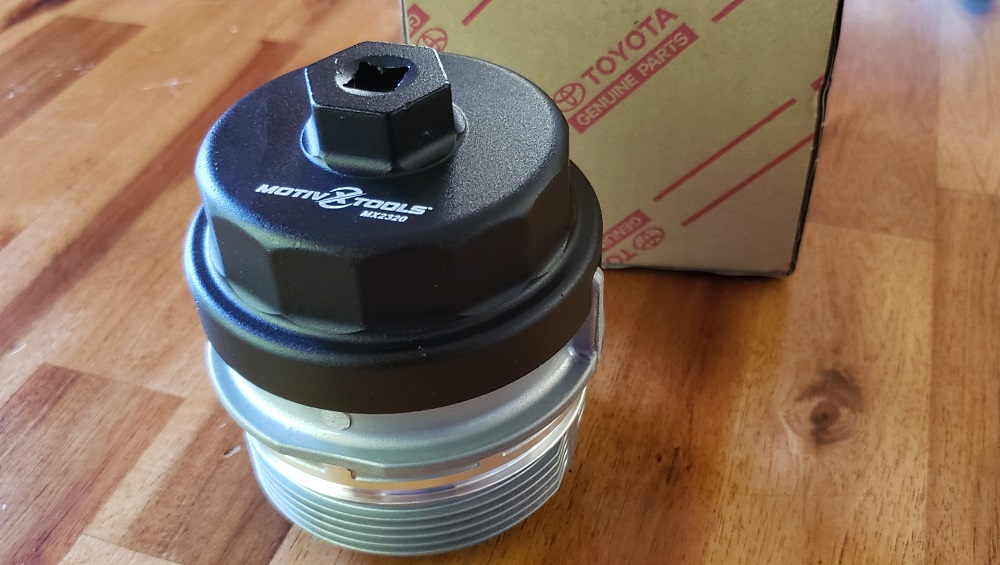
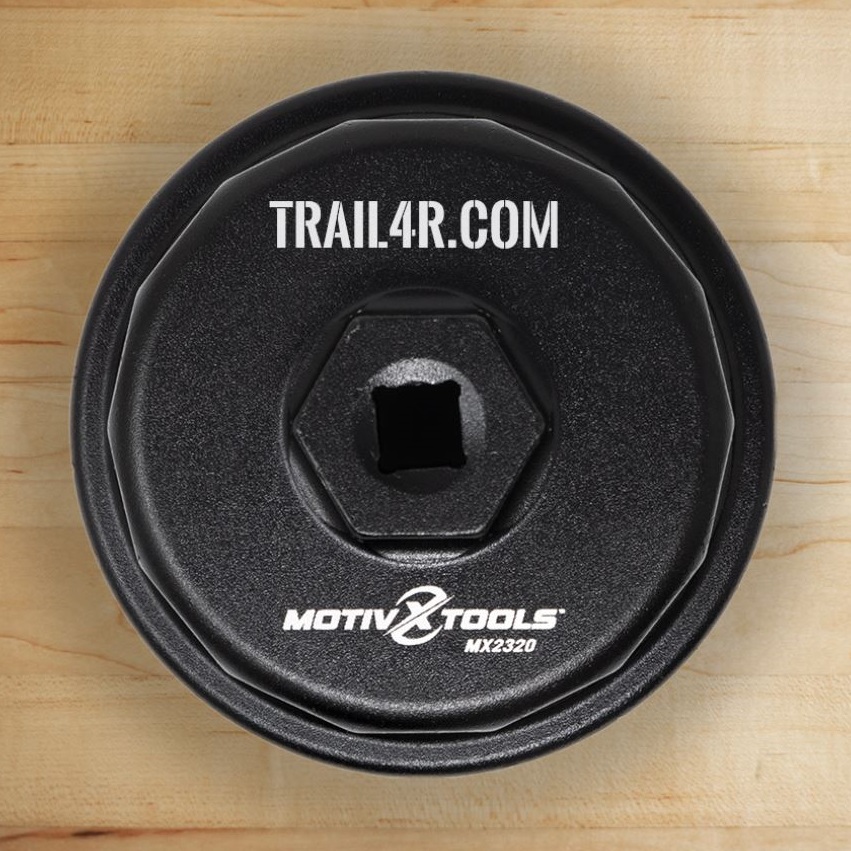
Motivx Tools Oil Filter Wrench
The Motivx Tools oil filter wrench fits all Toyota, Lexus, and Scion vehicles equipped with 2.5L, 3.5L, 4.0L, 4.6L, and 5.7L engines that use the newer cartridge-style oil filter system.
It is made of forged 6061 T5 aluminum, and won’t crack or flex like cast or plastic filter wrenches made by other manufacturers.
The 14 flutes and indexing tabs on the wrench securely grip the base of the oil filter housing. In addition, the design and finish allow for easy removal of the oil filter housing from the tool, with no sticking or damage.


When ordered directly from Motivx Tools, the oil filter wrench can be custom laser engraved at no additional charge. This is great for people who may have multiple oil filter wrenches for different vehicles, or work in an environment where tools are lent/borrowed.
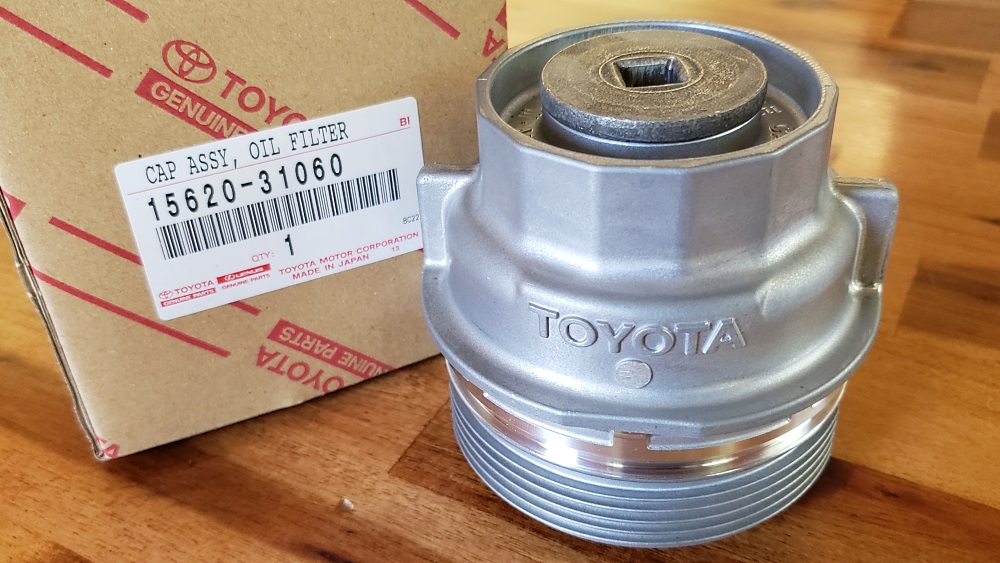
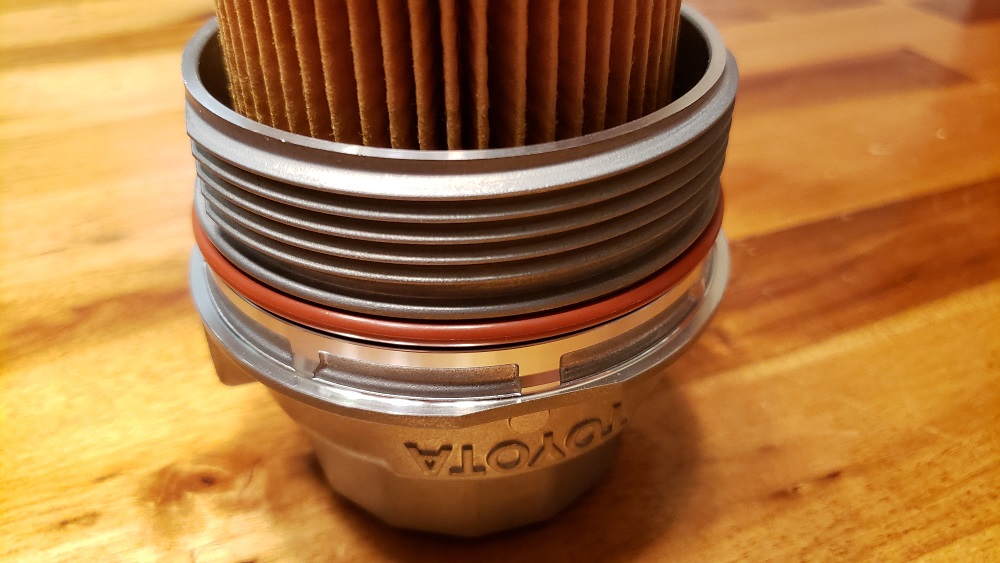
Metal Toyota Oil Filter Housing & Cap
Genuine Toyota part 15620-31060 is a metal replacement for the plastic version of similar parts that installed our 4Runners at the factory.
With the metal oil filter housing and cap, there is no concern of cracked plastic or longevity.
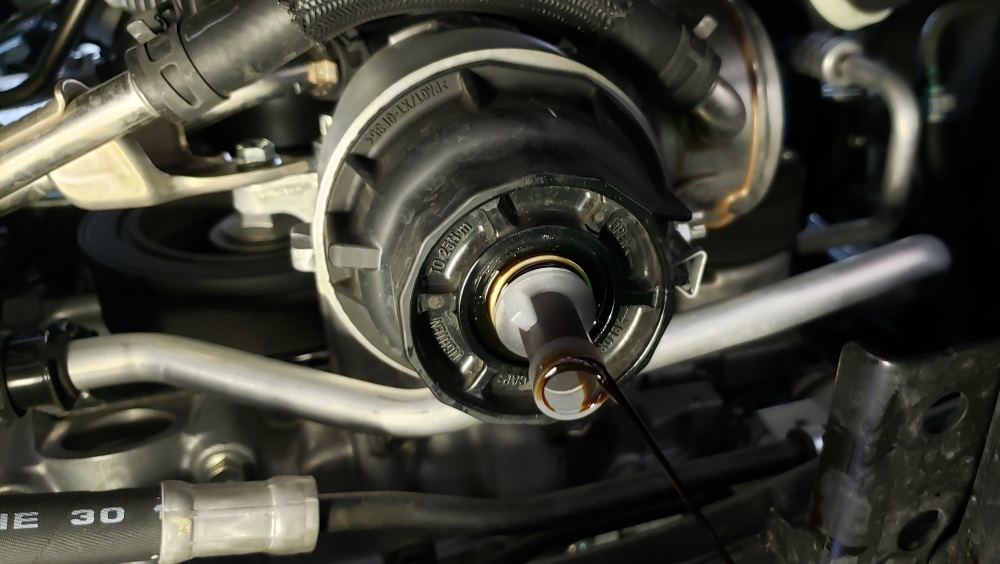
Remove the original, plastic oil filter housing
- After any skid plates have been removed to allow access to the oil filter housing, use a ratchet and 3/8” drive socket extension to remove the cap from the bottom of the filter housing.
- This is done by inserting the socket extension into the cap, and turning the ratchet counter clockwise.
- Set the metal cap aside, as it will be installed with the new metal oil filter housing in a later step.
- Place the oil drain pan under the filter housing, and thread the plastic nipple, that was included with the replacement oil filter, into the bottom of the oil filter housing.
- Allow oil from the filter housing to drain, and then remove the plastic nipple.

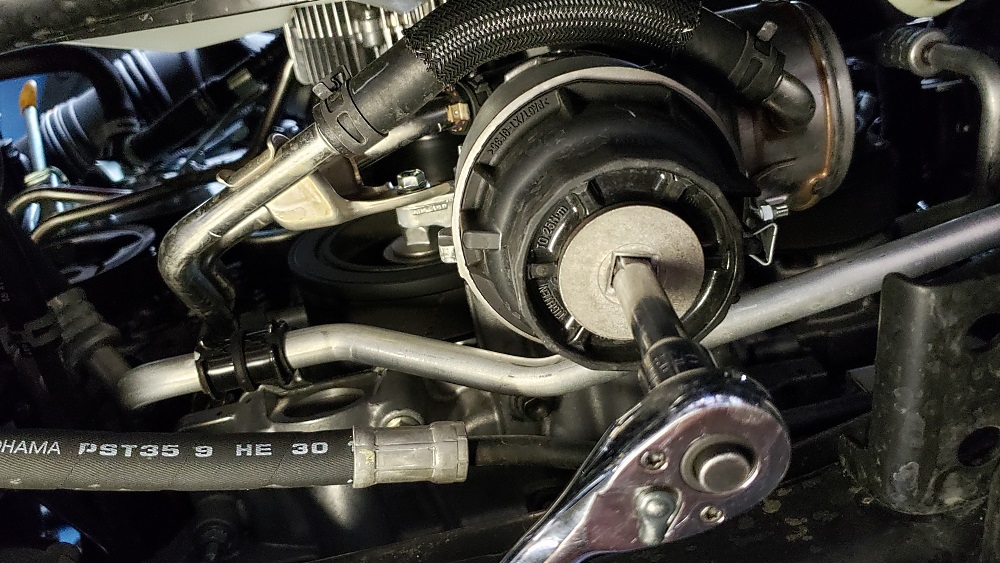
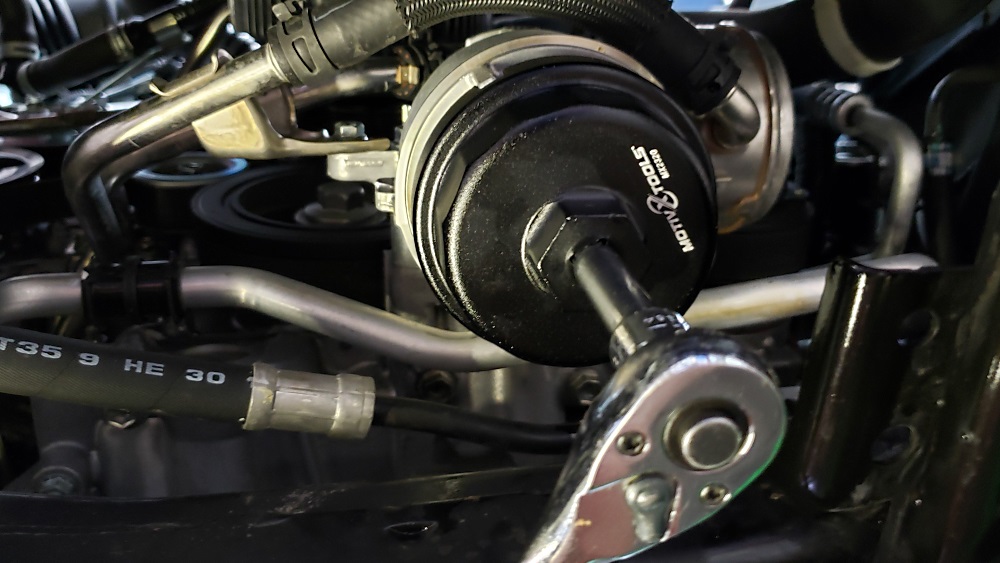
- Put the Motivx Tool oil filter wrench onto the bottom of the oil filter housing. The center slot/tabs on the side of the oil filter wrench should be aligned over the “wings” on the filter housing.
- Insert the 3/8″ drive socket extension into the square opening in the bottom of the filter wrench, and use a ratchet to remove the oil filter housing by turning it counter clockwise (Optional: Use a 1/2″ drive ratchet and 27mm socket to turn the filter wrench). Additional oil will drain from the filter housing.
Swap the perforated center tube between housings
- Genuine Toyota part 15620-31060 has a perforated center tube, which is shorter than the one which is installed in the plastic oil filter housing.

- The longer tube must be moved to the metal oil filter housing. To do this, apply sideways pressure near the top of the tube, while pushing in at the bottom. This will allow the tabs on the bottom of the tube to be removed from the housing, and needs to be done on both housings.
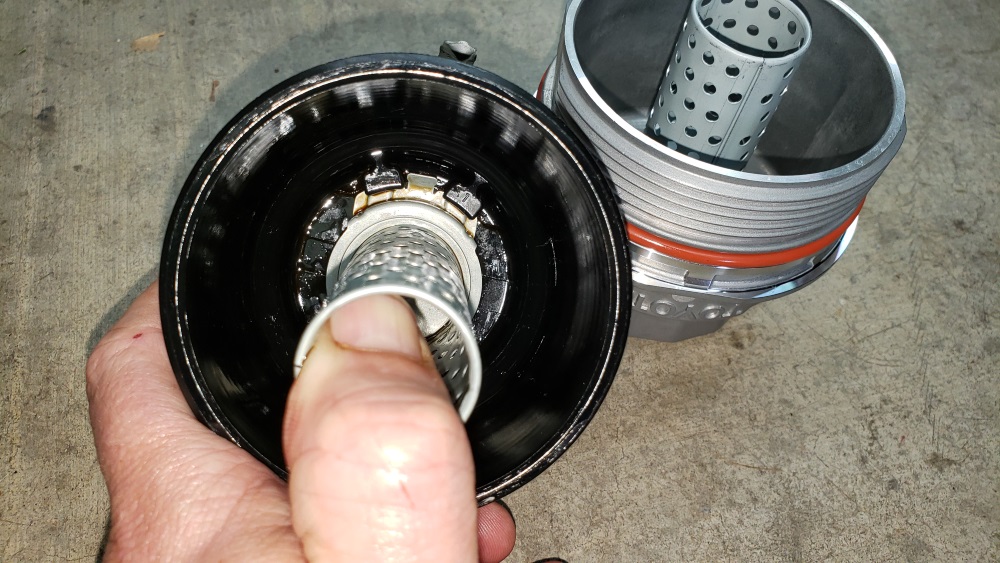

- To reinstall the tube, first insert the bottom plate, with the domed side facing up. Put the spring inside the tube. Insert the tube into the housing at an angle, placing the tabs of it under the “feet” inside the housing. Push in at the bottom of the tube, while applying pressure at the top. Once installed, the tube should have spring tension on it. Press down on it a few times to ensure that it moves freely, and does not come out of the housing.

Install the new, metal oil filter housing
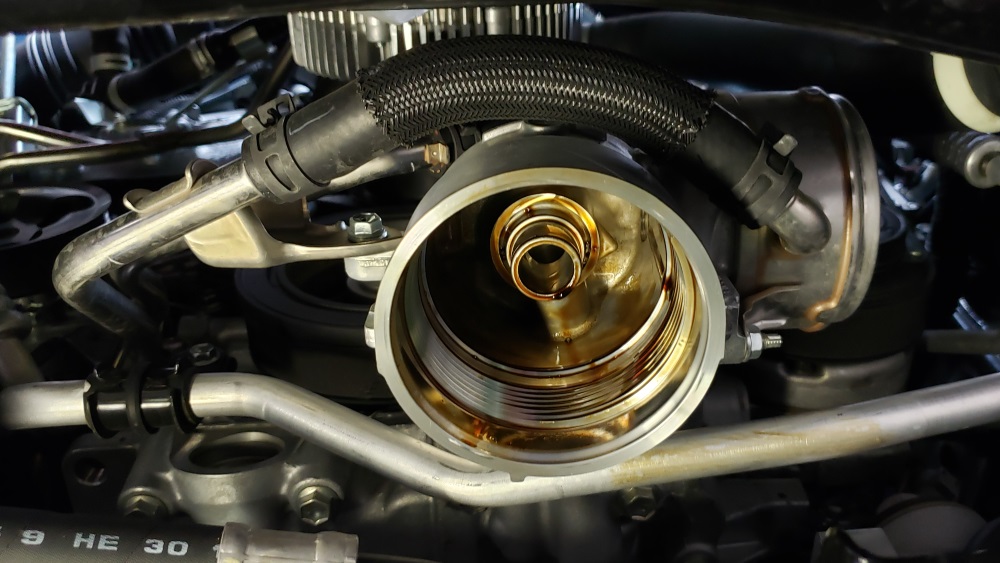
- Place the large O-ring that was included with the replacement oil filter, into the grove near the threads at the top of the oil filter canister. Coat the O-ring with a little engine oil for lubrication.
- Put the replacement oil filter over the center perforated tube in the middle of the filter housing. The longer tube installed in the previous step extend towards the end of the filter. The photo below shows a Mobil 1 M1C-256A Extended Performance oil filter, with the longer tube installed.

- Thread the oil filter housing into the same location that the plastic version was removed from. Hand tighten initially, to ensure that it is not cross threaded.
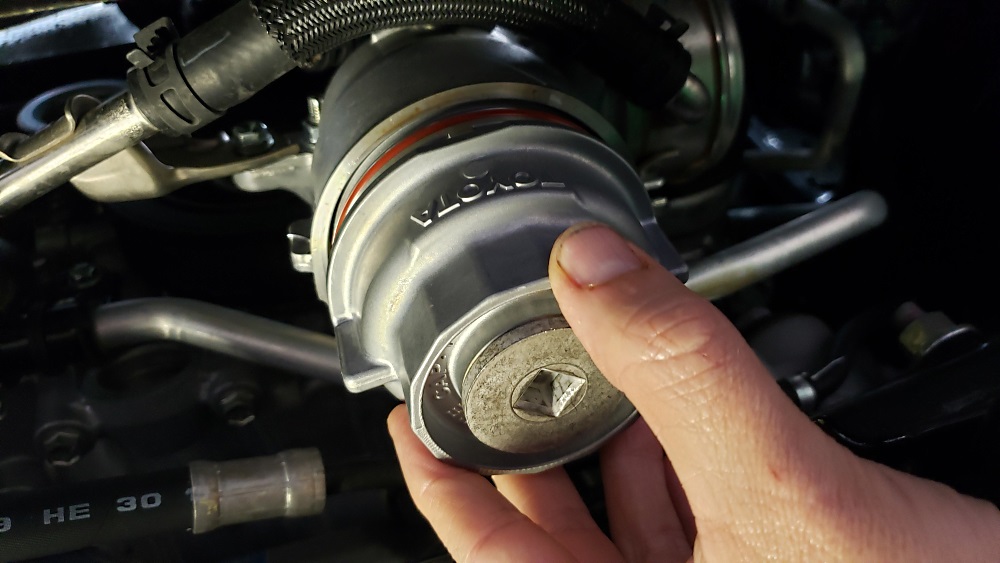
- Put the Motivx Tool oil filter wrench onto the bottom of the oil filter housing. The center slot/tabs on the side of the oil filter wrench should be aligned over the “wings” on the filter housing.
- Insert the 3/8″ drive socket extension into the square opening in the bottom of the filter wrench, and use a ratchet to install the oil filter housing by turning it clockwise (Optional: Use a 1/2″ drive ratchet and 27mm socket to turn the filter wrench). Tighten to 18 foot pounds.
- Put the small O-ring that was included with the replacement oil filter, into the bottom of the oil filter base. Coat the O-ring with a little engine oil for lubrication.
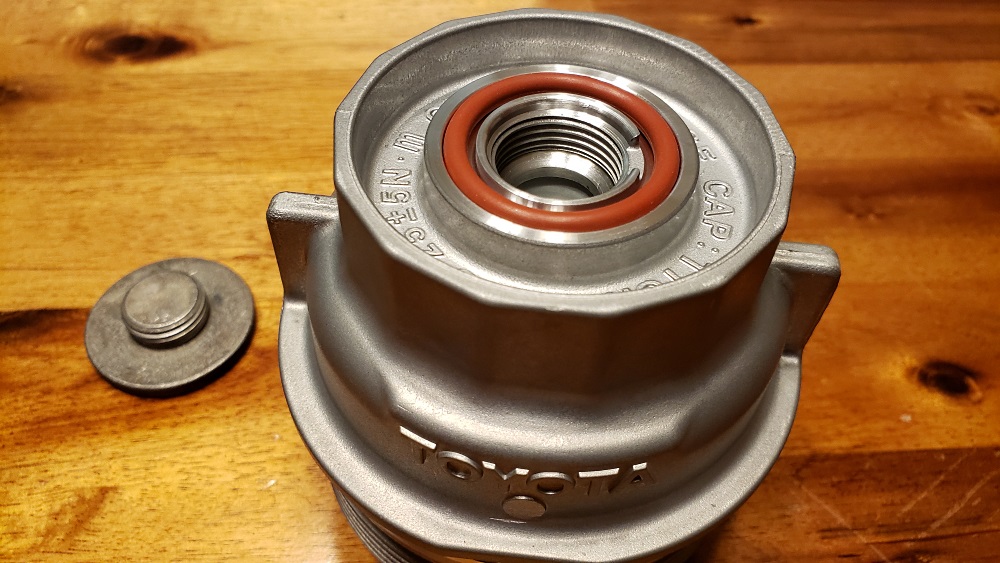
- Finger tighten the oil cap, and then use a ratchet and 3/8” drive socket extension to install it into the oil filter housing by turning it clockwise. Tighten to 9 foot-pounds.
- Start the vehicle and check for leaks.
- Reinstall any skid plates that were previously removed.
I must say, this is truly an interesting read. Just tried my first oil change (2023 Taco) after the dealer’s “free” 10k oil change. I’ve done 3 previous to the dealer’s undesired sex act with me. I don’t put a lot of miles on the truck. Dealer mech (I use the term loosely) reused the oil drain plug washer that I had on there and I have been completely unsuccessful removing the filter housing. Was wondering if there was any videos on how to remove and replace the filter housing bracket as I expect absolutely no love from Toyota on this and I wouldn’t sent V. Putin to that damn dealership
the first oil change I got was at the dealership and they overtightened the plastic housing. The plastic was basically welded onto the metal upper housing. I guarantee some 19 year old tech hit it with an impact wrench. The plastic broke into pieces when I tried to remove it and change the oil myself. I had to pair the pieces off with a chisel. Now when I get an oil change or do it myself, it leaks oil. I have to tighten it WAY past 18 ft/lbs. Now it won’t stop leaking at all. Is it possible to replace the upper housing? Anyone ever do that? I think the upper housing has been abused at this point. This is beyond frustrating. The 4runner is a rock solid vehicle but this part is TERRIBLY designed. Seems like this happens all the time.
Great article. My old plastic housing got cracked when I was trying to loosen the filter after Thor tightened it on at the stealership for my last ‘free’ maintenance.
That part number worked fine on a 2020 TRD ORP and I appreciate the tip to swap the middle tubes. Attaching the tube again was a little tricker than getting the old one removed. A flathead screwdriver did the trick to get the last finicky tab in place.
Any negatives to changing to the metal housing? Is there a risk for over tightening or stripping the threads?
Dealer and Lube place lost both my front skid pan bolts. Overtightened the drain plug. I was unable to get it off. So… I removed the whole housing and was doused with oil. So much oil was in base of my skid plate it was gross. I could tell they just popped off the filter and let the skidplate hang there while oil drained all over it. Had to degreaae entire thing. DIY from here on. Ordered the new filter too. I would use the 3/8 drive vs the 27mm wrench too for the housing removal. Much easier
i bought this upgrade, and it does not fit my 2013 4Runner SR5. Do you have any idea what the part number is for the 2013?? Thank you
My last trip to Toyota was a disaster . They call me, can’t get bolts out off skid plate. Well you put them on I said. Salt corrosion they say . I have my doubts. They break them loose I go home. 1/2 quart overfilled I ordered the metal canister a new filter and a Wrench from your most helpful list. Aluminum spacers at front of skid plate mushroomed . Almost could not get filter off. Had to be 70-80 ftlbs. Drain nut welded into canister. I had all the stuff previously ordered from your article . I will be doing my own oil changes from here on . Changing the tube was sketchy but it did work as stated. Thanks for the info!
Hmmmm any idea if this will fit my GX460 also?
Great article and instructions. Planning on upgrading the oil housing. I recently bought a new 2021 4runner SR5 premium 4WD. Doing my first oil change at 5K and then let the dealer will do the free oil changes at 10K. & 20K. Will swapping out the plastic housing to the metal housing void any of Toyota’s warranty (36K and 60K)? Anybody have any experience with warranty claim? Should I wait till after 25k when the dealer free maintenance (ToyotaCare) is done? I’ll be changing my own oil anyways after the dealer free changes. Thoughts on the warranty?
It just escapes me how Toyota having knowledge of an oem metal oil filter housing for the 5th Gen 4R doesn’t offer it for a vehicle that is designed to go off-road. I still do my oil changes at the dealer in order to have a record of maintenance in case they decide to void my warranty for whatever reason.
😂 Dude u have a skid plate protecting your engine. If u break the oil filter housing off-roading u did something majorly stupid. These things don’t break from off-roading. They break because plastic becomes brittle over time. Most people crack them trying to remove them or tighten them which while an issue eventually it doesn’t really effect the off road worthiness of the 5g 4runner in the slightest.
I got a Corolla with this type filter about 2 years ago and couldn’t get the filter off for one oil change so left it on for this next change and a better plan. (FIY for anyone else – I got it off by using this exact filter wrench and hitting the ratchet gently with a rubber hammer.)
I found this blog article because I was searching the net on something you (and ONLY YOU) covered. The lube tech guy who changed this for the previous owner left the tube out and bent the tabs on the spring clip in such a way it fell out and I had no idea what to do with it. I couldn’t find this info anywhere and started to panic. THIS was the only explanation that allowed me to figure out what went where and how to get it back in there. Now I’m off to get a new canister with a tube.
I just wanted to say THANK YOU for that!!
I found a metal clip on the plastic piece, do I have to move that to the metal cartridge? I did not and Im worried the oilfilter may come loose.
So the part number for the metal filter housing says its for Avalon when running it through my favorite online genuine toyota parts store. Just curious how you discovered this fit on the 5th gen? Its a no brainer in my opinion and I will be changing my housing on my next oil change. I wish I came across this install write up sooner.
Hey Derek,
The same filter housing fits a number of different Toyota models. I found a reference/cross reference to the metal housing some time ago, and learned that it works with the 4Runner as well, *provided* that the original taller center column piece is swapped over, as I mentioned in the article. It is VERY important to make this change.
Stupid question. Do we need to touch the drain plug Gasket or change it at all.
Hey Marty. If you’re draining your oil at the same time as doing this filter canister mod, it’s a good idea to take a look at the “crush washer” that goes with the drain plug, to make sure it is in good shape.
i think you have a mistake when thightening the oil filter housing bc earlier you state 18 foot pounds and later after you mentioned to finger thight the oil cap (on the same paragraph) you also said that the oil filter housing should be torqued @ 9 lbs or so and that is disrespectful for your audience please pay attention to your writing. thanks
Thanks De Carlo. The filter housing is torqued to 18 foot pounds, and cap that screws into it after is torqued to 9 foot pounds. I’ve updated the article to clarify this.
if doing this mod and any crazy little / big thing happened to the engine while in warranty, could Toyota void the warranty.
Bill, like other modifications, if the installation of the filter canister can be pinpointed as the cause or contributing factor of an engine issue, a dealer/Toyota could refuse to cover related repairs under warranty.
some thing to think about
Thank you! My normal mechanic told me that my oil filter housing was looking brittle. I can’t wait to have peice of mind again.
I just did this after I broke one of the tabs off of my plastic housing which was way over-tightened. The instructions given here for swapping the long tube over are a little misleading. There are two opposing metal tabs on the bottom of the tube assembly, each constrained by a pair of features molded into the housing. These tabs need to be pried up with a screwdriver so they are parallel to the tube. The tube assembly can then be pushed straight in and twisted to be removed. Installation into the new housing is the reverse, then you can push the tabs back down with a screwdriver to lock the tube assembly into the housing.
I have a 17 Tacoma Pro and finished my free dealer oil changes. Today was my first one and yup, the tech who did my last change over tightened the casing and both tabs broke off. I’m thinking to epoxy the oreilly oil wrench to the plastic casing to break it free now. Does anyone know if this metal casing fits the 3rd Gen Tacoma too? I assume so since I saw Avalon and Corolla memtioned on this thread too. Can’t believe how cheap Toyota can be to not using a metal casing here. Then again, the Toyota tech would’ve be able to get 150 ft lbs on getting it torqued down instead of 90 with the cheap plastic shit.
Kevin, although I’d read about others doing this, I didn’t have to pry/bend any tabs, or use any tools to remove the center tube. I swapped tubes just like I described in the article. Pushing backwards and sort of an an angle allows the tabs to clear the housing. One of the photos in the article illustrates this.
I thought this was bs until I managed to figure it out myself – the whole tube has to be moved to one side and down to disengage one set of the tabs, then the whole thing just comes out!
Huh, interesting. I tried every which way to get that tube out without bending the tabs, including following your instructions. Must just be manufacturing variations that account for the differences. My apologies, I had assumed you were just glossing over the need to bend the tabs in your writeup.
No need for apologies, Kevin – good knowledge share/community here. I pushed in at the bottom a little too. The tube has some flex in it, and that along with the sort of angled push/pull action allowed me to easily remove and install the tubes.
Is the oil filter element the same part number for both housings?
Hi David. The same filter element is used with the plastic or metal oil filter housing.
Thanks!
Great write up, thanks. One Q: Why do you have to move the longer tube? Why would Toyota put in the wrong part?
Thanks! Toyota has three different tube lengths that I’ve seen, and the same metal filter housing is used on multiple vehicles/engines.