
If you’ve grown bored of the OEM head unit in the 5th Gen 4 Runner, or are just longing for a bigger screen, smaller knobs, better sound, and pretty much full Android tablet functionality in your dash, the T10 from Cartrimhome might be for you. The install is relatively easy, though if you have an extreme phobia of breaking plastic parts, or you’re not a fan of spaghetti wiring harnesses, you might want to bribe a friend to help with the install. A delicious beverage usually does the trick.
2026 Update: There is now a V4 head unit.
Table Of Contents
Introducing the T10 Head Unit


The T9 has been around for a while, and the T10 is a definite improvement. Not just in the feature department, but it’s also an easier install. You’ll notice right out of the box that the backside electronics of the T10 are much slimmer than the T9, so it’s lighter to handle, and all the wires are much easier to shove back inside the console when everything is all wired up.
In this article, I’ll briefly cover how to remove the OEM unit, wire up the T10, swap over the plastic parts from the OEM, and install the T10 into your 5th Gen 4Runner. I’m using an iPhone XS (Soon to have a 13) to connect to the Android head unit, and also as a hotspot. I am NOT using a SIM. If you intend to use a SIM, I’ll include installation instructions and a few notes at the end of this article.
Installation

My OEM unit, with a scratched screen 🙁
Tools & Materials
- Philips screwdrivers of varied sizes, or a small screwdriver kit
- 10mm socket and driver
- Prying tools provided in the T10 kit
- Towel or soft object to cover the gear shift
OPTIONAL: SWAPPING THE FACE PLATE
Most likely, you can skip to STAGE 1. I originally received a T10 with a silver faceplate, and the interior of my 4Runner is black, so I asked for a black faceplate and received one shortly thereafter. The swap wasn’t incredibly difficult, but I used my lifeline and called my friend Mark Mollat, aka @ofrd_adv, with a few questions. He also has a video on his YouTube channel that walks you through the swap in case you break the screen, since that’s most often the reason people need to swap out the faceplate.
Luckily, I managed to swap without damaging the screen. The glass screen is held to the plastic faceplate with adhesive tape, and removing it was a bit sticky. But the hardest part of the swap was dealing with all the little clips and ribbon wires that I hadn’t worked with before. Once I learned how to unclip and clip those (Thanks, Mark!), the swap was relatively easy. If you have to do this swap, make sure you clean the screen and glass cover inside perfectly before putting it back together. I had mine fully assembled and realized I’d left a wealth of forensic evidence sandwiched inside, so I had to go through the assembly process twice.
Step 1. Remove the Plastic Side Trim Pieces


Sitting inside the rig, the first thing you’ll need to do is remove the plastic side trim pieces. You can start with either one. Hold it with both hands, pinching the top and bottom. Wiggle it back and forth, left to right, while pulling out until it comes off. Then remove the other side.
Step 2. Remove the Air Control Knob Assembly

Hold on to both sides. Pull one side out and away until it comes out, then do the same on the other side.
Step 3. Remove the Air Control Knob Wiring

Squeeze the tabs on the sides of the white plastic insert, then push it through the hole.

Squeeze the tab on the plug and remove it to free the control assembly. Set it aside.
Step 4. Remove the four 10 mm bolts

Remove the four bolts from the silver metal tabs with a 10mm socket. These will not be used with the T10, so I just bolted them back into place after the install for safekeeping.
Step 5. Pull Out the Oem Head Unit

Place a towel or something soft over the shifter knob. You’ll see why shortly. Gently wiggle the head unit and faceplate assembly, then pull them out. The six tabs beneath will release. Hold on tight and don’t drop the unit onto the shifter knob.
Step 6. Disconnect All Wiring From the Oem Head Unit

Begin removing all of the plugs. There are small buttons/tabs on each that will push in and release the plugs. Be careful not to break them. Even though you have a towel between the screen and disaster, don’t put weight on the unit. I scuffed my OEM screen (see above) while doing another install. Also, watch the metal brackets on the bottom of the head unit, as they will scratch other parts of your console if they rub while you are removing the plugs. It helps to have someone supporting the head unit while working in the truck.

Step 7. Remove Plastic Parts and Vents

Remove the head unit from the vehicle and take it to a flat workspace. To do the T10 swap, you’ll need to remove the vents, the plastic around the air-vent direction adjusters, the hazard switch, and the top panel from the OEM, then install them on the T10. Start by removing the two screws holding the plastic top panel: one on the left and one on the right.
To remove the vents, use the plastic tools provided or a small screwdriver to gently pry the tabs apart from one vent at a time. They will un-click from the faceplate. Take your time and don’t break the tabs. Unscrew the small plastic trim pieces from around the air volume dials. Remove them and put them aside for reinstalling into the new faceplate.
Step 8. Remove the Hazard Wiring Harness

Hazard assembly is still attached to the OEM unit. Plug detached from the metal plate.
Gently squeeze the tabs together on the white plastic bracket, pry it away from the metal, and remove it from the head unit. Squeeze the prongs of the other attachment together and pull it out. Press the tabs on the hazard switch, then pull it out of the faceplate.

Hazard light assembly detached and ready to remove from the OEM unit.

OEM Head Unit with all necessary plastic parts and hazard switch assembly removed.
Step 9. Prepare to Wire the T10 Head Unit

This can be done on a table or workbench, then moved into the 4Runner for installation. Cartrimhome provides all the wiring and harnesses you need to do the job, and then some. I opted not to use a few based on our desired setup. And some were just not necessary. See the diagrams below for a layout of everything provided.

First Box (Contents):
- USB – 4 pin
- USB – 6 pin (Same wiring and functionality as the 4 pin)
- USB cable that connects your OEM USB to the head unit
- SIM card harness with RCA plugs and SIM Tray
- Backup Camera harness
- Main Harness
- Optional microphone – Did not install
- GPS
- Antenna for SIM – Use this if you want to use a SIM card. If you will be using your phone as a hotspot, you can leave it out.
- RCA connectors for subs, amps, etc. – Did not install
- CAN Bus device
- Wi-Fi Antenna: Not installed; T10 already has one installed.
Second Box (Contents):
- A set of prying tools
- A bag of rubber caps for unused RCA female cable ends.
Notes:
- Careful with the SIM tray if you’re installing a SIM – It’s a bit fragile.
- Two plugs on the wiring harness will not be used.
- Not all harnesses and wires provided by CTH will be used
- Don’t cut any zip ties off the wiring harnesses. Leave them intact.
- Be careful with the screen and knobs of the head unit. When working, use something soft (such as a foam block or foam packaging from the shipping box) to hold the faceplate and keep the knobs from pressing against your work surface. Don’t let the knobs hit any surface, as they can press into the glass and crack the screen.
There’s no specific order this has to be done in. But I worked from the center out to make sure nothing got in my way. When plugging the white male ends into the female sockets, they should go in easily and make a click when fully seated. A couple of mine took a bit of effort to click into place. And a couple didn’t give an audible click. In these cases, I used one of the provided plastic tools to push gently down on the edges of the white plug until they felt fully locked in. To check and make sure they are secure, pull up lightly against the weight of the head unit. If the head unit lifts off the work surface, you might be pulling too hard. Be careful, as the wires can pull out.
Step 10. Connect Wiring Harnesses to the T10 Head Unit

Wiring Guide for T10 Head Unit:
- Plug in the USB cable. The four-pin plug goes into the four-pin socket.
- Plug in the second USB cable. 6-pin plugs go into the 6-pin socket. There is no difference in the functionality of these two. The wiring is the same. One uses a six-pin plug for some reason.
- Put this USB cable aside as it will be installed in the Vehicle later.
- If you’re installing the SIM harness, plug it in until you hear it click. I installed mine in case I want to add a SIM later. But I’ll be running my head unit off my iPhone hotspot.
- Plug the backup camera harness into the corresponding socket. Note that 5a will connect to 6e.
- Plug the black plug (6b) from the main harness into the socket marked “Power”. Do not cut the zip ties. 6d will plug into 11. Note that 6d is a wide, twenty-pin white plug and is hidden in the mass of wires in the photo. The radio antenna (6a) plugs in just above the GPS and 4G. There is an 8-pin plug on the wiring harness that has two blue wires (6c). Plug that into the corresponding socket in the head unit.
There are two yellow male RCA jacks. One is attached to a smaller white plug, and the other to a larger plug. Use the male yellow RCA from the larger harness (6e) and plug it into the female yellow RCA on the camera (5a). Make sure this is the harness plug that connects to your vehicle in step 16, not one of the leftover harness plugs. - You will not install part number 7. Put it aside.
- The GPS cable goes to the upper GPS jack and screws on by hand. Then tighten slightly with a needle-nose pair of pliers. It will still turn at the junction for flexibility. Don’t over-tighten.
- The 4G antenna attaches to the plug just below the GPS. Tighten by hand, then gently with a pair of pliers. This doesn’t need to be installed if you are not using the SIM. I installed mine in case I want to use it in the future.
- I did not use part number 10. I believe it’s for audio amplifiers and/or sub-woofers.
- See step 6 if part 11 is still rolling solo.
- I did not use part 12.
- Red Xs mark sockets that were not used in our install.
If your head unit and wiring look like the picture below, you’re ready to install the plastic parts you removed from the OEM head unit in step 7.


Step 11. Test the Head Unit

Successful test of the wired T10 head unit. I tested my T10 head unit before swapping all of the OEM plastic parts. I plugged all the plastic plugs from the head unit into the truck, turned the ignition key, and confirmed it was getting power. It was, so I moved to the next step.
Step 12. Install the Plastic Parts Into the T10
These parts are a direct lift from the OEM unit (shown above for reference). Clips and a few screws are holding them in, which will need to be handled carefully. Take your time with the clips and don’t force anything.
You will install the plastic top tray from the OEM unit into the T10, along with the two vents and the two small plastic pieces that hold the air volume adjuster dials.
Take your time on the top tray and make sure you use the correct-size screwdriver so you do not damage the screw heads or the holes they go into. There are two sets of screws from the removal of the OEM head unit. Use the larger screws for the top tray. These screws were a bit stubborn, and I slightly stripped the heads as a result. So, I drilled out the holes in the T10 very slightly, and the screws went in easily.
The hazard switch has two clips. It will only go back one way. Arrow points up 😉
RH Vent goes right. LH vent goes left. Before we install the vents, you must install the small plastic outer air volume dial trims on either side of the face plate. There are right and left sides. Use the smaller screws. Two on each side. These took a bit of finessing to get the small pegs into the holes and to line up the screw holes. Take your time and make sure these are fitted correctly before threading in the screws.
The vents install from the rear of the faceplate and have clips on the top, bottom, and sides. Just push until all of the clips click in. I had to use a small screwdriver to finesse a couple of them into place. A couple didn’t seem to fit perfectly, leaving a small gap between the vent and the faceplate. I’m pretty OCD, so I want things to be perfect. But, if you look at this from the front, it’s not visible. You can only see them if you’re sitting on the dashboard looking straight down onto the head unit. And that’s probably not going to happen.
Step 13. Remove the Yellow and White Clips From the Oem Head Unit

Next, you’ll need to remove the yellow and white clips from the OEM head unit and install them on the T10. Be careful and take your time so you don’t break them. I know, I keep saying this… I used one of the plastic tools provided to gently pry under the edges of each clip and pull them off by hand. There are a total of six. When you snap them onto the T10, yellows will go on top and bottom, and the white tabs go in the middle on each side. Make sure you push them all the way on until they click into place.
Step 14. Prepare to Install the Full T10 Assembly Into the 4Runner.

T10 head unit with all wiring, vents, plastic,c and hazard assembly installed.
I scratched my OEM screen on the gear shift during a prior install. So, trust me, it’s a good idea to cover the gear shift with a towel or something soft, as the screen will likely come into contact with it at some point. But, be careful not to put pressure on the screen, otherwise it may crack.
In the truck, start with the SIM if you’re using one. We didn’t, so it’s not pictured here. Put it into the SIM holder on the T10. Make sure the SIM card is flush and locked in place before closing up the SIM tray. I went ahead and installed this harness in case I want to use a SIM in the future.
Step 15. Install the Usb Connector Cable

The USB connector cable (Part 3 that we set aside earlier) goes to the gray square plug on the truck end and to either USB port on the T10.
Step 16. Connect the T10 Wiring Harnesses to the Truck

Work from the truck to attach the harnesses. They all have different numbers of pins and plug sizes, so obviously plug the ends that fit into the corresponding sockets. This should be fairly self-explanatory. There are seven white plugs open on the wiring harness, and two will not attach to anything. (See photo below) Just let those hang.

There will also be a second USB to use to attach your phone or TPMS, etc. Make sure you run that to a spot that’s accessible once the dash is closed up. I ran mine just below the left side of the glove box for now.
Step 17. Reconnect the Hazard Plug to the Truck

Step 18. Position the Gps in the Dash

Run the GPS to the right behind the vent, so it’s facing up. I stuck mine just above the right air vent. Leave the 3G in the middle if you choose to use that cable.
At this point, I turned on the ignition and did another test to make sure the T10 was getting power, and it was. So, I proceeded to close up the project.
Step 19. Tidy Up the Wires and Install the Head Unit

Tidy up the wires as much as you like and shove them into the cavity in the vehicle behind the head unit. Align the head unit so the six tabs go into their corresponding holes. Push the corners of the radio until it clicks into place. You’ll hear 4-6 clicks. The main thing is to make sure it’s secure and easy to pull out. Mine didn’t click as perfectly as I’ve been told it should, but it still felt solid.
Step 20. Reinstall the Air Knob Control Assembly

Next, install the air control knob assembly by first reconnecting the white clip and plug that you removed when we started. Then, push the control assembly straight forward until it clicks into place.
Step 21. Re-install the Plastic Side Pieces

Set the side pieces in place, then firmly push them onto the console with both hands until they click into place. Wipe off your console with a clean, dry, soft cloth (preferably a computer screen or phone polishing cloth).
Pro Tips After Installation
- Using your phone as a Wi-Fi hotspot is the way to go, since you can take advantage of the T10’s 5 GHz Wi-Fi.
- Disable SIM1 (China eSIM). Introducing a U.S. SIM card may cause issues, as they conflict with each other. SIM2 is where you’d add your local SIM card if that’s the direction you go.
- Known SIM cards that work: T-Mobile (and their variants like Mint Mobile). Also note that ATT works; however, once they kill 3G, it will no longer work. SIM cards from other carriers, such as Verizon and Sprint, will not work.
- After installation, perform a pinhole RST reset to remove all factory Chinese network settings.
The pinhole RST is in the lower right corner of the product. - Also, remember that this is essentially an Android tablet for your car, and you’ll occasionally need to reboot if you encounter anything funky, just like you would on a cell phone or computer.
- A soft reboot is done by pulling down the menu at the top and hitting reset. In 90% of cases, a soft reset will resolve any anomalies.
- After making a setting change, usually a hard reset is needed for it to take effect. A hard reset is done by pressing the reset button on the faceplate with a paper clip or SIM card tool.
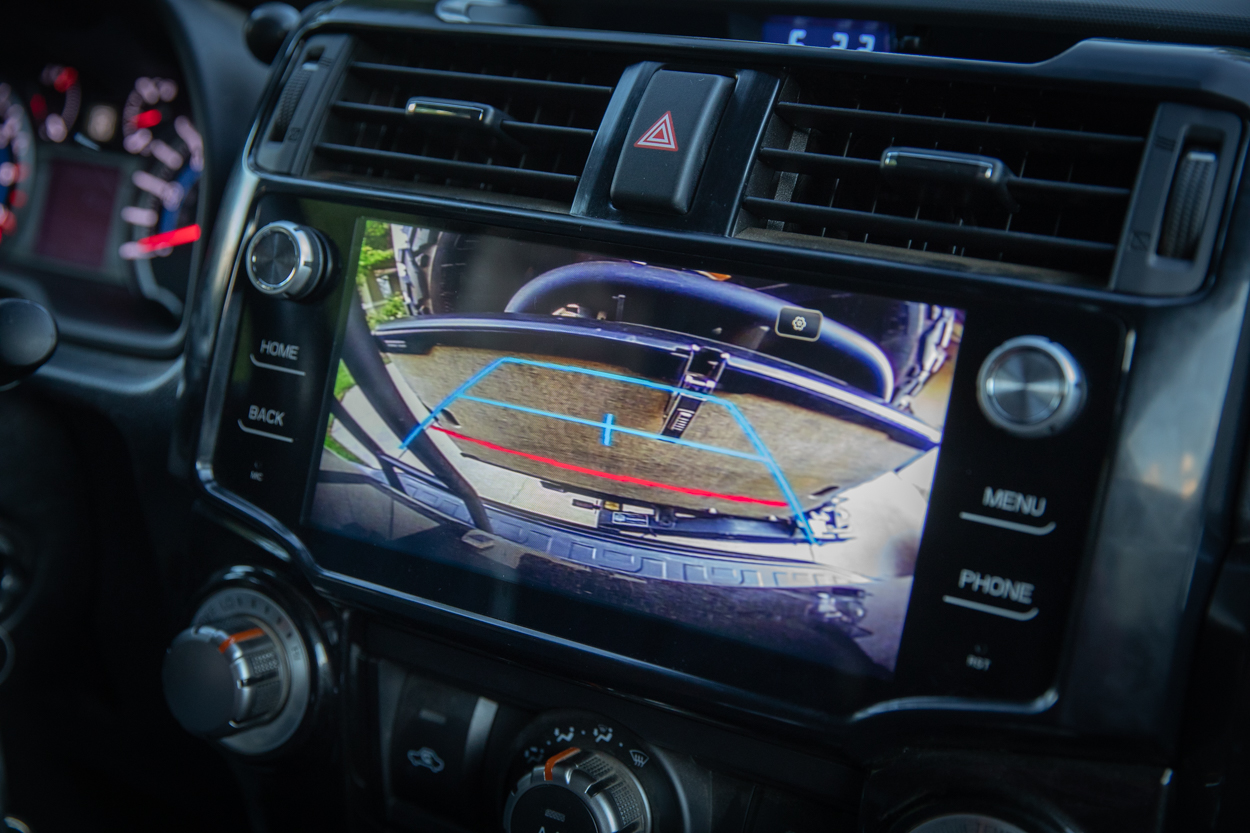
- Test your reverse camera. If it looks like the photo below, you’ll need to go into camera settings and switch from PAL to NTSC. The default on mine was PAL, a video format standard used in Europe.
Camera Troubleshooting

Backup camera with PAL setting
Backup camera with NTSC setting and Rigid Ultraswing blocking my view. Thanks to Mark Mollat, aka ofrd_adv, for the help and technical info in this section!
Final Thoughts
When everything was back together, and I powered up the fully installed T10, it was a bit like the 4Runner had come to life. I didn’t have anything against the OEM head unit other than the scratch I’d previously put in the screen. It worked and did its job. But once you have a legitimate, fully functioning smart device in your dash, you see what you’ve been missing.
I’m an iOS guy and was a bit concerned about connectivity with the T10. With a few taps, my phone was connected wirelessly and playing music. No problems at all. And the sound is noticeably better. Just having an EQ makes a big difference to me as well.
The one thing that could be improved is the microphone. When stopped without the engine running, the person on the other end of a phone call can hear you at about an 8 out of 10. As soon as you start driving, the engine noise and road noise must affect the mic, and it drops to 5 out of 10. As my lady said, I sounded like I was underwater, and she got annoyed and didn’t want to talk to me. If you want to change out the mic, there’s a mod for it. Just not getting into that here.
Beyond these basics, play around. Download apps. Google stuff. Do all the things you do with a new tablet or smartphone. With the T10, the possibilities seem almost endless. I’m personally just touching the surface (literally and figuratively), but my 18-year-old son taps around on it like he was born with it in his hand. Which… I guess he kinda was. Thanks for the help, Deegan! And thanks again to @ofrd_adv for the technical help and advice via text.

As a bonus, the T10 was loaded with a few Britney Spears songs. Thank goodness she’s getting the royalties now that her father stepped down from his conservatorship. Enjoy!
I’ve had my T10 in my 2018 4Runner for a few years now. Have loved it so far. But one day I got bored and started messing around with the settings and now there are a few corks I can’t get rid of. The radio reboots every time I start it up. It no longer retains the Wi-Fi password. And I can’t figure out how to remove the pin on startup. I’ve tried the reset button a few times but all it does is restart the radio. Is there a way to bring all settings to factory reset?
Thank you for this — I got mine today and looking at the PDF instructions, it’s hard to see al the numbers. Your pictures are clear and I’m looking forward to getting this baby installed.
Hi there! Just installed my T10 to my 2019 4Runner Off-Road but once I finished install I had ABS, Traction, and multi-terrain lights pop up on my dashboard. Any solutions?
Jamine, Did you ever get an answer or solution to your question?
I love to no if you had a solution.
Hi! Great guidance. We followed but the unit does not turn on. Any ideas?
Helped my BIL install the t10 unit yesterday. how did you get the steering wheel control for the phone to work. (press the speak button on wheel) When pressed it shows a brief message – setup HFM or something like that
A couple questions.
Oh my gosh Brad, I completely agree! The quality of the radio sounds so much better than playing music off my iphone. I have played around with the equalizer, trying to mimic the radio quality, but I just can’t figure it out. And speaking of sound, when I use the navigation, I can barely hear it, it’s like a whisper, basically making it useless.
Have you pushed the reset button on the front of the unit.
I’m trying to install the Enfig aftermarket mic but not finding where to plug in the 3.5mm jack. Anyone have insight?
Same, trying to install the aux mic, but no jack.
I got mine installed on a 2014 4Runner Limited and its working great overall… there are few things I have questions/comments about:
Anyone have ideas for any of these?
I am having troubles with my steering wheel controls too, except mine is with the next/back button. I have to hit the next button 2/3 times to get to the next song, and when that song is over, it plays the previous song. This is after I went through the steering wheel controls, and tried to change it. Also, I am noticing the same issues with the polarized sunglasses. I am on my second T10 head unit, with the first one, I did not have issues seeing the unit, now my second one looks black with my glasses on.
Does this work with Sirius/XM?
You have to use the streaming service. Works great though. I eliminated my subscription since wife has XM in her SUV. I use her streaming service.
I can’t seem to get the back up camera to work. It saying there’s no signal.
There’s 2 yellow cables and you need to plug into the other. That happened to me when I installed over the weekend.
How long would you say the installation process takes?
It took me about 2.5 – 3 hours… but 30 of that was spent on getting a stubborn harness disconnected from the old unit without breaking it 🙂
How can I do a factory unit reset?
Put a paper clip in the RST hole on the front of the unit
Nothing happens when I shift to reverse? Should camera view come up automatically? I am stumped and have checked for proper yellow RCA cable.
So why attach usb females that just sit inside the cavity? I don’t understand the boys pose of 1 & 2, maybe it’s just my 2012 has no function for these?
Just “finished” the install. I’m not crazy that it isn’t bolted back in. Anyone fashion something to allow that happen? Has anyone had any issue with it coming back out on a rough trail?
Did anyone have issues with the steering wheel controls?? If so how did you remedy?
I was able to set each button push to a command using the steering menu.
I went through the same menu, but am still having troubles with the next/back option. I have to push the next button like 2/3 times to get it to go to the next song….and then once that song is finished, it plays the previous song. Very strange.
has anyone found an anti-glare screen protector for the T10? If so can you share a link? I am having a hard time finding one and know it will be really helpful to have.
I absolutely need one too! Have you happened to find one?
Hi. How do i connect my factory rearview camera to this unit? Nothing happens on the screen when put in reversegear.
Same problem here with my 2012 – triple checked connections, this is my nightmare going aftermarket that some core functionality wouldn’t work.
do you have the rear view camera in your rear view mirror from the factory like an older sr5 would?
Change the settings for reverse camera view. You may not have plugged the yellow rca in correctly.
Is there an adapter to retain the factory gps available?
Not sure if you’ve found one by now, this should work from discount car stereo
This is an amazing guide and I just finished my install today – HUGE upgrade from OEM!
I have a pesky vertical blue line on the display though, any tips for getting rid of it?
When you comment on the microphone in the final thoughts, do you mean the microphone that comes with the T10? I have a 2019 TRD Pro w/factory unit and the audio quality for calls is trash.
I successfully installed the T10 head unit and paired it successfully with my iPhone. I followed the instructions on the video and set up the tlink5 app so that my Apple CarPlay would work. It worked however while I was programming setting other features the tlink5 app disappeared and now I can’t find it.
I bought the radio but youtube and other music sound low. How can put more volume gain?
What’s the pin? In order to connect my iphone to bluetooth it’s asking for a pin, where do i find the pin?
0000
My radio function does not pick up any radio stations. Any suggestions on trouble shoot
Antenna amp needs power thru blue wire
how do you do that?
how well does the black trim match the sparkly 4runner black?
Hey! Great article. Anyone know if the T10 is comparable with the OEM audio system??
Does this support HD radio ?
I got my unit installed which was simple, thanks to this write-up. However I’m not receiving any sound output from my phone, additionally, my phone is not connecting via TLINK, nor is my T-Mobile SIM card being recognized (no signal on the unit). Anyone have any pointers on how to fix any of these issues?
Finally got mine installed with the help of this great article and other videos on YouTube. My initial conundrum is how to switch from kph to mph???
Resolved.
Hey James! I’m having the same issue and wondering how you were able to resolve this?
Is their an input for a front camera? Can you view rear camera anytime or still have to be in reverse?
My install process went great but I’m having some major issues with the unit itself. Apple Carplay doesn’t seem to work at all… and I did a factory reset to see if that cleared things up but now none of the “physical” buttons like “HOME” “PHONE” etc work at all. Help!
Dustin, what is the color of the T10 head unit? The OEM head unit is black glossy with sparkles. The Cartrimhome website is black matte but it almost appears to be a dark charcoal gray. However your T10 photos appear to be black head unit, slightly glossy but unsure if there are sparkles. I’m trying to determine if the T10 color closely matches the rest of the OEM side/panel/door trim or if the color difference is significantly noticeable.
Does the T10 work with 2022 4runner multi terrain camera?
I am also interested to know about this and if you had to relocate your backup camera with the ultra swing as I want to get that as well
Where can you buy the T10? The link takes you to the CarTrim website, but says the product is out of stock
I bought mine from Rhino Radios.
Hi, how was the service with Rhino Radios?
Does this radio sit more flush to the dash console than the oem one?
Wondering if I can mount a t4pam to it. Has anyone else done that?
Would this be compatible with a powered accessories mount like Expedition Essentials?
Can you upload a video while using Apple CarPlay for day to day operations? Thanks!
Nice one , I finally decides to go with the T10. Does the T10 read OEM TPMS or you need to purchase separate set?
Nice job! Definitely like the aesthetics more than the IPad look (XL Screen) I’ve seen with other head units.
Thanks! It actually looks really good. I look at the OEM and it looks archaic by comparison.
Hey Dustin, thanks for the install tips. I was wondering are you still able to use the steering wheel controls? To skip or pause music?
Yeah, mine currently work the same as they did with the OEM head unit. And I think you actually might be able to change how the function in the settings on the T10. Have to dig into that a bit more, but seems like I read/heard that somewhere.
Just installed mine in a 2019 SR5 and everything works as it should EXCEPT the steering controls. Tried to go through the steering app to “learn” them but nothing seems to make any change. Any advice?
I have a 19 Limited but held off on the T9 until they worked out a couple of kinks, which it seems they did. Do you think that the optional mic would help with recipient audio? And would the RCA harness that you didn’t use be a direct fit to the JBL sub that I have in the Limited? Thanks for the thoroughly detailed write up!
Hey. Thanks! Mark down below in the comments can probably answer those questions better than I can 😉 Give him a reply and maybe he’ll drop some knowledge.
Great write up, Dustin!
Thank you! Thanks for the help and info.
Hey Dustin, where can you buy the T10? It is out of stock using the link you provided. THanks!
Brian, they just came back in stock today and I was able to snatch one up. Your best bet is to use the link in this facebook group where Sev can help you buy and track(use Kingsev7 coupon code for a discount)
https://www.facebook.com/groups/394448974760999