
VLEDS Micro Limited H11 Fog Light Bulbs + Lamin-X Fog Light Covers Install & Review – 5th Gen 4Runner
Like most of the lights coming stock on a 5th gen 4Runner, the stock fog lights are pretty basic. They’re fine, and a welcome tool when driving a dusty road or of course through the fog. But they’re not exactly powerful, nor do they enhance your visibility.
There are of course abundant options for supplementing your stock lighting, from upgrading to light bars and aftermarket pods to swapping out the fog lights with a new light group. The easiest thing to do is simply augment the lights you already have. And there you have two options.
- You can use a film to change the look and color of the stock light housing.
- You can replace the stock halogen bulb with an LED alternative that delivers more lumens from the same wattage.
We’re going to do both.
Find it Online:
- VLEDS Micro Limited H11 LED Fog Light Bulbs: Check Price
- Lamin-X Yellow: Check Price
- Lamin-X Amber: Check Price
- Lamin-X Clear: Check Price
- Plastic Pry Tools: Check Price
- Microfiber Towels: Check Price
VLEDS Micro Limited + Amber Lamin-X
Tools and Materials
The tools required for the VLEDS Micro Limited bulbs are so simple, you might not even need any tools. The space behind the bumper cover is accessible from the bottom, with no tools necessary. So if you’re willing and able to just reach up and swap the bulbs, all you need are your hands. But for the sake of the pictures in this review and a slightly easier installation, I decided to open up the fender liner. This requires a 10mm socket or wrench or the Phillips screwdriver I used.
The Lamin-X Fog Light Covers don’t require much for installation, just your fingers and a sharp tool for trimming. But you’ll want to clean the lights before you install the film, so make sure you have a high-quality glass cleaner on hand along with some lint-free cloths.
Lamin-X Film Install
We’ll start with is certainly the easiest part of this install and maybe the easiest mod of all time. If you’ve got any experience applying decals of any kind, you can probably handle adding Lamin-X 4Runner Fog Light Covers with ease.
Step 1. Clean Lenses

A clean lens ready to stick. Trail damage optional.
Using your favorite glass cleaner and a lint-free cloth, wipe down the lenses of your fog lights, as well as the housing immediately around the light. The cover is going to “drag” on the housing as you’re installing, so don’t let debris on the housing ruin your install.
Step 2. Peel and Stick

Starting from the middle of the lens, apply the sticky side of the Lamin-X 4Runner Fog Light Cover and work in a circular pattern out to the edges.
Getting the centering right is important—you want a fairly even amount of “extra” material on all sides of the lens, otherwise, the next step is going to be quite tricky. Luckily the tabs on either side of the cover work as effective handles if you need to pull off and start again, and the Lamin-X Adhesive is resilient enough to handle a couple of re-sticks without a problem.
Step 3. Tuck and Trim
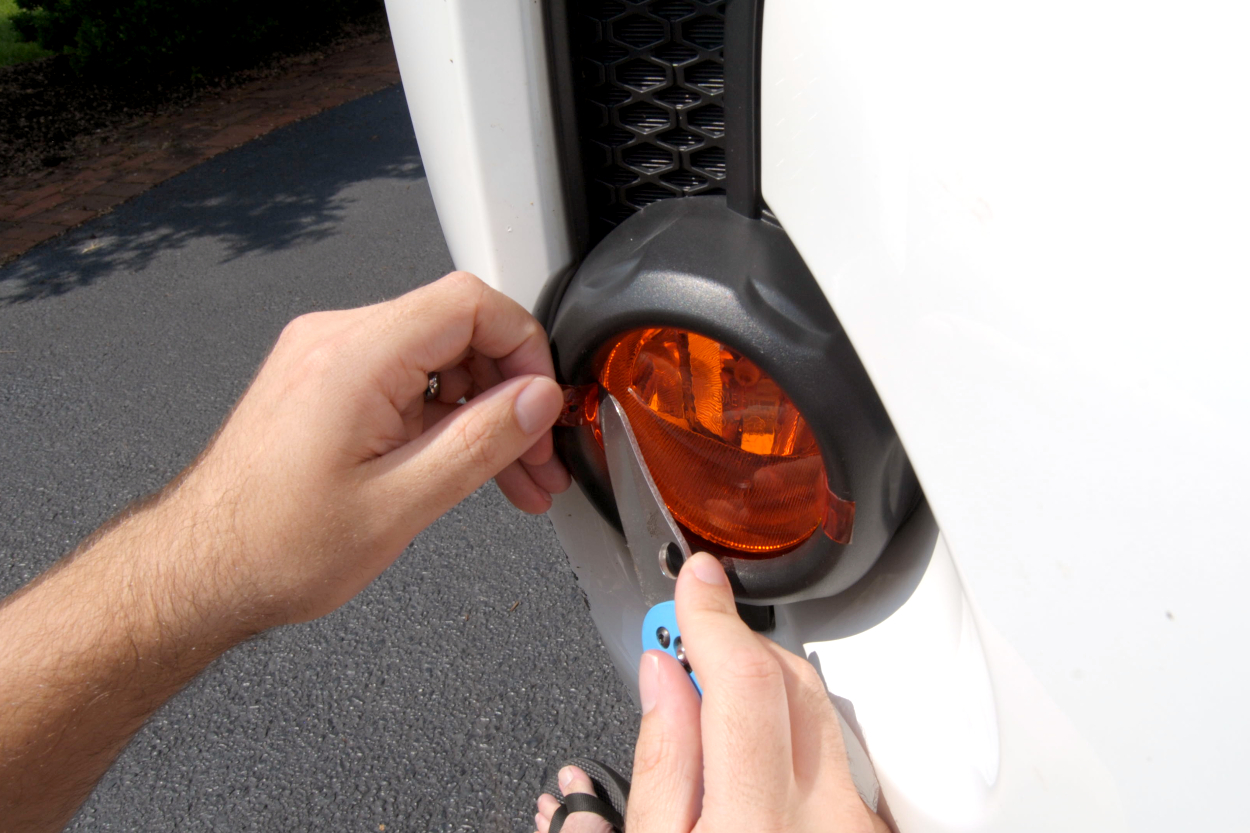
Once the Lamin-X 4Runner Fog Light Cover is fairly centered and mostly stuck to the lens, simply push along the edge of the lens to tuck the excess cover behind the housing. It requires a bit more force than you’d expect, but you shouldn’t feel like you’re going to break anything. In fact, if you’re having to force it too much, you might want to start over and try and get the cover more centered.
Lastly, trim the tabs at either side of the cover and tuck the remaining excess just like you did with the rest of the cover. Be extra careful when trimming the pull tabs, you don’t want to trim too much and leave a portion of your original lens exposed. It’s not likely that you’ll miss the protection Lamin-X provides, but the visible contrast between the covered amber section and the raw lens will be noticeable.
After that, you’re done. Lamin-X claims that after a few days the cover will eliminate any small trapped bubbles of air on its own, but the application is so easy, with a little bit of patience, I managed to apply them without any air bubbles in the first place.
Lamin-X 4Runner Fog Light Cover Review

Before and after.
If we’re talking about simply the look of the vehicle, the amber color Lamin-X 4Runner Fog Light Covers offer a tremendous bang for the buck. Especially on the monochromatic front end of my Super White 4Runner.
And while it’s a pretty difficult thing to scratch the lens of a fog light inside the factory housing (and a fairly insignificant problem if you do), the Lamin-X material is surprisingly durable and should do a fair job shrugging off thrown gravel, bug guts, and the occasional stick or two. And even if it doesn’t, it’s way cheaper to replace a scratched Lamin-X than it is to install a whole new fog light assembly.

Stock fog lights on the left, fog lights with Lamin-X 4Runner Fog Light Covers on the right.
But the purpose of fog lights is illumination, how does the Lamin-X 4Runner Fog Light Cover do when it comes to seeing more? Well, the amber color, valued for the contrast it provides over white lights in white environments, does certainly make a difference, as shown in the above picture.
For the record, both of these images, and all of the illumination comparison images in this article, were shot at the same settings on my camera. 1/13s, F4.2, ISO800. And the only processing I did to any of these comparison images after the fact was to crop, no enhancement whatsoever. So while it can be hard to get an “apples to apples” comparison through a computer screen, the difference here is obvious.
While the Lamin-X’ed light (right) may not illuminate any more than the stock (left), it is certainly more noticeable with more detail than the stock light. You can’t see anything extra, but in the white-on-white environment of the side of my in-law’s house, you get a better look at what you already see.
VLEDS Micro Limited H11 Fog Light Bulbs Install

So what do you do if you want even more illumination than the stock?
Of course, you could replace your fog lights entirely, there’s a lot of fog light upgrade options out there. Picking the right one is just a matter of identifying your goals, illumination needs, and budget. And the budget is probably where these VLEDS Micro Limited H11 Fog Light Bulbs shine the brightest. This is saying something, considering the fact that, at 2,500 lumens, they claim to be seven times brighter than the stock halogen bulbs.
Step 1. Open Up Fender Liner

As mentioned above, you could skip this step if you can swap the bulb just by reaching up behind the bumper. But it’s certainly easiest this way.
Before shutting your 4Runner off, turn the wheel full-lock away from the side you’ll be working on first, to give yourself more room to work. Then simply remove the clips with your chosen tool and pull back the fender liner.
Step 2. Disconnect & Remove Stock Bulb

If you’ve changed an automotive lightbulb before, nothing here should surprise you. If you haven’t, simply squeeze the electrical lead connecting to the bulb on the right tabs and pull it off. Then twist and remove the bulb.
Step 3. Install VLEDS Micro Limited H11 Fog Light Bulb

Then do the same, in reverse, to install the Micro Limited H11 Fog Light Bulb. But take note, that the gasket around this LED bulb is much thicker than the stock one, providing a more secure seal once installed. It will take a bit of effort to compress the gasket and get the bulb installed. No heroic strength is required, but more pressure than you’d expect.
And due to the long lead of the VLEDS bulb, the wiring will hang a little looser than it did on the stock bulb. But it should still be well inside the bumper and clear of any moving parts inside the engine bay.
Once you have the bulb installed, make sure you have it oriented correctly. You want the actual diodes emitting the light on either side of the bulb once installed. That’s side-by-side, not up-and-down. That helps the light project wider, rather than higher, once installed. Both of my bulbs were oriented that way straight out of the box, but you may need some adjustment. If you do, follow the instructions VLEDS includes to fine-tune the angle before you install.
Now all you have to do is pull the fender liner back and replace the clips and screws holding it in place.
Step 4. Repeat On Other Side

Fog lamp housing on the passenger’s side.
Now repeat the process to replace the bulb on the other side of the car. Note that the back of the fog light is covered by a protective shell when you do the passenger side of the vehicle. This is because the fender liner on this side is ventilated. Which allows more air into the engine through the factory intake drawing from the fender well. But while you won’t be able to see the back of the bulb in the same way, the removal and installation are identical to the driver’s side. You do not need to remove the housing.
VLEDS Micro Limited H11 Fog Light Bulbs Review

The stock bulb on the left; VLEDS Micro Limited H11 on the right.
It’s hard to imagine getting more for less. The VLEDS Micro Limited H11 Bulbs deliver a LOT of power. Just look at this!! HUGE Improvement over the factory bulbs. These lights are very impressive for the money. I now understand why there is a lot of hype around VLEDs.

On the left is the same Lamin-X on the stock as in the first half of the article. On the right is the VLEDS shooting through Lamin-X. You can see landscaping, and a whole other part of the house, that you couldn’t see before. And again, the same settings were used for the camera in both of these shots. Or consider this more dramatic example.

These two pictures (Lamin-X only on the left, VLEDS on the right) show how much further the light is being thrown. The bush and traffic cone are in both pictures. Only the Micro Limited H11 bulbs put out enough light for you to see them.
Granted, this was at an extreme angle, probably about 30° from the vehicle’s direction of travel. That kind of coverage can be the difference between seeing a deer before it gets in your way and smashing up the front of your rig.
Final Thoughts

Between the two, there’s no doubt that the VLEDS Micro Limited H11 Fog Light Bulbs make the biggest difference. And since they’re available in yellow, you can get the contrast-enhancing effects without the added cost and effort of the Lamin-X Fog Light Covers if you don’t want the amber look. Or, if you combine the yellow VLED bulbs with amber Lamin-X, you would be able to create the most yellow/amber output possible while getting the amber fog cover look at the same time. Brenan did that style of bulb/housing mod here.
Regardless of what you choose, you will be happy with the output of each option.
Both VLEDs and Lamin-X make killer products.
Any good trails in NY?
Some, but not a lot. Lots of camping though. And luckily I live close enough to Vermont to get over there when I need my Class IV fix.
Seriously bright lights! Are these going to blind other drivers, though? Looks like a whole lot more up and down spread of the light afterward..
Not like, sear their retinas blind. But I certainly wouldn’t want an oncoming driver to have them on in my face. Seeing them in real life it doesn’t look like
However that’s also just fog lights. They’re like high beams, they’re not gated to limit light output in oncoming traffic. Basic etiquette is to not use your fogs around other traffic, and in several places I’ve lived it’s been against the law to use them around traffic. Just like high beams. It’s rude with stock fogs, it’s aggressively rude with any sort of upgraded output.