
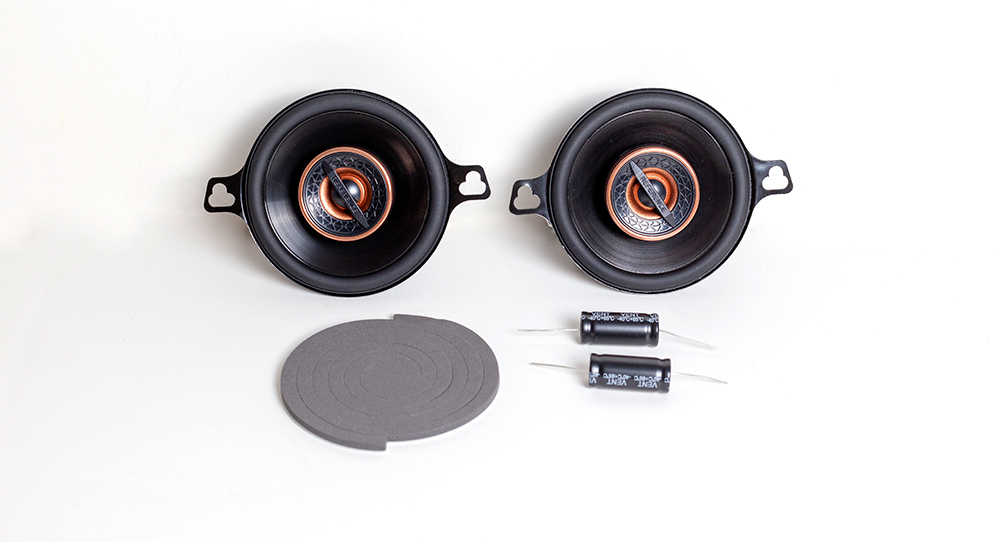
Swapping out the OEM dash speakers with a coaxial speaker, that has a woofer cone, and integrated tweeter
Most everyone will admit that the 4Runner’s audio system isn’t horrid, but it does have much to be desired. I personally find upgrading an audio system a little daunting, with all the speaker combinations, audio processors, subwoofers, I wouldn’t even know where to start.
However, until I commit to a full system upgrade (like from OEM Audio Plus), I chose to start small and test out swapping my OEM dash speakers with a much better coaxial speaker, that has a woofer cone, and integrated tweeter. These new speakers will add a higher bass output, and enhanced midrange performance.
With all the seat time I am logging in this 4Runner, going camping, exploring trails, or even in my daily commute, I didn’t want to settle for “meh” sound, I want great sound.
So for $47 bucks, I figured, why the heck not?
Let’s begin.
- Install Time: 3-5 Hours
- NOTE: This is not a direct Plug and Play swap, cutting and imagination required.
Parts Used:
- Infinity 3022-cfx: Check Price
Tools & Parts Required:
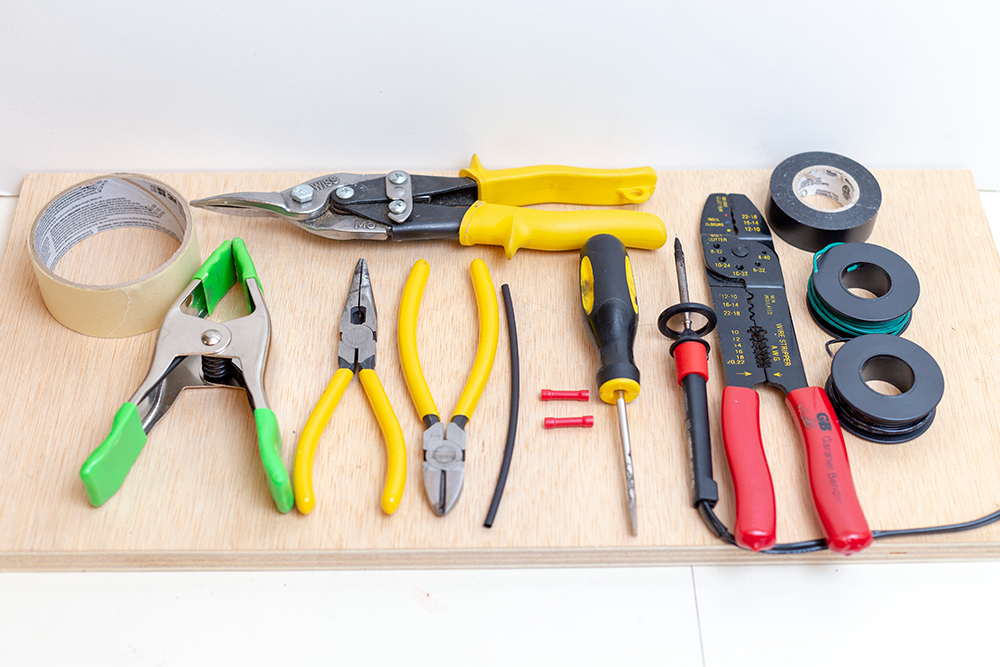
- 10 mm Socket wrench
- Socket Set
- Tin Snips
- Masking Tape
- Cutting Dikes
- Butt Connectors
- Heat Shrink
- Needle Nose Pliers
- Flat Head Screw Driver
- Electrical Tape
- Wire (18 Gauge)
- Solder Tool
- Wire Cutters
- Spring Clamp
- Female Wire Disconnects (not pictured)
NOTE: Installation follows the Passenger Side, which is slightly more difficult. Same steps will be taken for the Driver’s Side, which will retain use of both OEM speaker mounts.
PART 1. Removing the Stock Dash Speaker (Passenger Side)
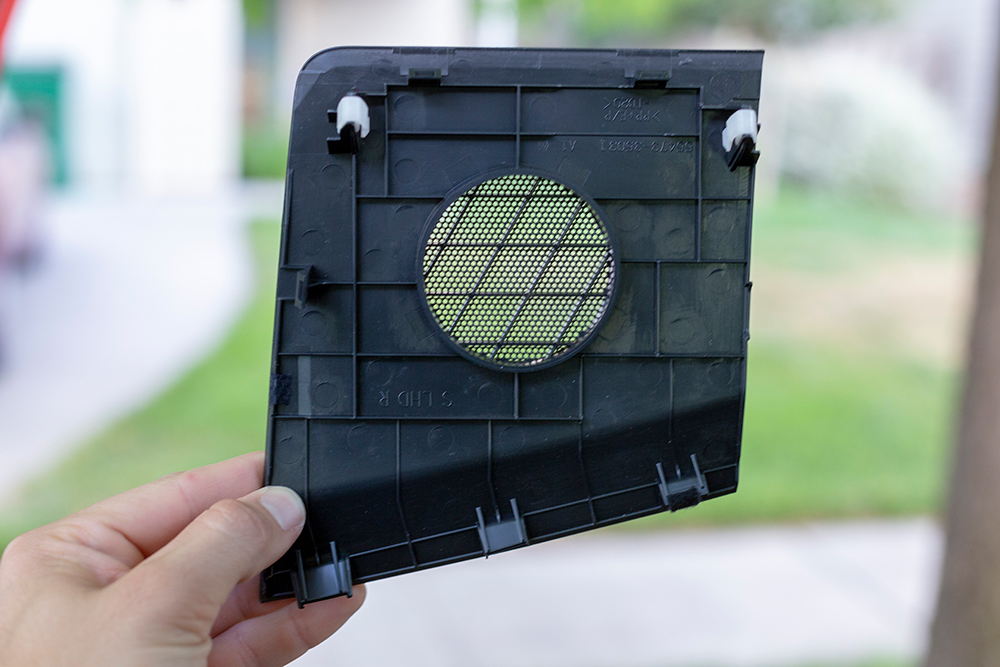
Step #1: removing the stock dash speaker grille

Start by removing the stock dash speaker grille. You may use an interior trim tool here, however, I was able to work a small flat head screwdriver in the gap, and proceed to pop off the two front clips.
TIP: I used electrical tape on the end of the screwdriver as to not scratch the factory dash.
Step #2: remove the two bolts holding down the factory dash

Using a 10mm socket wrench, remove the two bolts holding down the factory dash speaker to the speaker mount.
Step #3: Remove the factory speaker, and unplug it from the OEM connector.

Remove the factory speaker, and unplug it from the OEM connector.
Step #4: Remove the factory speaker mount with 10 mm socket wrench.

Step #5: mask off the area around the speaker
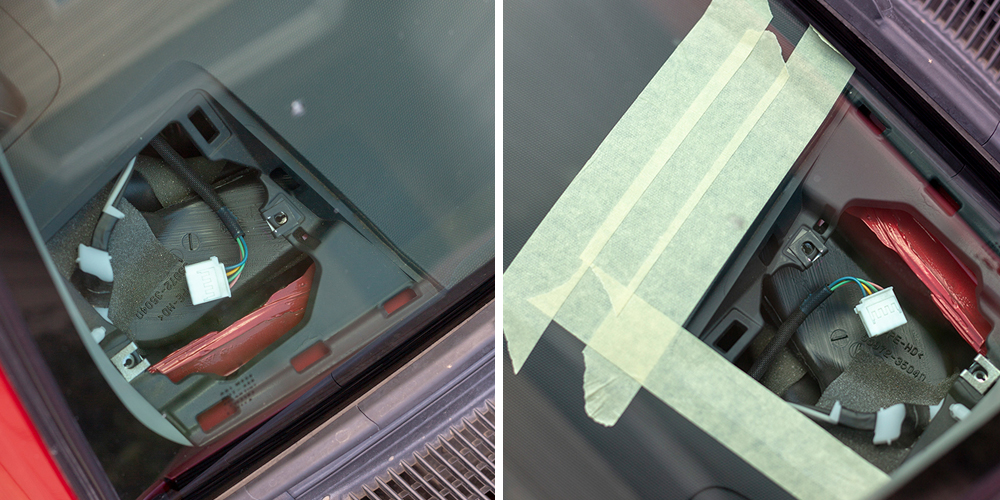
For the rest of the installation, I masked off the area around the speaker as to not scratch it while installing the aftermarket speaker.
PART 2. Reusing the Speaker Connector
Step #1: remove the blue OEM connector
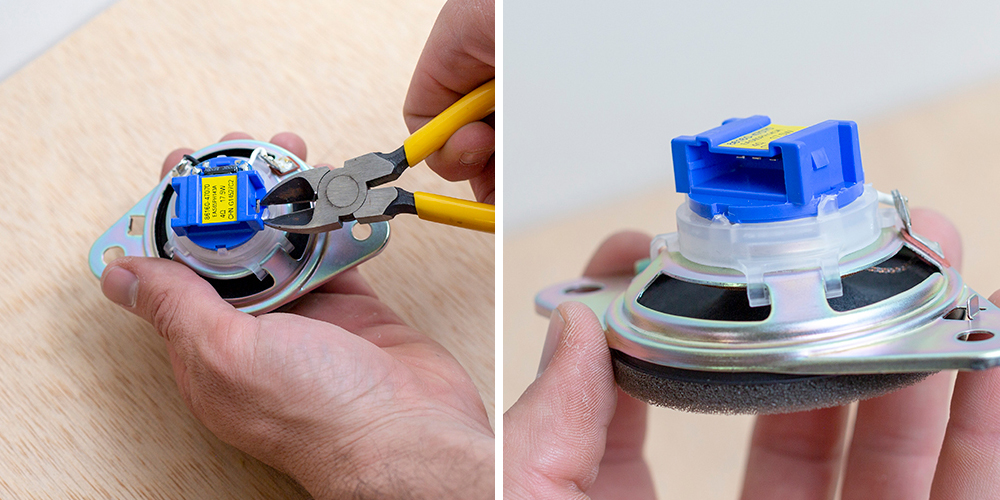
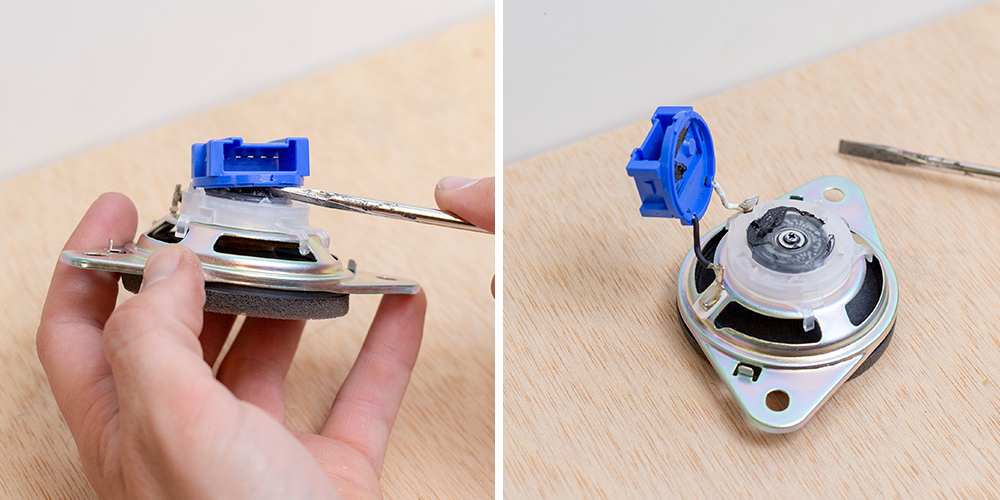
We will want to remove the blue OEM connector off the OEM speaker, this will help us connect our new speaker to the OEM connector.
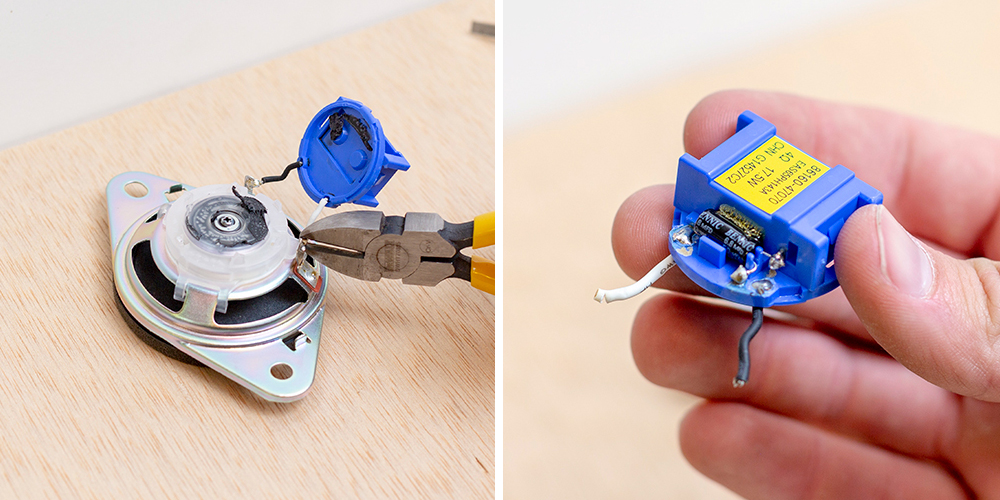
The blue female connector is held onto the speaker by several clear clips. Using a set of cutting pliers, cut off the clear clips. The only thing holding the blue OEM connector to the speaker now is an adhesive. Work a flathead screwdriver between the blue connector and OEM speaker, breaking the adhesive bond and fully separating the two.
Using the cutting pliers, cut the two wires as close to the OEM speaker as possible.
Step #2: Removing the OEM Crossover

Working the OEM crossover out, remove with needle nose pliers. With the OEM crossover removed, I was able to solder a bypass between where the factory crossover once was.
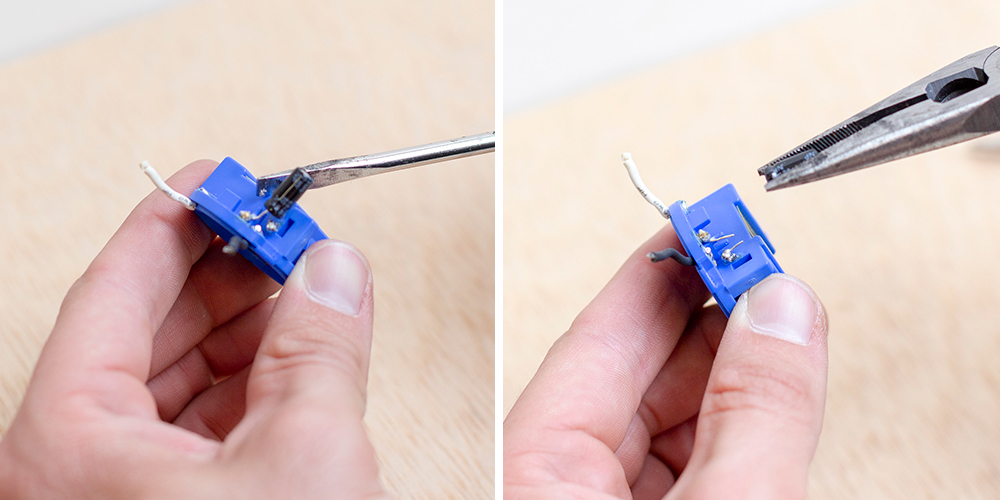
Step #3: Building the New Harness
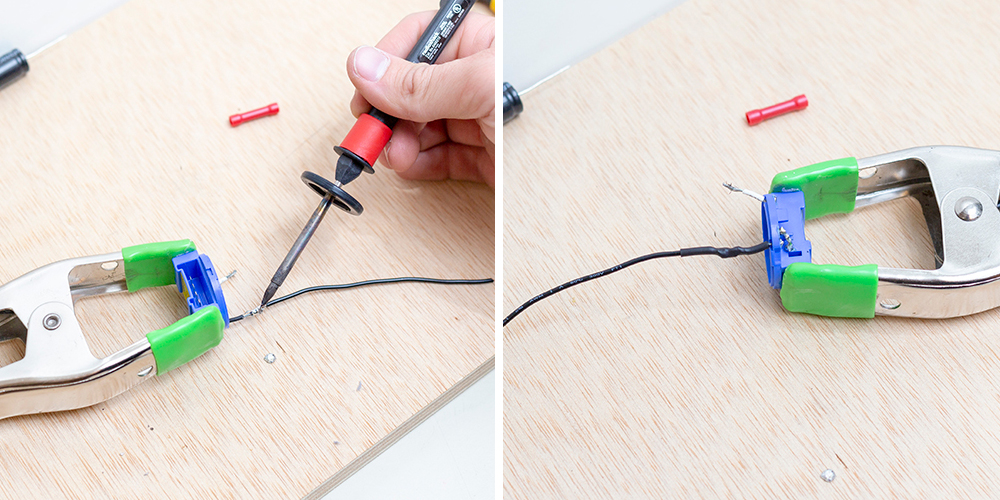
Gently strip the ends of the two wires from the OEM blue connector. Lengthen the factory wires with new wires, solder ends, and add heat shrink. Repeat to other side.

The Infinity 3022-cfx I used recommended the used of a supplied crossover. I attached the new crossover inline, with the same black wire of the previous OEM crossover, using butt connectors.
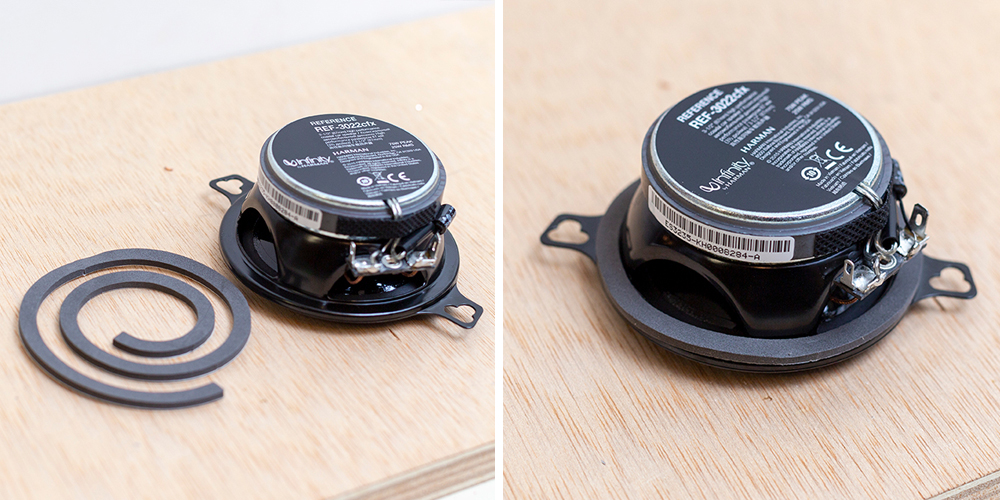
Also supplied with my infinity speakers was an adhesive foam strip to add around the edge of the speaker. I chose to add mine, whether or not it will make a difference for our application.
Step #4: Modifying the OEM Speaker Bracket

Using a pair of tin snips (or another comparable tool) cut away at the factory connectors to help adapt our new speakers to fit in the dash location. The driver’s side and passenger’s both differ and will require different cuts to assure fitment.
Step #6: Attach the new harness

Attach the new harness to your aftermarket speaker and prepare to install in the vehicle.
PART 3. Installing the Aftermarket Speakers

Driver’s Side: Reinstall the factory speaker mounts using 10mm socket. Connect factory audio harness to the blue connector, and gently place into the dash, lining up holes of the factory bracket and new speaker. Reuse the factory 10mm bolts and tighten down with 10mm socket wrench. Lastly snap on, the speaker grille.

Passenger’s Side: This is where things get creative. Utilizing one of the OEM speaker mounts (previously the passenger side right piece of the speaker mount), invert and attach to the left side of the cavity, into the dash, tightening down lightly. Connect the OEM harness to the OEM blue connector, and gently feed into the dash. It’s a tight fit, but there is a cavity that the wires will slide into. Gently place the new speaker down into the dash. The left side will line up with the factory mount that we modified, and the right side of the speaker will line up with the threaded hole in the dash that was previously for the OEM mount itself. Tighten down all three (two screws and one bolt) with a 10mm socket wrench. Lastly, snap on speaker grille.
NOTE: This side is open to interpretation, others have made their own bracket, extending the holes for better fitment. However, I was able to still achieve fitment by reusing the OEM bracket. With the new speaker sitting slightly higher, it will be a snug fit. If you would like a little more piece of mind knowing there is a gap in there, you can shave down the plastic ring under the speaker grille.
Verdict:
Replacing the dash speakers solved many of the problems with the OEM audio system. Before, the old OEM dash speakers, sounded muddled and cruddy, diminishing further in quality at higher volumes.
After swapping out the OEM tweeters, I am pretty impressed by how much the audio quality increased! The largest improvement I noticed has been in music particularly containing guitars, drums, piano or strong vocals. Overall, these speakers transformed the muddled crud of the highs and mids into a sharp, crisp, detailed sound. I was surprised how much detail I was missing out on with the previous OEM tweeters.
One of my favorite tracks to test was Queen’s Bohemian Rhapsody. I was amazed at the general increase of quality as the whole track played. Freddy Mercury’s voice was clear and sounded as if he was right there in front of me. The drum kit and cymbals were detailed, sharp, with a wonderful crispness with each hit. The audio even retained its quality all the way up to max volume.
Is it worth it?
Yes. For me, the benefits of this mod far outweigh the cost or time I put into the installation. With my investment into this mod being under $50, the most challenging aspect was the latter. Keeping in mind that this is NOT a plug-and-play application. The most difficult part was fabricating a new speaker harness and fitting these much larger 3.5” coax speakers into the small dash area. In the end, installation time pales in comparison to the future hours of enjoyment I’ll have with a better sounding audio system.
We put together a very similar setup using a wiring harness and custom adapters for mounting the speakers! Instructions here https://docs.google.com/document/d/15hmcC8Zk_aV0ljRCv_-nCW5iHmg1MzR7-I5VKJK98Lw/edit?usp=drivesdk
lots easier if you use the wiring harness from RedWolf and the two spade connectors on the Infinitys. just solder the crossover in place on the positive wire. I do like this write up better than some, as it addresses the PITA passenger side space. thanks
Hi,
I am installing kicker dsc3504. Iam wondering should I apply crossover for that or the oem crossover will be enough.
If not could you tell me the crossover part number.
Thanks
The OEM crossover cap cuts the frequency at about 5.8kHz. For me, it was a little too high. I installed a PAC capacitor from Amazon which cuts at 2.8kHz (suggested for a 4″ speaker) when I installed my 3.5s. But some people go all the way down to 600hz or lower on their 3.5s. It all depends on what kind of music you mainly listen to and how you want the sound stage.
I used the Infinity Reference REF-3032CFX for my install.
Excellent write up. I just did this on my 2013 4 Runner and it is awesome! Thank you!
You didn’t tell us the polarity of the Green or Black wires.
Can you please put that up on your web page somewhere we can find it?
Thanks:)
I don’t have all these tools (really just the soldering iron) let alone don’t know how to solder. Would there be another plug and play option that you would recommend (beside the Subaru ones)?
You may have already received and answer to this but I’ll comment anyway. I went to Crutchfield to get speakers and there are “kits” that they will include in the purchase of speakers. WELL worth it if you ask me. I picked up speakers, the wire harness kit and a 600hz bass blocker this week and yes….makes a huge difference. Prompted me to do ALL of my speakers. The sound now is incredible even without an amp
Hi Krusty,
I appreciate your response! did you upgrade speakers on a 4runner and if so which speakers did you go with?
Nice write up!
I have a new to me 2016 4runner and I did this install with the Infinitys today. I couldn’t figure out how to make the brackets to work in any configuration. I used a piece of sheet metal to make my own bracket for the outer side and just screwed the inner side down opposite of your right speaker adaptation. It worked out well with no need to cut/grind down the plastic covers. I made adapters and used supplied capacitors as per your instruction or close to it. I put infinity 6x9s in the doors as well today. The 6×9 Infinity Reference door speakers are very nice. If I were to one or the other I think the Door speakers would be the better improvement, easier to install and only about $25 more though I am glad I did both.
I also put Rockford Fosgate 6.5″ in back doors as well as hatch and a 10″ powered sub a couple weeks back which was a much more dramatic improvement for me. The stock rear speakers sounded really awful to me where I think the front stock speakers sounded pretty OK in comparison.
I may eventually change the head unit as well but I have spent about $280 and dramatically improved the sound from the stock head unit. I am using a 10″ sub with a small amp that I had in my old truck, I think I paid $50 for it on Craigslist 10 years ago and don’t include that in my upgrade cost.
I’m using the Taco Tunes harness they supplied. It has 4 wires (2 positive, 2 negative) for the tweeter harness. Do i only use 2 of the wires (positive & negative) and leave the other set? I would wrap them with electrical tape.
I got my own question answered by Taco Tunes for anyone else needing guidance on this:
TACOTUNES-SUPPORT
Howdy
Join together the 2 wires positives together into your positive on tweeter.
Do the same for negatives
So your tweeter will have 4 wires going to it. 2 for positive. And 2 for negative
Black and stripes are negative. Solid red and white are positive.
Hi Frank long time listener first time commenter. Your page is amazing firstly!
I have a 2015 limited which has the JBL system. I wonder if this works with that. Any insight?
THanks!
While I do not have insight on this, I do know that the JBL system is a little different.
Does this work for the new 2020 TRD Pro with JBL’s?
Not that I am aware of, I have heard that the JBL wiring diagram is different.
Great write up, thank you!. May I ask do I see a crossover already soldered to the speaker? If not, what is that used for? I bought similar speakers with the same thing attached, and they didn’t come with supplied crossover. When I tried my new speakers with or without the factory crossover, I cannot hear any difference.
Were you referring to the capacitor? The job of capacitors is to allow only the high frequencies to pass, and cut out some of the lower frequencies.
Hey Frank, thanks for the tutorial. It was nice to have one source for the full install and some guidance on modding the mount for reuse.
Did your speakers come with that 220uF capacitor? I think that will be filtering lots of audio that the speaker is capable of handling with the power of the stock headunit. The 4.7uF cap should be all that’s needed to filter out audio below ~133Hz.
Hi Dane! You’re welcome and thank you! I do think that the speakers are able to handle the sound without the capacitor, however since it was supplied inbox from Infinity, I included it as per manufacturer suggestion.
Great work. Just finished Sounds great. Do you have the same tutorial for the doors?
Door removal and speaker replacement can now be viewed here: https://trail4runner.com/2019/04/30/reference-500q-oem-audio-plus-5th-gen-4runner/
I will have a tutorial coming up for the doors soon in a new article.
Thanks so much for the guide. Got it installed in about 3 hours following this.
Just did this mod to my 2019 TRD 4WD Premium 4 Runner using the Infinity speakers shown here. Didn’t add the extra capacitors, they came with some already installed. I used 3 Stanley flat pieces of steel from Home Depot with holes already drilled in them so I didn’t have to cut up any original parts. I carefully bent the little strips of steel so they kept the new speakers at about the same elevation as the originals. Screwed the one in directly as shown in this post. I also bought the wire harness from Taco Tunes. After all the research and waiting for parts, it was a very smooth install. The difference in sound is very noticeable.
There are dash speakers that are plug & play that takes about 10mins to install. That’s what I did.
Genuine Subaru H631SFJ101 Tweeter Kit https://www.amazon.com/dp/B00PV6F8I2/ref=cm_sw_r_cp_api_i_Zk2ECbW4C00FQ
I considered this swap too. However, the reason why I chose the Infinity component speaker is to add some more midrange into the mix as well.
Hey Frank. I truly appreciate all the info you have compiled on this website.
I am going to attempt the install in a few days. Do you think the TacoTune harness is needed? Also, is there any way to contact you quickly if I have an issue? If not, no big deal.
Thanks again.
I don’t think that the Taco Tunes harness is needed. I adapted the factory speaker components to build a new harness for the new component speakers. The Taco Tunes harness/adapter could make the process much easier since it provides you with OEM connectors.
Thank you for the detailed writeup, I followed this using the TacoTunes wire adapters and a set of JBL Club 3.5″ speakers and it came out great!
Did you use the capacitors? I have the jbl club speakers for this mod coming too. How does it sound after the install? Vocals good? Good replacement for the stocker tweeter functions?
Terry, I reused the stock capacitors when I made the new harness in Step #3. I ordered the Infinity speakers, but I think they are close in quality with the JBLs. It sounded great after the install, and a better replacement for the stock tweeters.
Frank, you mean you used the Infinity “stock” capacitor correct, not the Toyota crossover that came off the factory speaker harness? I think I’m getting ready to do this as well. I like the Tacotunes 12″ subwoofer but I have the Rago panels so I think I have to come up with something else for a subwoofer.
Yes, you’re correct. I used the Infinity capacitors, not the OEM Toyota ones.
I received the harness. Which two did you use to hook up to the speaker or doesn’t it matter? My harness has a red and white for positive and black and white/black for negative.
The infinity speaker I received didn’t have the terminals clearly marked. However, the larger terminal blade was similar to the OEM positive blade and the smaller blade with the negative on the OEM tweeter. The instructions I followed had my capacitor ibetweenthe positve side and the positve terminal of the speaker.
Thanks, Chris! I appreciate the feedback!
Did you put a bass blocker in? Looking at a few other threads about a front speaker upgrade and a lot of people are saying putting a bass blocker in helps the sound a lot. What’s your opinion?
The “bass blocker” was the capacitor that I soldered into the new harness in Step #3.
I read the same opinions in most speaker threads as well. I tested the speaker with, and without the capacitor. Without the capacitor, the speaker was active across a larger frequency, and I have no doubt that it would most certainly be able to handle the frequency and power that was originally sent to the stock tweeter. However, in the end the reason why I decided to install the capacitor, was because it was recommended by the manufacturer (Infinity) in the instructions.
any rattling or speaker coming loose. p.s. great job explaining
Thanks!
I haven’t had any rattling or speakers coming loose.
I wish I could answer this question! The 5th gen has been my first 4Runner, and this has also been my first foray into replacing speaker components myself. I would start searching here first though, http://www.t4r.org
What size and kind of speakers do you recommend for my 3rd gen 4runner?
Seems these REF-3022CFX are not made any longer, I did find these REF-3032cfx just not sure of the difference.
That’s correct. Inifinty updated their REF-3022cfx to the REF-3032cfx. Although I did go with a previous model, they are still a LARGE upgrade from the stock tweeters. That and they were about $30 less on Amazon than the new model.
did you use the existing capacitors or do I need to buy ?
I removed the stock capacitors and used the ones supplied by INFINITY.
Great write-up Frank. Think I have to do this.
Cheers!
-Fred (aka PDXplorer)
Thank you Fred!
excellent showcase of talent and creativity here…could have saved yourself the time by just getting the harness adapters at tacotunes.com…either way, very well done Sir.
Nick, I am interested in the Harness that you are mentioning to make this a little easier. Could you send me a link to the exact one you are referring to? Thanks in advance
tweeter wires for the 5th gen: https://tacotunes.com/shop/toyota-4runner/plug-and-play-wire-harnesses-toyota-4runner/toyota-4runner-tweeter-speaker-wiring-harness-adapter-connector/
door speaker adapters: https://tacotunes.com/shop/toyota-4runner/plug-and-play-wire-harnesses-toyota-4runner/toyota-4runner-aftermarket-speaker-harness-adapter/
Thank you Nick!
Hey Nick, do you have a link for the harness adapters?
Looks good Frank!