
Are you in the market for a front bumper? These days, there are a ton of options with varying designs and price ranges. The Magnum RT front bumper is one of the latest entrants to this category. With an optional bull bar (they call it an RT Bar), this bumper is offered at a competitive price.
The optional RT bar and price point are what drew me to Magnum. While shopping around, I couldn’t decide if I wanted a bull bar or not. So, when I came across this bumper with the ability to add or remove the bar as needed, it was a no-brainer.
Note: The RT bar will block the TSS sensor, so you probably won’t use it if you have a 2020+ 4Runner.
Find It Online:
- Magnum Front Bumper: Check Price
Table Of Contents
Features

“The Magnum RT Series Front Bumper for the Toyota 4Runner is built for the serious off-road enthusiast. The bumper was designed and built to give a greater approach angle, higher clearance of obstacles and front-end protection.”
The bumper has a 1/8″ steel plate shell with 1/4″ steel support braces. It comes in a black textured powder coat finish with no option for a raw finish. With the RT bar installed, it weighs 75 lbs. Without the RT bar installed, it weighs 65 lbs.
The included RT bar is removable via mounting points on the bottom. This is great if you either don’t want to use the RT bar or have a newer 4Runner with the TSS sensor.
There’s a cutout for a 30″ single-row LED light bar and an integrated winch mounting plate that supports up to a 12k winch and synthetic rope fairlead.
The bumper is backed by a limited lifetime manufacturer’s warranty on workmanship and structure and a 1-year warranty on components and finish.
Parts Included:
- Magnum RT Front Bumper
- Bumper Hardware:
- (x6) M10 Bolts, Washers, & Flange Nuts
- (x2) M12 Bolts & Washers
- (x2) Flat Mounting Bracket
- (x2) “L” Shaped Support Bracket
- Optional RT Bar
- RT Bar Hardware:
- (x2) M8 Bolt Plate
- (x4) M8 Nylon Lock Nuts, Washers, & Clear Plastic Square Washers
- (x4) Black Plastic Caps (If you don’t use the RT bar)
- Light Bracket Kit
- (x2) “L” Shaped Light Bracket
- (x2) M10 Bolts, Washers, & Flange Nuts
- Detailed Installation Instructions
Installation Prep

The order of steps you take may vary. I already had a 30″ behind-the-grill lightbar installed, so I had to remove the OEM bumper before installing it into the Magnum bumper. If you bought a light bar and winch for the bumper, I would start with installing those into the bumper first. That way, it’s all ready to go when you install the bumper.
For more detail, check out my video overview of install.
Tools Needed:
- 10mm, 14mm, 16mm, & 18mm Sockets and/or Wrenches
- Breaker Bar
- 1/2″ Drive Torque Wrench
- 1.5″-2″ Masking Tape
- Flat Head Screwdriver or Panel Popper Tool
- Utility Knife
- Dremel or another tool to cut the plastic bumper
- Sander
- Safety Glasses
Just like all aftermarket front bumpers, you will need to remove your OEM front bumper and crash bar first. This process will vary slightly depending on what you have already done to your 4Runner.
Don’t forget that you will need to remove/unplug other aftermarket mods you may have added as well. This includes grille lights, a front camera, behind-the-grill lights, recovery points, etc.
Note: If you have any recovery points installed, you will need to remove those. The Magnum RT bumper uses the same hole in the side of the frame that many recovery points use.
Step 1. Remove OEM Front Bumper

There are a lot of articles as well as the included instructions from Magnum that you can follow on how to remove your front bumper.
Here’s a quick overview.
- Remove screws in your fender well and under your front valance. If you did a viper cut or have removed the front for skid plates, the number of screws you have can vary.
- Remove your plastic radiator cover
- Remove the 10mm bolt and additional clips for the front bumper
- Pop-out sides of the bumper
- Pull the bumper towards you from the front
- Set aside on blanket
Step 2. Remove OEM Crash Bar

Next, you need to remove the OEM crash bar. First, remove the foam piece. Magnum’s instructions say to remove the (x3) bolts in the holes of the crash bar which will give you easier access to the (x4) 14mm bolts on each side. I skipped taking those off and went straight back to the 14mm bolts.
It is a little tighter but not too difficult. You will likely need a breaker bar to get them loose, and a ratchet to get them out. There are little hooks that keep the crash bar from falling down when all bolts are removed. Still, be careful to ensure it doesn’t fall on you.
Note: Make sure to keep the (x8) 14mm bolts handy, as they will be reused to install the Magnum RT bumper.
Step 3. Trim Or Remove Radiator Shields
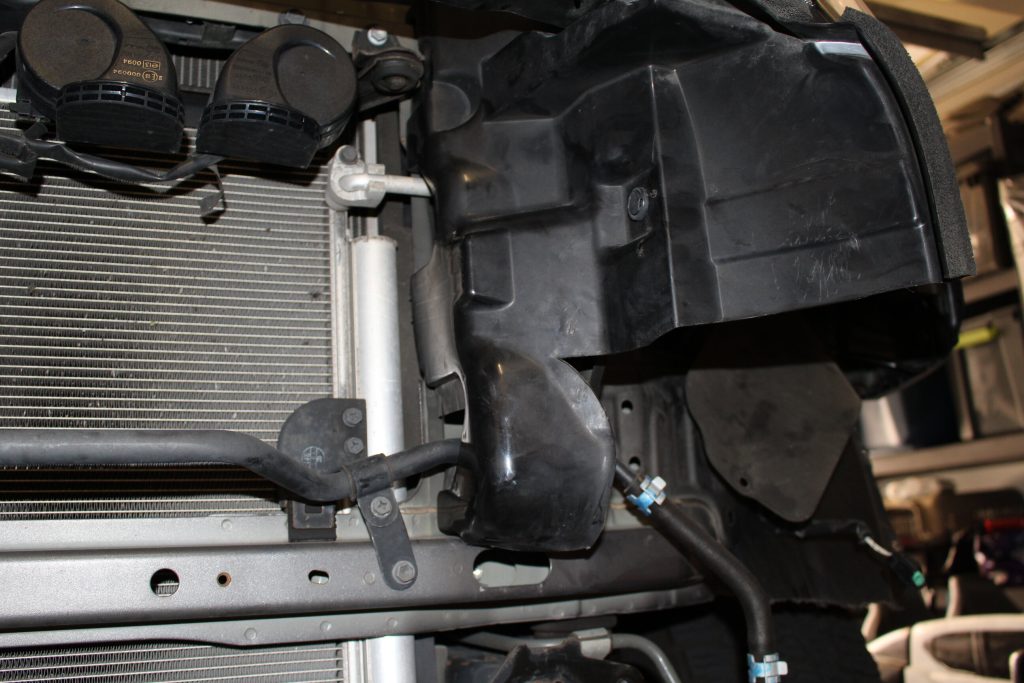
Next, you need to trim or remove the radiator plastic shields. I followed the line that the instructions suggested but there was plenty of space for error and I could have left more plastic.
I have seen some examples where the shields are taken out completely. Personally, I like to keep as much OEM stuff in place as I can since there was a reason it was there in the first place.
Step 4. Install Lightbar/Winch Into Bumper (Optional)
If you’re opting to install a lightbar and/or winch, it’s easier to install these into the bumper before it goes onto your truck. I used the 30″ light bar I previously had, but I did not have a winch to install. If you have a winch, I recommend installing the light bar first, as it is already a tight fit.
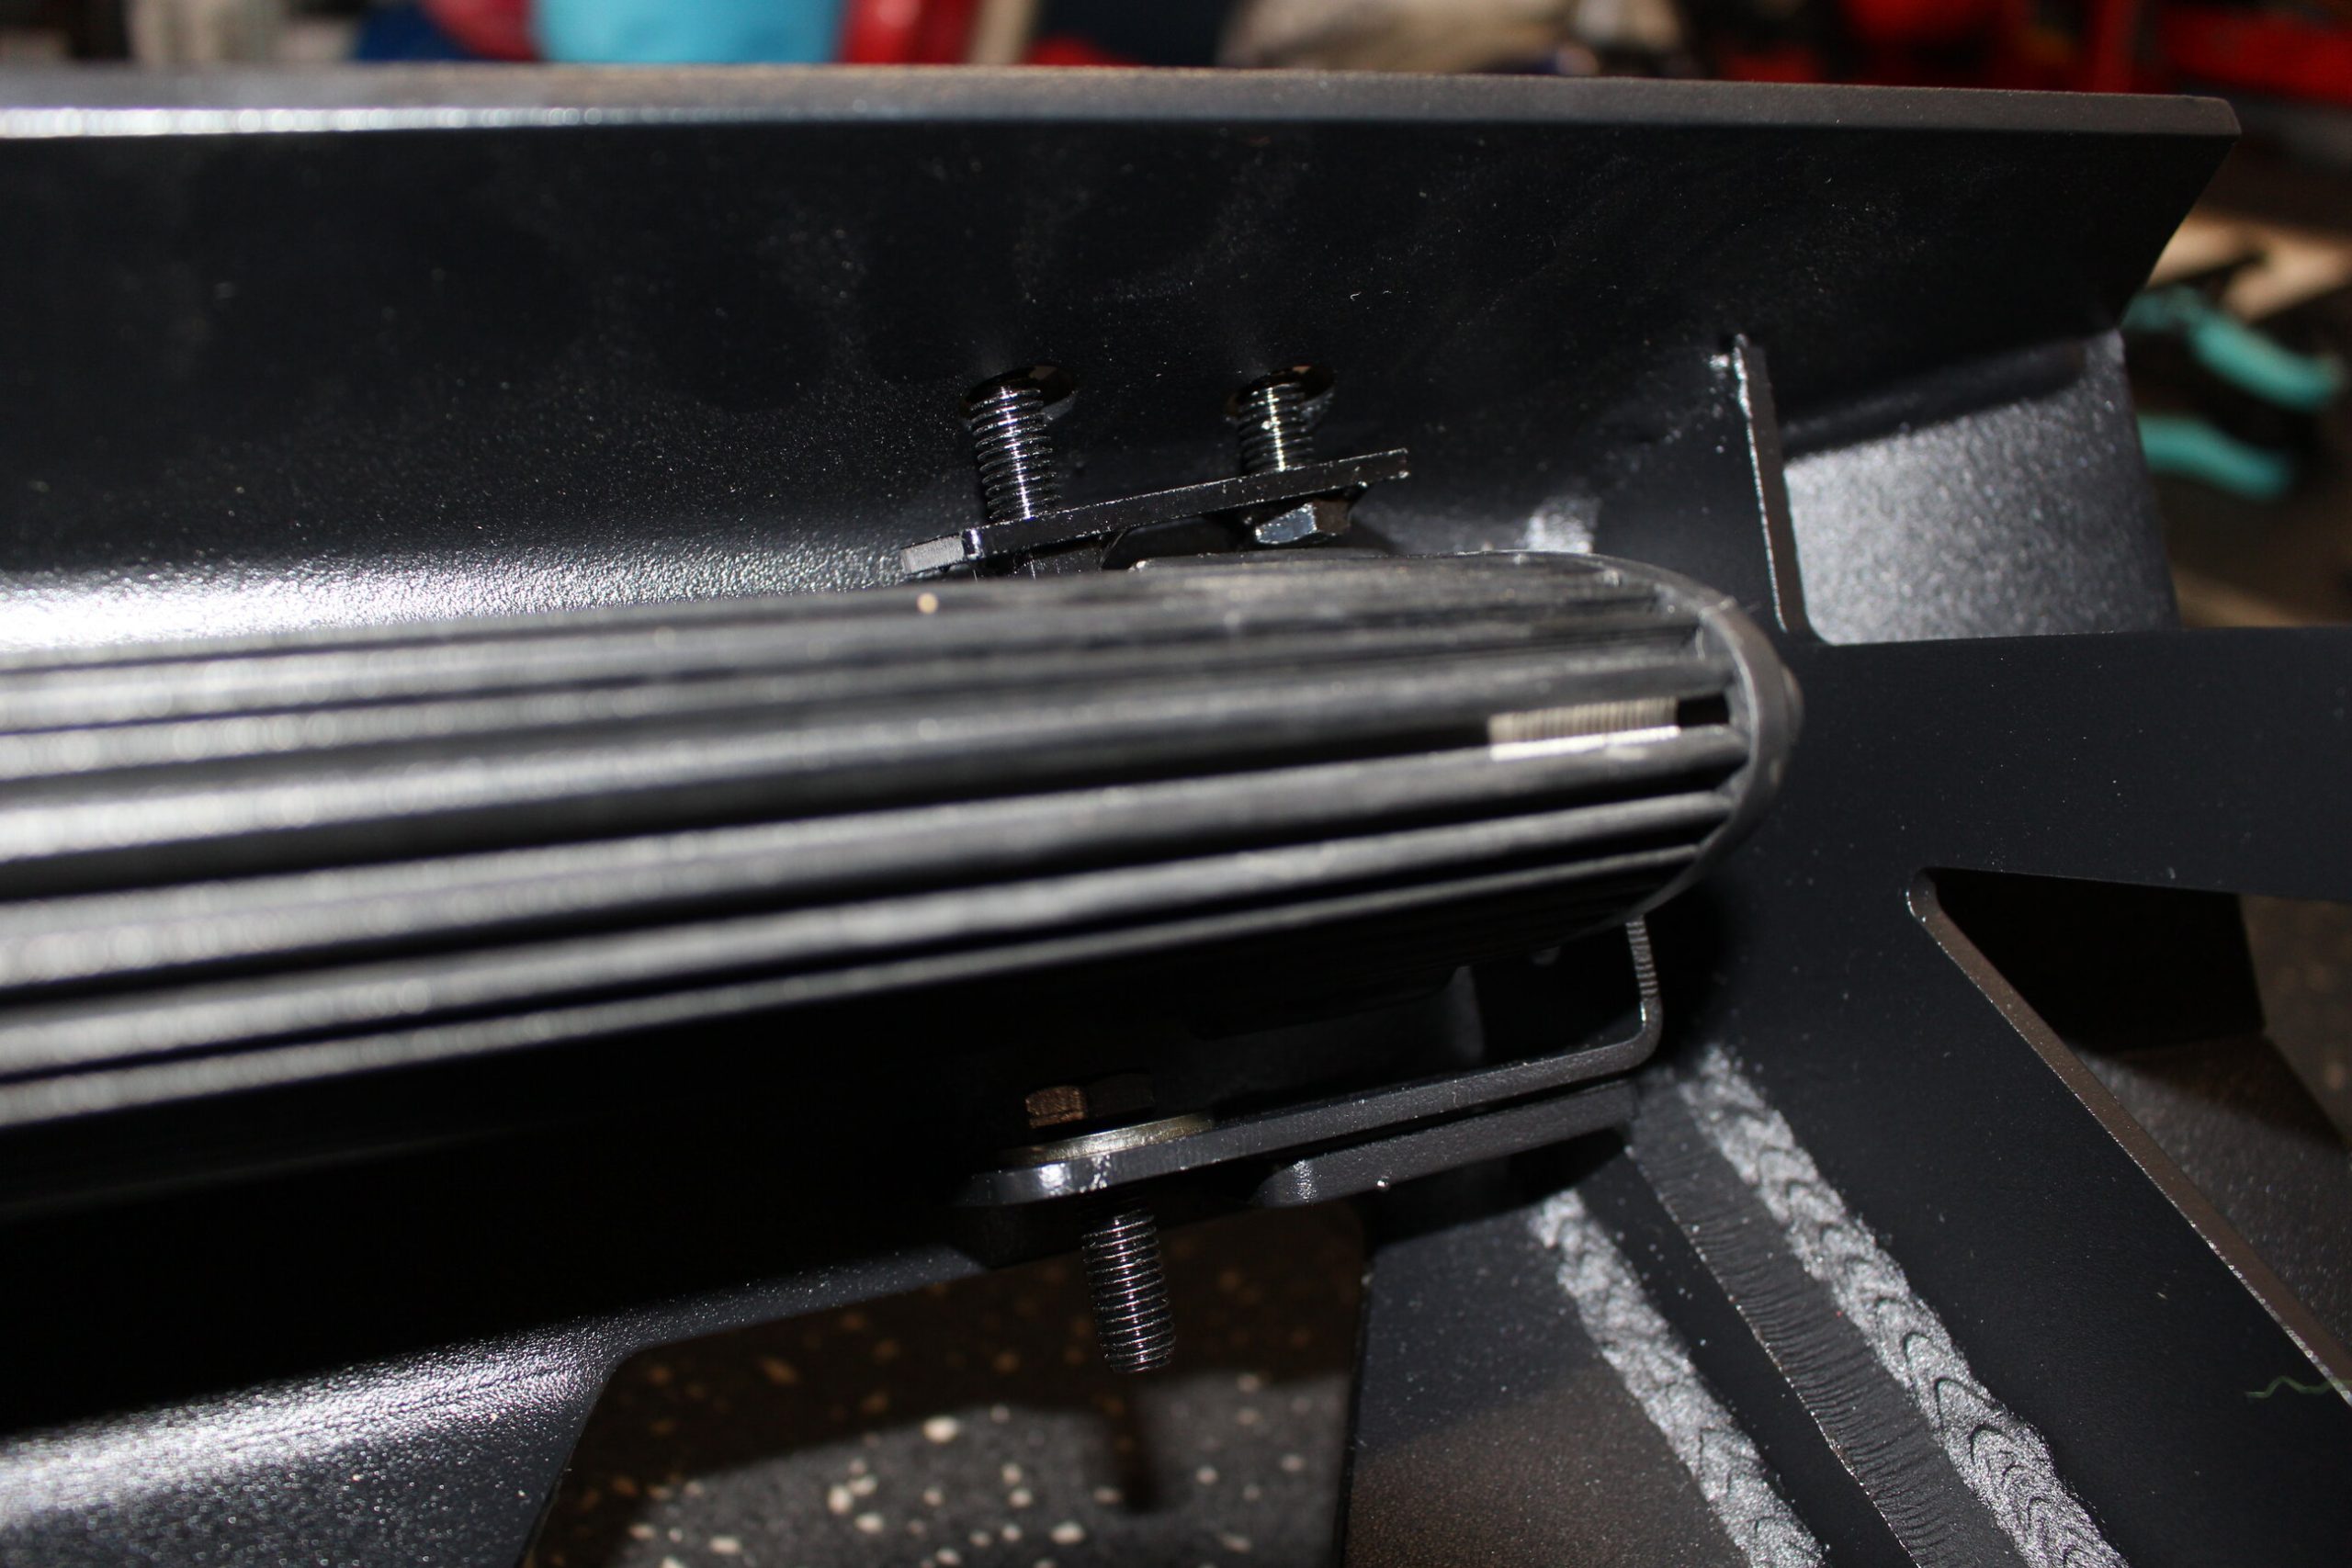
If you are going to install the RT bar, I recommend putting the M8 bolt plate in the holes and using the M8 clear plastic washers to hold them in place. I forgot this step and put them on when the bumper was already on the 4Runner. It was doable but tight. The square washers are a little big and can be seen when the RT bar is installed. I suggest trimming them down a bit, maybe down to 3/4″ x 3/4″ so they will be hidden by the RT bar.
If you are installing a light bar, you will need L brackets, (x2) M10 bolts, washers, and nuts that come in the package already put together.
Depending on your brand of light bar, you will just need to play with alignment. However, the light bar brackets on the bumper and L brackets allow for plenty of room for adjustments.
I found it easiest to put the L brackets on the light bar first, snug them, then attach the L brackets to the bumper brackets. I snugged the bolts for the brackets and then adjusted the position of the light bar where I wanted it before tightening them down.

Note: I suggest having the light bar end with the plug on the driver’s side so you don’t have to run it back across to get to the battery.
If you’re installing a winch, make sure to follow its provided instructions. For example, you may need to push the air conditioning line over. If you are installing an integrated winch that has a control bar built into the top of it, you may also have to relocate the power steering cooler line.
Once you have your light bar and winch installed in your bumper, it’s ready to go on the 4Runner.
Step 5. Install New Bumper

My 4Runner was pretty clean and the frame bracket where the crash bar is mounted to just needed a quick wipe down. Make sure there isn’t any dirt or debris on the brackets that would prevent a tight fit when installing the bumper.
I was able to lift the bumper with the light bar by myself and get the other bolts started. However, it would obviously be easier if you have someone help you. You will see the side of the bumper support is almost like handles, this helps hold it and get it into position.
If you installed a winch, I highly recommend having someone help you lift the bumper as it will be significantly heavier than the bumper alone.
Take (x2) 14mm OEM bolts that held the crash bar on and put one on each side from the back so they stick out towards the front. This will allow you to get the bumper up and have it rest on the bolts while you get the other bolts started.
Once you have the other (x3) of the bolts loosely installed, remove the one bolt you reversed to help hold the bumper up and install it correctly. The holes for these bolts on the bumper are slotted, allowing some wiggle room. I found the best fitment was to let the bumper go all the way down which makes a tighter fit on the OEM bumper once it is on. Once you’re happy with the positioning, snug all of the bolts.
Step 6. Install Support Brackets

Next, you’ll need to add the L support brackets to attach to the side frame hole. The brackets attach to the RT bumper with (x1) M12 18mm bolt and washer into the side of your frame. Make sure the bracket sits flush on the frame and not on the weld. The other side of the L bracket connects to the bumper with (x1) M10 16mm bolt, washer, and a 14mm nut.
Now that you have all bolts on the bracket snug, you can torque everything to spec:
- (x8) M14 14mm OEM bolts for the frame bracket: 85ft/lbs
- (x2) M12 18mm bolts for the side of the frame and L support bracket: 55ft/lbs
- (x2) M10 16mm bolts for the L support bracket to the bumper: 40 ft/lbs
Magnum’s instructions said to add the RT bar once the OEM bumper is on to ensure fitment. However, after seeing the spacing, I think you can safely add the bar prior to reinstalling the OEM bumper if you like. I followed the instructions and saved the RT bar for last.
Step 7. Trim & Reinstall OEM Bumper

This is the most stressful part if you haven’t done many mods on your 4Runner; cutting the center of your OEM bumper. The good news is that the Magnum RT bumper fits really well and hides all of your cuts. So, they don’t have to be perfect. For some other bumpers, you need to be more precise in your cuts as well as use a rubber edge guard to make the cut look cleaner.
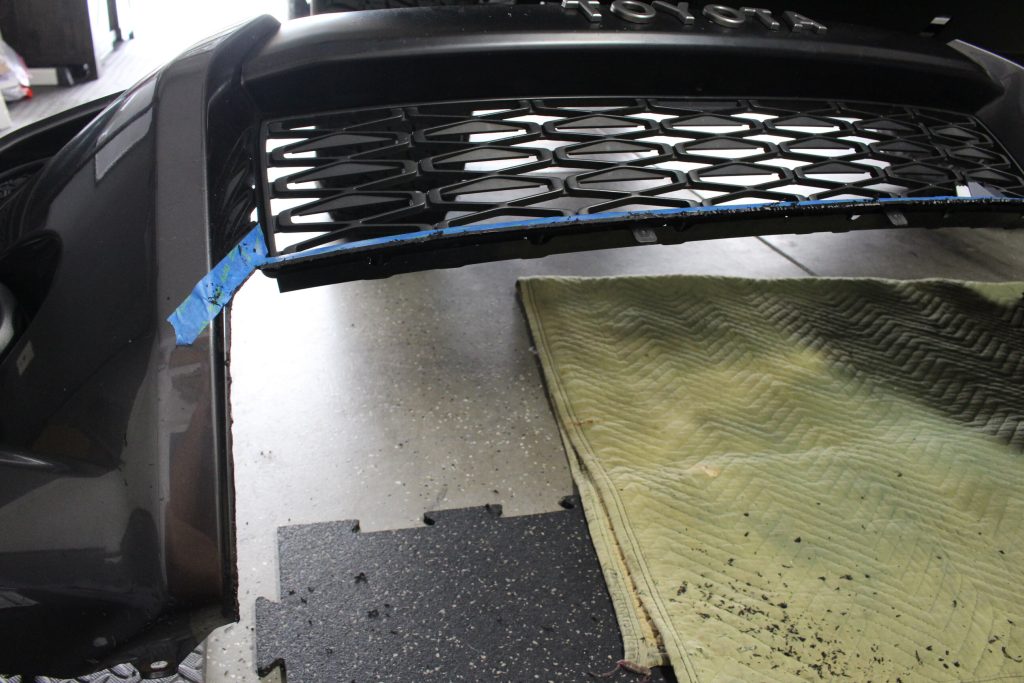
The instructions call for the cut line to be 1.5″ down from the grill and just inside the raised edges on the sides. I went the safer route on the top and made it closer to 2″. For the sides; as long as you cut in the corner along the raised edge, you will be good.
I used a Dremel with a circular blade for the top part and then a tungsten carving bit for the corner that was tighter to get to. I definitely suggest wearing safety glasses for the cutting part. The last thing you want is a hot piece of plastic in your eye.

Take your time and remember you can always cut more off if you didn’t cut enough, but you can’t add it back on. With the Magnum bumper already attached to the 4Runner, you can check fitment. If you didn’t cut enough, you can take it back off and cut some more. Just be careful taking the OEM bumper on and off as you can hit your headlights and scratch them.
Once you are happy with the look and fitment, you can start snapping it back into place and putting the fender liner back in between the brackets and the screws.
Step 8. Install OEM Bumper Support

Lastly, you will need to attach the flat mounting brackets from the Magnum RT bumper to your OEM bumper. Take a bracket, (x2) M10 16mm bolts, 14mm nuts, and washers, line them up, and tighten them. This gives your OEM bumper something to attach to and will help keep it more rigid. If you have a viper cut, you can skip this step.
Step 9. Install RT Bar (Optional)

The bumper looks great with or without the RT bar in my opinion. I decided to install it for a more aggressive look. The RT bar has four slots cut out on the top to mount auxiliary lights if you’d like.

The RT bar is a pretty easy install, so you can take it on and off as you please. When I was test-fitting it, I realized the front lip sits on the main bumper and thought that it might rub against the powder coat. Because of this, I decided to put some foam tape as a cushion to prevent any rubbing.
Hold the RT bar onto the bumper where you have the bracket bolts already sticking out from the bumper. Then, with a wrench, put a washer and a 13mm Teflon nut on the bolts. I found it easiest to start on the outer bolts on each side. Tighten both bolts down tight and into the Teflon part.
That’s it for the RT bar, very simple!
Step 10. Reinstall Lighting & Accessories

If you haven’t done so already, plug your fog lights back in and run any other accessory wiring you have. I won’t go into how to wire your lightbar or winch as there are plenty of articles on here as well as YouTube videos you can reference. Check to make sure everything works properly.
Next, make sure the OEM bumper is fully snapped in and you reinstalled all the screws on the side. Don’t forget the single 10mm bolt by the hood release latch.
Finally, put the plastic radiator cover back on and you’re all done!
If you ever need to make some touch-ups to the bumper, Magnum suggests using Krylon COVERMAXX Paint, Satin Black.
Front Camera Compatibility

The RT bar does block part of the view of my front camera in the original spot. If you are going to add the RT bar, you will need to move your front camera. For now, I decided to use one of the existing holes in the bar to mount my front camera. They do not have a center hole, so it is just a couple of inches off-center.

I am still debating what I want to do for the final setup with the camera. I might drill a center hole on the RT bar or look at a spot on the main part of the bumper.
You can see the wire goes from the bar to the original mounting spot, I’m still deciding how to best route it.
Final Thoughts

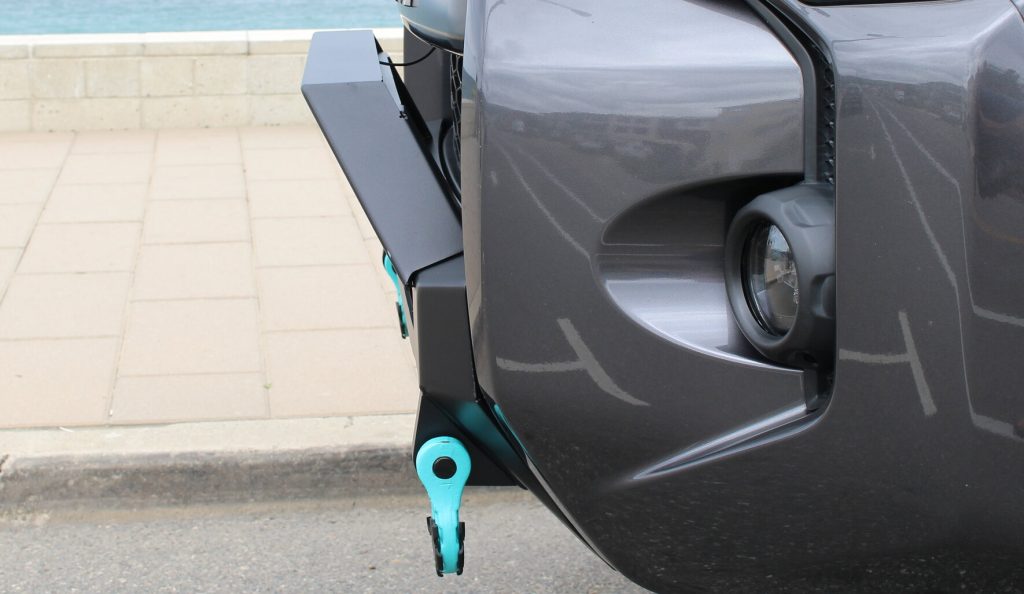
I’m really impressed with this bumper! Magnum has made a great bumper at a much lower cost than the current big-name brands. I also love having the option of installing the RT bar or not.
They really took their time on design and making the overall fitment as best as possible. I have definitely seen other bumpers with poorer fitment and design.
This bumper is pretty light, I currently have a Dobinsons lift installed and it did not make my front end sag at all once installed. However, depending on what suspension you have up front, the additional 35 lbs. over stock could still cause sag. If you install a winch, you’ll definitely notice a small drop in height.
I couldn’t find any flaws with this bumper. The only thing I could think of is maybe having some high-clearance cut add-ons, but that’s nitpicking. Who knows, maybe with enough demand, they will make some down the road!
“Note: The RT bar will block the TSS sensor, so you probably won’t use it if you have a 2020+ 4Runner”
For those of us looking for a bull bar component, this is a dealbreaker and definitely should be listed as a “con”