
It’s no secret that the 4Runner’s center console has some pretty useless storage cubbies. While the internet has found some creative uses, they generally aren’t very useful. If you’ve wanted to add some easily accessible, organized storage, Cali Raised has just the solution for you with their Center Console MOLLE Panels.
MOLLE panels are a great way to organize your 4Runner’s interior, thanks to the plethora of accessories available for mounting on them. Are you tired of picking up your water bottle and having the rubber cupholder insert stuck to the bottom of it? You can easily add a MOLLE-compatible water bottle holder with the Center Console MOLLE Panel.
Center console MOLLE panels are also a great place to store your EDC gear, such as knives, flashlights, or even to mount radios. If you’re looking for an easy way to mount items to this MOLLE panel, check out the R4T Molle Mounts here. This mounting hardware makes it super simple to mount your gear and accessories.
Find It Online:
- Cali Raised Center Console MOLLE Panels (Sold as a pair): Check Price
- R4T MOLLE Mounts: Check Price
- Size: 1″x1.5″ or 1″x0.75″
- Fits: Cali Raised Panels
Table Of Contents
MOLLE Panel Overview

The Cali Raised Center Console MOLLE Panels are laser-cut from 12-gauge American steel and come powder-coated. They are backed by a 2-year warranty, just like Cali Raised’s in-house products.
I really like the use of Allen-head screws and threaded inserts for mounting them because it allows quick and effortless removal to add your favorite accessories. It’s way easier to take the panels off than it is to fish MOLLE webbing straps through one that’s already installed.
Note: There is a slight bend in the panels; this is intentional to follow the contour of the center console better.

I can appreciate the clean aesthetic that Cali Raised went for with their Center Console MOLLE Panels. I was never a fan of the full cage-type panels that surround the shift knobs. To each their own, but those are just a little overkill for my needs. The Cali Raised panels are super low profile and are discreet enough not to draw unwanted attention while your rig is left unattended.
Installation
Installation is super quick for these MOLLE panels and takes less than 30 minutes. They come with all of the required hardware and can be installed with simple tools. It doesn’t matter which side you start the installation on; the steps are exactly the same for both.
Tools Required:
- Power Drill
- 3/8″ Drill Bit
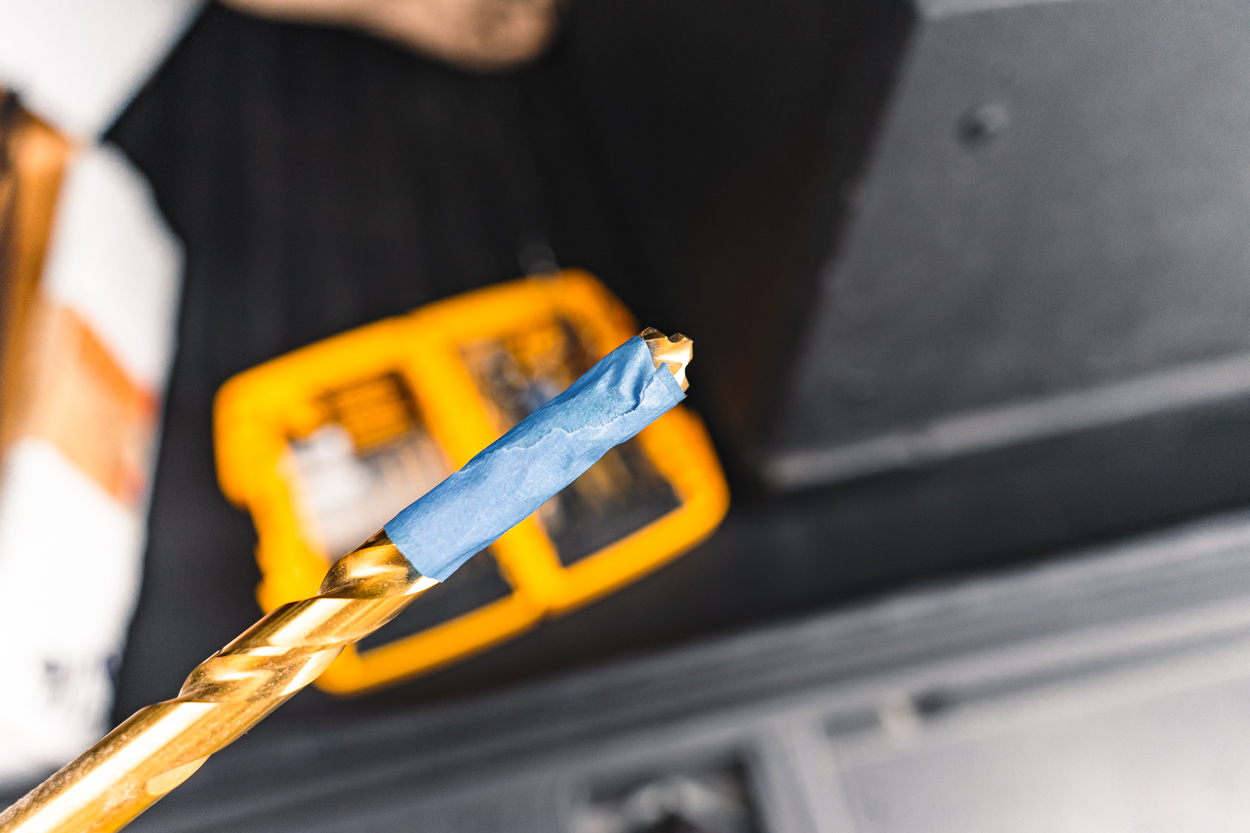
- Masking Tape (Optional)
- 5/32″ Allen Key
- 1/2″ Wrench
- 7/16″ Socket & Ratchet
Step 1. Remove Shift Knob(s)

You’ll first need to remove the transmission shift knob (and transfer case shift knob, if applicable). To remove either shifter, twist counterclockwise until you can pull it off the shifter rod.
Step 2. Remove Center Console Trim Panel

With the shift knobs out of the way, you can remove the center console trim panel. Firmly pull straight up on either side to start disengaging the retention clips.

On the passenger side, a wire harness must be unclipped before the trim panel is completely free. Once all of the retention clips are free and the wire harness is unplugged, you can pull the trim panel up and over the shift levers.
Step 3. Align Center Console MOLLE Panels

When positioning the Cali Raised Center Console MOLLE Panels, be sure to pay attention to any wiring inside the center console. Ensure that when marking the mounting holes for drilling, you avoid hitting or damaging any of the wires. Cali Raised recommends positioning the panels after the center console curves and becomes straight.

You can use a black marker to mark the mounting holes to be drilled. I used a drill bit to make a small etching instead, as a black marker on black trim was hard for me to see.
Step 4. Drill Mounting Holes

The mounting holes for the threaded inserts will use a 3/8″ drill bit. It is recommended that you use masking tape on your drill bit to serve as a stop, preventing you from accidentally drilling too far into the center console.
Step 5. Install Threaded Inserts

The threaded brass inserts should install into the drilled holes with little effort. After placing the inserts (three per side), use the provided hardware to secure them in place.

Place the hexagon-shaped long nut over the long bolt, then start threading the bolt into a threaded insert.

Once you feel the bolt start to have resistance, use a 1/2″ wrench to hold the spacer in place while you use a 7/16″ socket to hand-tighten the bolt.

As you begin to tighten the bolt, it will start to crush and secure the threaded insert on the inside face of the center console. It does this in a similar way to how drywall anchors work.
Note: Be careful not to over-tighten the bolt, as the threaded insert may cause the center console plastic to deform.
Step 6. Install Center Console MOLLE Panel

With the threaded inserts secured, you can now install the Center Console MOLLE Panel. Insert a bolt with a washer through the outside of the panel with a small washer on the inside face.

Hand-tighten the Allen-head screw with a 5/32″ Allen key.
Once you’ve finished tightening all three mounting screws, repeat the installation process on the opposite side.
Final Thoughts

I have to admit that I was hesitant to drill holes into the center console of my fairly new 4Runner. Generally, I try to avoid irreversible modifications. However, I think the Cali Raised Center Console MOLLE Panels are an exception to that rule.

These really are necessary to add any real organization to the front of the 4Runner’s cabin. This is an excellent area to mount radios, flashlights, personal protection devices, or anything else you’d like. With only two cup holders to stow items on the center console, I know that my wife will appreciate me adding a water bottle holder or MOLLE-compatible storage bag to the passenger-side MOLLE panel.
If you’re looking for a simple organization solution for your 4Runner that won’t break the bank, definitely take a look at Cali Raised’s Center Console MOLLE Panels! They’ve made me a firm believer in center console MOLLE panels, and for my inner OCD, it is well worth the measly three mounting holes that I had to drill.
Weird question but what is the total length? Can’t seem to find that info anywhere. Looks great!
I have their rear window molle panels and overhead tray. Installation was quick and easy. I’m hoping to do the center console molle next, and this is going to be my go-to guide!
Have had my Victory 4×4 banana holder for over a year now! Great for holding emergency knife, sharpie, and tactical pen by my right leg. Used the passenger side to mount my phone holder. With the T10 head unit, I like have a super clear line of sight now.
Sounds like an awesome setup! It’s mind-boggling how little storage/organization we get from the factory
Got a set of the Rago version a while back. The functionality is nice for anything with magnets and quick access stuff like flashlights, pouch mounted gear and all your every day run of the mill EDC gear. TSO makes a set of these as well. All of them pretty much offer the same functionality.
Wow, I hadn’t thought of magnets – thanks for the tip!
Ridiculously stupid
I used to think it was crazy to do this but the more I look for ways to keep everything neat and quick access the more this makes sense to me. The setup here looks pretty good in comparison to others
For sure, that area is typically wasted space so more organization certainly can’t hurt.