
I’ve been very pleased with the VIAIR 88P that I’ve been using for a few years, but decided that I wanted something that was faster, had a longer duty cycle, and that I could hard-mount for onboard air. I chose the latest hard-mount automatic compressor from the folks at VIAIR, the 400H-A.
The portable 88P compressor I previously had was nice, but it took a little time to connect and disconnect each time I used it. In addition, I had to be careful where I stored it after use, as it got very hot. It also took up cargo space and was an extra item to add to the packing list for each trip.
The solution for all of the above is to hard-mount a compressor in the engine bay. Bryson Hicks showed us how to do this with a Smittybilt 2781 compressor a couple of years ago. I mounted the VIAR 400H-A in a similar fashion, but without the need for a welder or rivnuts.
Table Of Contents
Features and Specs

The 400H-A has a 33% duty cycle at 100 PSI (or ~40 minutes at 40 PSI), which makes quick work of filling tires up to 35 inches. With an IP54 rating and moisture-resistant power switch, the compressor is designed to live in engine compartments like those in our 4Runners, which may see plenty of dust, water, and mud.
If you’re not familiar with the term “automatic” as it applies to compressors, the 400H-A has an automatic shut-off function that keeps it from droning on in the background, as you move from tire to tire or check the pressure.
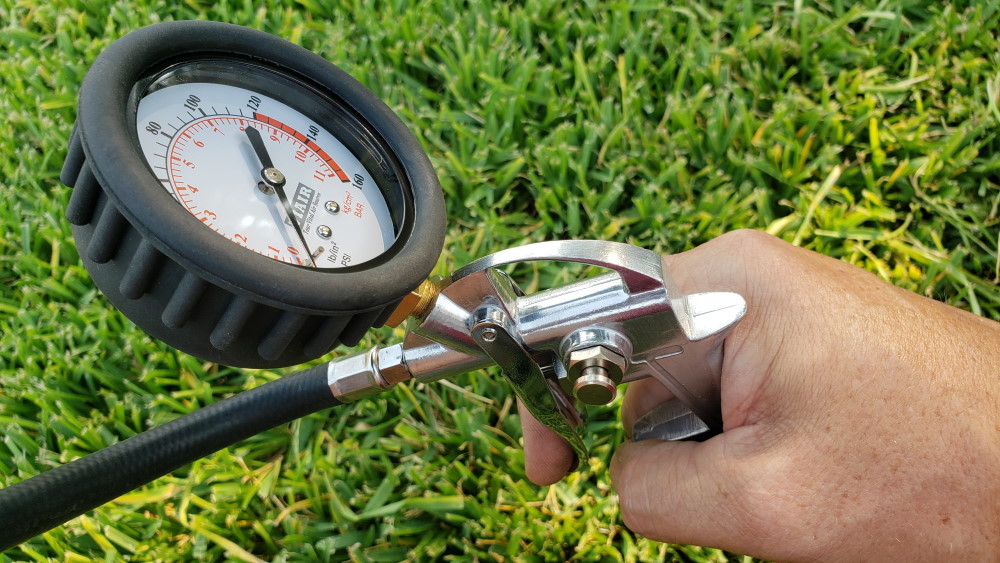
Speaking of pressure checks, the 400H-A includes a trigger-type inflation gun, which has a 160 PSI gauge and a built-in release valve—got a little too much air? Bump the button that is the release valve, let out some pressure, and the gauge will show the pressure in real-time.
The inflation gun connects to a 30-foot coiled air hose with bend restrictors and quick-release fittings on both ends, making it easy to use and ensuring a long-lasting life. The 400H-A also includes a zippered, nylon bag that is big enough to contain the inflation gun and hose (plus a few extras, like Coyote Automatic Tire Deflators), but small enough to tuck away in the glove compartment or one of the storage spots in the rear cargo area.
Fill Rates
VIAIR published the following specs for the 400H-A:
31″ X 10.5″ FILL RATE
- 0 to 30 PSI 3 min. 00 sec. (± 10 sec.)
- 15 to 30 PSI 1 min. 35 sec. (± 05 sec.)
33″ X 12.5″ FILL RATE
- 0 to 30 PSI 4 min. 20 sec. (± 10 sec.)
- 15 to 30 PSI 2 min. 05 sec. (± 05 sec.)
35″ X 12.5″ FILL RATE
- 0 to 30 PSI 5 min. 20 sec. (± 15 sec.)
- 15 to 30 PSI 2 min. 45 sec. (± 05 sec.)
I’ll speak about my experience inflating the 285/70-17 tires on my 4Runner later in this article.
Modifying the Battery Tray for Compressor Mounting

What to Buy
- VIAIR 400H Hardmount Compressor
- C4 Fabrication 5th Gen 4Runner Spare Battery Tray – Passenger Side
- 90 Degree street elbow fitting, 1/4″ NPT male X 1/4″ NPT female
- Haltec H-5265 Standard Bore Lock-On Air Chuck – optional
- One 3/8″ ID Bolt/screw thread protector – optional
Tools/Supplies
- 3/8″ Drive ratchet
- 3/8″ Drive socket extension, 6-8″ long
- 10mm Socket
- Wirecutter/crimper
- 14mm Combination wrench or adjustable wrench
- Teflon tape or liquid pipe sealant
- Zip ties
- 1/4″ Split wire loom (not mandatory, but nice for a clean installation)
- Loctite Threadlocker Blue 242 (not mandatory, but prevents loose hardware in the future)
- Magnetic pick-up tool (not mandatory, but helpful if you drop any hardware)


Because the 400H-A is meant to be hard-mounted, the steel base has rubber-sleeved mounts that will help isolate vibration from the compressor. Included hardware can be used to bolt the compressor onto any flat surface that is big enough for the footprint.
In my case, that footprint was the spare battery tray from C4 Fabrication. It is designed to support the weight of a full-size battery, so it is a solid piece! In addition, it fits perfectly into the empty spot in front of the firewall on the passenger side and ties into existing threaded holes on the fender and studs below.
I started by temporarily installing the battery tray into my 4Runner in order to determine how I wanted the compressor to be located/oriented. I initially positioned it with the power switch and air hose connector facing the engine, but later decided to rotate the compressor 180 degrees to keep the “soft parts” further away from the engine, and the hot parts of the compressor away from the wiring harness/plug that is mounted to the inner fender well.
The spacing of the mounts in the base of the compressor is 187.5mm apart in length and 84mm apart in width. I measured this out on the battery tray and then drilled 3/16″ holes at each corner.
IMPORTANT NOTE: Before drilling holes in the tray, note the position that the compressor would be when bolted to the tray, and ensure that you can get to the studs that secure the bottom of the tray, with the compressor already installed on the tray. The position of the holes shown in the second of the above photos illustrates how I accomplished this.
Paint the Battery Tray


The battery tray is bare steel when it ships from C4 Fabrication. Normally, I’d choose to have bare steel parts on my 4Runner powder-coated, but since the tray will be under the hood and mostly out of the elements, I decided on a DIY finish. I painted the tray with semi-flat spray paint from Krylon, called Rust Tough. This is an alkyd enamel paint that I’ve used before with good results. It takes a little longer to dry, but it is easy to paint with and is surprisingly durable.
Attach the Compressor to the Tray

Next, the compressor can be bolted to the battery tray. The compressor includes a set of bolts, washers, and nuts to do this. I chose to install some upgraded fasteners, which I picked up from my local hardware store – four M5x30mm bolts, four M5 washers, and four M5 nylon locknuts, all in stainless steel.

Installing the hardware is easy and requires typical hand tools – a ratchet, a socket, and small wrenches. If you choose to use the VIAIR-supplied hardware, I suggest putting Loctite Threadlocker Blue 242 on each of the bolts to keep them from coming loose.
Installing the Battery Tray and Compressor
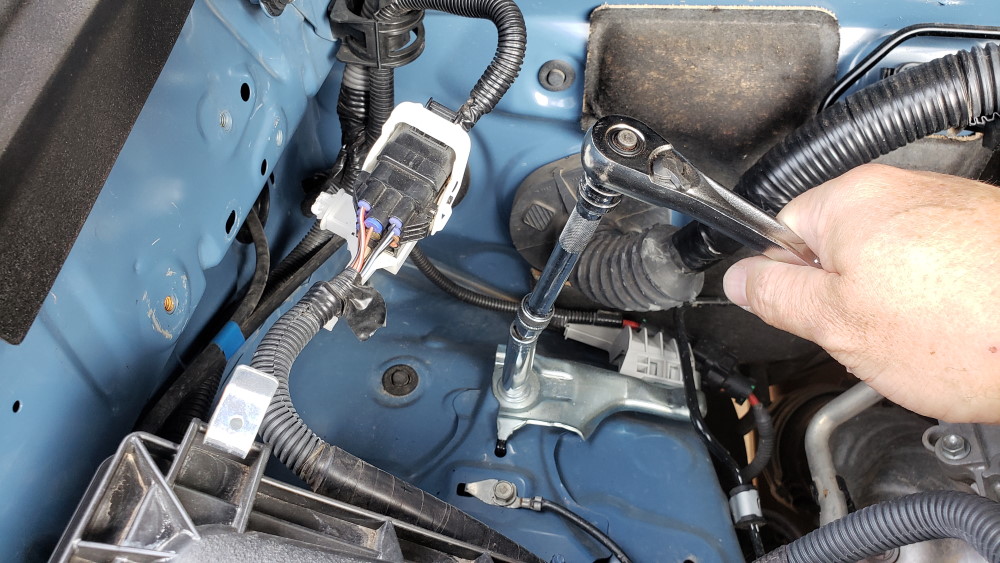
Under the hood of the 4Runner, in the larger empty spot between the airbox and firewall, there is a large metal bracket, held down by a nut. Use a ratchet, extension, and 10mm socket to remove the nut. I temporarily removed the bracket that attaches the wiring harness/plug to the inner fender to give me some more room, but found that doing so made the bracket fit loosely when I reinstalled it.
Carefully maneuver the tray and compressor into place. The two raised spots on the bottom of the tray will go over the two existing studs on the 4Runner (one from the previous step, and one that is a bare stud).

Use two of the bolts supplied by C4 fabrication to attach one side of the battery tray to the inner fender well. The bolts will go into existing, threaded holes. Add a few drops of Loctite Threadlocker Blue 242 to the bolts before installing them. NOTE: Do not fully tighten these yet.

Use two nuts and washers to fasten the bottom of the tray in place. The one closest to the firewall is a little tricky, due to limited room. I found that it was easiest to use a magnetic pick-up tool to place/start the washers and nuts on the factory studs. Add a few drops of Loctite Threadlocker Blue 242 to the nuts or studs.

Ensure that the battery tray is fully seated, then tighten the bolts in the inner fenders and the nuts at the bottom of the battery tray. If desired, use one of the bolts or studs for the compressor ground wire, as mentioned in the next section.
Wiring the Compressor


The 400H-A has two heavy-gauge wires coming out of one end, below the power switch. The black negative wire should be connected to a good ground source. I crimped the included ring terminal onto the black wire and attached it to one of the fasteners used to attach the battery tray to the body of the 4Runner.
Routing and Connecting the Wires

The red, positive wire includes a 40-amp inline fuse holder. Although you could route the insulated wire through the engine bay and over to the battery, I encased the wire in a 1/4-inch split wire loom that I picked up at a local auto parts store. The split is not only easy to install but also protects the enclosed wire and offers an OEM look.
I ran the wire loom along the top of the firewall and zip-tied it above the existing factory harness/loom that takes the same route. You have to look to realize it wasn’t there all along. The end of the wire is clamped onto another ring terminal and attached to the positive battery terminal (or the switch/terminal box of your choice).

Test the compressor by moving the power switch to the on position.
Modifying the Compressor

When I decided to mount the compressor with the power switch and air outlet towards the inner fender, I realized that things would be easier if I added a 90-degree fitting between the compressor and the fitting at the air outlet. This would provide more clearance and easier installation/removal of the coiled air hose.


- Use a 14mm combination wrench or adjustable wrench to remove the straight air fitting from the end of the compressor’s air outlet.
- Apply Teflon tape or pipe sealant to the male end of the 90-degree street elbow fitting (1/4″ NPT male X 1/4″ NPT female).
- Insert the male end of the elbow fitting into the air outlet of the compressor, then tighten it with a wrench until it is at a 45-degree angle to the handle (up and out).
- Apply Teflon tape or pipe sealant to the male end of the fitting previously removed in Step 1.
- Insert the fitting from Step 1 into the female end of the 90-degree street elbow fitting and tighten it with a wrench.

When not in use, place the 3/8″ ID thread protector over the end of the straight air fitting to prevent foreign objects from getting inside.
Modifying the Air Hose

Although the 400H-A includes a nice trigger-type inflation gun, I prefer using a lock-on air chuck and timer method to inflate my tires—more on that later.
Adding a lock on an air chuck, like the Haltec H-5265, is quick and easy. Simply use a couple of wrenches to remove the brass, quick-release coupler from the end of the coiled air hose. Apply Teflon tape or pipe sealant to the male end of the fitting at the end of the air hose, screw on the lock on the air chuck, and tighten with two wrenches. Afterward, check for leaks.
Using the Compressor

After installation, using the compressor couldn’t be much easier:
- Attach the coiled air hose to the straight air fitting on the compressor by sliding the collar on the larger end of the hose back, inserting the hose onto the fitting, and letting go of the collar while pressure is still applied to the hose/fitting. It should snap into place.
- On the opposite end of the air hose, a brass, quick-release coupler is. Slide the collar back on the coupler and insert the straight air fitting from the inflation gun into it. Let go of the collar while pressure is still applied to the hose/fitting, similar to what was done when attaching the hose to the compressor.
- Move the power switch to the on position. The compressor will run briefly until it reaches the auto-shutoff pressure.
- Attach the air chuck end of the inflation gun to the valve stem of a tire to be inflated.
- Pull the trigger to start the flow of air. The compressor will turn on.
- To check air pressure, release the trigger, and read the gauge. If more inflation is needed, squeeze the trigger again and then re-check. Repeat until the desired pressure is reached.
- If a tire has more than the desired amount of pressure, press the button on the left side of the inflation gun to release pressure. Then, check the gauge to determine tire pressure.
Final Thoughts

Above is my modified air hose, with a Haltec air chuck installed and locked onto a valve stem.

The coiled air hose and inflation gun fit nicely in the zippered storage bag above the passenger side, rear wheel.

If I were to use the trigger-type inflation gun that comes with the 400H-A, I’d swap the 160 PSI gauge for one closer to the inflated/deflated range of my tires for greater accuracy, with a larger/easier-to-read scale. An analog gauge with a PSI range of 0-60, a 1/4″ male NPT fitting at the bottom, and costing less than $20 would be perfect. Although more expensive, a digital gauge with the same fitting is another option.
Rather than using an inflation gun, I prefer to attach a lock-on air chuck to a valve stem and let the compressor run for a set amount of time. This takes a little trial and error to determine how much pressure is raised over a certain amount of time.
When using the 400H-A to air up the 285/70-17 tires on my 4Runner, I’ve found that it takes approximately 2 minutes and 30 seconds to inflate each tire from 20 PSI to 35 PSI. Rather than sitting and monitoring each tire during this process, I’ll set a timer on my phone for 2 minutes and 30 seconds, start the compressor, and wait for the phone alarm to sound. In the meantime, I’ll do something else, like check my gear, have a quick snack/drink, or talk with friends.
Compared to the VIAIR 88P, the 400H-A inflates each of my tires about 60-75 seconds faster and doesn’t get slower on the last tire, as the 88P did. That performance increase, coupled with the convenience of having a hard-mounted compressor under the hood, makes the VIAR 400H-A an excellent choice in my book.
any updates after 1 year? How has it been holding up to the heat in the engine bay?
I’ve had the compressor mounted underhood for 2.5+ years now, and it still works great 👍👍
Why the 400H instead of the 450P? The 450P is continuous duty rated.
Hi Brett. The 400H puts out more CFM than the 450P, and the 40 minute continuous run time limit is more than triple the amount of time it takes me to air up all of my 285/70-17 tires.
This is an amazing write up! I want to do this the same thing. Would it be possible to use this set up with my Firestone airbags AND use it as a compressor for tires?
Thanks, Josh!
I’m not sure how an air bag setup is plumbed, as I don’t have experience with them. If you can set them up so that there is an air valve that can be inflated with the same air chuck as is used to inflate tires, the on-board VIAIR compressor could be easily used for both. You could also probably also plumb in a tee, with valve that allows air to flow to the bags, or an air chuck.
Unrelated- but noticed the yellow pelican case in the rear- looks like a great fit -which box size is it? Thx.
@Facto – the case is a Pelican 1120, and it does fit well in that spot. Mine is loaded with first aid supplies. See my DIY first aid kit article at https://trail4runner.com/2019/08/05/diy-vehicle-off-road-first-aid-kit/ for more info.
Awesome thx & I’ll check the article
Great article! Thanks.
Thanks, Kevin! 👍