
Smittybilt 2781cfm On-Board Air Compressor on the 5th Gen 4Runner (Passenger Side Mount)
The Smittybilt 2781 is currently the highest CFM air compressor available other than the dual ARB compressor.
However, at about $400 more for the dual ARB compressor, it is difficult to justify the cost for the 10% increase in performance, so the Smittybilt 2781 is a great option for most people.
You can see the full review of this Smittybilt compressor that Brenan previously wrote.
Unfortunately, and unsurprisingly, the Smittybilt 2781 is much larger and heavier than the less powerful VIAIR options, so it is a pain to get set up and takes up a lot of room to store it. This makes permanently mounting the compressor in the engine bay an appealing option.
There are no pre-made products for mounting the Smittybilt 2781, so in this guide, I will show you how to use the C4 Fabrication spare battery mounting tray to create a sturdy mounting solution.
ITEMS YOU WILL NEED:
- Smittybilt 2781 (Amazon): Check Price
- Smittybilt 2781 (4WheelParts.com): Check Price
- C4 Spare Battery Tray: Check Price
- ¾” Grommet or Similar
- Rivnuts: Check Price
- Paint: Check Price
- ¼” Hose Coupler: Check Price
- Hose Coupler: McMaster-Carr 53425K63: Check Price
- 90° Barbed Hose Fitting: McMaster-Carr 5346K122: Check Price
Mistakes Were Made…
Because there are no guides on how to do this already available, I had to make educated guesses as to the best way to mount the compressor to the battery tray.
I made a few mistakes along the way that made it unnecessarily difficult for me. I’ll be mentioning these mistakes and what I would have done differently so it should be much easier for others to do this install.
PREP ENGINE BAY & PLAN OUT COMPRESSOR MOUNTING

C4 Fabrication has an excellent guide on how to install the battery tray in the 4Runner available here. You will need to move around some stock wiring harnesses and remove some stock brackets. Review this guide and prep the wiring harnesses, but don’t bolt down the battery tray yet, and you can skip the steps involving the top battery bracket.
Next, you’ll need to figure out where to mount the air compressor unit.
Start by removing the original tray on the compressor.
Mistake #1: I mounted my compressor on the rear side of the tray (closest to the firewall). The compressor fits fine right here, but it was very difficult to bolt it in place once the battery tray was mounted.
Solution: Instead, mount the compressor as close to the front (away from the firewall) and with the switch end as close as possible to the left of the tray without touching. Roughly test fit everything inside the engine bay to confirm that everything fits well.
Mark the four locations where the bolts will go.
DRILL MOUNTING HOLES

Drill the four locations where the bolts will go.
DRILL LARGE HOLE FOR TUBE

This assumes that you want to mount the hose outlet in the wheel well instead of the engine bay.
You can make this project a fair amount easier by just leaving the hose outlet in the engine bay, but you will have to open the hood every time you want to fill up the tires.
To get the hose down to the wheel well you will need to pass it through the mounting plate so that it does not get too close to the engine exhaust manifold.
Use a stepped drill bit to drill a 15/16” hole so you can fit a ¾” grommet in the plate.
Mistake #2: I drilled this hole on the front side of the tray (away from the firewall) since I mounted my compressor on the rear side of the tray.
Solution: Because you should actually mount the compressor on the front side of the tray, you will need to drill this hole in the firewall side of the tray. So, drill the hole in the corner that is close to the firewall side edge of the tray and the edge closest to the engine.
MOUNT AIR FITTING INTO WHEEL WELL

Again, this assumes that you want to mount the hose outlet in the wheel well.
Mistake #3: I made my own air fitting mount with some leftover aluminum stock I had. In hindsight, it would have been much easier to just buy a premade product.
Solution: Rago fabrication makes an excellent solution for this (linked above). Their kit comes with 4 mounts, but you will just need the front passenger side mount. Connect the two air fittings linked above through the air fitting mount, using Teflon tape to give a tight fit and airtight seal. Then, mount the new air fitting and mount in the wheel well in the location shown in the picture.
Important Note On Air Fitting Replacement Parts:
The air fitting that Smittybilt uses is a special fitting difficult to find a replacement for. I was able to find that the fitting is a Japanese quick disconnect hose coupling.
You can replace the fitting with a standard industrial air fitting, but then you will have to replace the female end on the hose as well. McMaster-Carr sells the fitting needed under part #: 53425K63. Since you are buying that air fitting, anyway, you can get the other needed part under part #: 5346K122.
If you would like to use universal air fitting parts, you can see that process here.
THE INSIDE VIEW of AIR FITTING
In this photo, you can see how the other half of the fitting should be facing up and angled toward where the drilled hole in the plate is going to end up after the mount has been installed.
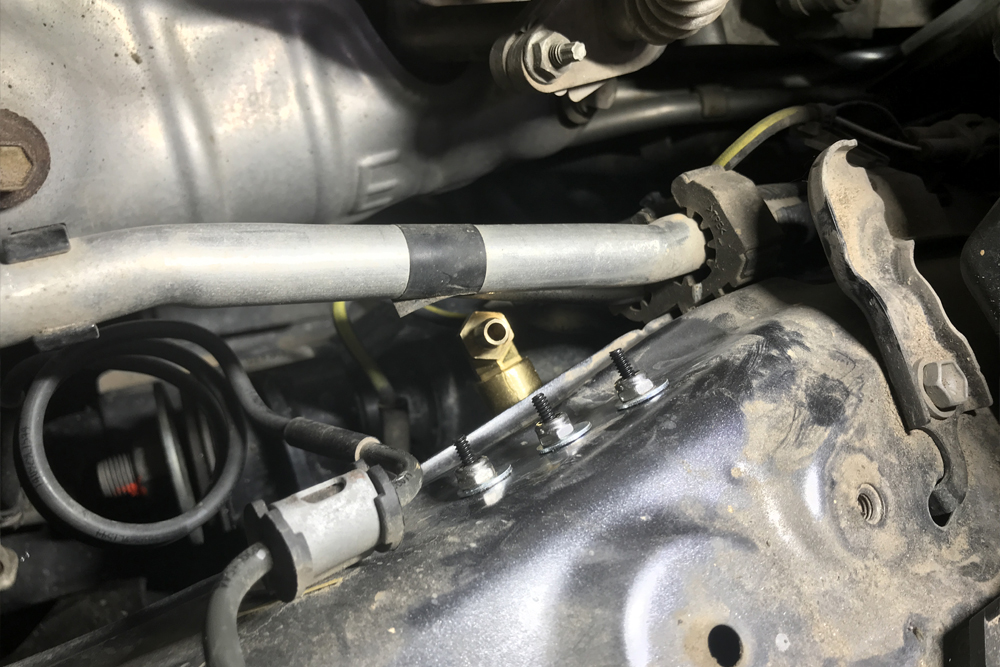
ATTACH NUTS TO PLATE

Mistake #4: When planning out this install, I did not consider how difficult it would be to hold the nuts in place while bolting down the air compressor after the mounting plate is installed. I ended up having to spot weld the nuts in place.
Solution: A much easier solution is to order some M6 Rivnuts ahead of the install. Install these Rivnuts in the place where the nuts are in my photo. There are plenty of videos online showing how to install Rivnuts without the special tool.
Next, paint all the bare steel mounting hardware.
I’ve had great results with Krylon Rust Tough Semi-Flat Black paint. I’ve been using it for all my metal painting projects and found that it goes on evenly without primer, dries quickly, and is about as durable a paint as you can get for a non-2 part paint.
INSTALL HOSE

Cut the existing fitting off the air compressor hose. Then, cut the air hose roughly in half. Attach half of the hose to the installed air fitting near the wheel well using a hose clamp. Attach a ¼” hose mender barb to the other end of the hose.
Next, install the mounting plate using C4 Fabrication’s instructions. Make sure that the hose passes through the hole you created earlier in the mounting plate.
FINAL STEPS

Bolt down the air compressor to the mounting plate using the bolts and rubber washers that came with the air compressor.
Using another hose clamp, attach the other half of the hose from the air compressor to the hose that is already connected to the air fitting in the wheel well.
Wire the air compressor directly to the battery, or via your preferred power source like a switch panel.
Keep in mind that you need a power source and a fuse or breaker that can handle 40 amps. Wiring the air compressor to a switch panel is preferred so you can turn the air compressor on and off without needing to open the hood, but you will likely need a relay to power the air compressor as most switch panels can’t safely handle 40 amps.
Just installed mine today. Only difference is that I used the battery hold-down bar from C4 to hold the compressor down.
I have been bummed to discover that I need to install a pressure switch to keep the relief valve from popping like a machine gun. So be it. A few more parts from Amazon and off I’ll go.
Does this really need an external breaker? The compressor has one built in. Is that enough?
Thanks!
Same issue. What did you use to resolve it?
Curious – how has this held up after a couple of years of use and temperature abuse in the engine bay? Would you do it again?
Make sure to leave at least 1/2″ or more away from the VALVE SET, EMISSION CONTROL, NO. 1 (little hose off manifold). When wheeling aggressivly the engine flexed/moves enough to break mine. I now mounted mine at a bit of an angle to provide clearance.
Image of angled mount
Great stuff! Hoping to tackle this over the weekend. Would a 40 amp in-line maxifuse coming off the positive terminal be a sufficient breaker if I’m planning to just open the hood and run it from the compressor on/off switch?
I would not recommend using a fuse for this. I actually used that exact setup (a 40 amp inline fuse) and it would slowly melt until it failed. Use a breaker instead like the blue sea 285 series.
Awesome…thanks for the quick response!
Also apologize for the multiple posts. Last question, did you just ground the negative to the frame right off the compressor?
Great stuff! Hoping to tackle this over the weekend. Would a 40 amp in-line maxifuse coming off the positive node work as the breaker if I’m planning to just open the hood and run it from the compressor on/off switch?
Great stuff! Hoping to tackle this over the weekend. Would a 40 amp in-line maxifuse work as the breaker if i planned to just open the hood and run it from the machine on/off switch?
Great stuff! Would a 4amp in-line maxifuse work as the breaker?
what type of air hose did you use for running the lines?
Just the stock air hose. It is long enough to reach the fitting in the wheel well.
Ok I was going to make a separate connection in the rear and then have the one up front as well. So I don’t have to drag a hose all the way around plus hose on my compressor has already been adapted to use standard fittings. Thank you I will just do a little research by the way great write up on this.
You should check out the “wifey” air system. Puts an air connection up at each corner.
https://sponsoredbywifey.com/2018/01/08/arb-dual-air-compressor-system/
https://www.toyota-4runner.org/5th-gen-t4rs/267292-board-air-tubing-diagram.html
I thought about that kit at first but the area I live in we end up with good amounts of thick clay style mud and it would end up coving the connection points so that’s why I was thinking one under the hood up front and one in the rear near the bumper area, but might just go with one under the hood and just use a good hose to reach all 4 from the front
This is awesome. I’ve been looking for a solution to install the same compresor in the engine bay. As I’m looking to install a second battery using the Shrockworks solution, I wonder if there is space left for the Air Pump Relocation Kit.
I am almost certain there would not be room. You would also have to move your washer fluid reservoir back there. If you want to have both an air compressor and a dual battery, you could still put a battery in the front passenger side like in the shrockworks solution, but you would have to put an ARB dual compressor in the rear passenger area. Rago fab makes a mount for that, but that’s where I am going to put all of my electrical control stuff. A better solution would be to get the Genesis dual battery kit, which keeps both batteries in the stock location, allowing you to mount other things in the rear passenger and rear driver areas.
Great alternative! Thanks for the ideas!
How has this set up performed in the heat? Have you noticed any degradation in air up times, say for instance, when it’s 90+ and the hood is closed?
Safe travels…
JB
I haven’t wired this into a switch panel yet, so I haven’t been able to run it with the hood closed. However, when running it after a four our trail trip in Moab summer temps it was a little slower, but not by much.
Good to hear! I’m sure there may not be much difference than what you put it through. Thanks.