
Coastal Offroad DIY Rear Bumper Kit – Review & Install For the 5th Gen 4Runner
I will admit, I’m a bit of a minimalist and I love the look of a mostly stock 4Runner with only tires and lift. However, after dipping my toes into off-road car camping hobby a few years back, it only took a couple of trips to the Ozark National Forrest to realize that plastic stock bumpers might become a long term issue.
My 5th Gen 4Runner is still my daily and during trips, I found myself stressed out about bumper damage on the trail. Almost every trip I took I came home with some form of bumper damage. I quickly started evaluating the aftermarket bumper options.
Pros + Cons of a Metal Rear Bumper (+ Other Options)
For me and my future off-roading plans, it was an easy decision to take the leap to aftermarket metal bumpers, but let’s take a look at the pros and cons of upgrading to a metal rear bumper.
For more options, check out Max’s top rear bumpers for the 5th Gen 4Runner.
Pros
- Improved Clearance Offroad
- Increased Protection Offroad
- Added Recovery Points
- Improved Departure Angle
- Relocation of Spare from Undercarriage
- Easy/Quick Access to Spare Tire
- Added protection during Daily Driving
- Added Accessory Mounting Options
Cons
- Irreversible Cuts to Stock Bumper
- Added Weight
- Less MPGs
- Reduced Power
- Drivetrain stress
- Potential Rust
- Financial Investment
Why I Choose Coastal Offroad…

The decision came fairly easily. Looks, Cost, Durability, and Fast Shipping:
- Looks – Not the most important factor, but I do love the sleek look of the Coastal Offroad Low Profile bumper. The lines are a little different than most other options and I liked that rear fender portion of the bumper didn’t come all the way up to the taillights. The swing-arm is light, no-frills, and sleek as well.
- Cost – With this being a DIY weld-kit, the cash investment is a lot less compared to what you would spend on a fully fab rear bumper. Obviously the time/labor investment of a DIY kit is dramatically higher, however, it paid off to have a few good friends that were willing to help me along the way!
- Durability – I went with steel. The design is minimal and it is strong exactly where it needs to be. NO surprises there.
- Fast Shipping – There is no 2-6 month waiting list game with Coastal Offroad. They sell CNC-Cut DIY kits. Since there is no fabrication labor, the kits typically ship in 1-3 business days!
The Low Profile Rear Plate Bumper Kit

From Coastal Offroad:
- CNC-Laser-Cut Weld-Together Kit
- Its slim profile is engineered to provide maximum ground clearance and complement the factory body lines – trimming of stock plastic bumper required
- Heavy-duty 3/16″ plate steel construction for maximum offroad strength and durability
- Optional 1/4″ 5052 aluminum construction for a lightweight yet very durable overlanding setup (66 lb weight savings)
- Optional 2″ hitch receiver is angled for a clean look and further clearance gains
- Mounts directly to frame using 14 factory mounting points – no drilling required.
- Reinforced 9/16″ thick clevis mounts allow the use of 3/4″ D-Rings
- All kits ship as clean, bare metal that is ready to weld out of the box – the Nitrogen laser cutting technology means no cutting edge oxidation and thus easier and stronger welds
- Steel base bumper weight: 130 lbs
- Aluminum base bumper weight: 64 lbs
Steel vs Aluminum Bumpers
Coastal Offroad does have Aluminum options that are about half the weight. However, I went with Steel primarily for the extra durability and peace of mind. The last thing I want to be dealing with is failed recovery due to a failed bumper.
Tools Needed For Install:
- Coastal Offroad Low Profile Rear Bumper
- Welding Rig, Including Cutting Tools
- Angle Grinder
- Flap Discs, 60grit and/or 80grit
- Plastic Edge Trim
- Powder Coating, Spray Paint or Bed Liner
- Drill/Driver
- Dremel or Die Grinder w/ Cutting Blades
- DA Sander (Optional)
- M18V Power Ratchet (Optional)
- Plastic Pry Tools
- Socket Wrenches (10mm, 12mm and 17mm)
- 10mm Open Wrench
Time Required:
Job time to complete this bumper will vary depending on your welding experience, how many swing arms you are building (Single or Dual), how much you grind your welds, and/or how much help you have along the way.
It’s safe to say this project will take anywhere between 18-30 hours…potentially longer if you are inexperienced or are working totally solo.
A Note On Shipping
One thing I love about Coastal Offroad is that they ship quickly!!! As mentioned, since they are only cutting and delivering the raw materials, they turn-around their orders fast. My kit shipped in 3 days.
You don’t have to worry about receiving a pallet shipment via freight! Depending on what you order, the kit will come flat-packed into 2 or 3 medium size boxes…think flatpack IKEA style. After all, it’s just a bunch of smaller sheets of metal flat packed ready to go for you. The longest pieces of metal are approximately 2’ long. All 3 boxes would fit in my front seat if I sat them upright. The point is, the shipment will be smaller than you’d imagine.
Installation Overview
This is NOT a full super detailed step-by-step installation guide. This is an overview of what you will be committing to if you choose to go the DIY route and a quick review of the final result.
If you are even considering this kit, you probably already know what you are committing to. If you aren’t a welder, you may want to learn a bit before diving in on a bumper build. If you know how to weld or have a good buddy that welds, or if you want to hire a professional welder… this is a great kit and I had a really good experience from start to finish!
Removal of Stock Bumper
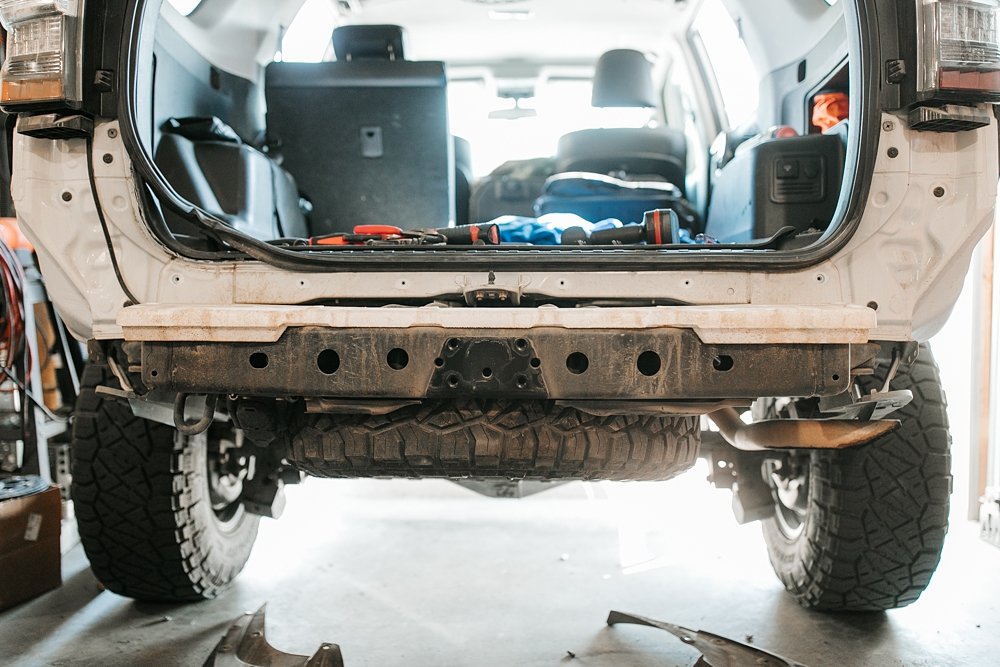
Really, the first step when getting started is to remove the stock rear bumper. You need to remove the bumper first and drop the spare tire because 95% of the kit will be tacked onto the truck’s frame piece by piece.
I was surprised how easy it was to remove the stock bumper. I had never done it before and it only took a few minutes. Standard plastic pry tools, a drill, and a few sockets will get the job done easily.
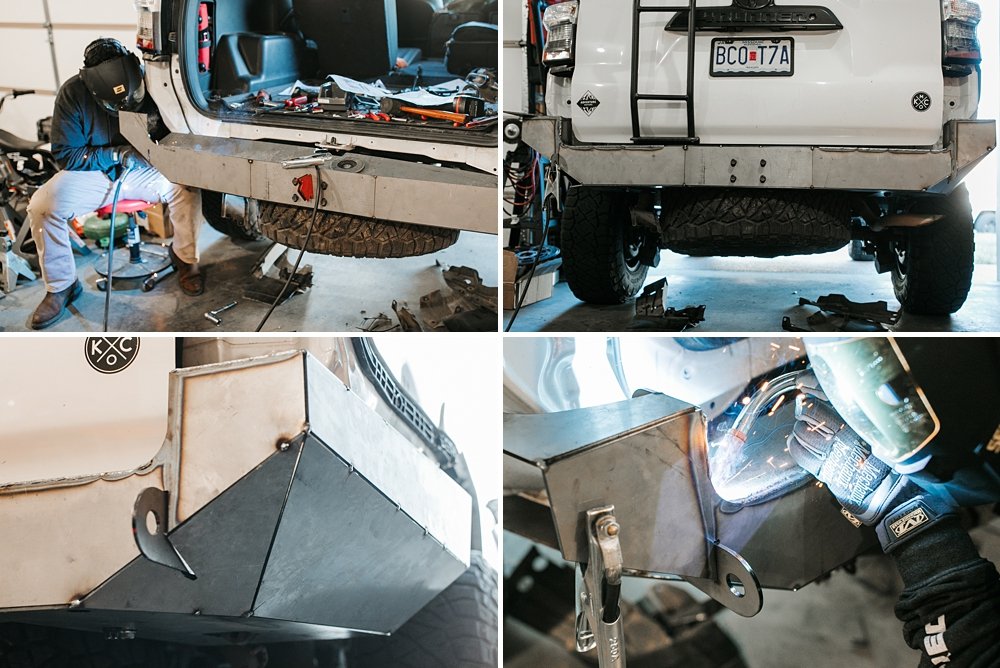
Tacking and Welding

Huge shout out to my friend Luis of @4LOBound for doing all the welding for me! The welding process is where you will likely spend most of your time. It can be done by yourself, but you will be better served with a friend/helper that can provide an extra hand along the way.
The pieces are laser cut and, by default, they will keep fitment pretty precise. However, if working alone, the pieces can get heavy and still getting the angles right is a critical component to the fitment.

The process is pretty straight forward. Coastal Offroad provides step-by-step instructions as well as a fully numbered guide of pieces and their suggested order of assembly. With a DIY kit, you can kinda go your own way but keep in mind going your own way is going at your own risk.
A note about hiring a 3rd party welder…
You can hire a 3rd party welder to do this portion of the job for you, however, be advised that this project really is a 2-day project and the bumper is assembled, tacked, and welded MOSTLY while it’s bolted on the truck.
If you hire a 3rd party welder, it’s likely that you will need to hang around their shop for a couple of days or plan on leaving it and coming back a few days later.
When hiring a 3rd party welder, make sure the welder is knowledgable with how to remove the OEM bumper and make sure you provide the various extra frame bolts that are required during the assembly process.
Grinding the Welds

Welding is done and now it’s time to clean up those lines! I wanted a very seamless look to this bumper and Luis (my welder) gave me plenty of the weld to work with in order to grind down to that seamless look.
I spent somewhere around 6-8 hours grinding and even used a DA sander with a few different grits to get the fully-finished look I was hoping for.
Grinding did reveal a few small pinholes here and there but at the end of it I did decide to put a few stitch welds on the inside of the bumper just for added strength and peace of mind, so filled the pinholes and re-ground them at the same time.
Finishing the Bumper

You have a few options for finishing your bumper. The quicker and lower cost option is using an off the shelf product such as paint or bed liner. Using a satin or textured spray paint or a bed liner product has its advantages. It’s quicker and makes for easy touch-ups. The more expensive option is powder coating.
I choose to have mine powder coated. I work with powder coating on the daily at my day job and it was a no brainer to go this route for me. The downside is higher cost and potentially not as seamless touch-ups.
I used Satin Black Texture from Prismatic Powders. You will need about 7 pounds for the single swing arm option and maybe about 8 pounds for a dual swing arm option.
Important Note: Chances are your local powder coater has a variety of black powders in stock and they will suggest that you use one of theirs. Be sure to review their samples in person.
Black is not just black! Powders have lots of variety in both color and texture. You need to see samples in person to make sure you choose your preferred color, sheen, and texture level. You do not want to be picking up your bumper only to find out that it was powdered in a high gloss black or a grip tape sand texture that you didn’t want. Make sure you see and choose the samples in person.
I choose to provide my own powder because my powder coater’s off-the-shelf options were all too glossy for my taste.
Final Step: Cutting the Bumper
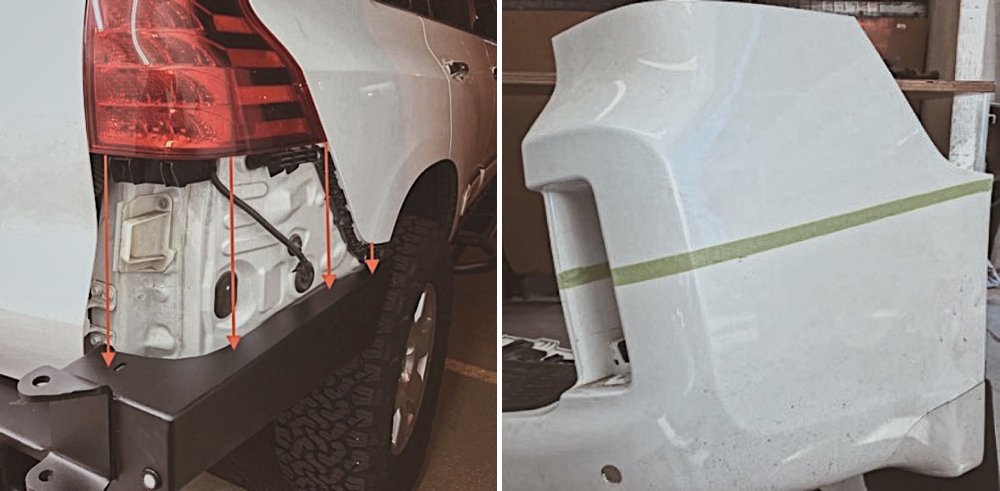
These photos courtesy of Coastal Offroad instruction manual for the GX
The last part of the install is pretty simple. There are up to 14 bolt-on locations and I only used 12 of them.
Once you have the metal bumper bolted back on, be sure to close the liftgate and center up the bumper before torquing it all down. Recheck alignment after torquing it down.
Cutting the stock bumper can be nerve-y but its pretty simple. With the metal bumper fully torqued down, pull several measurements between the top edge of the metal bumper and the quarter-panel as well as the taillight.
Keep in mind, you can always cut more plastic but not vice versa! If you’re really picky like me and IF you mess up by over-cutting, you will be running to every junkyard in town looking for a fresh OEM bumper to start over. Don’t be that guy!
Once your measurements are pulled, transfer them to the un-cut plastic OEM bumper with a marker and create a straight line with masking tape for your cut. Once your cut line is created, pull all the measurements again just to make sure they’re accurate! Measure twice (or 6x in my case LOL) and cut once.
Cut Along Measured Line + Check Fitment

Cut along the line with a Dremel. Once cut, check the fitment and make any extra cuts as needed for proper fitment. If you’ve never cut plastic before with a Dremel, practice a bit on parts fo the bumper that you know will be thrown away to get a feel for the speed, blade, and the cut process.
Note: You need to have a 1/4”-1/2” gap between the metal bumper and the freshly cut OEM bumper to allow for frame flex. During frame flex, your metal bumper may squish up into the remaining OEM plastic of the body and create damage IF your gap is left too tight/small.
Finally, finish off the cut plastic with plastic edge trim for a more finished look!
Optional Rear Camera Re-Locate

Once your bumper is all buttoned up, your OEM rear camera will be blocked and basically useless. I came across a plug-n-play rear camera relocate kit from RIGd Supply. For about $100 you can pretty easily restore your rear camera wherever you choose. I put mine on the spare tire mount.
The kit plugs into the dash at the OEM camera harness and it comes with enough wire length to run through the undercarriage to the rear spare tire.
The is a harness clip about 2’ from the end. In the event you run the camera wiring through the spokes of your spare tire, simply unclip the harness to create a loose end and you can slip the spare tire right off without any issue.
The Takeaway
I’ve had this bumper on for 2 months now and I couldn’t be happier! I love the look and it had already taken some knocks and bangs in the Ozarks this past winter. I’ve already had to touch up the paint with Rustoleum Rust Stop. Gotta pay to play I suppose.
This bumper is quiet both on and off-road; no crazy rattles or shakes. Initially, my tailpipe hook was rattling against the bumper but that was an easy chop job which also created more clearance as well. Win-win!
I can’t stress enough how much I love the lines and fitment of this bumper. There’s not a whole lotta flash to the swing-arm and I love that. It is a fairly lightweight kit while providing maximum clearance and protection.
The way I have it set up is basically as tight as it can go to the liftgate. The heim joint leaves room for some micro-adjustment to the swing-arm if needed.
The beauty of a DIY kit is that you can really dig in and add in your own custom touches as well. I didn’t really add anything but I’ve seen users that have added Baja S2s and I’ve seen others add extra reinforcements in places. One could really get creative with a little bit of effort.
Final Thoughts
As with all things, there’s always room for improvement but I think Coastal has knocked it out of the park on this kit. All in all, Coastal Offroad Low Profile Plate bumper kit receives two thumbs up and I plan on having this on here for a long time!
Any spare tire shakes/vibrations while on the highway, i.e,, 65 mph and above? Thanks!
Great article. I’m with you, and I love the clean look of this bumper. I had a question for you. The first picture under the section “Removal of Stock Bumper” it looks like you have a matching spare tire in the factory spare tire location. I have not tried to fit a matching spare 285/70/17 in that spot. Can you tell me about your setup prior to the bumper as it looks like you got a matching spare tire in that spot? From my measurements it looks like I would not be able to get that to fit. Thanks in advance.
Friend of mine (welder) just finished the install on my Lexus GX470. He did a few mods, including adding a ‘stop’ on the swing-out tire carrier so it doesn’t hit the tailgate if you accidentally push it in without latching it, and he added a bit of steel to the front sides by the fender flares for a cleaner look. Overall LOVE the look and seems durable, we’ll see how it holds up. Also did the sliders and they look sweet too. I got it all powder coated instead of painted, but either would be fine.
I’m honestly not sure how “easy” this for new welders as the company claims, and for me they were HORRIBLE with getting back to me on a couple very basic questions. They will NOT give you a phone number, and some guy answers e-mails days, sometimes weeks later, and usually gives you the wrong answer so you have to e-mail again…..then wait for them to reply. It literally seems like the company is one dude working part time.
It is a legit, cool product, but be warned. If you have a lot of questions and can’t keep the project going without an answer, it’s going to take a looong time.
I just started the assembly process and have hit a snag. When you built this kit, did you have to remove the tubular undermount supports for the spare tire (when it’s in the stock location)? They’re sticking up into the top plate area.
Grab a sledge hammer prolly something between 5lbs-10lbs and hammer them downwards towards the ground. They should to be an issue with the spare since i presume its getting re-located to a swing arm.
Any info on the version with rear hitch and impacts to towing weight?
Curious if there was anything you needed to do to get the ladder to fit properly?
With the single swing arm, the only thing I had to do was slightly trim the white plastic catch pad. If you go dual swing arm, the frame of the smaller jerry can arm will need some cuts made to clear the Gobi Ladder.
Thank you! I believe I have found “the one”. I love the simplicity of this bumper (design, not work involved) . I’m primarily looking for a rear tire carrier that provides better clearance than hitch mounted. So many of the other full bumper options have too much going on for me. Coastal Offroad had a great idea selling these as a kit. Now I just need to brush up on my welding.
Hey Kevin, great to hear!!!