
Blacked-Out Hood Scoop Step-By-Step DIY Install For the 5th Gen 4Runner
In the effort to transform my 2014 4Runner Trail into a top of the line TRD Pro, I am always excited to install new parts. Today we will take care of swapping the (non-functional) hood scoop present in all Trails, TRD Off-Road, and TRD Pro models.
With the 2019 model, Toyota introduced a few updates to the TRD Pro trim, one of which is a blacked-out hood scoop instead of color matching the paint of the truck.
Owning a super white 4Runner I really like the contrast with black details. Indeed one of my previous installs was the front and black valances, followed by matte black TRD wheels.
There are two ways to change the look of the hood scoop:
- Paint / Plasti-Dip / Wrap
- Buy a Replacement
The DIY option is, of course, cheaper but it will require more time and some skills in order to do a decent job. But, unless using plasti-dip or wrapping, this will be a permanent modification that you should consider. For example, if you are planning to sell your 4Runner anytime soon.
On the other hand, buying a more expensive replacement part (but still very affordable) will make the install very quick and easy, give it an OEM look, plus you’ll have a spare hood scoop in case you change your mind later.
Parts list and Installation Overview

Tools Needed
- 10mm Socket Wrench
- Needle Nose Pliers (or similar)
Items for this project
- Black Hood Scoop Insert (1 x 7618135080): Check Price
- Seal / Hood Protector (1 x 7618535030): Check Price
- Seal / Hood Protector (2 x 7618335030) : Check Price
- Seal / Hood Protector (2 x 7618335040): Check Price
- Small Grid on the Front (1 x 7618235080) (Optional): This is optional since it’s the same one of the hood scoop already installed: Check Price
- Flange Nut Assembly (4 x 9008017189) (Optional): This is also optional but I bought them anyway since I wanted to get new ones: Check Price
Step 1. Open Hood + Remove Insulation Pad

Start with popping the hood and removing the insulation pad, if you have one.
My 2014 4Runner doesn’t have it but in the case you do, you have to pull out the 10 plastic rivets that hold it, starting with the rear and work your way up to the front.
Tip: Do not try and pull the rivets out because most likely you will break them. There is enough play that you can actually wiggle the needle-nose pliers under the head of the rivets to grip their necks, allowing you to compress them so they come right out.
The necks only compress one way, so you’ll have to turn them a bit until they feel them disengage.
Step 2. Remove (x4) 10mm Bolts

Once the pad is out, go ahead and remove the four 10mm bolts (circled in green).
Step 3. Pull Out (x3) Plastic Rivets Using Pliers

Next, take and look and find the three plastic rivets with ears, one orange in the center, and two blue on the sides.
Grab the orange one with your pliers and turn it counter-clockwise. It will turn just enough to clear the ears from the hole.
Then, insert your pliers through the hole far enough to (gently) grip/compress the ears on the blue ones.
Apply a small amount of upwards pressure, and you will feel them release. Be careful, the blue ones are a bit flimsy.
Step 4. Pull Out “Faux Grille Insert”

The insert is hinged on the back.
After you complete the above, simply lift from the front and pull it out. Once it is out, you can remove the thin ‘faux grille insert’ piece, by compressing the 4 tabs on the backside of it since that will be reused in the new hood scoop.
This is also a good moment to clean the hood scoop housing!
Step 5. Match New Padding To New Hood Scoop

At this point, take a close look at the back of the hood scoop.
In particular, take a look at the rubber padding attached all the way around the edge. What you need to do next is to match each piece of the new padding and attach it to the new hood scoop. You have 5 pieces in total: 2 at the top, 2 on the sides and a long one at the bottom.
It’s pretty easy to match them since they all have different sizes.
When you are ready to attach them, just follow the guidelines printed in the plastic (green arrows) which will help you with the positioning.
Step 6. Move Small Hood Grill To New Hood Scoop

After you’re done matching the new padding to your new hood scoop, you should have something similar to the photo above.
Next, you have to move the small hood grille from the hood scoop to the new one. It’s pretty straightforward, just unclip it from its base and clip it in the new one.
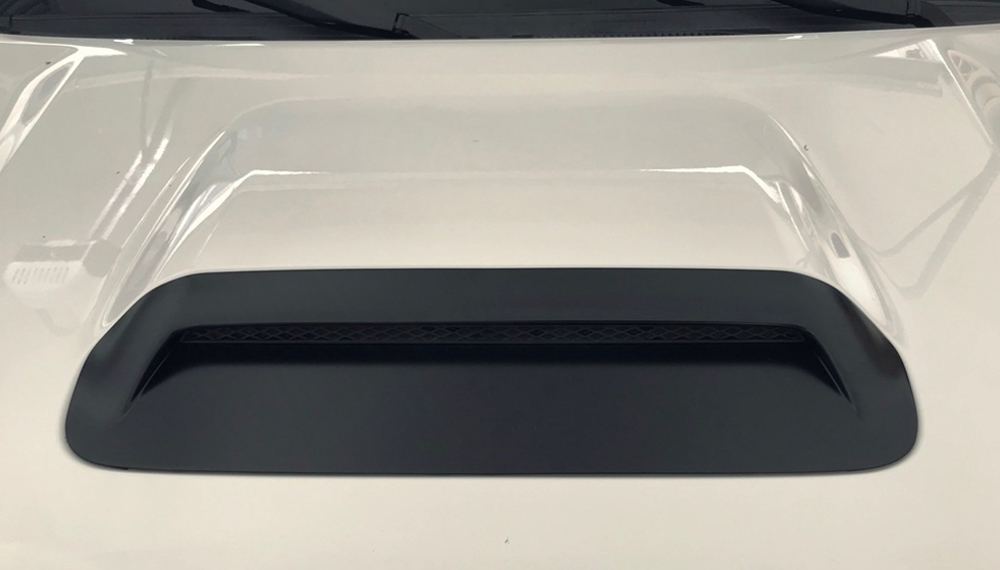
Step 7. Reinstall (New) Hood Scoop
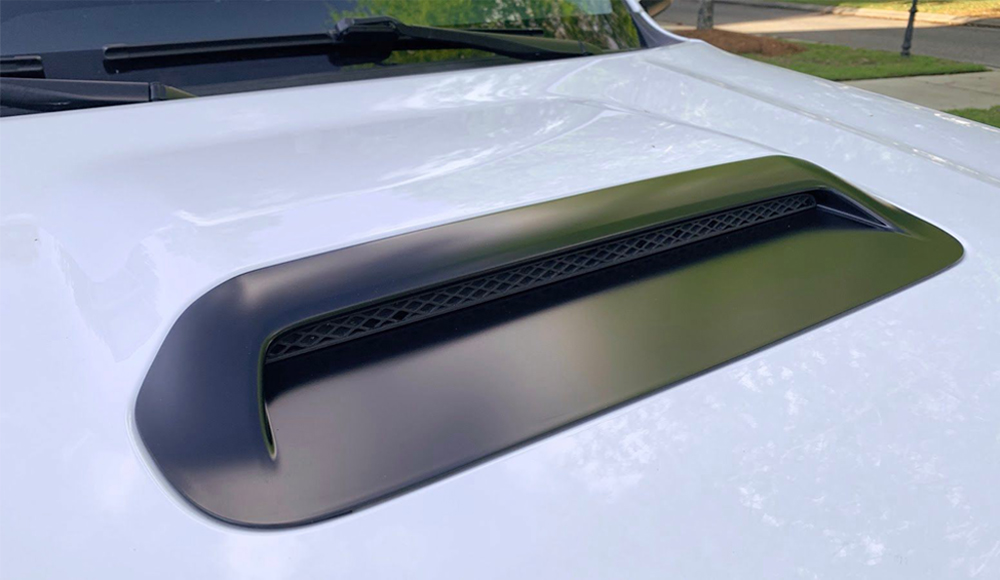
Now you are finally ready to install the new hood scoop. Just invert the steps you followed so far and you are all set. Position it in the hood, snap the clips in and bolt the 10mm screws.
At the end you should get something like this:
Final Thoughts


This is by no means a huge upgrade, but more like a very quick and cheap modification to add some extra accent to your truck.
I really like how it looks now and how it matches the rest of the black accents.
Hey! I want to get this but the website for the scoop is saying it doesn’t fit on a 2024 TRD Off-Road Premium. Will it fit or is the website lying?
Hey Taylor, I just looked on Toyota’s parts website and the latest model is the 2023, that’s why I think it show’s it won’t fit. Once they will update the website to support the new models I think it will show as compatible. To be honest I didn’t even know they announced the 2024 MY, where did you find one?
i Just changed my hood scoop out with a OEM matte black one. Looks great. I was wondering If it’s normal for some water to make its way thru? Im noticing that the insulation pad has some moisture on it after taking it thru the car wash. I’m pretty sure the install was spot on and since it was a Toyota OEM scoop, the fit was perfect. Thank you.
I never checked after a car wash but just looking at the seals I would imagine some water might slip through.
Josh, i did a perfect install and also have some water leak in after washing my 4Runner.
Does the new black scoop come with new blue and orange clips? Just making sure all I need is the black scoop and the padding pieces.
Yes, see the picture above!
So I’ve been wanting a scooped hood for my sr5 premium since I bought it a year ago. I needed 3rd row seating and no trd models come with 3rd row. Bought the scooped hood had it professionally painted. I looked at your guide and it was super easy to install the scoop. Thank you for laying out each piece needed to purchase and where they needed to go.
Hey! I just got the same trim! Where do you recommend I find a replacement hood??
Hey Shawn, just bought my hood, about to get it painted next week. Interested to hear more about your process.
No problem Shawn! Glad to hear it was helpful.
Hi, I purchased the OEM hood scoop black matte after reading this but after a year it is starting the fade. Any suggestions?
Mark, that is strange! I think mine is almost 2 years and it looks brand new.
Are you sure it is original Toyota? Did you buy at the local dealership or online?
You could contact the store and ask for a replacement, maybe. Or you could take it down and repaint it? In that case I’m not sure how it would hold up.
Worst case scenario you could always get a new one.. they are fairly cheap.
My new scoop is on the way so I’m looking forward to giving this a shot! I’ll let you know how it goes … my first self-mod ever on a vehicle! My new 4Runner is supposed to be here tomorrow.
Great, and congrats on you new truck!
Thanks for the info! I just replaced mine and it took less than 20 minutes with this outline. I only removed the front 6 plastic insulation clips and let the insulation “hang”. There was plenty of room to work between the hood and insulation. I also used a pair of angled needle nose pliers to loosen the blue clips – pinch the clip and push out… Easy peazey!!
Hi Roger,
Thanks for the feedback! Glad this was helpful 👍🏼
Would this fit the 2020 venture?
Hello Bon,
I haven’t had a chance to see a 4Runner Venture in person yet, but I’m 99% sure that it will fit just fine.
Usually when you buy parts online, under the item description the sellers have a compatibility list for that part. That would be a good place where to check.
Have fun with the install!
Carlo
Ok, just finished! Here are some things I learned. The most difficult part was getting the blue things to pop up so you can pull the scoop out. I was simply putting the needle nose pliers in the little holes on the blue clip and pushing up. AFTER, I realized you meant the actual round hole, that’s where you put the pliers through, then with the pliers, you have to grab the “ears.” Just look at your new scoop, you’ll see what you need to squeeze to make it pop. The second part where I was confused was when I put the new scoop on. You simply push down on the new scoop where the blue and orange clips are. Then you’ll hear them “pop” back in (locked) and then you can put the screws back on. The orange clip was more difficult, but you just put pressure on it with the hood closed and you’ll hear them pop back in.
Again, great detailed “how to”, thank you.
Hello Sergio,
Sorry if some of the instructions weren’t very clear! I will keep it in mind for the next tutorial.
Glad you were able to successfully complete the installation!
Carlo
Carlo, not at all, they were great! I didn’t read it correctly, that’s on me. Thank you again.
Carlo,
Thank you for the detailed article. It has motivated me to swap out the hood scoop on my 2020 4Runner TRD ORP that currently has the X Series blackout package. I believe the hood scoop swap will look great.
Thanks,
Tim
Glad to know that is was useful! I’m sure it will look awesome
Finished the install. Pretty easy. I had to remove the insulation but everything was right on target with your instructions. I like the look and appreciate your post.
Hi Tim,
I believe the most recent 4Runner all come with the insulation pad. How did the removal go?
I wish I had one too, I wonder if it would help with the noise.
Glad the article was helpful!
Carlo, this is great, thank you for sharing. I’m curious, why are there two links to the scoop?
Black Hood Scoop Insert (1 x 7618135080) and Small Grid on the Front (1 x 7618235080), whats the difference?
Again, thank you for the post, I’ll be buying this as soon as you respond.
SP
Sergio, the ones you mentioned are the actual hood scoop and the tiny grille insert.
If you have already a hood scoop you can pop the grille out and insert it in the new scoop.
Hope this will clarify!
Hey Carlo,
Thanks for the detailed write-up on this! I really appreciate the time you took to write this up. I replaced mine today. The only trouble I had was with the blue clips. I think I needed a pair of needle-nosed pliers that were thinner than the ones I had. For those of you with a hood insulation pad, I would also recommend buying some of these clips. I wasn’t able to figure out a way to get them off without breaking them, so it’s just easier to buy new ones for the insulation pad reinstallation.
https://www.toyotapartsdeal.com/oem/toyota~clip~for~hood~insulator~90467-09006.html
Josh, how many did you have to buy? Thanks for the heads up.
Looking good Josh!
Does the new scoop come with the blue and orange rivets or did you reuse the ones from the original scoop?
FYI, I just completed this install and the new scoop I ordered DID come with blue/orange clips already in place. I ordered from McGeorge Toyota if that helps.
When you buy the scoop it doesn’t come with any accessories. You should reuse the one you have already. If lost or broken, you can buy new ones.
Thanks!
Hi! I was just wondering what was the estimated time it took AND how much the costs were for everything? Thanks much!
Hi Selena,
The part listed where about $70 from where I bought it but you could try another shop for a lower price. The most expensive part was the hood scoop itself, $57.
Regarding the time probably 30-45 minutes max.
This was the first mod I did on my Premium, only I plastidipped the original and not a new scoop. Came out great and only took me about 4 hours (dry time included). Just make sure you do at least 7 very thin coats of plastidip. You want it to be nice and thick so its easy to peel off if you ever need to and you dont want to do heavy coats that would cause runs.
Carlo, is it really necessary to change the seals if they’re still usable?
Brian, how were yours, did you replace the seals?
Ray, I’m pretty sure that you have to change them if you decide to get a new scoop like me. I haven’t tried but I’m sure it will be pretty hard to cleanly remove the seals from the old scoop and attach them into the new one. Plus, the seals don’t really cost that much.
Brian didn’t have to replace them because he kept the stock scoop, since he decided to painted it (correct me if I’m wrong).
Thank you Brian and Carlo. My plan is to paint my original scoop so I’ll just re-use the original seals.
No issue with seals. Didn’t have to replace them.