
This modification has been done widely in the Tacoma and Lexus GX460 area where the foam element inside of the secondary air intake pump can break down over time, and eventually lead to a pump failure if the foam element is introduced to the propellers of the pump.
While some say that they have checked the foam element within the pump housing after several hundreds of miles if not more and have found it to be in serviceable shape, I decided to do what many other Tacoma and GX460 owners have done and replaced the foam element in favor of a Uni Filter UP-107 1” clamp-on breather.
The filter can be found on Amazon at the link provided for around $20. Since the air injection pump only operates at startup and briefly when the engine is turned off, the filter is unlikely to require frequent maintenance. However, the Uni Filter is washable and can be oiled if needed, similar to K&N filters.
Upgrading to a Uni Filter offers better filtration, reusability, and durability. It keeps debris out of the pump, lasts longer than stock filters, and can be cleaned instead of replaced. Even with limited use, a quality filter helps maintain efficiency and prevent restrictions.
Table Of Contents
Find it online:
- Uni Filter: Check Price
Tools and Materials:
- T25 Torx bit/wrench
- Flathead screwdriver
Locate the Air Injection Pump
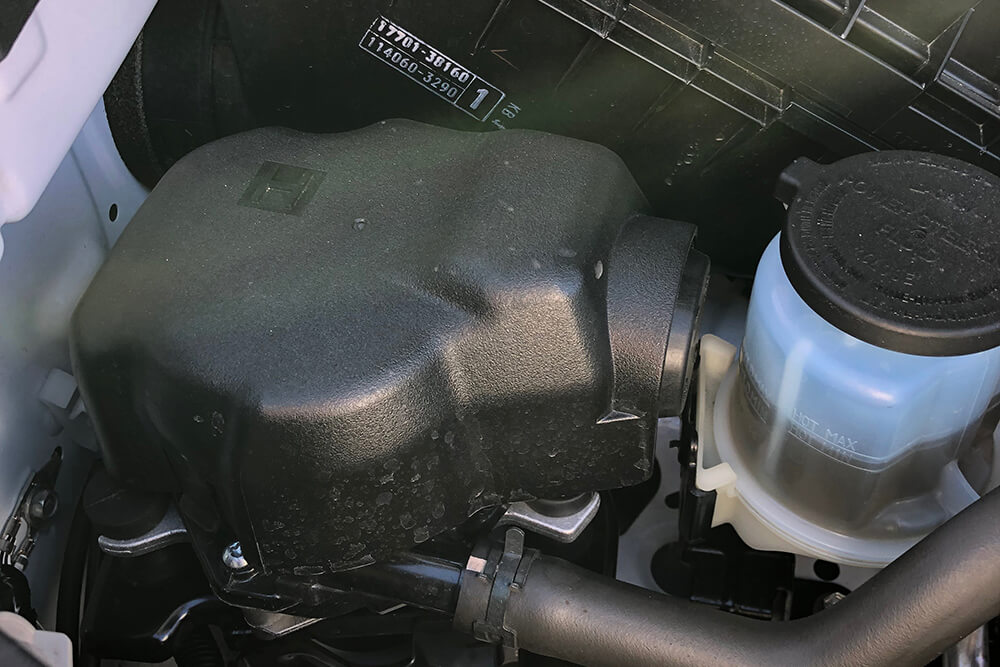
The air intake pump can be found on the passenger side of the engine compartment next to the air filter housing and the windshield wiper fluid reservoir.
Remove Plastic Cover

The plastic cover has a tab facing the front of the vehicle that needs to be pulled up on and then you can use your other hand on the side facing the air filter house to pull on that side of the cover while lifting up. It is a tight fit and does require a bit of force to remove so don’t worry if it feels like it might break.
Remove T25 Torx

With the cover off you’ll be able to take off the T25 Torx screw in the middle of the air pump housing that is holding the cover down on the element. Once the T25 Torx screw is removed you’ll be able to lift up on the air pump housing cover and the foam element along with the propeller blades will be exposed.
Remove Foam & Cap

You’ll want to take out the foam element from the housing and also take off the cap on the end of the air pump housing that you just removed. This is the part where you will take a flat blade screwdriver (or another prying tool of choice) and pull up on the tabs attached to the cap. There is a small lip on the end of the air pump housing that the cap needs to have the tabs pulled over in order to be removed.
Install the Uni Filter
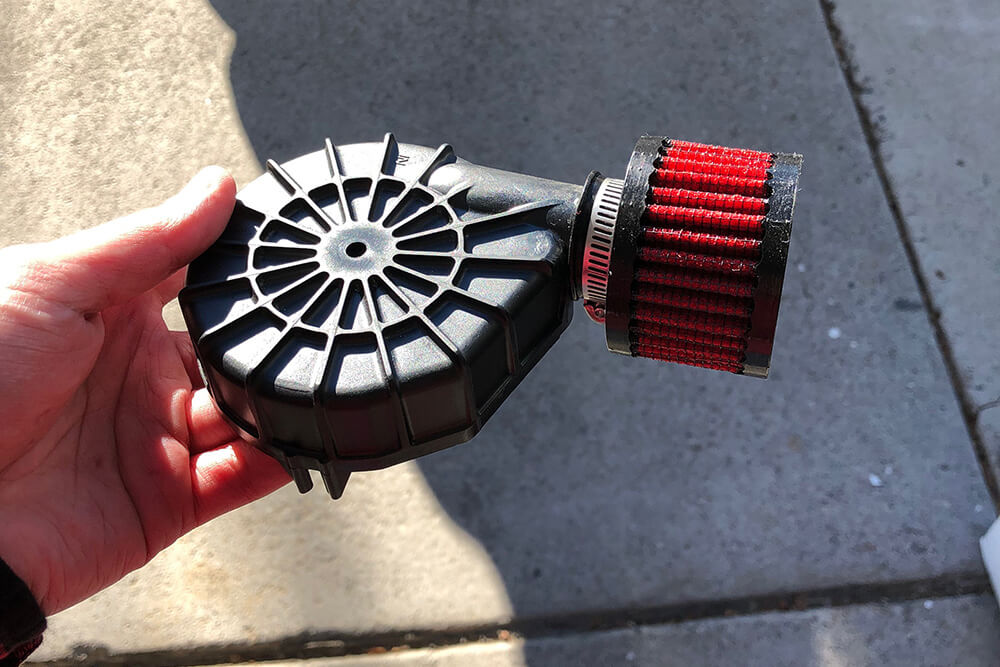
Once the cap is off you can slide the Uni Filter onto the air pump housing inlet. It is a snug fit so you can push on the end of the Uni Filter using a rag to seat it all the way down the inlet. Once it is on the inlet, proceed to tighten the clamp down. The fit is snug already so the clamp doesn’t need to be torqued down, a few turns will be sufficient for this part.
Replace Housing
Go back to the engine bay and replace the air pump housing back on with the T25 Torx screw. This is another screw that needs to be snug rather than torqued on possibly cracking the housing. There is also a plastic ridge on the housing that will seat with the cover when putting it back together as shown in the photos.
Replace the Air Injection Pump cover
Replace the first plastic cover that was over the air pump housing by pressing it into place and verifying that the tab snapped back into place facing the front of the vehicle. This completes the modification for the air pump and the chance of the foam element degrading and causing a failure of the pump!
Save housing cap and foam if needed
I’ve also decided to keep both the foam element and housing cap in case I need it for emissions or any other purposes. I placed them in a labeled zip lock bag after the install was completed for safe keeping.
What is the PN# to oem foam
Doesn’t exist.
The uni filter is a dry filter unlike the k&n you mentioned in this article. Why would you oil it?
Your write-up was write-on! Took me less than 5 minutes. I decided not to push the filter to the very end since I feel the intake will get better flow if it is more toward the end. Also, when you don’t push it on fully, more filter area is exposed (once you snap back on the top cover which partially covers the filter). Curious your thoughts on this.
so I just wanted to put in my experience with this mod and you can take from it what you want to. I did this on my 2020 5th gen 4runner and at first no problems at all for about 5 months, then out of no where it went into limp mode while out and about. I got it to the dealership and ran the usual diagnostic test and came up with a pump failure code, they tried to reset it still didn’t work so they looked deeper into the situation noticed that I had done this mod and found a lot of red particles that had clogged not only the main pump but also a valve and another pump on the left head. so do this at your own risk! the filter was as clean as a whistle when installed, so just be carful this mod cost me 1,500!!!
I’m not saying this doesn’t work I’m just saying that it could happen. the mod that was supposed to prolong it from the bits of the stock filter screwing it up actually screwed it up lol.
What do you think caused the red particles ? Did you wash the uni filter before installing ?
Sorry that happened btw, sucks ..thinking of skipping mod now on my 2019 sr5p 4runner.
I cleaned the filter out before installing could have just been my luck with that one filter who knows, I just wanted to post what happened to me because it could happen to anyone and it sucks when it does. I figure the only reason why this mod is posted is due to the stock foam filter inside deteriorating over time so I would say every 3 to 4 years or when ever you feel like it change it out, problem solved lol. My opinion I would leave it be.
Hi Matt, I’m unclear. Did you clean the UNI filter before installing it? With what?
Thanks & Regards,
Paul
Thanks for reply Matt, and I agree … wonder if Amazon sells that piece ? Will check with dealer and see if I can get a part number. Also I would spend a little more for the k/n filter (for anyone still doing this mod) instead of Uni …same size but maybe higher quality, even though the k/n is made in China. Also clean every 50k .. https://www.amazon.com/62-1370-Vent-Air-Filter-Breather/dp/B00029WXTA/ref=pd_sbs_263_1/140-7466191-99
Hi Matt, I’m getting P2441, P2443 and P2445 codes after a very dusty “off-road” ride. What codes did you get?
Todi, I read your thread on another 4runner post. Do you mind sharing pictures of the tube you said got damaged? I am experiencing the same issue at the moment l, but unable to figure out where the broken tube may be. Thanks
I have all 3 codes now
not sure the dealership didn’t give me that information and that’s something I should have asked but at the moment I wasn’t thinking clearly lol. I can try and find out tho.
I forgot to post the update.
Right next to the passenger side air valve, I had an air compressor installed on a Rago second battery tray.
What has happened was that due to vibrations, the compressor, that was merely 1/4″ from the top of the air valve, broke the plastic tube that actuate the valve.
This valve works on the same principle as an electric relay. Because the valve was not actuated it did not open causing these codes.
Thanks for the write up John, well done. Can someone explain the purpose of this Air Injection Pump? Is it simply to reduce emissions after startup? Merci.
it directs hot air to the catalytic converters to heat them up faster so they start working faster. it’s for emissions.
Thanks Mike, I got an OBD code for this last spring on a cold and humid day. Cleaned the airpump unit and inside all the hoses. No problem since.
The housing cap actually fits perfectly over the filter. I put it back on to give the filter some protection from dirt.
Install was pretty easy after following your instructions and even passed my 5K inspection (kind of useless) but wanted to say thanks for the great write up’s and flatter wallet 🙂
Same, don’t see a link
Hey Bryson,
Doesn’t look like the link transferred over in the post.
Here is the Amazon listing that I purchased from: Uni Filter UP-107 1″ Clamp-On Breather
Got a link to the filter? Unless I’m blind, I’m not seeing one.
Hi John, thanks for the article! I had this done but didn’t remove the foam insert. Do you think I should? I didn’t think the K&N filter would obstruct the airflow much and thought double the protection the better.
Hey Pablo,
You’re welcome!
I would remove the foam insert because the idea behind the modification is to prevent the failure of that part over time.
Since the pump only runs at start-up and when the engine is turned off a quality filter such as K&N or Uni will be sufficient.