
Car Trim Home Power Folding Mirror Step-By-Step Install & Product Review For the 5th Gen 4Runner
While 5th Gen 4Runners are extremely capable vehicles off-road, there are times when the lack of luxury features becomes annoyingly apparent. One such feature is power-folding mirrors – invaluable in situations ranging from parallel parking to threading the needle in a tightly packed forest.
Thankfully, Car Trim Home makes a kit that allows you to do just that – a few hours of wrenching and you’ll have mirrors that automatically fold and unfold as you lock and unlock the vehicle. Not only that, you’ll have a manual override as well, if you want to fold the mirrors while the vehicle is on.
Price
- Car Trim Home Power Folding Mirror Kit: Check Price
Step-By-Step Installation
The installation is fairly involved and includes the removal of the door cards and complete mirror disassembly. You should be comfortable with undoing snap fits and keeping track of multiple parts of a complex assembly before tackling this mod.
If you’re still with me, let’s get started!
Tools & Materials:
- Auto Trim Removal Tool
- Phillips Screwdriver
- 10mm Socket Wrench
- Needle Nose Pliers
- Wire Fishing Tool
- Wiretaps and Mating Spade Connectors
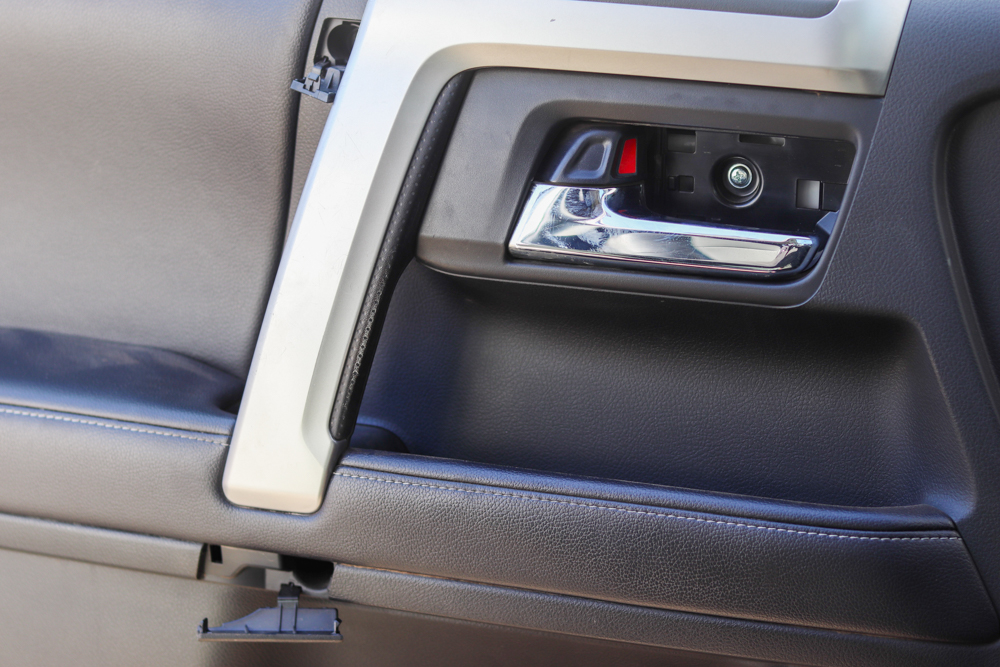
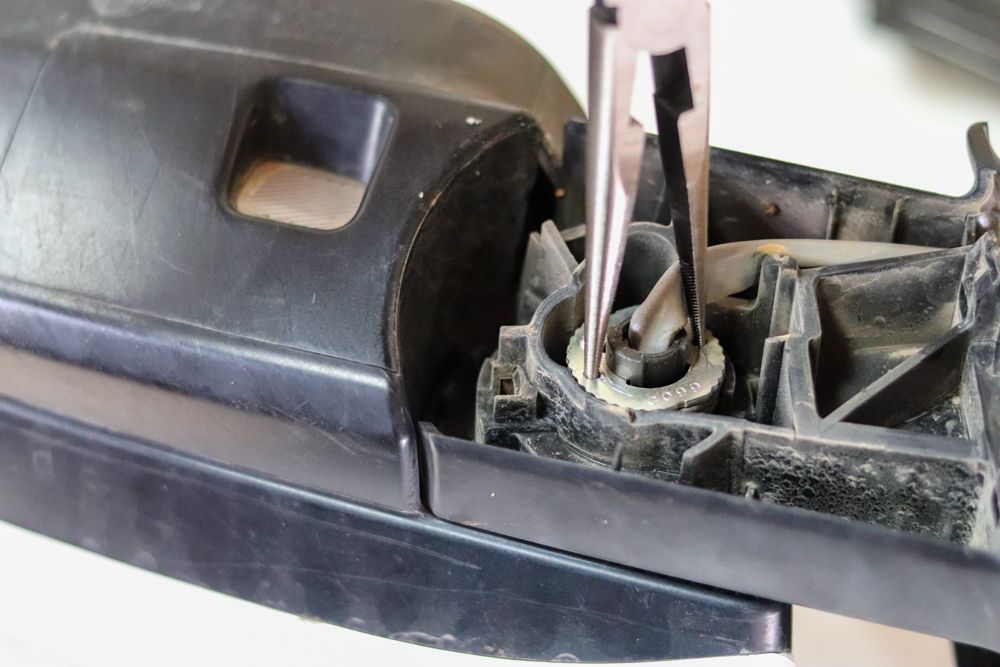
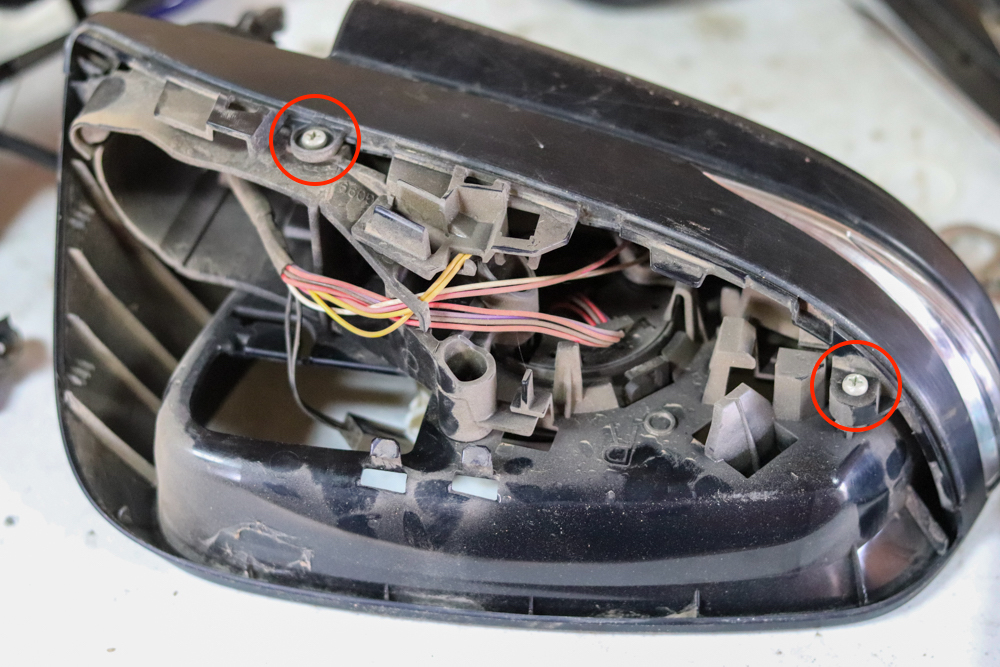
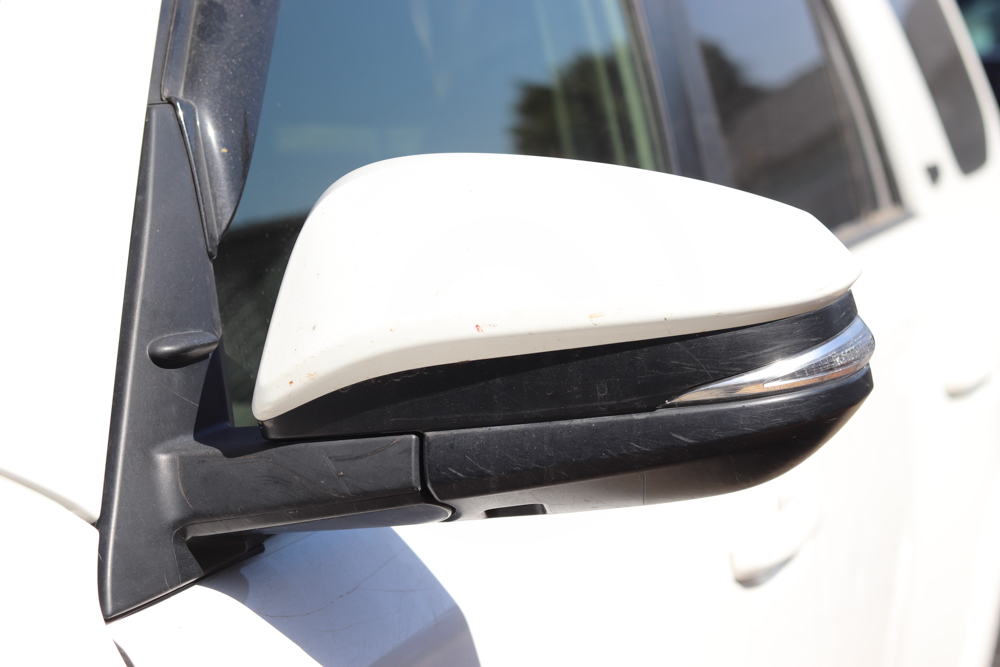
Step 1. Remove Mirror Mount Cover Panel

Starting on the driver side door, pry off the plastic panel that covers the mirror mounts using an auto trim removal tool.
Other tools (i.e. flathead screwdriver) can be used, but using a plastic tool like the one pictured will keep you from damaging your trim.

Once the cover is removed, you should see the three 10mm nuts that hold on the mirror assembly.
Let’s leave these alone for now.
Step 2. Pop Off Door Card Screw Covers
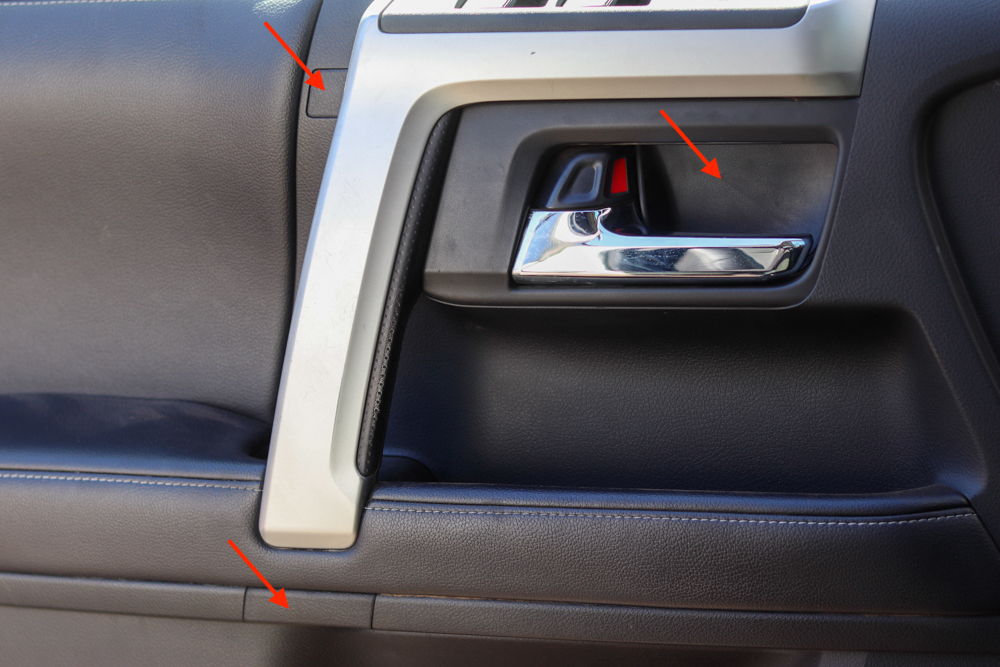
Once again using the trim removal tool, pry off the three marked screw covers that hold the door card in place.
After opening the three covers, remove the three screws using a Phillips screwdriver.
The door card will remain in place via perimeter snaps that we’ll deal with for the next step.
Step 3. Undo Door Card Snap-Fits
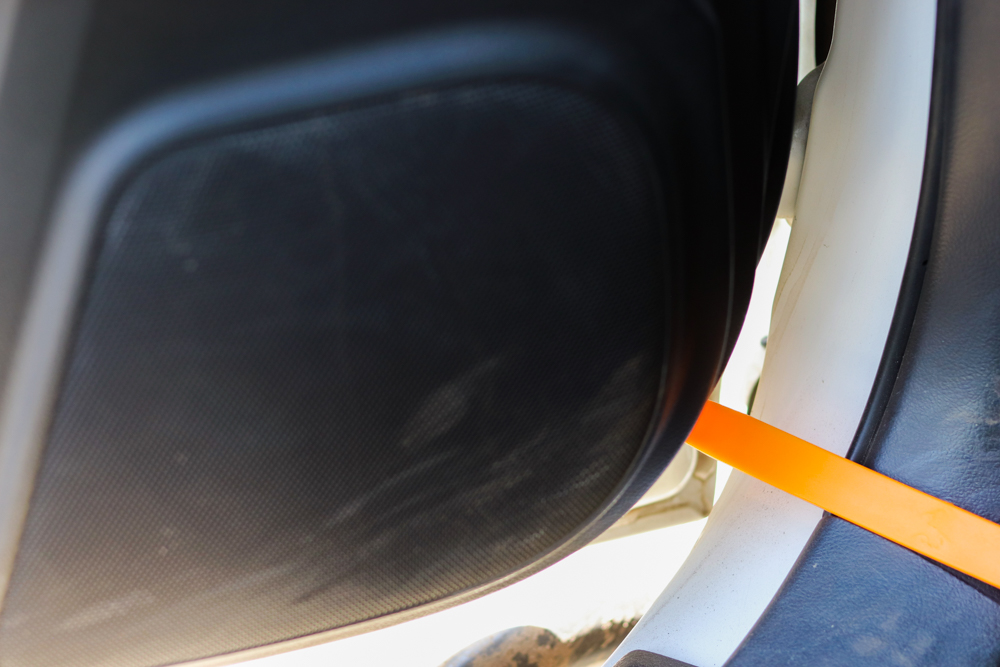
Using your handy trim removal tool, begin in the lower right corner and start separating the door card from the door frame.
Slowly work your way around the bottom and sides, popping off each successive snap until you’re left with the door card hanging by the top lip.

Before continuing, unplug the courtesy light connector located in the bottom left of the door card. You’ll have to slightly pull the bottom of the door card away from the door frame to access the connector.
Push down on the tab on the rear of the white plug body to disconnect.
Step 4. Remove Door Card Connections
In order to remove the door card, we’ll need to pull it straight back off the door frame at the top lip we previously left clipped in. These are a different kind of snap-fit, so they’ll pop off all at once.
Make sure not to pull the door card too far away – we still need to deal with the latch and lock cables!
If you look behind the door card you just pulled off, you’ll see one white and one green Bowden cable termination. Carefully snap these out of the black housing and maneuver the steel cable ends out of their enclosures.
Don’t forget to unplug the white connector towards the front of the door card as well.
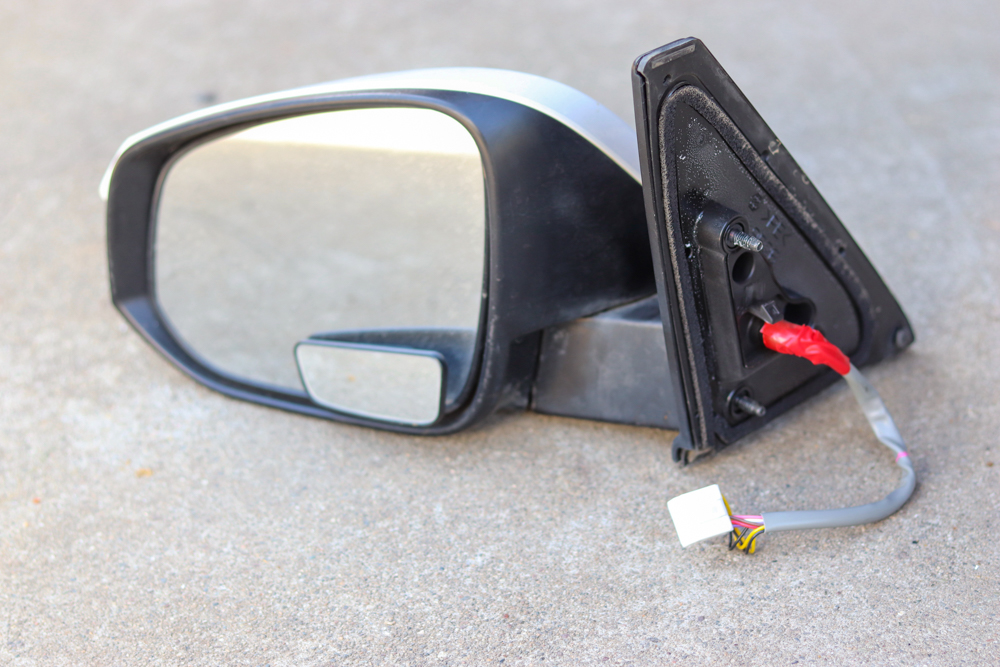
Step 5. Unplug Mirror Connector & Remove Mirror

Now that we have the door frame exposed, we can easily find the mirror connector – just follow the wire that’s coming out of the mirror and routing down to the white connector at the top right side of the door.
Let’s unplug this and remove any tape holding the cable in place.
We can now unbolt the mirror assembly by removing the three 10mm nuts we exposed in Step 1. Carefully push back the plastic tab that’s still holding the mirror in place and pull the whole assembly out, cable and all.
Now follow Steps 1-5 for the passenger side mirror as well.
Congratulations! You’ve finished the easy part. Let’s proceed with the motor module transplant.
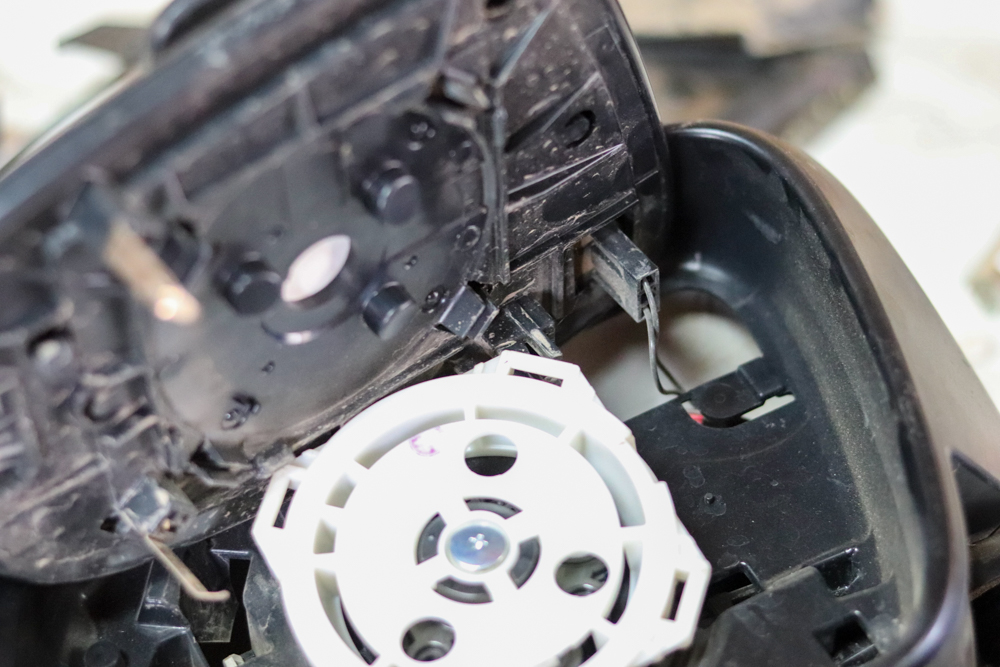
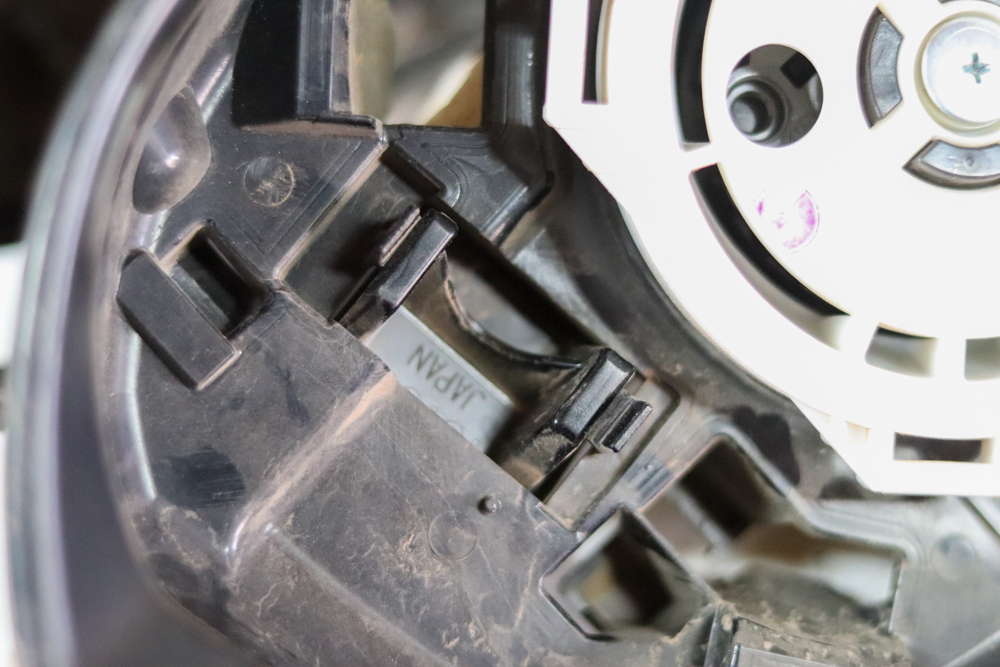
Step 6. Separate Mirror Connector
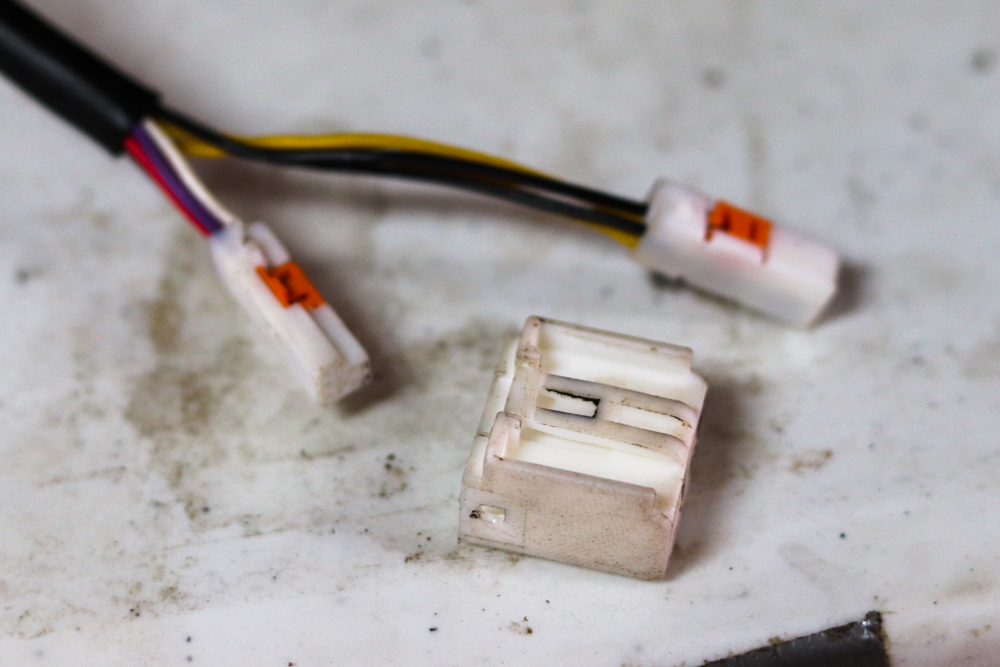
This is a tricky step.
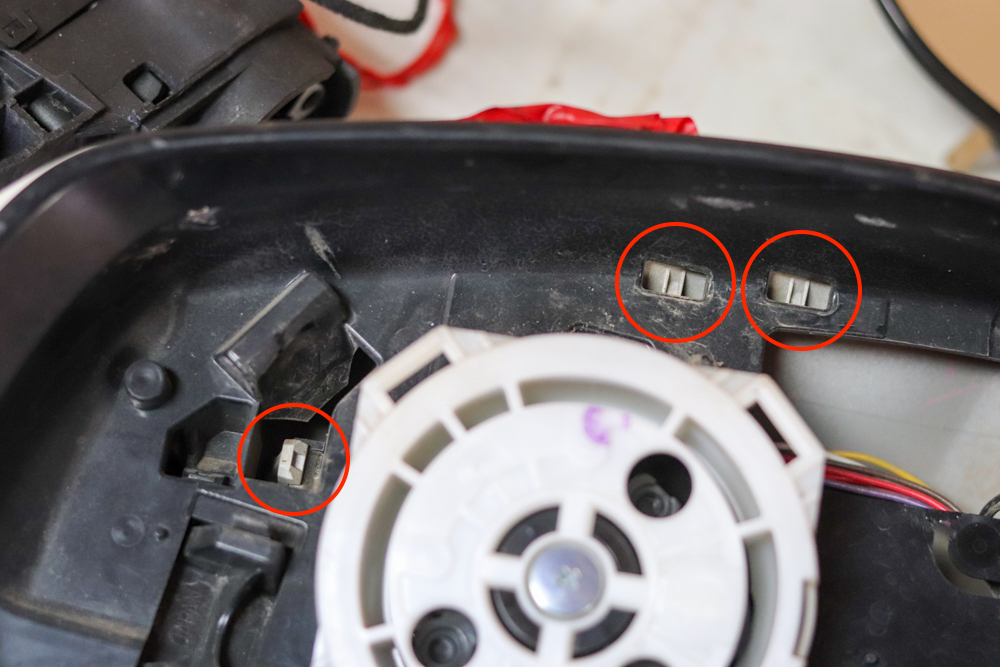
In order to fully disassemble the mirror, we’ll need to slip the cable and connector through some narrow openings. The only way this can be accomplished is by separating the two small connectors from their outer enclosure.
If you look closely at the full connector, you’ll notice four captive barbs on the external sides and between the two internal connectors. These need to be pushed in to release the internal connectors from the outer enclosure.
Be careful, since we’ll need to reassemble this connector towards the end of this mod.
Step 7. Remove Rubber Isolator
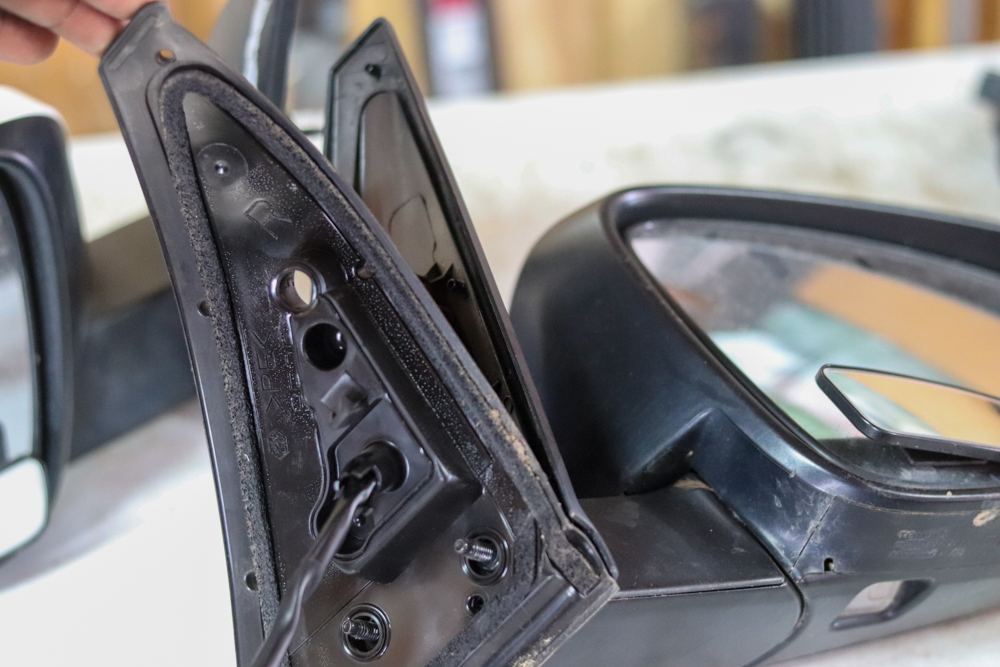
Now we can peel off the rubber isolator from the mirror assembly, and slip the cable through it. Make note of how the mirror cable is routed behind it.
Set this aside for the end.
Step 8. Remove Lower Mirror Arm Cover
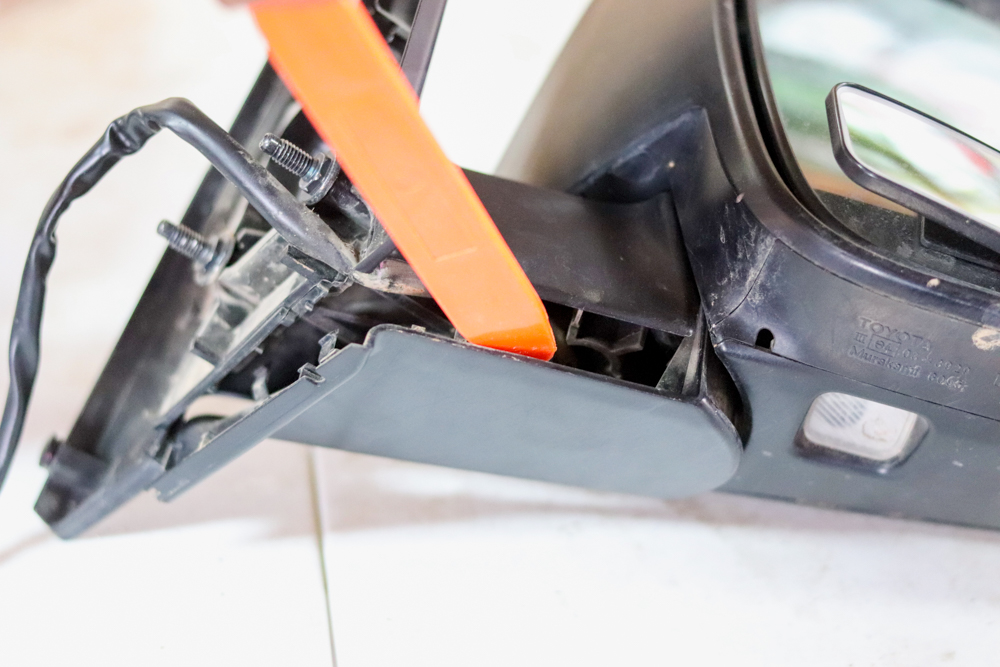
Using the trim removal tool, carefully pry open the lower mirror arm cover. It’s a handful of snap fits, so be careful not to break any.
Step 9. Remove Spring Clip
Bring out your needle nose pliers for this step. The metal clip here is keeping the mirror spring-loaded in open and closed detents.
With the addition of the motor, this becomes unnecessary, so we can get rid of it. Insert the tips of the needle-nose pliers into the two opposing holes on the spring clip.
Keeping some force on the pliers to keep the tips inserted, give the whole thing a firm twist. This should align the slots on the spring clip with tabs on the center shaft and it should pop right off.
At this point, you can also remove the spring and plastic washer that was being held down by the spring clip.
Step 10. Remove Mirror Plate
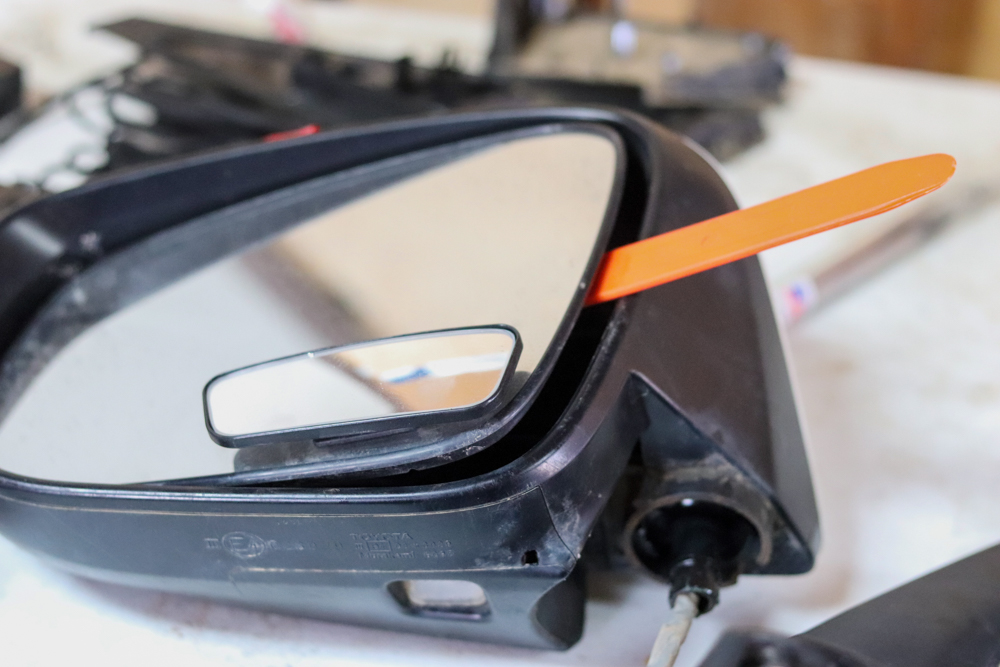
Using the trim removal tool, gently lift the mirror plate out of the housing. It may feel like you’re about to break something, but the mirror plate should pop right out if you continue pulling up.
Before you fully remove it, disconnect the two-pin connector for the mirror defroster.
There’s no latch for this connector, so it may take some force to pull it off due to the snug fit.
Step 11. Remove Cosmetic Cover
In order to remove the cosmetic cover, first pop off these three clips from the mirror plate side.
Once they’re off, you can push the cosmetic cover off by poking your fingers through the internal cutouts. There are a few more inaccessible snap fits that you should be able to overcome with some finagling.
Step 12. Remove Lower Cover
Remove the two noted screws and you should be able to pull off the lower cover. There are some snap-fits around the sides and bottom edge, but gentle persuasion should release the cover.
Step 13. Remove Signal Light
Looking at the assembly from the mirror side again, locate these two clips behind the signal light.
Pull each one out and away from the inner bracket to release the light module.
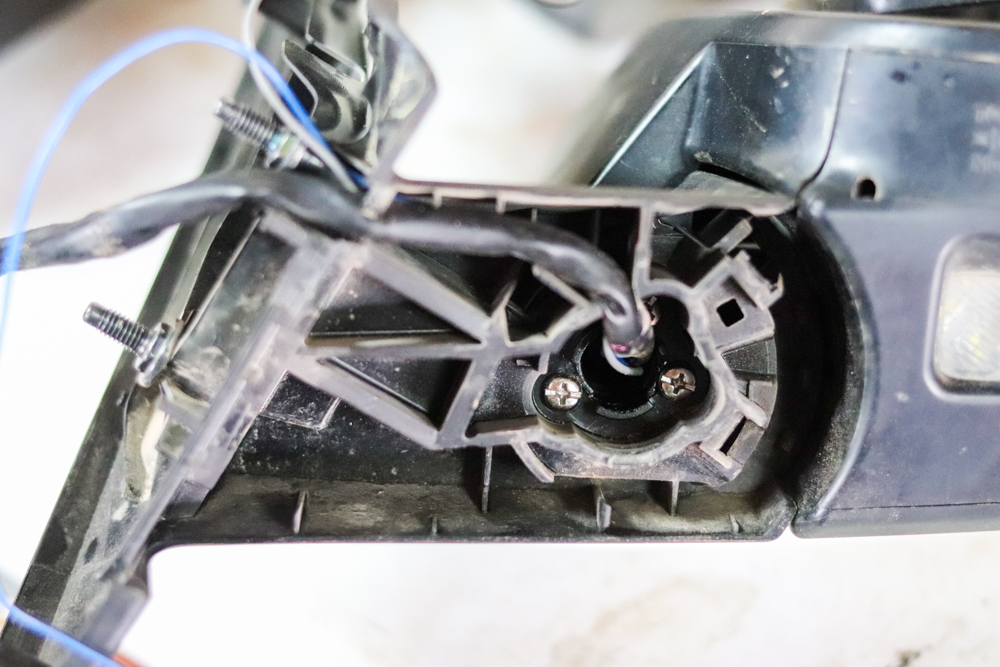
Step 14. Remove Screws Holding Arm Bracket In Place
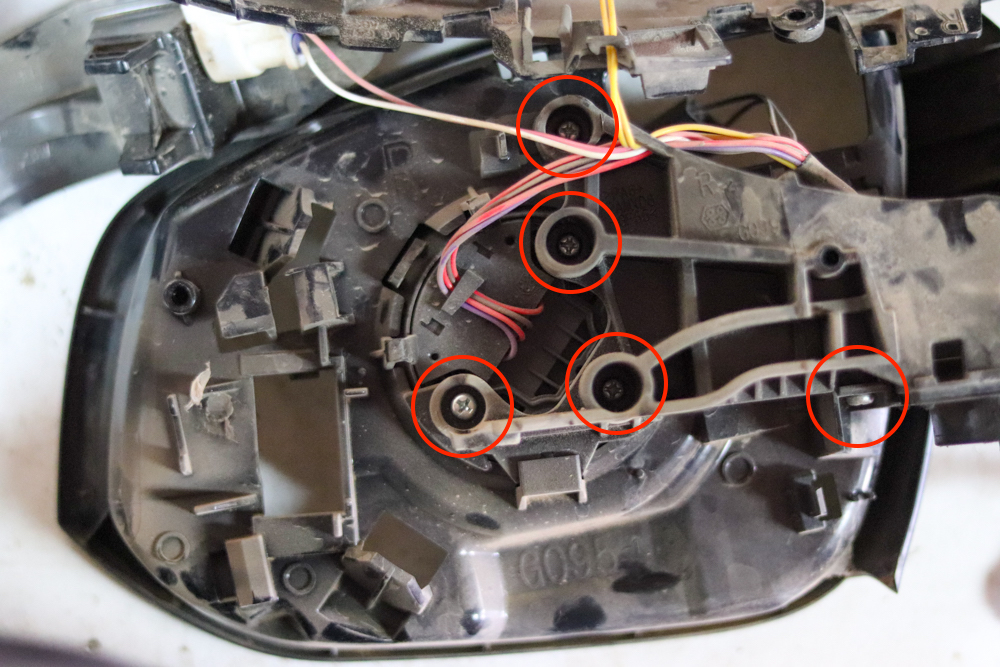
Remove these five screws holding the arm bracket in place, and remove the bracket. The kit that we’re installing comes with replacement arm brackets with integrated motor and gearbox that we’ll swap in.
Step 15. Assemble New Arm Bracket w/ Motor
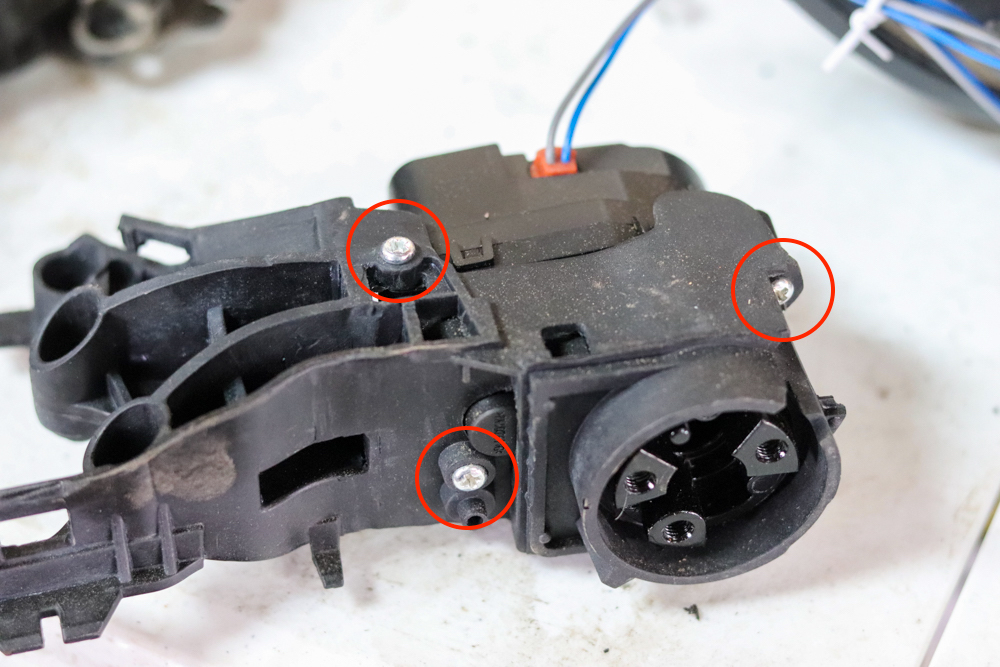
Before assembling the new bracket, remove these three screws. They’re unnecessary for our actual assembly, so feel free to toss them.
We’ll be reusing the original mirror assembly screws that we removed in Step 14.

Now we can swap in the new arm bracket. The fit should be identical to the original arm bracket, so follow what you did in Step 14, except backward.
Put back all the screws you previously removed. Tidy the wires up (including the two new wires from the motor) and route them back through the hole in the new arm bracket.
Both outer covers can be assembled at this time – just follow the steps you took previously, except backward.
Step 16. Assemble Mirror Assembly to Mirror Arm
Using the supplied screws and washers (three per mirror), mount the mirror assembly to the mirror arm.
Make sure that you position the mirror in the unfolded state when screwing the mirror to the arm. You can now route the cable along with the wire guides and out the mounting face.
Finish up by re-attaching the lower arm cover and rubber isolator. Hope you noted how to route the wires behind it!
Pro Tip: In case you didn’t, send the wires around the inner perimeter to the center opening so they can exit out the inner hole of the rubber isolator.
Step 17. Re-Attach Mirrors To 4Runner
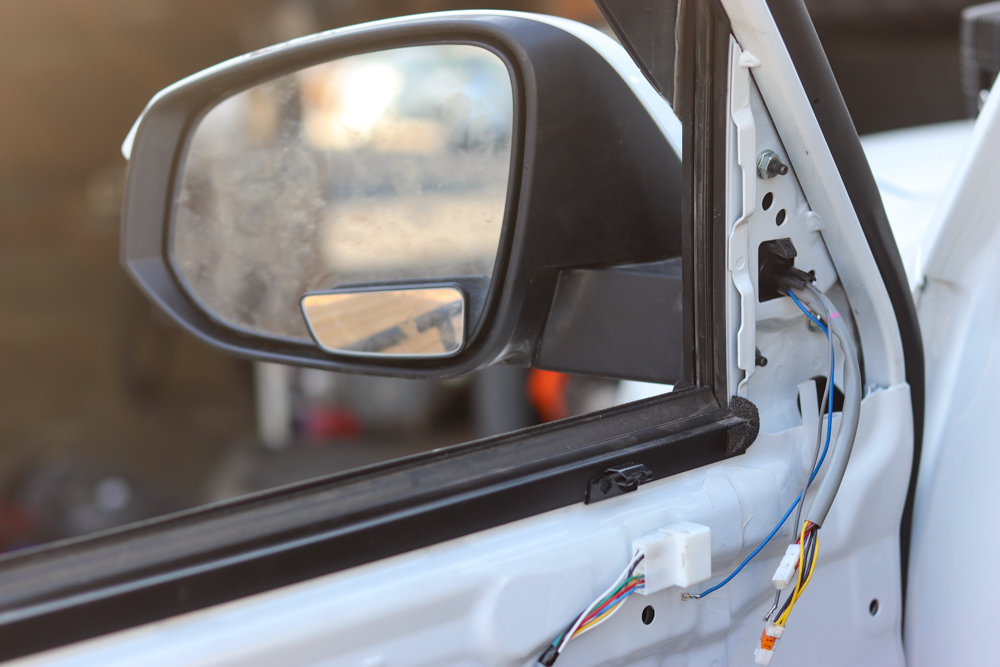
We’re finally done with the mirrors!
Let’s reattach them to the vehicle with the three original 10mm nuts. Make sure the wires are cleanly pulled through to the inner side of the door.
Now that we’re done pulling the cable through tight gaps, we can reassemble the two inner connectors into the outer housing and plug it back into the mirror receptacle. The power wires from the motor remain free.
Step 18. Prepare Door Grommet For Wire Routing
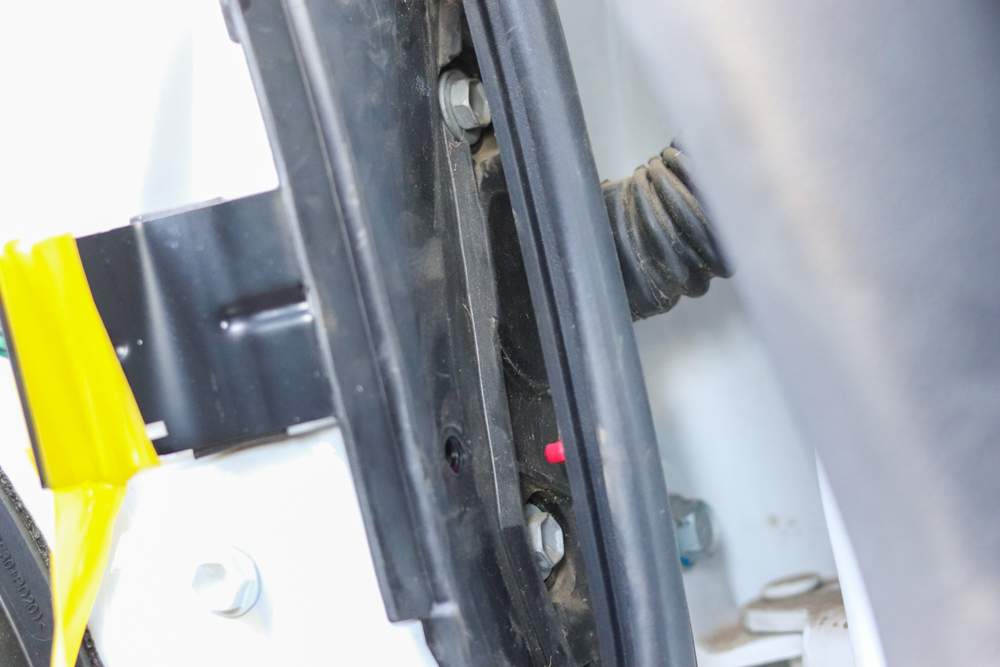
Remove the door seal in the door grommet region.
This will expose two 10mm bolts that retain the bracket clamping the wiring harness. Undo these bolts and remove the tape securing the harness so you have free access to the door grommet.
Step 19. Remove Kick Panel
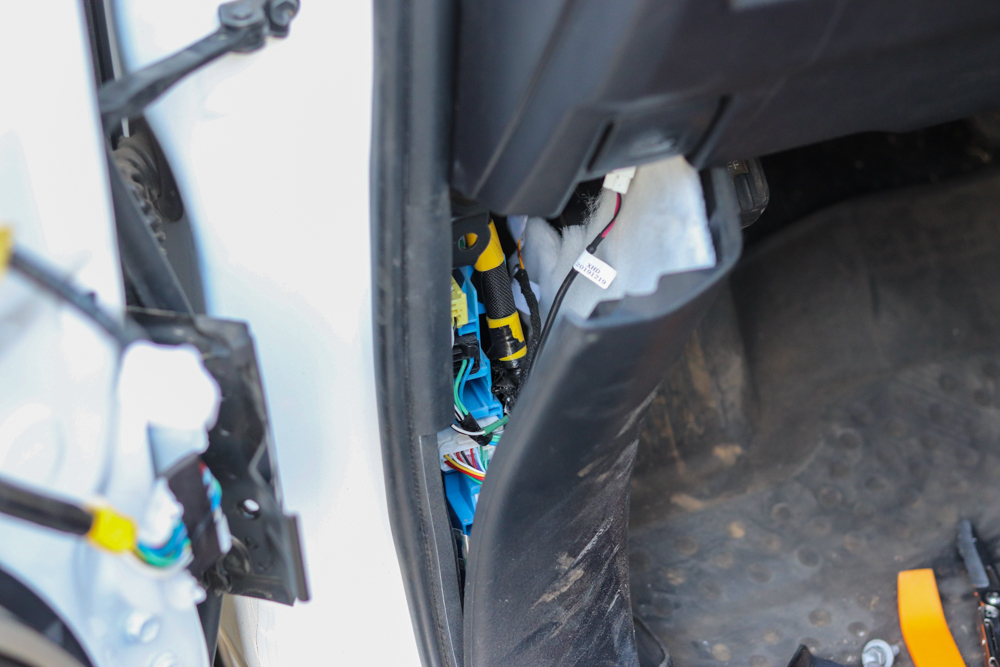
Removing the kick panel is necessary to access the wiring harness and the door grommet.
First, unscrew the plastic screw nut towards the back, and then pull out the snaps in the front to remove the panel. Locate the opening for the door grommet and use the wire fishing tool (sent in from the door side) to pull the short power pair (from the kit’s wiring harness) through on the driver side.
You’ll want to take the long power pair and pass it through the center console and perform the same routing through the passenger door grommet.
Step 20. Connect Power Wires
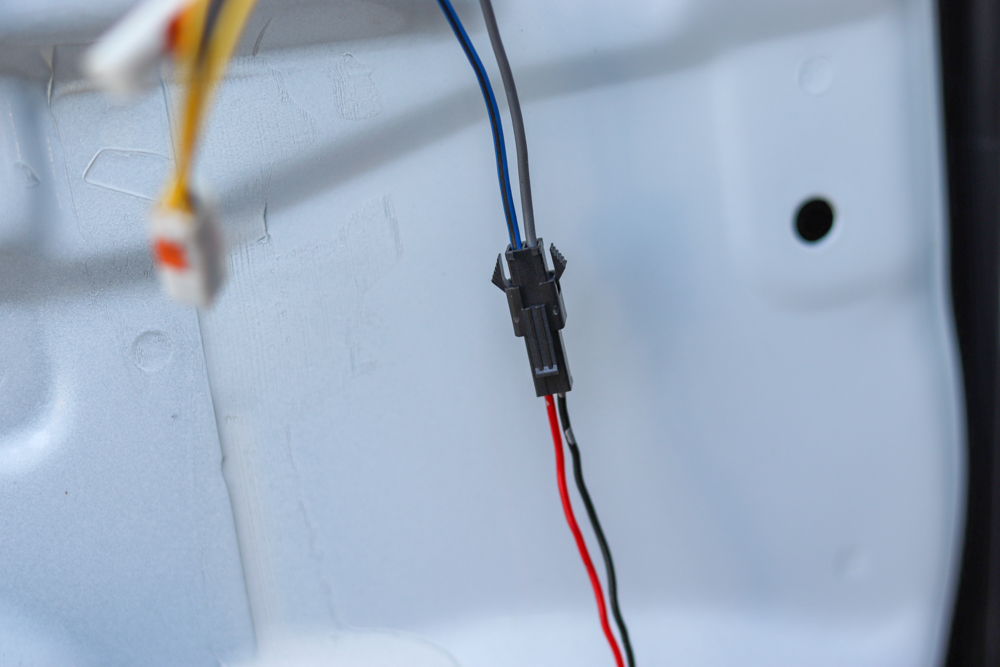
Use the included plug/receptacle pairs to connect the terminals from the power wires you just sent through the door grommets and the power wires from the mirror modules.
Make sure you match red/blue wires and black/gray wires. Take special care to insert the terminals correctly in the housing so they don’t pull out later.
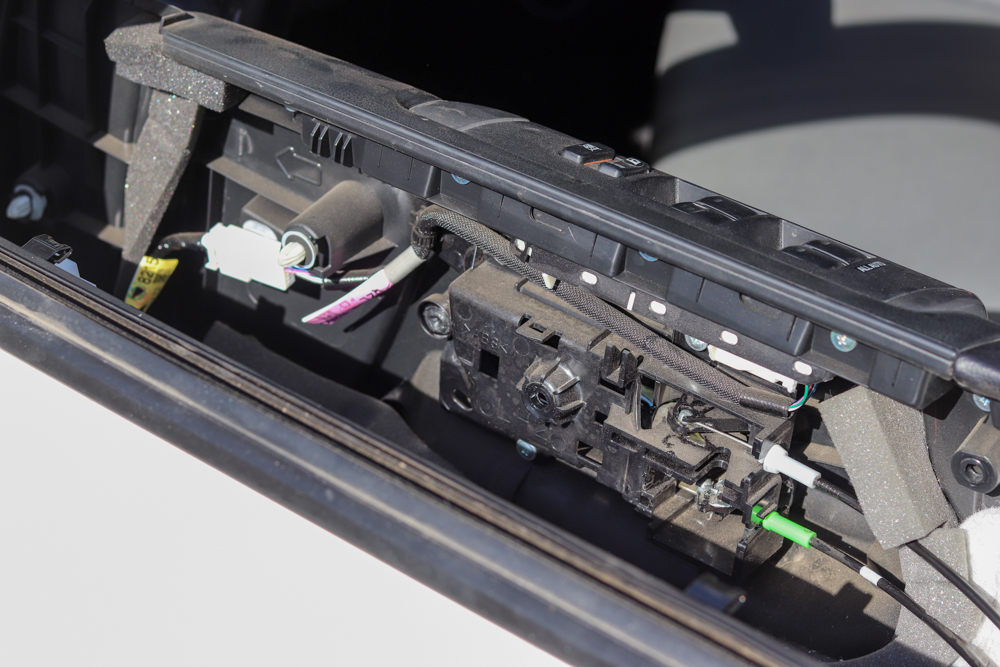
Step 21. Install New Mirror Control Panel
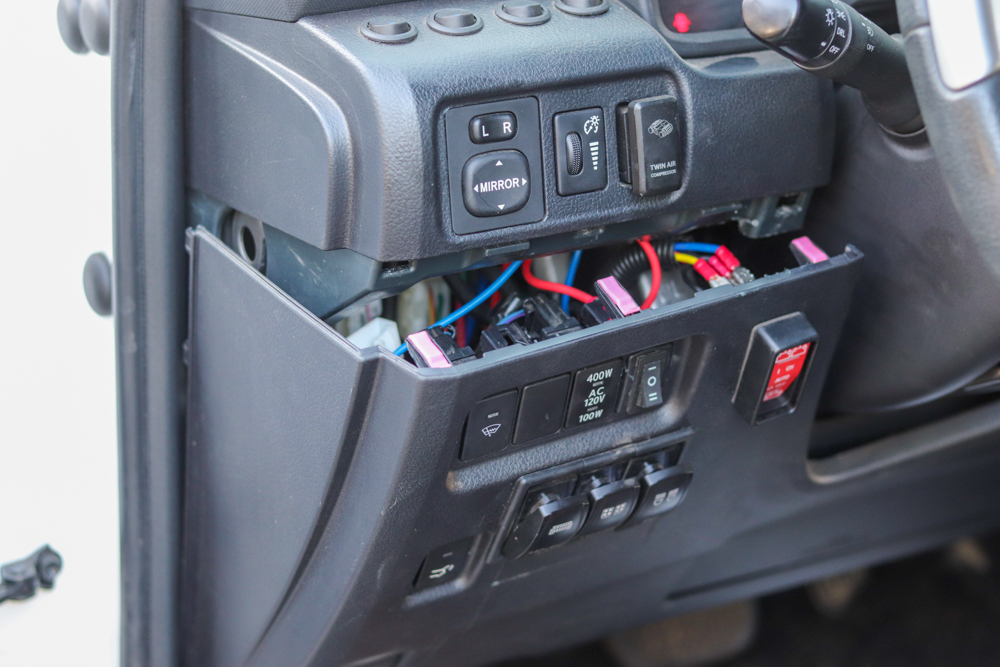
Pop open the dashboard by pulling on the top right corner of the lower panel, directly to the left of the steering column. From here, you can reach up from below the current mirror control module and push it out from behind.
Once it’s out, disconnect the old control module by pressing the tab on the rear connector. Plug in the intermediary harness – one side connects to the original connector and the other side plugs into the new control module.
You can now install the new control module into the dashboard and reassemble the panel.
Step 22. Tap vehicle wiring harness for 12V and lock/unlock signals
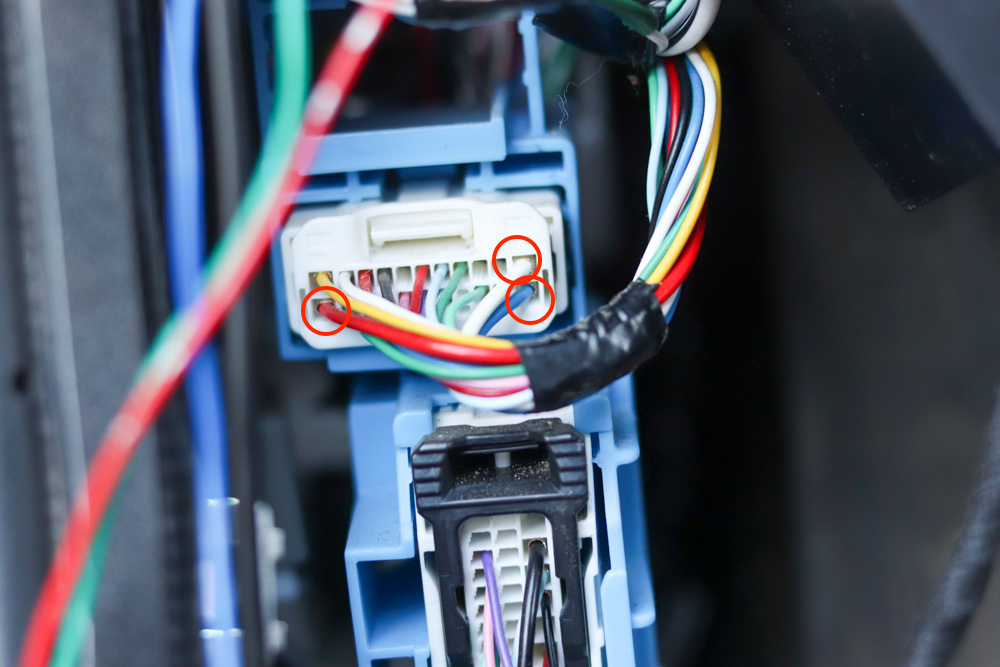
Now we’re left with three wires from the kit harness – red, green, and blue. Find the connector pictured above in the vehicle harness and locate the three circled wires – red, white, and blue. We’ll be tapping these wires and connecting the kit harness.
Match these wires as follows:
- Red ⇔ Red
- Blue ⇔ Blue
- Green ⇔ White
Step 23. Tidy Wiring & Close Up
After tidying up the wires, put the kick panel and both door cards back on. Remember to plug in all connectors (window controls, courtesy lights, latch/lock Bowden cable terminations) and check that all snap fits are properly engaged.
Now all you need to do is test your new setup!
Final Thoughts
Overall, I’m extremely pleased with this kit. The installation process was fairly smooth, though the instructions were lacking in several areas. I’m typically comfortable with advanced mods, but this took more time than anticipated – I ended up completing everything in approximately 5 hours. The end effect was worth the effort – the auto-folding feature works great and it’s almost indiscernible from a stock feature.
The only fault I found with this kit was the fit of the new arm brackets; I was unable to get the mirror cover panels to line up perfectly once the new brackets were installed – an apparent tolerance issue. Again, my overall impression is positive. I definitely recommend this kit to anyone that wants power-folding mirrors as well as a fun challenge
Does this work on any trim 5th Gen? I do not have lights on my sideview mirrors just the regular adjusting mirror. Will this work?
How do I get the 2 power wires from the passenger side kick panel thru the center console to the area near the mirror control module?
what size are the 6 screws and washer for the mirror arm?
I had this installed this past week by a friend who is an electrician by trade and does extensive vehicle work. I am so pleased to have working power mirrors now. Awesome. I saw the question from someone else asking how to disable the auto feature; I’m glad that can be done. However, I do have one problem. I can no longer automatically adjust the passenger mirror. The left adjusts with the controls, so that’s good. Anyone else have this issue? Anyone know what the problem might be? Could it be the switch that was installed? Is there a particular wire that would have caused the passenger mirror to no longer be electronically adjusted? Thanks for any comments/suggestions.
So after returning to my truck in the garage, I noticed the BSM (Blind Spot Monitoring) light was flashing on the driver’s side mirror. I learned that I had to disconnect the plug that is labeled as the “unlock” signal to prevent it from blinking while the truck is parked. I kept the OBD 2 plug attached and everything works as designed. This may be a 2022 thing, but I am all for less integration for it to work.
I am having the same issue with this on my 22 4Runner which plug did you disconnect?
Installed on my 2022 TRD Pro with no issues. It was straight forward. The only difference was I had to depin the mirror wires. My truck’s harness was different. It was overly easy, and again, straight forward once you took it apart.
How did you disassemble the connector? Is it just the clips on the side holding it together?
Installed on my 2022 TRD Pro with no issues. It was straight forward. The only difference was I had to depin the mirror wires. My truck’s harness was different. It was overly easy, and again, straight forward once you took it apart.
Great write up! I just finished installing mine on my 2020 Trd Pro, and would like to share some updates. Looks like the product has been updated. I didn’t have to tap any wires, they provided a lot of wires/connectors. This could be very tempting for people who are worrying about warranty while tapping the wires. Also, there is an extra upgrade. After doing this wiring, the windows will roll up when you hit lock on the remote.
I’ve been looking for something like this for my 21 SR5 Premium 4R. It’s definitely a feature I miss from my previous car due to a tight carport. I won’t be installing this … an electrician friend will … but my question is….. Once it’s properly installed, is there a button to push while still driving/engine on, i.e. while parking/backing up, to fold/unfold the mirrors? Or do I have to wait until the vehicle is locked/unlocked? If they only fold/unfold after the engine is off and vehicle is locked, that won’t really help in my situation. Please clarify for me. I’m hoping for a positive answer. Thanks!
I just installed mine today. Yes, there is a button what you push and will fold/unfold anytime while the ignition is on, so it helps with parking in tight places.
It works on 4Runner 5th Gen pre facelift?
Looks like it’s for 2014-2022. If you have power folding mirrors, and same mirrors as the 2014-2022, I’m sure you can make it work, but it might require higher experience about wiring.
Is this motor work on aftermarket side mirror like koolvue
I don’t see the photos anymore. what happened?
Updated. We’re all set here.
Hi, on step 22, I don’t have the white cable; the blue cable is there but no white.
Any help is much appreciated.
Thanks
Can you attach a picture of your harness?
Here is the picture, thanks.
Sorry, I don’t see any attached pictures. Can you share them via email?
I am having this same problem! How did you solve this?
Yes,
Hey y’all. OUTSTANDING write up. I am not too savvy with wiring and what not but I had a question concerning T-tap, can I use this method when tapping into the 3 different color wires? Thanks so much and be safe!
Thank you! T-tap is definitely the easiest method to connect the 3 different color wires!
I agree! It was such a fun, challenging mod that gives functionality and appeal. I’m so glad I got to do this thanks to your write up.
If i don’t want the unlock/lock to trigger the unfolding/folding actions, would I just need to run the 12v wire? In that case, could an ‘Add-a-tap’ be used in the fuse box, instead of actually tapping a wire?
That’s correct. The blue wire taps into the “lock detect” circuit and the green wire taps into the “unlock detect” circuit. The red wire is constant 12V and you should be able to use an “Add-a-tap” to accomplish the same thing.
Thanks for the speedy reply! And thanks your efforts on the excellent write up.
No problem!
Great write up, Sanju!
Just ordered these. Question – if one fails to fold them in electronically and a tree pushes one in will it damage the mechanism or fold in like the factory default?
Thanks for any insight
They fold in just like the normal mirrors upon impact.
Thank you!
Any chance this would work on a 4th gen? (2008 Ltd V8)
I’m inclined to say no, since the replacement mirror arms are designed specifically to drop into 5th gen 4Runner mirrors (which are different from 4th gen 4Runner mirrors). You might want to reach out to Car Trim Home directly to see if they have a similar kit for the 4th gen or know whether their 5th gen kit is compatible with 4th gens.
As far as the passenger side mirror, how is the wiring hooked up to the mirror control modular? Does the wiring need to be fished thru to the driver side of is there a convenient spot on the passenger side?
The wiring is identical to the driver side mirror connection. The wire coming out of the harness provided by Car Trim Home is longer for the passenger side connection, so you can fish it through your center console. This requires removal of the front trim pieces and A/C control module at the very least. Let me know if you need additional details for that part.
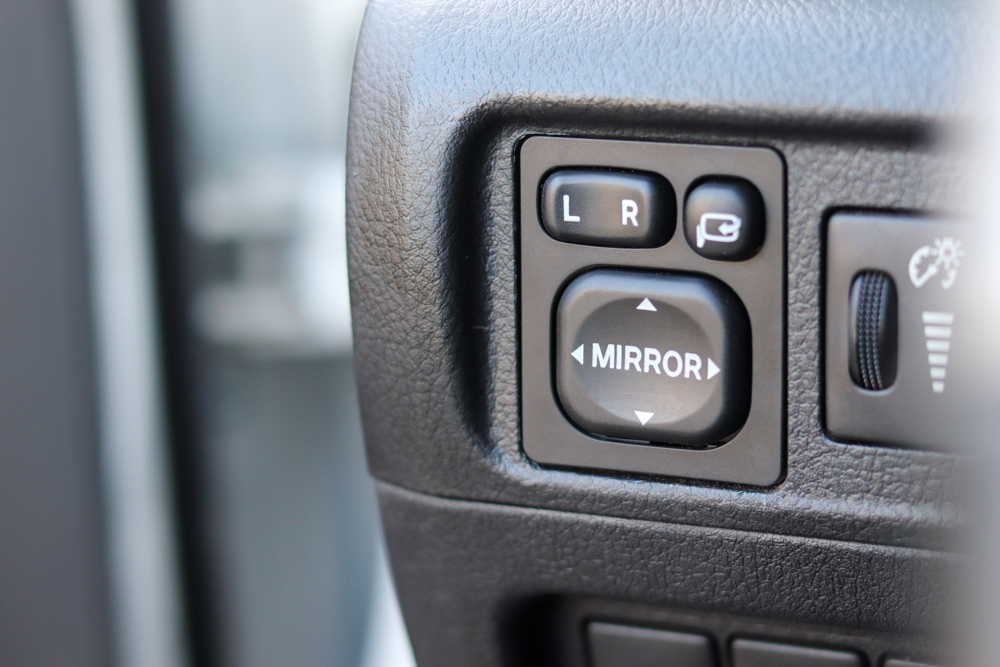
Thx so much. If there is a chance to show more details fishing thru the center console and the removal of the front trim pieces would be helpful. I’d hate to break any of the plastic trim/parts. Your pictures showing the trim removal for the control switch replacement is helpful. I would have never guessed how to remove that trim.
Here are some images that hopefully help.
Ah yes, these pictures will be a BIG help! Thanks again.
The two side trim pieces on the center console (on either side of the A/C control module and lower cubbies) can be pulled straight back. They pop right off. Afterwards, the A/C control module can be pulled straight back as well. This should give you a sufficiently sized opening where you can fish the passenger side mirror wire through from driver footwell to passenger footwell.
I can’t wait to do this mod to mine! These directions look detailed and easy to follow along!
The level of detail in this article was so good that I absolutely couldn’t help myself when I passed the 4runner in the garage this week. Next thing you know my iPad is on the hood and I’m tearing the mirror apart. Five hours later I have automatic folding mirrors they look so good and function like a dream. Sure I’m short a couple hundred bucks and I still don’t own a truck but whoever owns that 4runner in my building’s garage has some badass mirrors now.
LOL
Well. Freaking. Done. The level of detail in this article leaves no room for error. Nice work man.