
Snorkel Install on Fiberglass Fenders: In-House Fabrication Snorkel for 5th Gen 4Runner with Advanced Fiberglass Concepts +3” Fenders
If you have installed your Advanced Fiberglass Concepts (ADV) fenders, then you already know they look fantastic and have the best fitment when it comes to fiberglass. However, there is one compromise you MUST make to run these fenders. You must sacrifice most, if not all, of the wheel well liner. For some of you, this isn’t a big deal depending on how many rivers there are on the way to the mall. But for the rest of you who dream of seeing what’s on the other side of the river, but are terrified of hydro-locking that precious 4.0 v6, a new option is here.
Allow me to introduce you to the newest snorkel to hit the United States and fresh off the boat from Australia—In-house Fabrication 4” Stainless Steel Snorkel. Yes, there is a long wait but it gives you plenty of time to think about what you’re going to do to your fender. My lead time was about 4 months from order to deliver and another 3 months not having the courage to cut my fender. Replacement fenders are available for 380+ shipping and paint.
Find It Online
- In-house Fabrication Snorkel: Check price
Tools & Materials
- 13mm socket
- Ratchet wrench
- 5/16th socket
- Flathead screwdriver
- Phillips screwdriver
- 3-½” hole saw
- Drill
- Razor Knife
- Jigsaw
- Multi-material blades (get a pack of 5, they wear out fast)
- Blue painters tape
- Rivet nut installation tool
- Sharpie marker
- Snorkel
- 90* silicon elbow
- Intermediate pipe
- Silicon coupler
- (2) 3.75” hose clamps
- (2) 4.5” hose clamps
- Courage
- Respirator
- Long sleeves
- Nitrile gloves
In-House Fab Snorkel Step-By-Step Install
Step 1. Prepare Fender
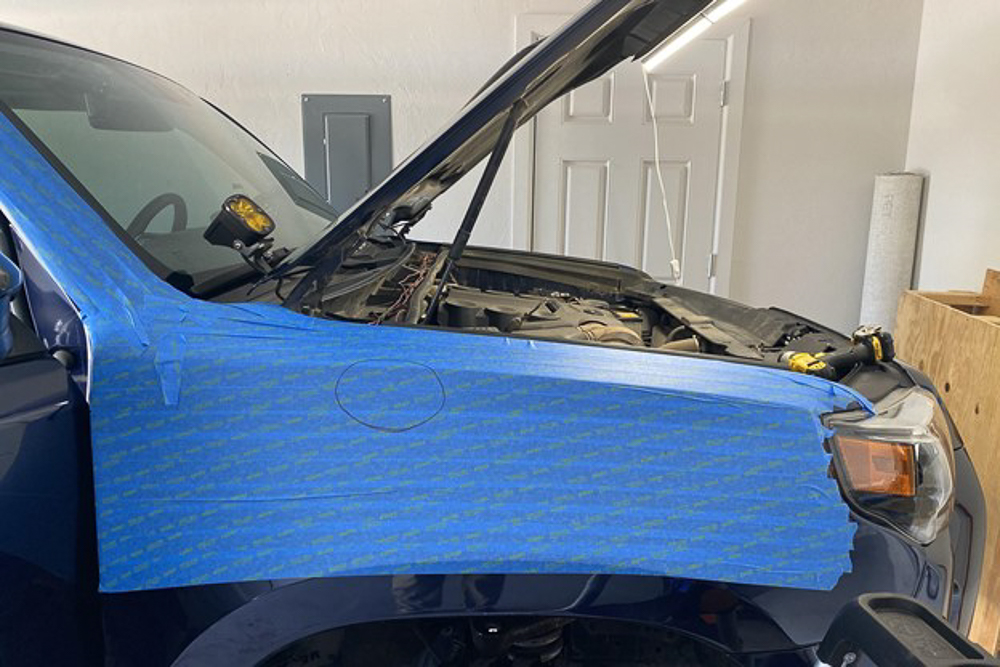
Protect the fender. Preparation is the easiest part of the job. Start by covering the fender and A-pillar in blue painter’s tape. Cover more than you think you need there will be a lot happening in this area as the process continues.
Step 2. Remove Air Box
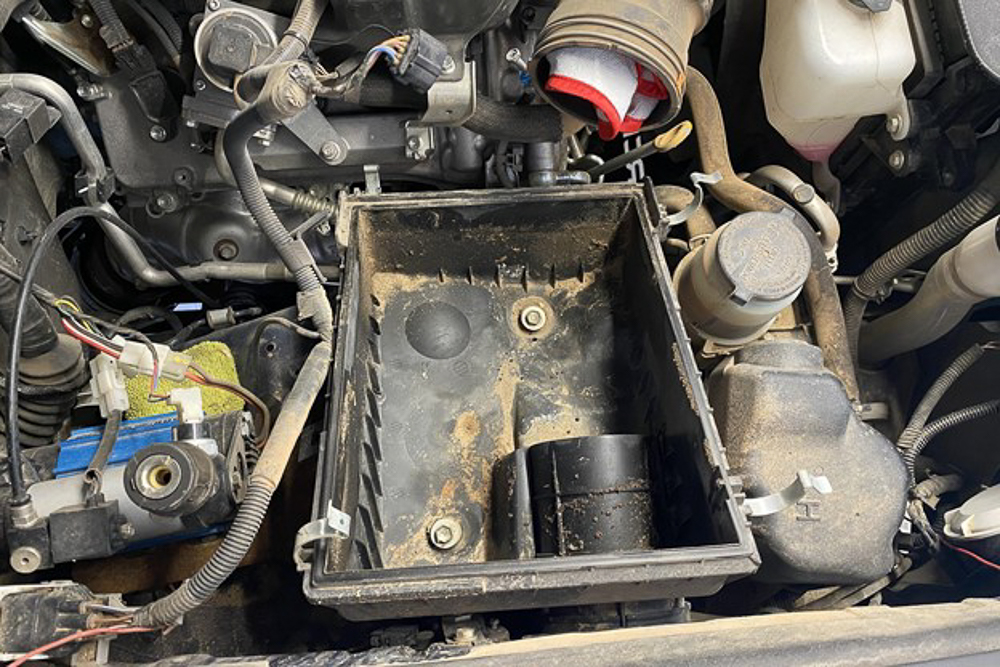
To remove the airbox, start by unclipping the wire harness from the mass airflow sensor by pressing on the tab and pulling the connector till it comes off. Loosen the hose clamp on the lid that connects the intake tube to the airbox. Then undo the four metal clips on each corner of the airbox lid and remove them from the intake tube and set them aside.
Place a rag in the intake tube to prevent any debris from entering the motor.
Remove the air filter to access the (3) 12mm bolts that hold the bottom of the airbox to the fender well. Two are inside the airbox and one is outside nearest the passenger compartment.
Step 3. Remove Splash Guard

Remove the splash guard that seals the intake against the core support. You will need a flat blade screwdriver to pop off the splash guard. Once it is off, toss it in the garbage. You will need to trim the tabs off to make a good seal with the 90° elbow.
Step 4. Loosely Install Airbox and Elbow

Begin by putting some dish soap on the outside of the elbow, just enough to have a thin film. Slide the elbow through the core support with the smaller end going through the hole. It is a tight fit, keep working it till the elbow is through the hole and facing the passenger door. Then slide the appropriate clamp over the tube on the engine bay side and loosely tighten the elbow onto the airbox. Be sure to have the screw tighten the clamp faces up on the right side of the tube so you can get to it when it is in the engine bay.
Step 5. Mark Fender for Initial Hole

Disclaimer: This will get you close, but you will have to do final trimming at your own discretion. This step was edited post-install for a more accurate first cut.
Cut the oval out of the template and align the template at the 1 ⅛” mark and tape it in place. Then mark the oval on the fender.
The measurements were made post-install with the snorkel installed and the template placed over the snorkel. This is a guide to be used for reference due to differences in the nature of handmade products.
Step 6. Make First Cut

Your oval should be lower than shown above.
Put on goggles, mask/respirator, gloves, long sleeves, pants, anything to keep the fiberglass off your skin. It will make you itchy and you DO NOT want this crap in your lungs.
I used a 3 ½” hole saw to make the first cut into the fender. This is the only time I used this hole saw. Yes, it is nerve-wracking but is easier than you think.
Step 7. Recess Snorkel

To recess the snorkel into the fender, slip the snorkel into the hole you made (a second person comes in handy for this step).
Then try to get the snorkel as close to the body as you can. Use a sharpie marker to trace around the snorkel where it touches the fender. Then remove that portion of the fender; I used a Jigsaw to remove the marked area.
Step 8. Repeat Step 7

Repeat this step until the snorkel fits within the fender, mounts to the intake tube adjoined to the 90° elbow and the A-pillar mount is between the door seal and the pillar. Cut a little at a time so you don’t end up cutting too much. When you are done, it should look similar to the above but hopefully tighter-fitting…learn from my mistakes.
Use a cut-off wheel or an oscillating tool to CAREFULLY trim the fender near the base of the A-pillar. There is not enough space to use a jigsaw and, if you hit the core support/A-pillar, the blade will bounce and damage your fender. Please don’t ask me how I know—it’s a sore subject.
Step 9. Tighten Clamps

Breathe a little bit, the hardest part is over. Tighten the clamps that hold the snorkel to the intake system. Doing this allows you to mark the A-pillar so you can mark two holes for the rivet nuts that will hold the snorkel to the pillar. Once you mark the holes, lose the clamps and remove the snorkel for the next step.
Step 9. Drill Holes & Install Rivet Nuts

Use a drill bit that is the same size or slightly larger than the outside diameter as the rivet nuts. I trashed a rivet nut as you can see. I had to drill it out and then file down the portion of the hole that was deformed. Do yourselves a favor and rent or buy a rivet nut installation tool. If I had the tool to start, this would have been a 2-minute process instead it took 2 days. It was so easy with the tool, I want to rivet nut everything now.
Step 10. Install Edge Trim Around Hole

This is the easiest part. Start at the A-pillar side of the hole and work your way around till the entire edge is covered. Since the glass fender varies in thickness, use a trim with a larger opening ⅛”- 3/16” this is the edge trim I used since my hole was up quite large. Other options are available but this works great.
Step 11. Install Snorkel Again

Breathe a little bit, the hardest part is over. Tighten the clamps that hold the snorkel to the intake system then use the two supplied bolts to secure the snorkel to the A-pillar. You may need to use a ½” drill bit to countersink the hole on the snorkel a bit to get a clean seal. You can see the difference the countersunk makes when the door is closed. Your snorkel is now attached. You can peel off all the blue tape.
Step 12. Double-Check all Fasteners

Now that the snorkel is installed, just check every fastener: Intake tube, airbox, (air filter is installed) snap all 4 clips on the airbox closed, four hose clamps on the snorkel, and the two bolts that hold the snorkel to the A-pillar. You are now ready to ride.
Final Thoughts

Scary, messy, intense, and totally badass. This was the most intense install I have had the pleasure of installing myself. I’ve cut most of the other body panels, welded on a rear bumper drilled holes in my frame, and built my own winch mount—nothing prepared me for this install. Not even the years I spent repairing jet skis. Fiberglass is nasty.
These fenders are beautiful and the snorkel fits right in and flows nicely. The entire install took about 3 hours total work time. Real-world, it took 4 days including waiting for tools. I would get frustrated and have to walk away and come back to it later before I really screwed it up. It looks cool, is functional, and is loud when the skinny pedal meets the floor and the windows are down. I haven’t noticed any change in miles per gallon but the throttle response is delayed a little bit from pedal movement to engine reaction. Is it expensive? Yes. Are the stakes high? Yes. Is it worth it? 100%.
I got a good deal on a new in box Safari Snorkel on craigslist locally and really like it but this is by far the best looking snorkel I’ve seen on a 4Runner!