
How To Wire Aftermarket Lights to Factory-Style Push Switch on the 5th Gen 4Runner (AOB or CH4x4 Push Switch)
One of the first modifications people usually do to their 4Runner is adding additional lights.
Since these are the first mods, most people are not spending the money to buy a SPOD or Switch Pro just to run one, two, or three accessories. The most cost-effective way to wire lights on the vehicle is with a manufacturer-supplied wiring harness. This saves you the time and hassle of sourcing the relay, fuse, wires, connectors, and switch.
I recently had the pleasure of briefly getting lost in the desert and had to navigate over some tight obstacles in the dark, which made me realize I should’ve put ditch lights higher on my priority list!
I ended up picking up a pair of Baja Designs S1s for a decent price. When buying from Baja Designs, they provide (depending on the kit) you with a well-built wiring harness that is simple to install. However, since the lights they sell are usually universal, the switch it comes with is not the most aesthetically pleasing. This brings us to CH4X4’s switches. Their switches are a direct fit into the dash and they sell an assortment of switches for whatever you plan on running.
This write-up won’t be focused on installing ditch lights, but rather it will focus on wiring up a set of lights to a factory-style switch; this could be for ditch lights, chase lights, light bars, etc.
What You’ll Need

Find it online:
- Baja Designs S1 Kit: Check Price
- CH4x4 Toyota Small Push Switch 4Runner Ditch Lights: Check Price
- Bussmann Fuse Tap HHLP ATM-LP: Check Price
Tools & Materials
- Ratchet
- 12mm Socket
- Scissors
- Waterproof Butt Splice & Ring Connectors
- Heat Shrink
- Wire Strippers/Cutters
- Wire Crimpers
- Small Flat Head Screw Driver
- Drill
- Drill Bit Set (required 5/16)
- Electrical Tape
- Tessa Tape (high-end electrical tape)
- Zip Ties
- Silicon Spray
- Heat Shrink Gun or Lighter
Step 1. Prepare Baja Designs Wiring Harness

Lay out the Baja Designs Wiring Harness and take note of the different components within the harness. The Baja Designs Wiring Harness is almost a plug-and-play setup, but since I am wiring it to a factory-style switch, a few modifications are needed.
Wiring Harness Components:
- Positive Lead
- Ground Lead
- Relay/Relay Connector
- Switch Cable
- Baja Designs S1 Connectors (2X)
Separate the following from the Baja Designs Wiring Harness:
- Relay
- Switch Cable
The Switch Cable is connected to the wiring harness with a white connector. Separating the two will make feeding the cable through the firewall and modifying the switch easier.
Step 2. Modify Baja Designs Switch Cable w/ CH4X4 Switch

Baja Designs Wiring Harness comes with a universal round on/off switch.
However, we are after an OEM look, and this is where the CH4x4 Switch comes in. CH4x4 makes Switches that will fit directly into any one of the blank switch spots in the 4Runner. Below are the wire color designations for the switch.

My goal is to wire the lights independently from the truck’s electrical system.
Therefore both RED wires will be tied together. This setup will only light up the switch when it is pressed, but if you want to have the switch light up along with the dash light, an easy way to do this is to tap RED2 into another nearby factory switch’s dash light circuit (usually green wire). You’ll have to use a multimeter to determine which wire is hot when the dash lights are on.
UPDATE (04/15/2021):
I found an easy way to have the CH4X4 Switch light up with the dash without tapping into existing light circuits.

Parts List:
- Bussmann Fuse Tap
- 7.5 amp fuse
- 16-18ga wire.
The wiring from the Switch to the Baja Harness will be the same except for the RED2 wire(next to GROUND).
First you’ll want to find the length of wire you’ll need to reach from the fuse panel (above the hood release) to the Switch. Once you have the length of wire connect the RED2 wire to the Fuse Tap either with crimp connectors or solder. Now from the fuse panel diagram/cover locate the “PANEL” fuse this is where the Fuse Tap will go.
 Remove the 7.5 amp fuse add it to the Fuse Tap along with the additional 7.5 amp fuse. Plug the Fuse Tap into the fuse panel and test the switch once everything is wired up.

If everything is wired up correctly the lettering (DITCH LIGHTS) from the Switch should light up when the vehicle’s light is switched to either Parking Lights or Headlights. And when the switch is activated/pushed the image on the Switch will light up.

Connect the following CH4x4 wires to Baja Designs wires:
- GREEN – WHITE
- RED1/RED2 – BLUE
- BLACK – BLACK
I used crimp-style butt connectors with a shrink tube to connect these wires, however, soldering these wires together will work as well.

Modified Baja Designs Switch Cable with CH4X4 switch.
Step 3. Attach Relay to Engine Bay

Separate the Relay Mounting Bracket from the Relay. Using a 5/16 drill bit open up the Relay Mounting Bracket hole for the M8 Screw. Reattach the Relay to the Mounting Bracket.
Note: Do not use the Relay to hold the mounting bracket when drilling, this could cause damage to the Relay.
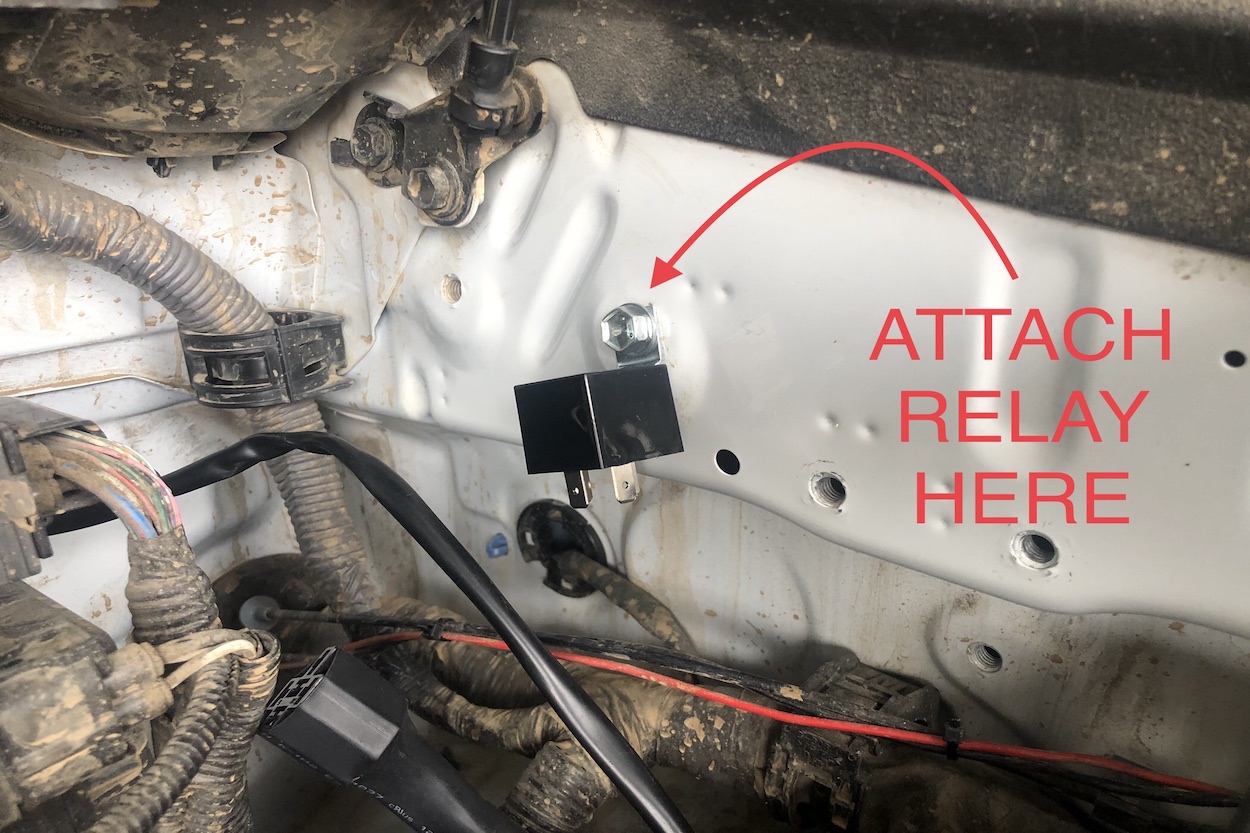
Attach the Relay to the side of the engine bay using an M8 screw near the driver’s side behind the fuse box. There are a few threaded holes to choose from. Pick the one that will work best for you.
Step 4. Wiring Harness Switch Cable: Separate Female Switch Connector

There are small tabs that are raised up locking the pins in place in the female connector. Using a small flat head screwdriver, insert it into the connector and gently depress the tabs to remove the pins. Wrap the three pins together with either electrical tape or painter’s tape this will protect the pins as the cable is passing through the firewall.
Step 5. Feed Wiring Harness Switch Cable Through Firewall

Locate the rubber plug behind the brake fluid reservoir and remove the plug and note the orientation it is installed. The hole the plug is covering up will be used to pass the cable through the firewall. The plug will need to be modified to accommodate the cable.
I modified the plug by drilling a hole through the center, starting with the smallest diameter drill bit I have and stepping it up gradually ending with a 5/16 diameter bit. Spray silicone lube on the plug to help to slide the cable through it, note the direction of the plug, and slide the plug up the cable, stopping at about 12 inches from Relay Connector.

Run the cable through the hole and it should end up exiting in the cabin between the parking brake and brake pedal.
Once the cable is through, attach the relay connector to the relay and feed the cable all the way through. Slide the modified plug towards the firewall and make sure it seats back into place. Remove the tape wrapped around the pins and reconnect the pins to the connector from the previous step.
Step 6. Remove Dash Panel & Connect Switch
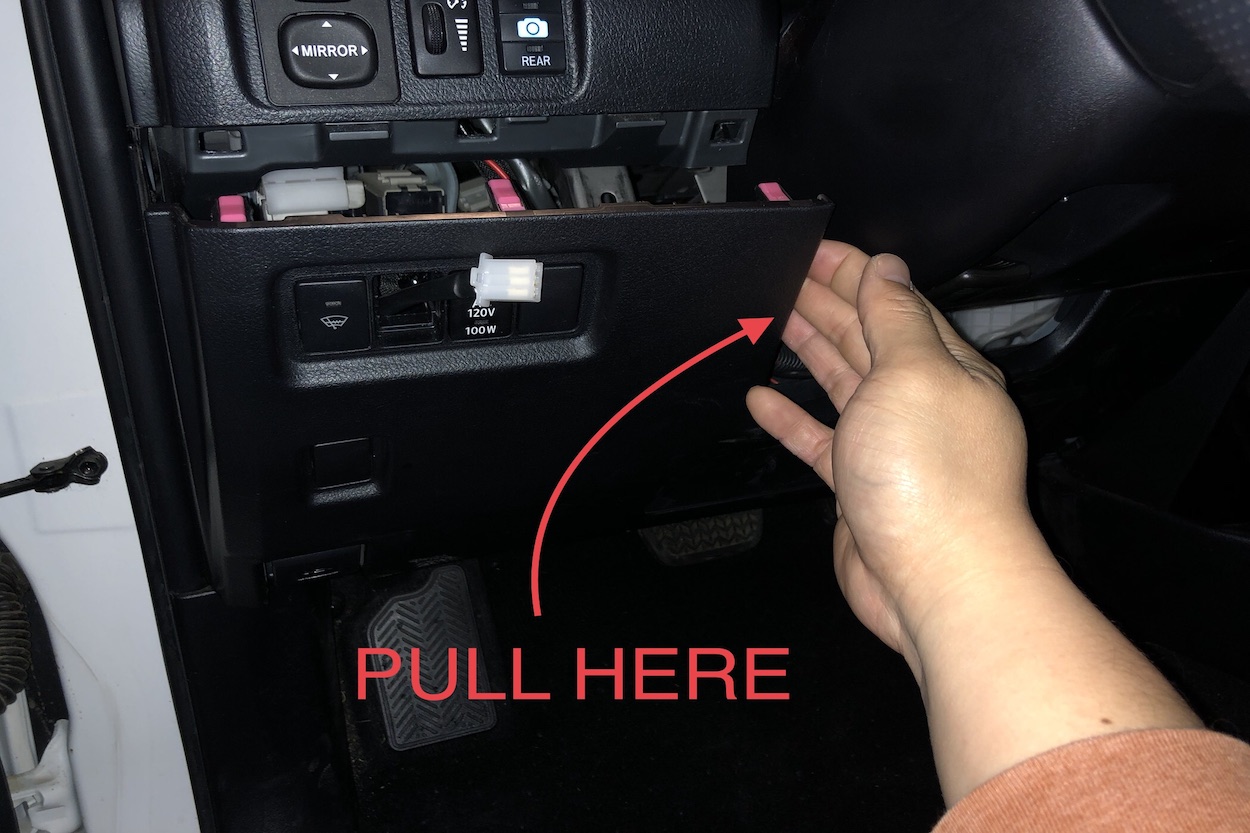
Pull the dash panel next to the steering wheel (see photo above) and work your way from the top of the panel towards the door. This should provide enough room to work within and between the panels so one of the blank plugs can be removed and the cable can be snaked up and through.
Step 7. Connect Everything & Check Operation

Time to connect the following and test out the switch!
- Modified CH4x4 Switch Cable
- Positive lead to the positive terminal of the battery
- Ground lead to grounding point next to the fuse box
- Lights to the wiring harness
The switch will light up when pressed and dim when depressed. If everything is working properly, zip-tie any loose wiring and reinstall the dash panel.
Final Thoughts
The Baja Designs Wiring Harness really made the installation of their lights a breeze and paired with the CH4x4 switch it definitely made the whole setup look like it was from the factory. Absolutely digging this setup so far, all I need now is to go for a night run!
These lights are the first of many electrical accessories I have in plan. However, I think once I have more than 3 accessories with all the wires, relay, and switches it’ll probably be more beneficial to invest in either a Switch Pro or SPOD just to keep everything tidy under the dash.
Thanks for posting. This helped me on my 2020 Tundra keep the OEM look for my light bar and BAJA lights. Great tutorial and writeup.
Hi, I’m a little confused with the step where you say “Once you have the length of wire connect RED2 wire to the Fuse Tap…”
Does this mean I’m not connecting RED2 with RED1 to the blue BD switch wires?
Is the step with RED2 -> Fuse Tap only for if I want the CHX4 switch to light up with the dash? In which case I’d only be connecting RED1 to the blue BD switch wire, with RED2 connected to the Fuse Tap?
Thank you
Step 5. I had a good fit with a 3/8ID x 7/8OD grommet if you dont want to drill out the original one. I put a few extra layers of electrical tape on the wire to get it a bit more thickness, slid the grommet over the taped section, and when pushed thru the firewall, it maintains a tight fit. Dry lube worked wonders to get it all thru.
nice good to know! sourcing a grommet thru McMaster-carr was my plane B if the plug mod didn’t work out.
Jensen, thanks for the write up. I’ve been using this to guide me through some wiring. Have you figured out how to wire your setup so the lights and switch turn off when the truck is turned off? I’m wanting to do this setup on some accessory lights and fear I’ll will end up with a dead battery sooner or later.
Great article and very helpful! Thanks! One quick question I had though. I have three OEM style switches like you do. Could the red wires from all three be spliced together and then run into the one fuse tap that you used to tie into the fuse box or would I have to run all three to different fuses?
You are talking about wiring multiple RED2s into a single fuse tap right? I think thats do able but you might need to go up in fuse amperage. However for reference I have 2 switched going to one fuse tap with 7.5A fuse and have not had any problems. I will probably goto 3 soon once i get more lights.
Yes. I have a light bar switch and two rock light switches that I’d like to have turn on with the dash lights as in the article. I suspect they all have to go into that one fuse so I’d like to splice (join) all three wires together, then run one wire into the fuse tap. I see your point about the fuse amperage. Never thought about that. I just don’t want to mess anything up electrically!
Stupid question: why do I need a realay? Seems to wor fine hard wiring to a fused hot.
You could, but it’ll likely damage the switch if used for an extended period of time since the switch is likely rated at a lower amperage. Older BD wiring harness for the s1 used to not have a relay and has caused some melted switches.