
I finally decided to upgrade my 4Runner’s roof rack and opted for Front Runner. It was a close call between Front Runner and Prinsu Designs. However, out of all the 4Runner roof racks available, I chose Front Runner because I liked the look and functionality of the wider slats. I also chose the ¾ length for a couple of reasons.
First, this is a non-drill roof rack installation. The full-length FR rack requires two rivet nuts to be installed via drilling into the roof, and I wanted to avoid doing that to the 4Runner for now. Second, I don’t need a lot of roof rack room. The ¾ length gives you plenty of real estate to mount your gear.
Lastly, I wanted to minimize wind noise on the roof, as I have heard some people complain about wind noise with certain full-length roof racks. Fortunately, there is zero wind noise with the 3/4-length.
Table Of Contents
Step 1. Remove OEM Roof Rack

Front Runner does a great job of packaging all of the supplies included for assembly. I always like to start an installation by laying out all the parts to see how things will come together. I started my install by removing the 4Runner’s OEM rack.
Begin by using a pry tool to remove the black caps covering the bolts. I invested in some plastic pry tools, which I highly recommend. Once you remove the covers, you will need to remove the bolts.
Be sure to take your time removing all 8 bolts to ensure the receiving end doesn’t fall into the headliner. I alternated loosening the bolts until I could use my hand to back them out. I had no resistance when removing the bolts.
Step 2. Prep Area For Silicone Application

Next, you will need rubbing alcohol to prepare the area for the silicone application, which will prevent any water leakage.
Be sure to remove any dirt from the channel so the silicone can have maximum effectiveness.
Step 3. Apply Silicone & Add Spacers

After cleaning, you will need the 4 spacers and some marine-grade clear silicone. Front Runner instructions call for putting silicone directly around the bolt holes on the roof and putting some on the bottom of the spacers.
Once you have applied the silicone, simply set the spacer into the channel, ensuring it is straight and even. Once you have installed the spacers, you are ready to install the footrails.
Step 4. Install Rack & Loosely Attach Bolts

The Front Runner logo on the foot rails will be installed toward the rear of the 4Runner. I installed the 4 bolts the same way I uninstalled the OEM rack – slow and steady, alternating sides in screwing them down.
Once I had all 8 bolts semi-tightened, I went back and made sure they were all tight. Now you can start to assemble the actual rack.
Step 5. Assemble Each Side of the Rail
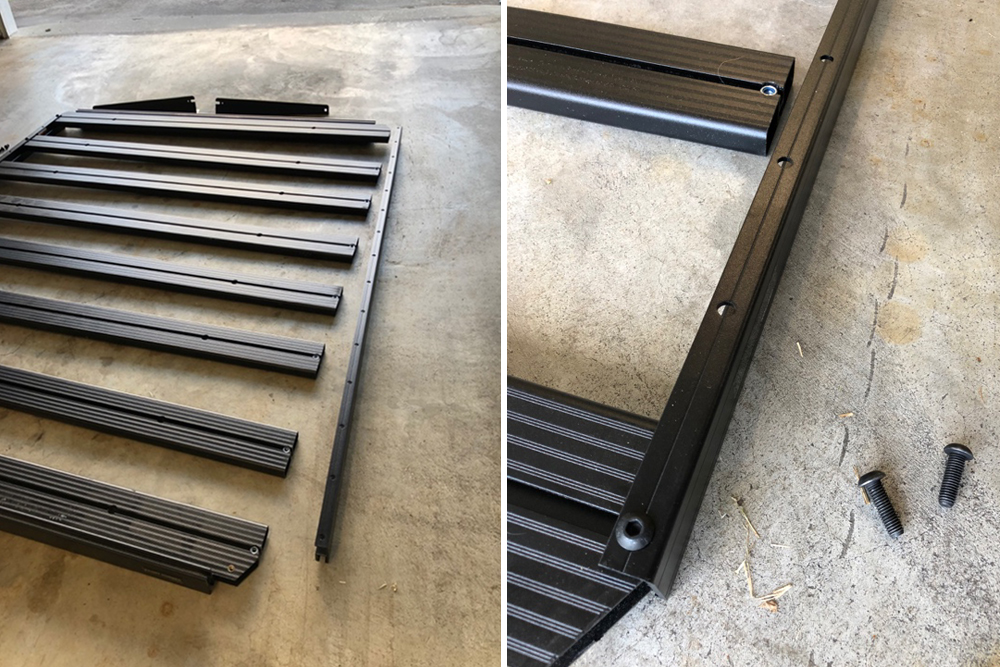
Honestly, this was kind of a pain to get together. The FR rack is made extremely well; it is tight-fitting, which means it will hold securely once on your roof for years to come. All of the nuts provided are locking nuts, so these bolts are not backing out anytime soon. I found it best to start with one side.
Start with the front/end piece, then install one side of the rails into the side rail, using every other bolt hole. The instructions call for the rack to be assembled upside down.
CAUTION: Do not make this mistake I did. In the pictures, you can see the locking nut inside the slot facing up. They need to be facing down during installation. This means once you install the rack, they will be on top.
If you make the mistake I did, you are going to have a horrible time trying to screw the Allen screws into the wrong side of a locking nut. It’s zero fun. I ended up stripping a couple of Allen screws and eventually ended up disassembly the rack and restarting the rack assembly to make sure it was done correctly.
Now, let’s assemble the other side rail.
Once you have one side of the rack completed, grab the opposite side rail, starting with the front or end, and work each rail into the groove until the rack is essentially holding itself together. It is a really strong design in my opinion. Once you have everything tightened down, you will see why so many people love Front Runner; this thing is SOLID.
Step 6. Mount Roof Rack On 4Runner

For the final major step, phone a friend to help you get the rack up onto the 4Runner. There are 8 bolts you will need to slide into the rack slots, which will match up to the foot rails to mount the rack.
Make sure to flip the rack END OVER END and not side over the side to avoid those bolts from falling out of the slots. There is no “front” or “back to the rack; it will go on both ways.
Note: I did not take a specific picture, but please ensure that you install the provided wind deflector on the rack while it is still upside down during the assembly process. It is extremely difficult to install on the bottom of the rack once mounted to the 4Runner.
The only item left is to install the corner pieces. Super easy and they look great.
Final Thoughts

I couldn’t be happier with this rack. It is made so well, and I cannot tell that it is up there while I drive. There are TONS of accessories for these racks, so the sky is the limit in being able to carry gear. My advice is to be patient with the installation; plan for about 2-3 hours, including removing the OEM rack.
Did you have any wind noise or mpg hit with this rack? I’m debating between this rack and the Sherpa Needle. Thoughts?
I currently have the rack Andrew I’m struggling to figure out how I would put a thule snowboard rack in it.
The front runner snowboard rack is kind of pricie so I was looking to go that route.
I recently picked up the Yakima Fat Cat Evo 6s. They use a wrap around strap type thing and fit the Front Runner rails PERFECTLY. I actually have an old set of Thule snowboard racks. I believe you would have to remove the bottom inside rubber of the Thule rack, then find some bolts that will go into the slots of the FR rack, then put your bolt on the inside of the Thule rack. Side note, I almost bought the Front Runner Snowboard racks, but opted out because you can only carry 2 snowboards, and one board HAS to have the bindings removed. I love the Yakima Fat Cats. My buddy has a set he has had for 10 years; they are still looking strong.
What is the height of the rack above the roof? I know the rack itself is 2″ high from the frontrunner website but how tall are the foot rails?
From the top of the 4runner to the top of the Front Runner rack is right around 5.5 inches max depending on where you measure.
Did the rack clear the antenna?
I have the full length front runner rack and yes it does. Doesn’t interfere with the signal either.