
Dual Battery Overview on the 5th Gen 4Runner: CTEK Dual Battery Charger For Maximum Battery Life & Performance on the go
The first upgrade I made to my Land Rover when I purchased an ARB fridge/freezer was a dual battery system.
However, electronics were much simpler then and a Sure Power 1314 battery separator did the job. Small, compact, and with one #8 positive wire, run to the cargo area where the second battery sat, all was good to go.
Later on, a 100-watt solar panel was added with an MPPT controller for times we camped in one location for longer than a couple of days.
And right up until my last Land Rover, a 2007 LR3, this set-up worked like a charm.
Fast forward to the recent purchase of a 2014 4Runner SR5 and all this changed.
While I likely could have used the battery separator, the 4Runner has a smart ECU (engine control unit) and to increase fuel economy, the alternator delivers a variable output and can be shut off when it’s not needed.
Second Battery Set Up with 4Runner’s ECU
Because of this, the second battery would not charge correctly with a battery separator.
A specific unit designed to work with a smart ECU was required.
Research led me to a couple of possible units to build the new set-up around. One was from Redarc, the other from CTEK.
CTEK Dual Battery Unit

These two companies seem to be the largest when dealing with DC to DC chargers. CTEK had great customer service and responded promptly to any email inquiries I made.
For this reason, I chose their D250SA 20A DC/DC unit as the heart of my system:
- CTEK D250SA 20A DC/DC Unit: Check Today’s Price
An added bonus was the fact it had an MPPT solar controller built-in so I could still use my solar panel off-grid to charge without any separate components being added.
Other Main Items You’ll Need to Complete the Install:
- C4 Fabrication Dual Battery Tray
- Blue Sea 6 Circuit Fuse Block
- Blue Sea Below Outlet Deck Panel w/ 12v Plug
- Two USB Plugs
- Mini Oled Voltmeter
- Anderson Connectors (solar panel to CTEK)
- 50w Renolgy solar panel
- 15A Circuit Breaker
The Blue Sea fuse block and Below Outlet Deck Panel would be mounted on the passenger side of the rear cargo area on the removable cubby door.
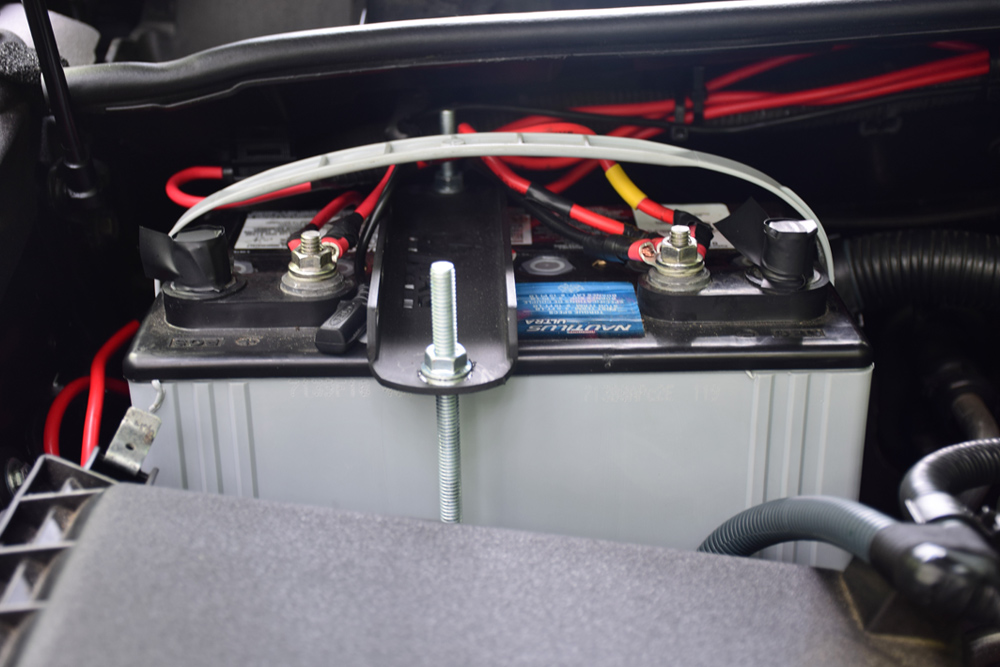
There’s plenty of room to install a second battery under the hood right up beside the passenger side firewall and C4 Fabrication makes a battery tray that fits perfectly.
The CTEK Battery Setup

Because of the US/Canadian dollar exchange, shipping, customs clearance, and Canadian GST, this turned out to be one of the more expensive items in the whole set-up.
Still, it’s nice when something is designed to fit and take advantage of bolt holes already in the engine bay. All the right size nuts and bolts came along with it making a very quick install.
The unit does come in raw steel so it needs to be painted prior to installation.
With everything ordered, I began by running 2 #8 wires from the passenger side of the engine bay to the rear cargo area. The big rubber grommet on the firewall makes passing wires through into the cabin easy.
Install Battery Fusebox Inside Rear Cargo Area

Pulling the kick panel on the passenger side off (there is a plastic nut against the firewall that needs to be removed), removing the plastic sills and unbolting the seat belt anchor between the front and rear doors made for a quick run to that point.
The challenge was fishing the wires behind the cargo area trim. Pulling the rear door seal and popping a couple of grommets helped me see from the front where the wire needed to go.
I drilled a hole in the hidden cubby area and ran a coat hanger through and with some trial and error, managed to get it in the right place for the pull.
Once the wires were into the cubby, everything went back neatly and some silicone on the rubber grommet in the engine bay sealed everything up.
Two pairs of Anderson plugs were deployed in the installation; one in the cubby area so the fuse panel on the cubby door could be removed if needed and the other was used for a tail to connect the CTEK unit to the solar panel.
Setup & Connect Solar Panel To CTEK Battery Unit

The solar panel can be deployed quickly when at basecamp and using an Anderson plug means no more fighting with the actual solar connectors.
The battery tray arrived, was painted and installed along with the battery. This determined the location of the CTEK unit which I installed on the under the hood fuse box cover.
I left extra wire when everything was being wired up and tied it against the inner fender so if I needed to remove the lid, I had plenty of slack.
Wiring is straight forward.
The CTEK has four terminals:
- Positive from the starter battery
- Positive to the house battery
- Positive terminal for the solar panel
- Negative from the house battery and solar panel
Even though I installed the CTEK unit very close to the starter battery, CTEK recommends you run the negative from the starter battery to the house battery and then back to the CTEK unit.
Additionally, 30 amp in-line fuses were added to the main battery, house battery and the wire to the rear cubby fuse panel. A temperature sensor is part of the CTEK unit and it needs to be run and positioned over the house battery for optimum charging in any weather conditions.
Finally, for the smart alternator, two additional wires come off the CTEK unit, one is a ground, and one needs to be connected to an ignition circuit.
Connecting the ignition circuit
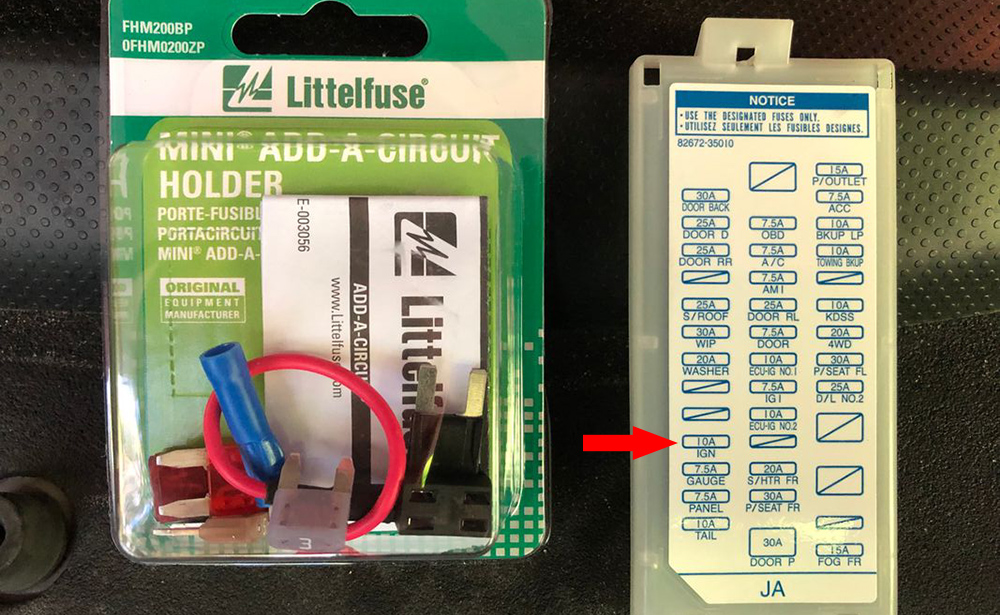
Once again, a large rubber grommet on the driver’s side of the firewall makes easy passage to the small fuse box below the dash where an ignition circuit can be found. Pulling the fuse and replacing it with a fuse tap with 10A fuses completed the install.
Connecting the Solar Panel to CTEK

Here, you can see the connection from the C-TEK to the panel.
The solar connection to the C-TEK has its own positive terminal on the unit and the negative is connected to the C-TEK at the same terminal as the negative from the house battery.
This runs to an Anderson plug on a short, maybe 1.5′ cable. When I deploy the solar panel, I take the wire attached to the solar panel which I added an Anderson connector to the end and plug both connectors together under the hood.
If you look at the photo, the top left connection is the solar panel positive (black wire as it is solar panel cable) and the negative is the top right connection. The short section of wire attached to the C-TEK is just tucked between the brake unit and the inner fender when not in use.
Because the C-TEK has a built-in MPPT controller, both cables from the solar panel attached to it. I had 50′ of red #8 and 25′ of black #8 so some of the negative lines under the hood are using a red cable so could be confusing.
Testing the Dual Battery on the 4Runner
To test, I plugged in the solar panel first and right away, the unit detected it and started charging.
The solar panel can actually charge both the starter and house batteries.
Disconnecting the solar panel, I started the truck and the CTEK unit started to charge the house battery from the alternator.
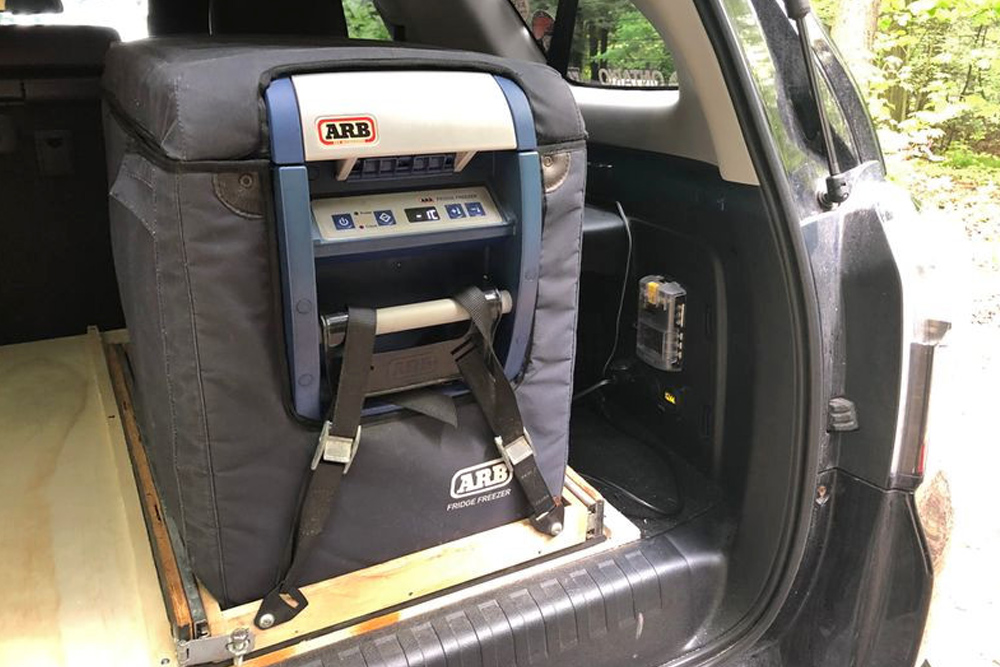
With everything complete, I installed my ARB fridge and can now enjoy both cold beer and cold milk at the end of a day of outdoor adventures.
Do you have a video/walkthrough of the install?
About how much will this setup run someone?
How many hours can your fridge run before recharging?
Just what I was looking for! Thanks for taking the time to describe your install. Not much info on Youtube and was hesitant to go CTEK (I need solar controller and dual battery capabilities) but I should of known someone on here would be ahead of the curve. Cheers.