
Front Skid Plate, Transmission and Transfer Case Step by Step Installation
RCI Offroad makes a great set of skids plates for the 5th Gen 4Runner.
They are competitively priced, quick to ship, and are very sturdy. They offer both steel and aluminum as well as a modified front skid option for KDSS compatibility.
In this guide, I’ll be showing the full install procedure for a full set of RCI Skid Plates
Full Skid Package Deal:
- Front Skid Plate
- Transmission Skid Plate
- Transfer Case Skid Plate
- Full Skid Package Deal: Check Price
- Optional filler plate: Check Price
Jack, Stands, and Ramp
- Sunex 6602LP 2-Ton Jack: Check price
- Pro-LifT T-6906D 6-Ton Jack Stands: Check price
- Truck Ramps 12K lbs: Check Price
Tools For Installation
- Ramps or jack + jack stands
- Moving mat (optional)
- Metric socket set
- Socket extender
- Impact wrench (optional)
- Anti-seize
- 8MM x 1.25 tap
- Tapping fluid
- Hose clamp sized to fit the exhaust hangers (optional)
- Cross check (optional)
If you are looking to protect your 4Runner, this is a great place to start. You can piece together different skid plates here and there but there are no guarantees that they will work with each other.
The full set (10-19 4Runner Full Skid Package Deal) of RCI skid plates is probably one of the more popular options in the community.
Preparing the Installation

Start by either jacking up the car or driving onto ramps.
Make sure that you use jack stands in addition to a jack for safety.
You will need the jack later anyway. Optionally, place a moving blanket below the car where you will be working.
This makes the work more comfortable, keeps you from getting covered in dirt, and keep the plates from getting scrapped up before you hit the trails.
Step 1: REMOVE FRONT PLASTIC PANEL

Remove the plastic panel between the stock skid plate and the bumper.
It has 4 bolts holding it in place.
Step 2: REMOVE STOCK FRONT ENGINE SKID

The OEM engine skid plate is actually two separate skid plates made out of pressed steel. Remove the 4 bolts holding it in place.
You may have to remove the skid plate behind it first.
They shouldn’t be touching, but if you have already done some off roading the front skid can get bent and pushed so that it is above the rear skid plate, preventing removal on its own.
It also has two tabs that hold the front of it up.
Step 3: REMOVE STOCK REAR ENGINE SKID:

Remove the rear engine skid plate. There are 4 bolts holding it in place.
ENGINE SKID HARDWARE SUMMARY
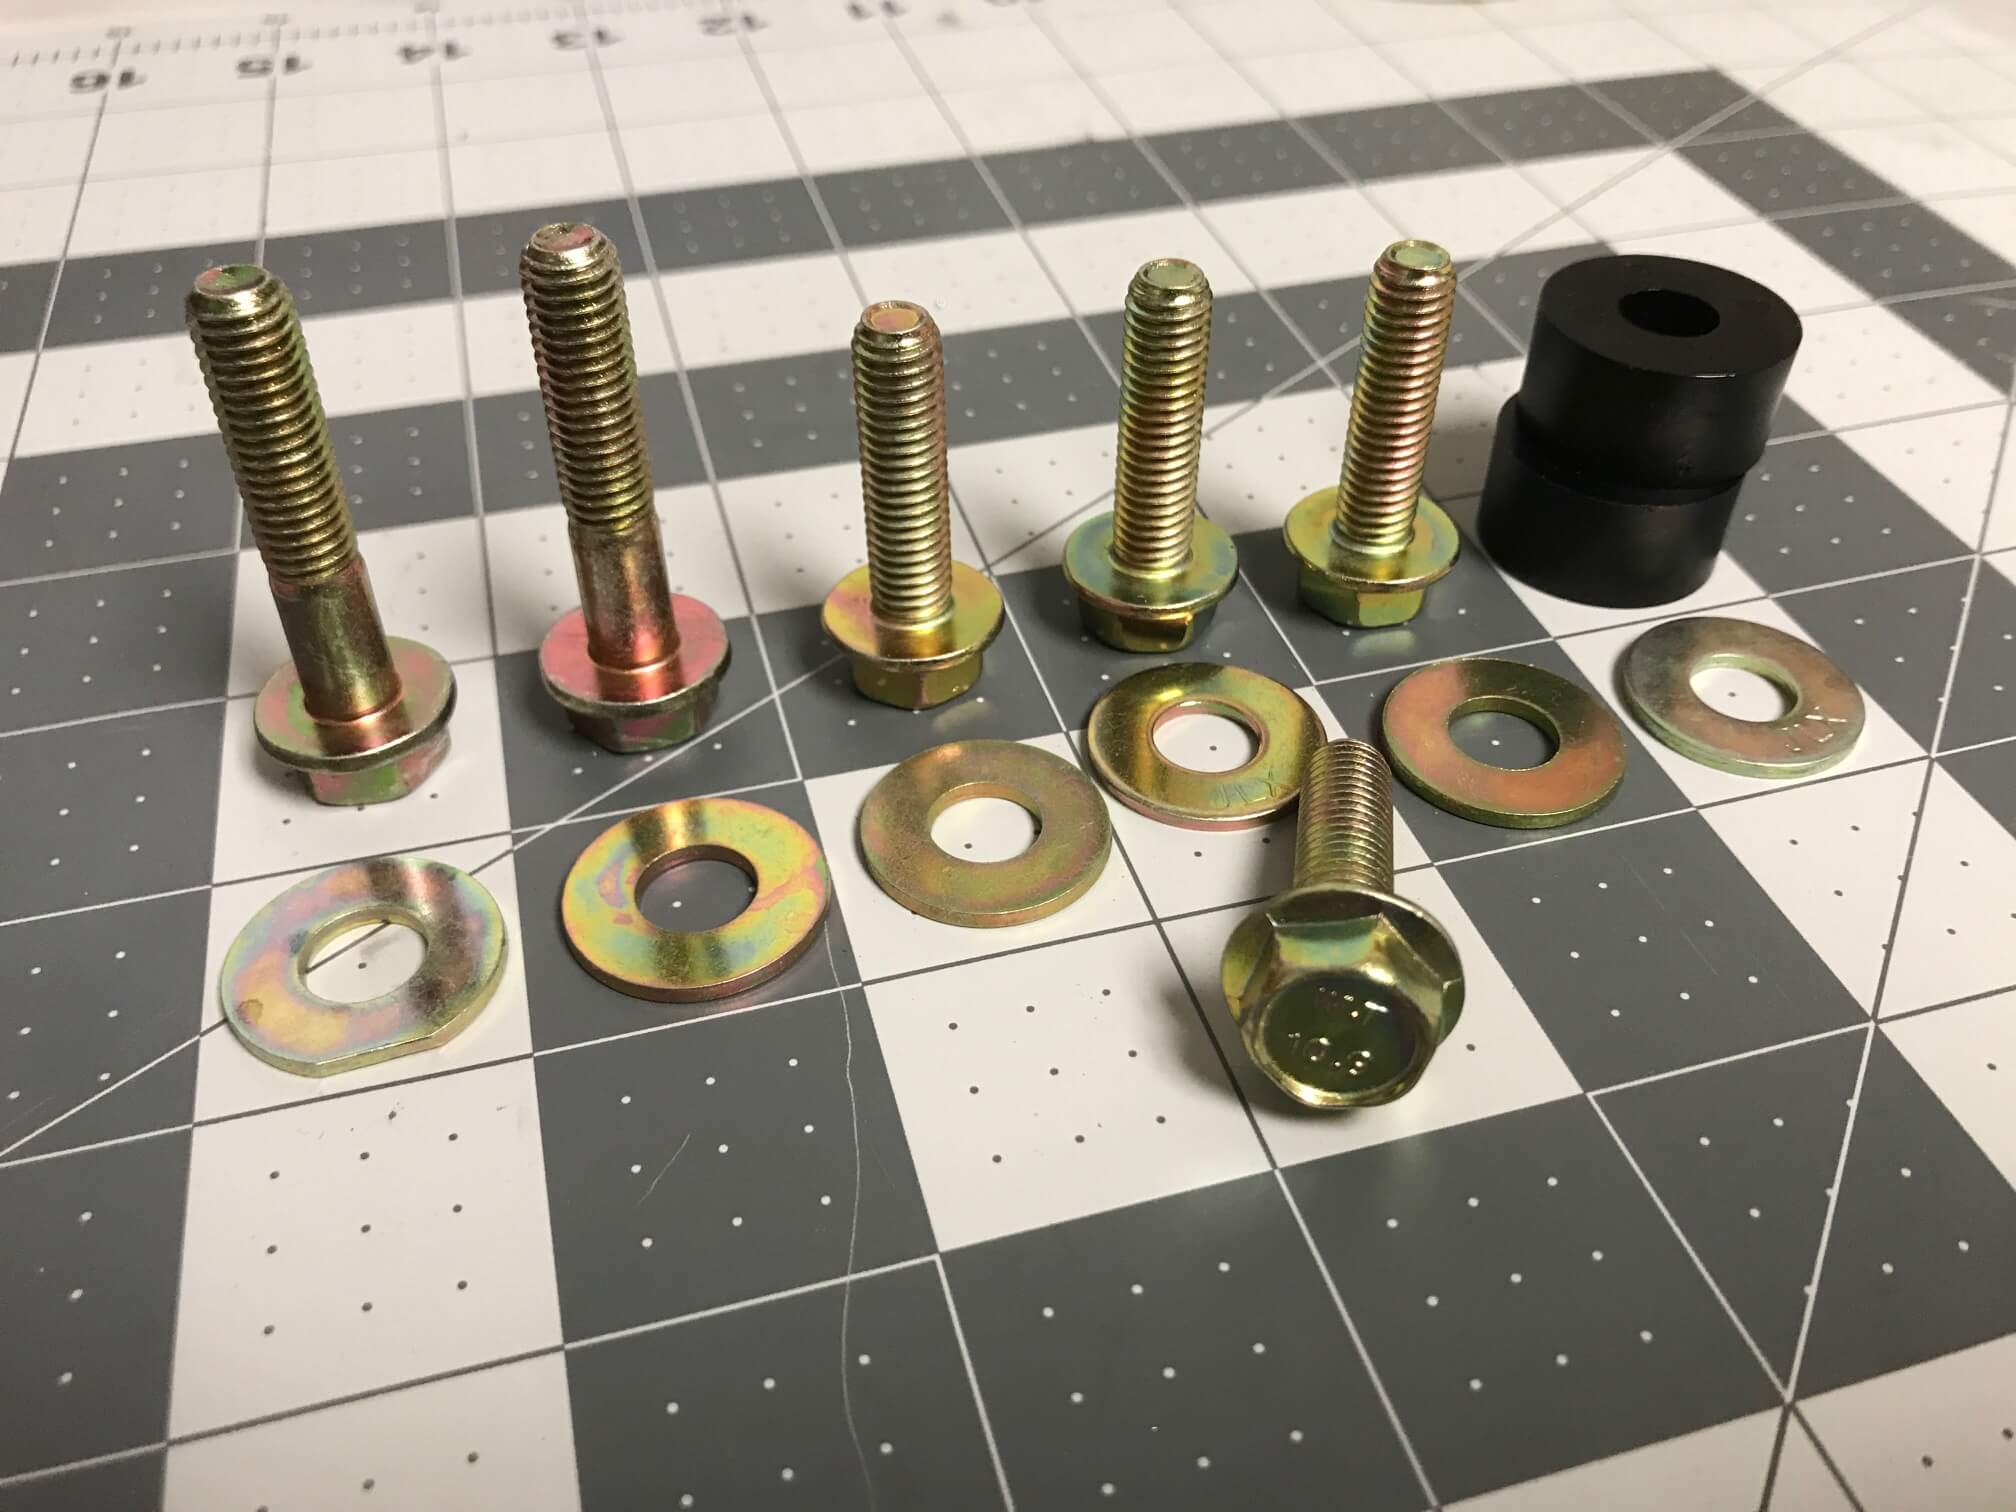
The hardware kit for engine skid comes with:
- 2 long bolts
- 4 short bolts
- 6 washers
- 2 spacers
RCI Full Skid Kit Hardware Specs:
All the bolts are made from a high-quality 10.9 hardened steel and are corrosion resistant. The short bolts will be used in the front and middle.
The long bolts will be used at the rear.
You will only use the spacers if you do not install the transmission skid.
Step 4: PREPARE FRONT BOLT THREADS
Odds are all your threads are full of rust and other grit that will prevent the bolts from going in smoothly.
I would recommend that you purchase an 8MM x 1.25 tap to chase the threads before installing the bolts.
The first two bolt locations will be directly under the radiator.
Make sure to use some tap lubricant while chasing the threads.
Step 5: PREPARE CENTER BOLT THREADS

The next two bolt locations will be near the lower control arms.
You will use the same tap for everything.
Step 6: PREPARE REAR BOLT THREADS

The rear two bolt locations will be just past the oil pan.
After chasing all of the threads I would hit each hole with a blast of compressed air to make so any remaining grit is cleaned out.
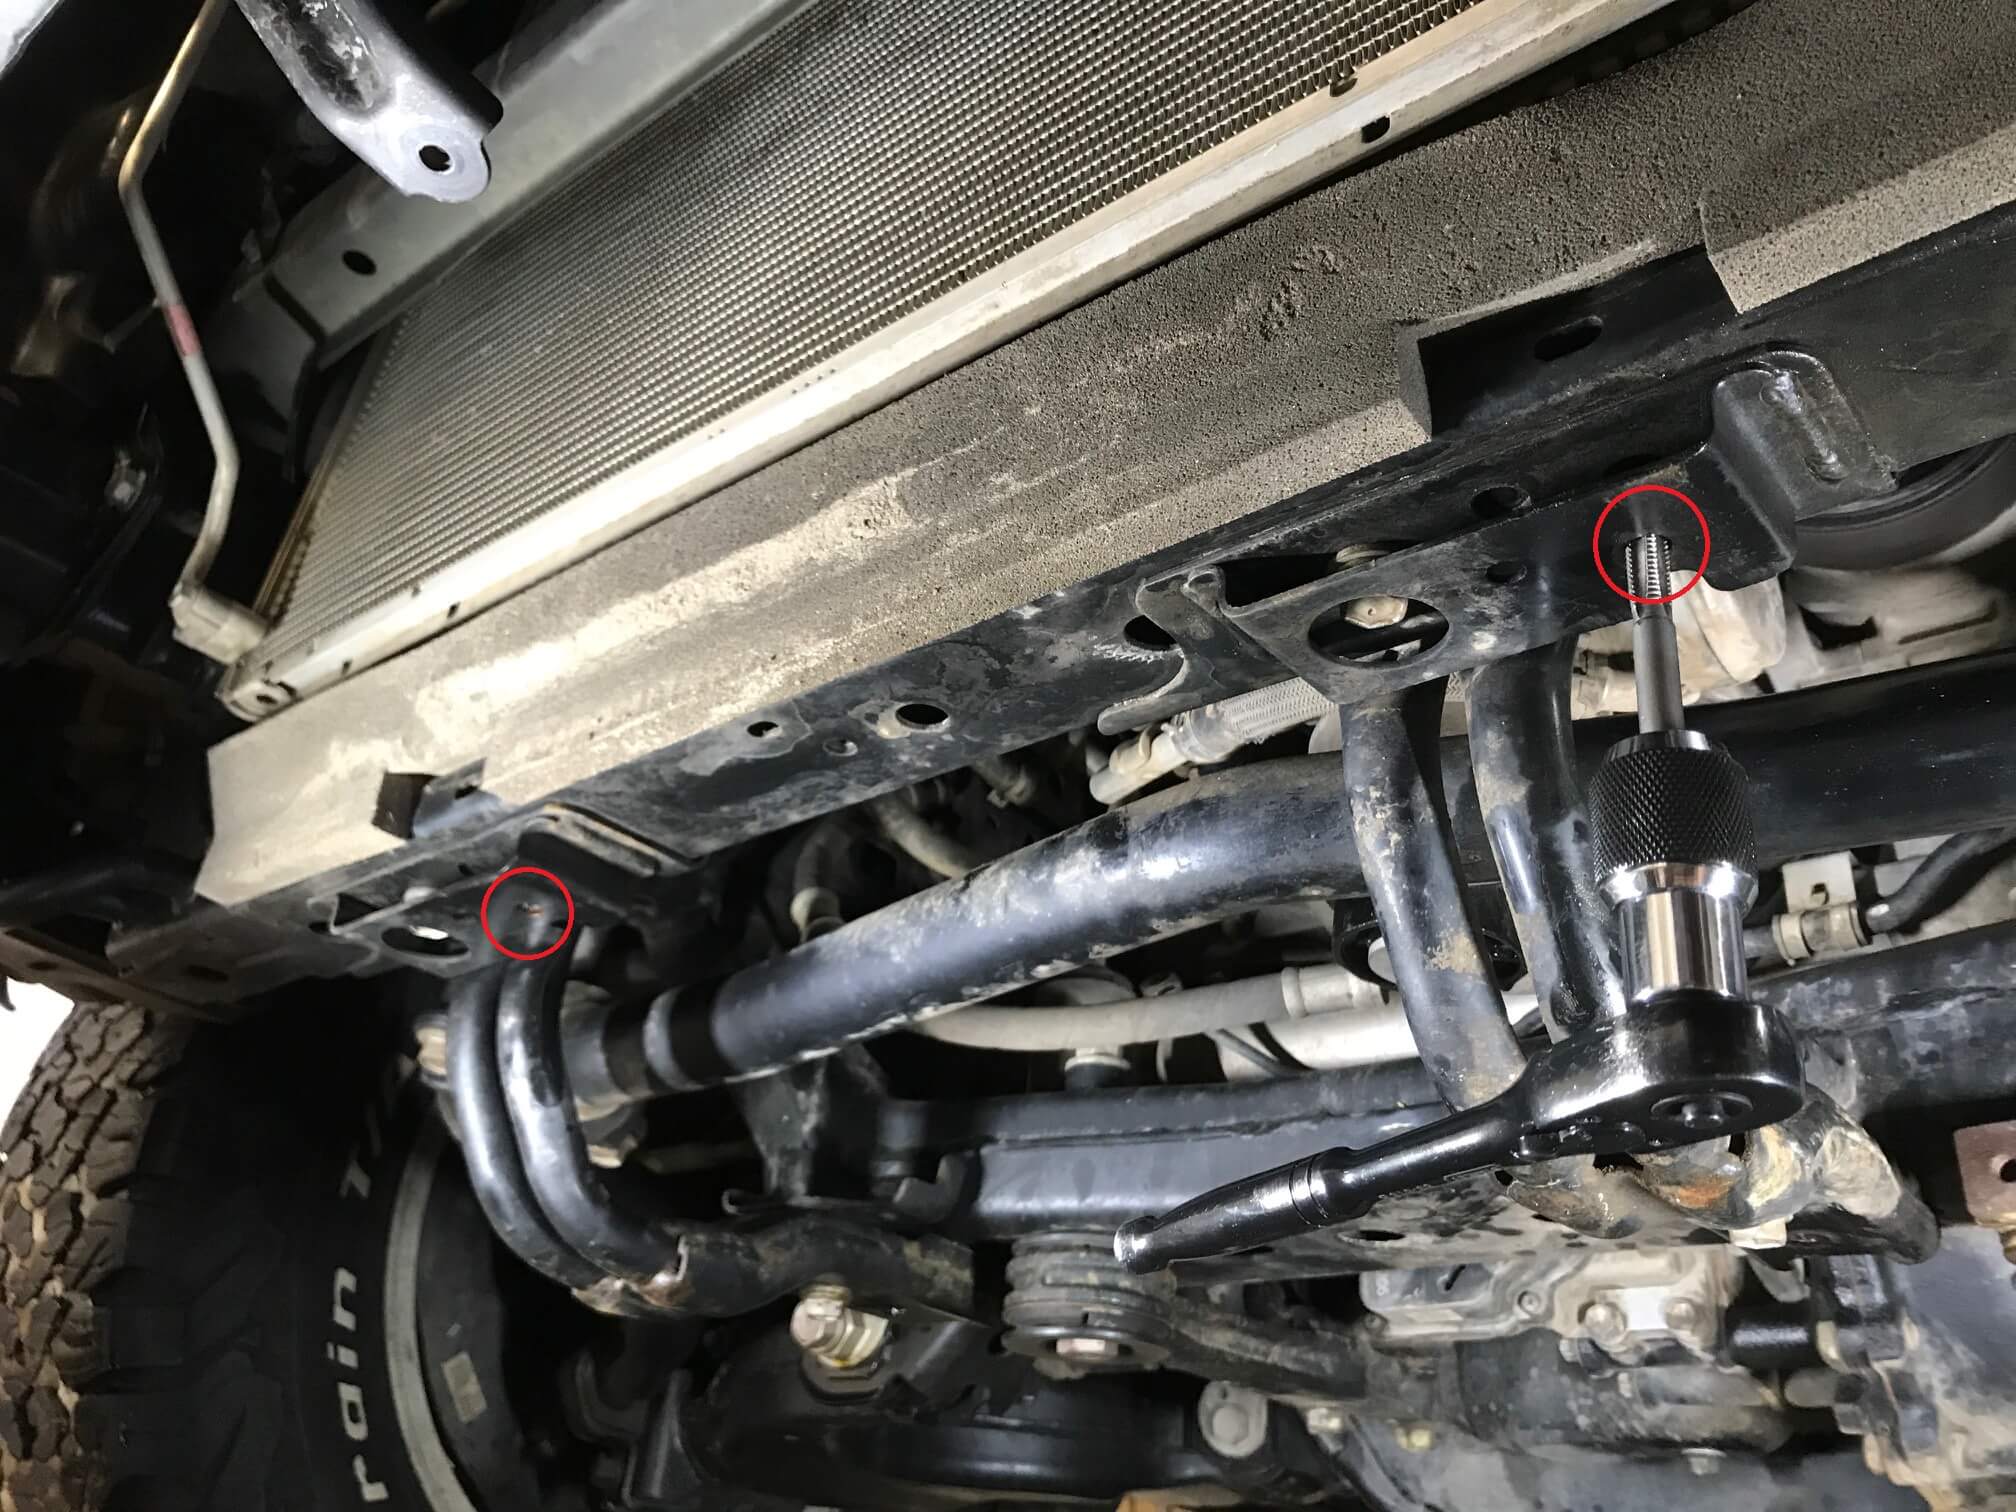
Step 7: LIFT THE ENGINE SKID INTO PLACE

I was able to do this on my own with the help of a jack. I lifted the jack to about 1 inch below the final position of the skid plate.
I then laid on the ground with the skid plate on top of me and lifted it into place and above the jack.
With the jack supporting the rear end of the skid plate I was able to hold the skid in place and install the two front bolts hand tight.
From there I raised the jack up some more so that the skid was in its final position and I installed the two rear bolts.
Step 8: INSTALL REAR BOLT SPACERS

If you are not installing the transmission skid you will need to install the two plastic spacers.
Make sure that you use the washers between the bolts and the skid plate.
Step 9: FINAL INSTALL OF THE BOLTS

One bolt at a time, remove each bolt and re-install it but with anti-seize.
The skid plate bolts are notorious for seizing in place so I would consider anti-seize a must.
I recommend installing the anti-seize as the last step because it is very messy and stains everything so I would not want to handle it while you are trying to lift the skid into place.
If you are going to be installing the transmission skid, then install all the bolts loosely.
If not, install them tightly. Make sure not to over-tighten them. It is easy to strip the threads.
Step 10: MODIFY THE PLASTIC PANEL

This is an optional step.
If you leave the plastic panel off there will be an ugly gap between the bumper and the skid plate.
RCI makes a filler plate to serve this purpose.
I will ultimately be installing a steel bumper so I opted to just modify the plastic panel.
Cut the panel as shown in the picture above and it should be able to slide in between the skid plate and the frame.
I used a jigsaw to cut it.
Step 11: DIFF DROP CAGE PRODUCT HIGHLIGHT

One of the great features of the RCI skid plate that most of the competition does not offer is a small cage for the front differential.
This cage is not necessary for stock differential location, but if you install a differential drop you will usually need to install spacers to lower the skid plate so the differential can fit.
This reduces your ground clearance, so it is not ideal.
With the RCI skids, there is room for a lower differential without the need for spacers.
In the photo above you can see this extra room.
TRANSMISSION SKID HARDWARE SUMMARY

The transmission skid hardware kit comes with:
- 4 long bolts
- 2 short bolts
- 6 washers
- 2 spacers
This transmission skid is the easiest of the 3 skids to install.
If you installed the engine skid you will not need the short bolts or the plastic spacers.
Step 12: Remove Tubular Support + Frame Bolts

Remove the 4 bolts connecting the tubular supports to the frame.
Step 13: Prep Threads

Chase the threads using an 8MM x 1.25 tap and some tapping fluid.
Blow out the holes with compressed air so that no grit remains.
Step 14: SLIDE THE SKID INTO PLACE

If you installed that plastic spacers with the engine skid you will need to remove them first.
Make sure that the engine skid is as loose as you can get it without the bolts coming out.
Slide the transmission between the engine skid and the frame.
Install one of the transmission skid bolts by hand just to keep it in place for now.
Step 15: Final Install Of The Bolts

Install the remaining bolts with anti-seize and the provided washers.
Re-do the bolt you installed by hand but with anti-seize and the washer this time. Tighten down hand tight.
They are easy to strip so don’t overdo it.
Leave loose if you are going to be installing the transfer case skid.
TRANSFER CASE HARDWARE SUMMARY

The transfer case hardware kit comes with:
- 4 long bolts
- 2 medium bolts
- 4 short bolts
- 6 washers
- 3 locknuts
- 2 steel spacers
You will not need the 4 long bolts and their washers if you installed the transmission skid.
You will also not need the 2 steel spacers if you use a trick that I will show you later.
Step 16: Remove Stock Bolts

Remove the OEM bolt holding the brake line bracket to the frame.
Step 17: Prep The Thread

Chase the threads with an 8MM x 1.25 tap.
You will need to chase the threads behind the bracket on the driver’s side.
There is also an identical threaded hole directly opposite of the driver’s side hole that you will need to chase too.
Clean them out with compressed air.
Step 18: LIFT SUPPORT INTO PLACE

Lift the support that comes with the transfer case skid into place.
There are two holes on the ends of the skid that should line up with the threaded holes you just chased.
Make sure it is lined up so that the center hole is closest the rear of the car. A jack is very helpful for this.
Once the support is in place install the two medium bolts with anti-seize and washers. You can then remove the jack.
Step 19: SLIDE TRANSFER CASE SKID INTO PLACE

Slide the transfer case skid into place between the transmission skid and frame.
Hold the rear end of it in place with a jack.
Install the 4 short bolts and the locknuts. Do not use anti-seize here.
Step 20: LIFT THE EXHAUST

Odds are your exhaust hangers have stretched over time so that the exhaust is hanging low enough to contact the skid plate.
This will cause a rattling noise and possible damage to the skid plate over time.
The hardware kit comes with two spacers that you can use, but this will slightly reduce your ground clearance so it is preferable to not use them.
Instead, a popular solution is to wrap the exhaust hangers with hose clamps and tighten them enough to lift the exhaust away from the skid plate.
After you are done with the full install do a test drive including reversing the car to make sure there are no rattles.
If you are still hearing the occasional rattle, tighten the hose clamp some more.
Step 21: TIGHTEN EVERYTHING UP

Go through every bolt on the whole skid plate assembly and ensure all of the bolts are hand tight.
All of the bolts going into the frame can strip easily so make sure not to overdo it.
Final Notes & Optional Steps
Finally, as an optional step, you can add some torque location marking using a sharpie, or even better a product like Cross-Check.
The cross-check will dry in place and make it very clear if the bolts are beginning to loosen up.
This will make checking all of the torques in the future very quick and easy.
Hey I want to see a picture of how the plastic filler looks with the RCI skid plate. Can you post one? Or DM me on Instagram @ptotnoc
Is this start you are looking for
No I’m referring to the plastic piece you modified for the front skid instead of buying the steel RCI filler. Do you have a shot from the front of the skid with the plastic filler all installed?
Thanks
Unfortunately I do not. I already installed my steel bumper. It looked surprisingly clean though.
Is there a reason you went with RCI over ShrockWorks?
They were about $300 cheaper, closer to me, and quality seemed similar. I like the design of the shrockworks a little more but I think RCI will do the job just fine.
Hi Bryson, thanks for the write up. Out of curiosity, what about the Shrockworks design did you like a little more? deciding between the two right now.
thanks
I just like the look a little more.
Thank you