
King Suspension Preload Adjustment on 5th Generation 4Runner
The following article is a step-by-step process on adjusting the preload on the OEM King Suspension System for a 2012 Toyota 4Runner SR5. These coilovers are not KDSS required parts, however, the process will be very similar for most OEM King Suspension Series.
King states that the OEM coilovers are preadjusted at the factory for maximum performance and ride quality, however, due to a wide variety of 4Runner/Truck configurations such as bumpers, 2wd/4wd, cab size, accessories, driver side vs passenger side weight, etc. it might be necessary to adjust the ride height/preload on your coilovers.
Adjusting your coilovers to your desired preload is recommended before installing your new front coilovers, however, not always achievable since you might want to adjust your preload again after you see how your vehicle sits. Usually, however, you can get very close to your desired ride height if you calculate you preload beforehand. We give details on our final preload settings at the end.
Shocks with external reservoirs have to be removed from the vehicle to adjust preload due to limited room for coil nut adjustment. King states coilover shocks without external reservoirs can be adjusted on the vehicle, however, we still recommend removing them and taking tension of the coil nut to make things easier and to prevent damage to your new coilovers.
The coilovers being used for this article are:
King Shocks Front Coilovers w/ Remote Reservoir, Compression Adj. and Extended travel. (P/N 25001-278A)
We hope you find the following instructions useful!
Step 1. Preparation
1.1 – Read Instructions
**Disclaimer: The following instructions were created to break down and simplify the process of adjusting the preload on the OEM King Suspension System w/ an External Adjustable Reservoir. Do not solely rely on these instructions! Make sure to thoroughly read the instructions you received as well. Contact the manufacturer or your distributor if you have any questions regarding your install. Also please feel free to reach out to us or comment in the comments section below.
1.2 – Prepare Tools:
For preload adjustment the following tools will be required:
- Coil spring compressors (Can be loaned from most auto part stores)
- Vice with soft clamping faces (To prevent damage to coilovers)
- 3/16” Allen Wrench
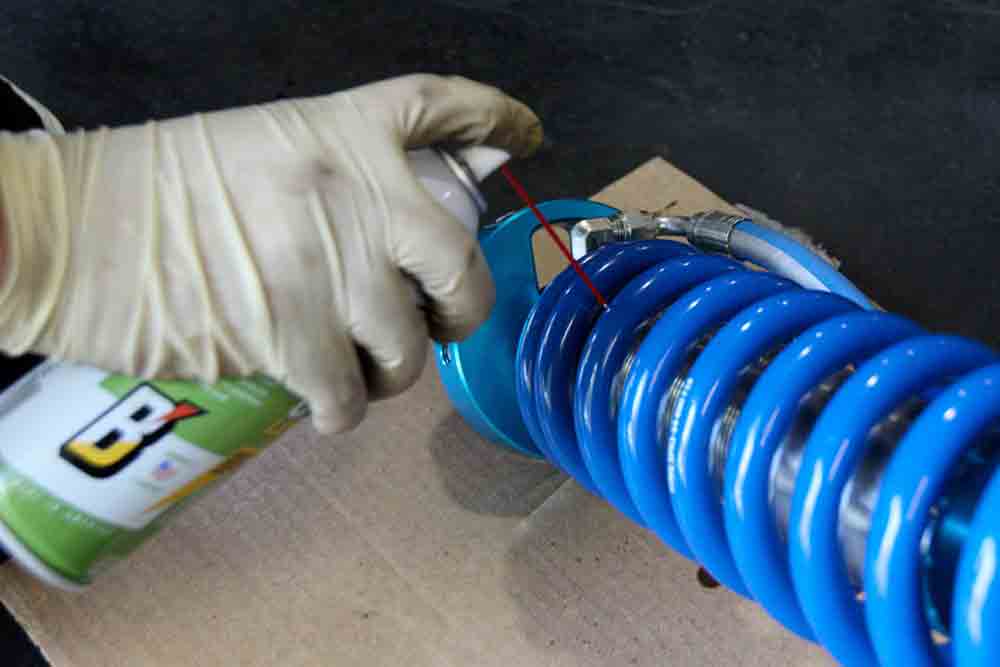
- Spray lubricant
- A friend to help
1.3 – Remove Shocks from Vehicle.
If you haven’t already done so, remove the front coilovers from the vehicle and prepare to adjust one at a time.
Step 2. Secure Coilover
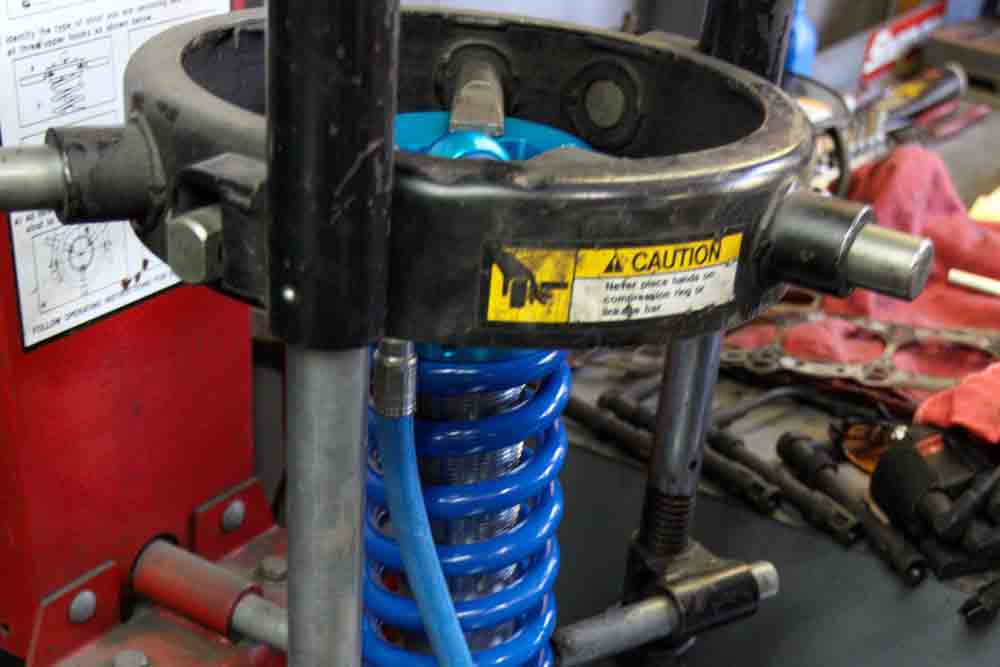
Using a vice mounted strut compressor is recommended, however, since most people do not have a vice mounted strut, the following instructions will be detailed using the small portable coil spring compressors that can be loaned from many auto stores.
Clamp the lower shock mounting point in a heavy duty vice and lay the shock horizontal on a piece of 2×4 if possible.
Step 3. Relieve Tension from Coil Nut
Using the coil spring compressors, relieve the tension from the coil nut. Thoroughly read the instructions on how to use you coil spring compressors. A spring is being compressed under high load which can be VERY dangerous. If you are unfamiliar or for any reason you feel unsafe, performing this step, get help from your mechanic friend.
Step 4. Adjust Ride Height/Preload

Now that you have removed tension from the coil nut, it will be much easier to adjust the coil nut.
4.1 – Lubricate Threads
It is best to lubricate the threads near the coil nut for easier and smoother adjustment.
4.2 Loosen Pinch Bolt
Using a 3/16” Allen wrench, loosen the pinch bolt by turning it one turn counterclockwise. DO NOT loosen anymore than one turn as this can cause the coil nut to jump threads and possibly strip the threads.
4.3 To Increase Height
(Note: when adjusting the coil nut, 5 turns equals to 1in of lift. Therefore 2.5 turns equals .5in etc.)
Using the King Coil Nut Wrench provided with your shocks (~8in Rod) turn the coil nut to the left to compress the coil and increase ride height.
4.4 To Reduce Height
Using the King Coil Nut Wrench provided with your shocks (~8in Rod) turn the coil nut to the right to expand the coil and reduce the height.
4.5 Tighten Pincher Bolt
Once you have achieved your desired preload setting make sure to tighten the 3/16” Allen pincher bolt again!
Step 5. Install Coilovers and Double Check EVERYTHING
Reinstall your coilovers on your vehicle. Make sure the correct one goes on the correct side! Double check everything before reinstalling wheels. Make sure to recheck all hardware after 100 miles and periodically thereafter as a routine maintenance.
Step 6. Alignment
After you have properly adjusted and inspected all fittings, it is critical to get a professional alignment, especially if you are installing your King Suspension for the first time. Some people like to get an alignment directly after. Some people like to get an alignment after driving the vehicle slowly for 100 miles. We recommend finding an alignment shop that will align your vehicle “immediately” after your install and will the fine tune after 100 miles or so.
Step 7. Adjustment Details
King OEM Performance Series are usually designed to level your 4runner, however, they can usually be adjusted for more height (about 1in-1.5in more) depending on the specifications of the vehicle. It is important to note that if you adjust the coil to its maximum extension, the ride quality will be adversely affected. There should be at least 1in of wheel drop out from its regular ride height to maintain the ride quality that is expected from King Suspension.
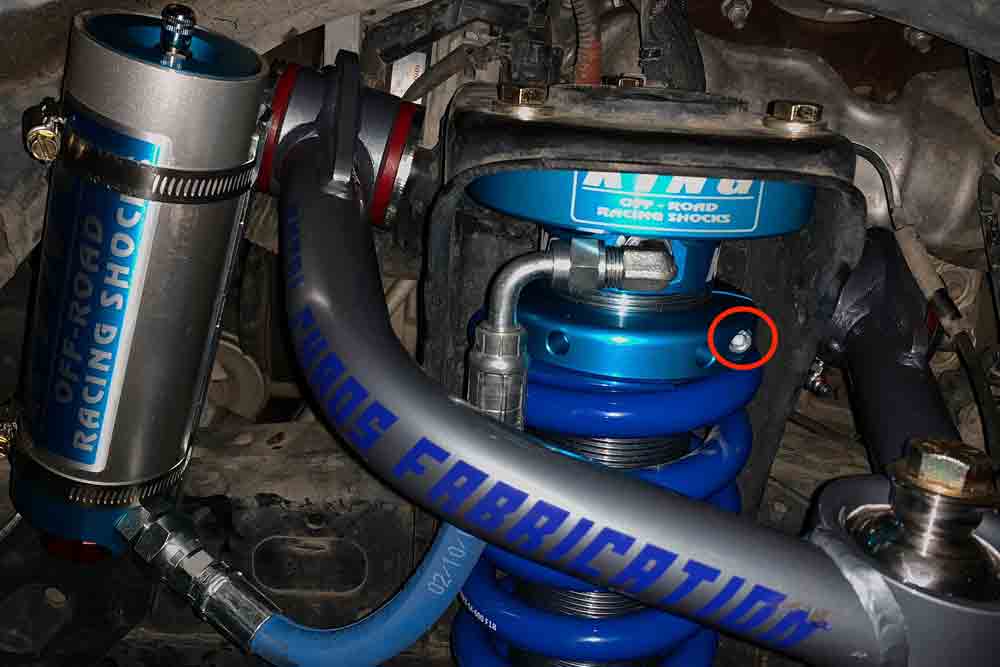
V4A Final specifications:
We aimed to achieve ~2.5” Lift in the front and ~2.0” lift in the rear.
For the rear, we used the Toytec Superflex springs which put the rear height at ~2.0”.
For the front, we installed the front coils without adjusting them and it sat with about 2.0” of lift with the driver and passenger sides differing about a .5” (Passenger side sat about .5” higher). (This is with a stock front end) Because of this, we removed the coils and increased the driver height coil by 4 turns (~.8in) and the passenger side by 2.5 turns (~.5in).
This ended up bringing the front end up to ~2.75” of lift in the front, so the ride quality was affected a bit. We left it like this because we are installing a steel front bumper and winch (~180lbs) which we expect to drop the front end ~.25” bringing it to a total ride height increase of ~2.5”. The final thread count above the coil nut is 7 on the driver side and 5-6 on the passenger side.
Final ride dimensions (dimensions are taken from center of the wheel to bottom of fender):
- Front Left: 23.4”
- Front Right: 23.5”
- Rear Left: 24.25”
- Rear Right: 24.5”
Below is a before and after shot:
Step 8. ENJOY YOUR NEW RIDE!
Make sure to check out @Venture4Adventure for awesome films, pictures, projects, product reviews, journeys & destinations, and more coming soon!
Great article. Do you know the specs of the Coil Adjustment Pinch Bolt? Mine are stripped and need replacements.
Thank you for the detailed info that been shared by you.
I have a question regarding the king shock 2.5 OEM for fj cruiser, That I’m not able to find yet.
What is the maximum turns I can go for the preloading of the coils pring for fj cruiser, as per king.
Plz disregard weight details, and ride quality, I’m searching for the Maximum safe turns that king recommend. I’m not able to find this info yet.
Thank you
I recently installed in front king 2.5 coilover with 700lbs 14” springs on the new hilux along with TotalChaos uca and rear also has king 2.5 shocks with factory leafs, as i have yet to receive the dakar springs. The factory ride height was 34.5” on factory shocks from floor and now has settled to 35.5” after installing arb bumber along with warn winch.
The preload is zero currently only showing three threads as they came from kings. Do i need to set preload ? The vehicle rear is an inch higher then front on factory leafs
Hey Mir! Sorry for the late response. I am not to sure on specifics when it comes to the Hilux. Possibly my future truck tho! From what I understand, King sends you the front coilovers preloaded specifically to your vehicles weight for the best ride. If you add weight to the front (bumper and winch), then you should be able to increase the preload without affecting ride conditions (or you should increase preload so it stays to kings “stock” specs). If you want to bring it back up to the level that you want/had it at, then I would think setting preload would be the way to go. Hope this helps!!
Let me see if I understand this. From the factory, the coil nut is all the way up (zero preload). This will net 2″ of lift??
From the factory the coil is close to all the way up. If I remember correctly i think it showed like 3 threads on top or so. But yes, It should net about 2” with a stock front end as they come. If you add weight, that might change.
Just an update. I installed the fronts yesterday with 0 preload (0 threads showing – thats how they came from wheelers) and i achieved 1.5″! not too bad. Once I get the rears on, I hope to adjust the front another 0.5″. Thanks for the info.
-Daikon
Not bad at all! Awesome info! Thanks for sharing!