
Step by Step overview on How to Use a Tire Repair Kit for Small Tire Leaks
For drivers who explore remote trails or even city streets, you are bound to get a flat or leaking tire eventually. Having a quality tire repair kit as part of your everyday carry is not a bad idea.
Tire repair kits can be picked up for under $50 and offer much needed cheap insurance.
There are many options to choose from when it comes to off-road tire repair kits. Two notable brands are Safety Seal and the ARB Speedy Seal Tire Repair Kit. Both are going to offer many of the same features, however, ARB comes with a few more items including pliers and a few other accessories including a steam repair kit.
The highlight of Safety Seal is that their products are made in the USA. Not a huge benefit over ARB because we all know ARB makes high-quality products and both have great reviews. Either option (the ARB or Safety Seal) is going to be a must-have in my opinion if you frequently explore offroad.
Tire Repair Kits:
- ARB: Check Price
- Safety Seal: Check Price
- Smittybilt: Check Price
- Slims for small slow leaks: Check Price
Smittybilt also makes a pretty nice kit that comes in a zip case that doesn’t take up as much room as the ARB and Safety Seal kit.
If you want a more compact solution, look at the Smittybilt. It comes in a smaller zipper case and can be condensed down into your tool bag or tool case much easier than the larger ARB or Saftey Seal case.
If I had to purchase over again, I would consider the Smittybilt for this specific reason.
UPDATE: 12/3/2019
I now own two Smittybilt tire repair kits. The materials are not as “quality” but the compact case with more bells and whistles really sold it for me. We should have a review coming out soon on these.
The large plastic cases just waste a lot of space in the recovery bag/tool bag. You can also take all the items out of the Saftey Seal kit and create your own small MOLLE case as well. Maybe an idea for another post.
Let’s Start: Locate the Tire Leak

For an overview straight from Safety Seal, check out their video.
Using a soapy water bottle, coat the entire tire until you find the leak. The leak pictured above is on our “new to us” 2016 4Runner that has had a slow leak for some time.
The owner who had it before me mentioned there was a slow leak so I set off to find it. It took about 20 minutes to find to obnoxious little leak. If you have a small leak, be patient and you will find it.
If you are not able to find the leak in the tread, check the sidewall, and stem for leakage using the same method.
Insert the Insertion Tool (Safety Seal Probe)

After locating the puncture remove the object (if any) in its path. We had a very slow tire leak with no object (nail, screw, pin, etc.).
Safety Seal recommends:
If the puncture is larger than a quarter-inch, if there is evidence of excessive carcass damage or if the puncture path is not straight, the tire must be removed for internal examination.
If the whole is this big, you have bigger problems on your hand and should take the tire to a shop.
You don’t need to worry about the direction of the path of the puncture. Insert the needle with a small amount of lube and the needle will follow the path without creating a new hole.
The Insertion probe tool opens the hole up allowing the tire repair Insertion needle tool easier access.
Prepare the Tire Repair Plug/String
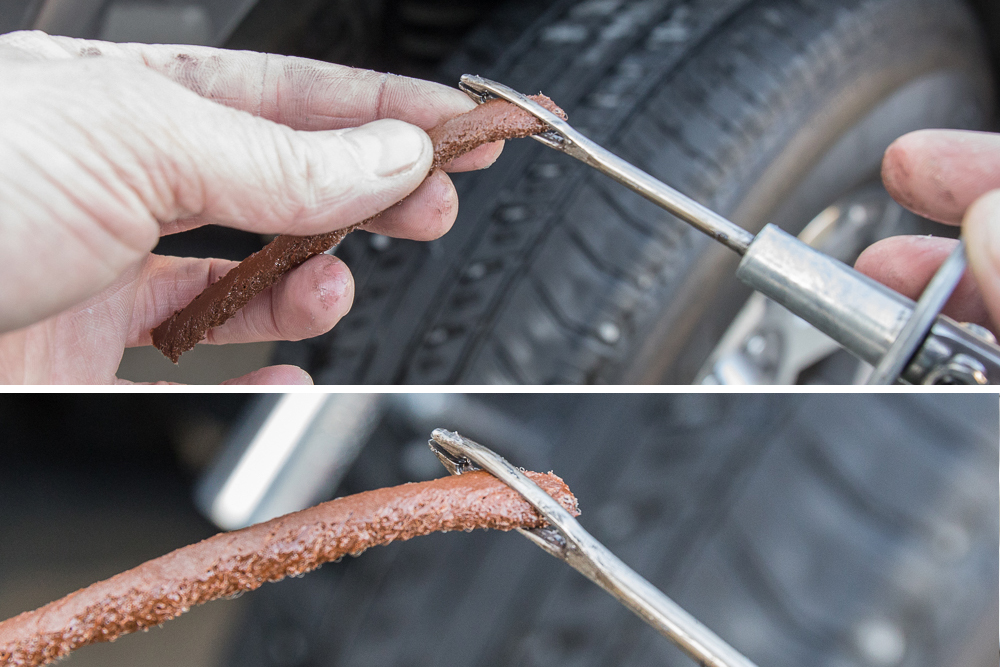
To repair the puncture, first, remove the safety seal plug/string buy peeling back the corners of the protective blue paper down away from the opposite side of the paper.
Then, insert the Safety Seal plug into the needle so that equal parts are visible on each side of the needle.
Lube the End of the Needle

Places a small amount of lube on the tip of the insertion needle.
Having located the puncture, insert the safety seal into the puncture. Only one safety seal repair should be used in a single puncture.
Insert the Safety Seal Needle with Plug


With extremely firm pressure insert the safety seal needle with the repair string into the tire until the sleeve touches the tire.
If more pressure is required, the safety seal probe may be needed again (*See the section below on repairing small punctures).
Remove the Insertion Needle

Grip the edge of the sleeve and hold it against the repaired area remove the needle by pulling away while holding the sleeves secure against the tire. Do not twist the tool when removing.
The sleeve has allowed the safety seal to release from the needle leaving the repair now in place.
Trim Excess Plug/String

Excess tire plug/string may now be trimmed away with the blades provided.
Reinflate the tire to manufacturers’ recommended air pressure. Check for leaks with your leak detector of choice.
If you still have air seepage, this may indicate inside tire damage or an additional puncture somewhere outside the original puncture area.
If this is the case, you may want to dismount the tire, take to a tire repair shop and have them check for further punctures.
*Repairing Small Punctures (Slow Leak) in Tire

- Find the leak
- Probe the area in a circular motion (loosen hole)
- Prepare tire repair plug & needle
- Lube the needle tip
- Insert tire repair needle
- Pull out the needle – this will repair the puncture
- Cut off the excess plug
For repairing small punctures in tires you will need to use the safety seal probe. For repairing small punctures in steel-belted radial tires, use the safety seal probe that spreads the steel cords without damaging the tire or removing any rubber.
Lube the tip of the probe and insert it into the puncture carefully following the puncture path. This is only to be used if the puncture in the tire is up to 1/8 of an inch.
You may not need to use the probe when using slims (slims are smaller versions of the standard plugs/strings).
You can use the insertion needle (repair needle) as a probe but the probe will allow the rubber in your tire to stretch more, allowing for an easier repair. Once the probe is fully inserted approximately a half-inch of the probe needle, rotate to handle is indicated in a circular motion.
This rotating displaces the steel chords allowing for easier insertion of the safety seal repair. No rubber is removed nor is the actual puncture enlarged. Probes are available from your safety seal salesman of choice at any local tire store.
All set! Your Leaking Tire has been Repaired

If you don’t already have a tire repair kit, you may want to consider picking one up.
These kits are inexpensive and you can see how they will come in useful when you need them most. Tire repair kits will come in especially useful off-road when you are miles away from city roads.
In any case, hopefully, this helps someone understand how to use a tire repair kit or how to repair a slow leaking tire.
dude your information is honestly unlike anything else out there. Thanks and please dont stop. Thanx.
Thanks man!
Quick pointer, I would also recommend wearing a glove when you plug the seal into the tire with the needle. Alot of the insertion needles out there have poorly made plastic handles. I have heard the handles breaking when forcing the plug into the tire causing the needle to penetrate your hands….imagine the pain!
Ouch, yeah good call.