
LFD Off-Road Roof Rack System Review on 5th Gen 4Runner
An overview of the LFD Cargo-stop brackets, Steel Rails, and Crossbars
There are many options for roof rack setups for the 4Runner and it seems everyone has their preference from well-established names like Gobi, Frontrunner, and Rhino-Rack to CNC style roof racks Southern Style Off-Road and Prinsu Design Studio.
The options can be overwhelming.
These are all great options, one name that might have not popped up on your radar is LFD Off-Road. LFD is an offshoot of Leonard Fabrications based in North Carolina.
They make a verity of products for the off-road community and specialize in Lexus GX and Toyota 4Runner lines.
This is a review of their 7/8 Roof Rack System. The rack is modular and made of 7 gauge steel rails and 11 gauge steel for cross bars.
Main Factors to Consider
When deciding to go with a roof rack setup I was looking for 5 key factors:
- Cost – Check the price
- Quality
- Versatility
- Compatibility
- No drill
The LFD Off Road rack definitely hits all these marks.
One of the great things about this rack is that it’s modular and can be built as a full setup or a simple as you want. This makes the LFD rack one of the most budget-friendly racks out there.
Each crossbar cost roughly $80 dollars and the rails range from $200 for the 3/8 to $250 for the 7/8. You can build the rack as your needs and budget increases.
LFD also sells complete rack kits with rails and crossbars included for roughly $900.
LFD CROSSBARS MOUNT TO FACTORY RAILS

For my build, I started out with two sets of the heavy-duty crossbars to carry a few items and mount my awning. The crossbars bolt on directly to the factory roof rails via a slide in t-nuts.
They come with pre-drilled holes in M8 and M10 sizes that give plenty of options for mounting different accessories. They’re also compatible with Frontrunner eye bolts which is a nice plus.
HEAVY-DUTY CROSSBARS WITH GEAR LOADED

This setup worked out fine for some time.
I was able to mount my awning, Waterport and a Plano sportsman trunk without any issues.
Later I decided to add the cargo-stop brackets
These are purchased separately and add extra security when loading the rack and they also have built-in slots for mounting LED bars or pods.
These brackets bolt on directly to the crossbars.
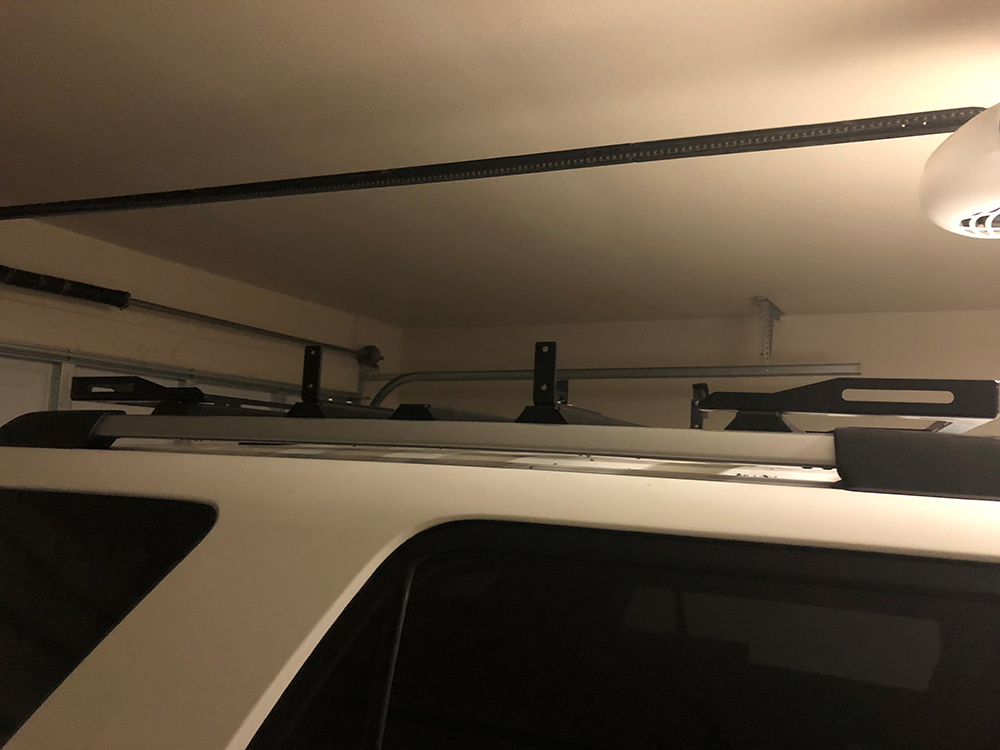
LFD Off Road (7/8 size rails) with adjustable slots
To complete the build I bought the 7/8 size rails, which replace the factory rails from Toyota. LFD has options for 3/8, 7/8 and full rack setups.
All LFD rails are made of 7 gauge steel and have adjustable slots for configuring the crossbars whichever way you want. Installing the rails works pretty much the same way as any other rack.
The best part is that there is no drilling required on any setup, whether its 3/8, 7/8 or full-size rack.
Remove the Factory rails to install the 7/8 LFD rails

To get these bad boys on First, you have to remove the factory rails by popping off the end caps. To do this LFD recommends using plastic trim tools. Start by sticking the plastic trim tool between the rubber seal and the plastic cap and pry them upward. The caps are held by some plastic clips. You will hear a popping sound once the caps come loose.
Once the caps are removed, unbolt the bolts using a 13mm ratchet and clean out any residue from the mounting bolts. I used some warm soapy water. Once the areas are dry place a small amount of rvt silicone gasket sealant around each bolt hole as well as the inside of the bolt holes.
LFD provides an aluminum bracket to help mold the gasket. One thing to note is that you don’t want to overdo it with the gasket sealant. The rails along the body of the 4Runner are actually meant to act as a rain gutter. Adding too much sealant will cause water to collect in the bolt areas and will prevent it from running off the rails.
Next, hoist up the rails onto to roof. Having a buddy assist during this process will make the job easier but I was able to do it my self. I also recommend placing a moving blanket or foam pad on the roof to avoid making any scratches or dings.
Next, alight the rails to the bolt holes and use the factory bolts to secure everything in place. Leave these hand tight to make room for any adjustments before tightening everything.
Once the rails are setup you are ready to add the crossbars. Start with the bars on the front and back. Then place the middle bar. Once these are in place you can fill in the remain bars. Once everything is adjusted and aligned you can tighten everything up.
LFD Rack System Cost
As mentioned the LFD system can range from simple crossbars to a full-size rack. The cost will depend on what your needs are. A typical range can be from $189 to $900 depending on your setup.
For my build the cost break down is as followed:
- 5 Crossbars: $387.37
- Side rails: $267.49
- 2 Cargo stop brackets: $128.38
- Total: $783.24
Additional Accessories
LFD offers a few accessory options to mount a Hi-lift Jack and a set of Maxtrax recovery boards. Additionally, they sell crossbar extensions to mount additional gear
Summary
In summary, the LFD Off Road rack is definitely worth a look. The rack is modular and can grow as your needs/budget increases.
With its powder coating and 7 and 11 gauge steel construction the quality is top notch, additionally, each part can easily be replaced if ever damaged.
Anyone considering a rack option for the 4Runner should add the LFD Off Road rack to their list.
Are there best practices with strapping cargo to the LFD cross bars without the cargo stoppers?
I see the post above, he has the trunk with some straps, but curious best way to secure similar items (ie. trunks, gear bags, etc)?
Anyone use the LFD cross bars with ski racks like from Thule?
I currently have the LFD crossbars on my factory 5th gen rack and also wanted to add an ARB awning. I like the low profile nature of the mounting bracket you are using. What bracket is it?
Actually I am using the stock L brackets that came with my awning. You could fab some up to suit your needs or just use the ones from arb or standard knock-off L brackets. I ended up facing them down to make the awning even more low profile. Hope that makes sense.
I purchased the LFD 7/8 for my 2020 4Runner, 4 week backorder. I am not in a hurry, but looking forward to it. You definitely helped me decide, thanks! Also, if you ask questions on their site hit LFD up for a coupon code, they gave me 10% off. Not guaranteed, but it does not hurt to ask.
What is the weight rating if you build the full rack?
Nice rack haha! I don’t see maxx trax and any other mounts than high lift on LFD Site. Also on their website, I see some spotlights installed on the front of the rack. Anyone can give some insight into the spotlight installations front and back? (meaning if there are some specific lights to be bought that make install for that rack easier?) Would definitely get this one but need to make sure all accessories can be installed/fit decently.
Thanks