DRL Switchback Fog Light Fang Bezel from AJC: Full Step-by-step Install & Review for the 5th Gen 4runner
Looking to differentiate your 4Runner from the other 4Runners during your daily commute or when out on the trails? If you’re not really sold on “raptor” lights because it’s supposed to be used as a width indicator for vehicles wider than 80” check out the AJC LED DRL Switchback Fog Light Bezels made by Aiden James Customs!
Find it online:
- AJC White/Amber Fog Light Pocket Kit or “Reverse Fangs”: Check Price
AJC LED DRL Switchback Bezel Kit For 5th Gen 4Runner
What Is The Fog Light Bezel Kit?

This custom fog light fang bezel kit replaces the factory fog light shroud on your 4Runner with one that has integrated LED tubes. It is available in a switchback model, white LED only, or amber LED only. Adding this fog light kit definitely adds a unique look to your 4Runner that compliments the lackluster DRLs that it came with.
The switchback model features a white led DRL for when the vehicle is on and flashes amber when the turn signal or hazards lights are activated. It adds a touch of aesthetics to an already good-looking truck and a tad of additional safety to your factory DRLs and turns signals. I think these are a win-win!
The AJC kit also carries a lifetime warranty on materials and craftsmanship.
Installation
Tools & Materials:
- 3/8 Ratchet
- 10mm Socket
- Extension 3″
- Plastic Fastener Prybar
- Diagonal Cutter
- Pliers
- Zip Ties (lots)
- Dielectric Grease
Step 1. Remove Upper Bumper Clips

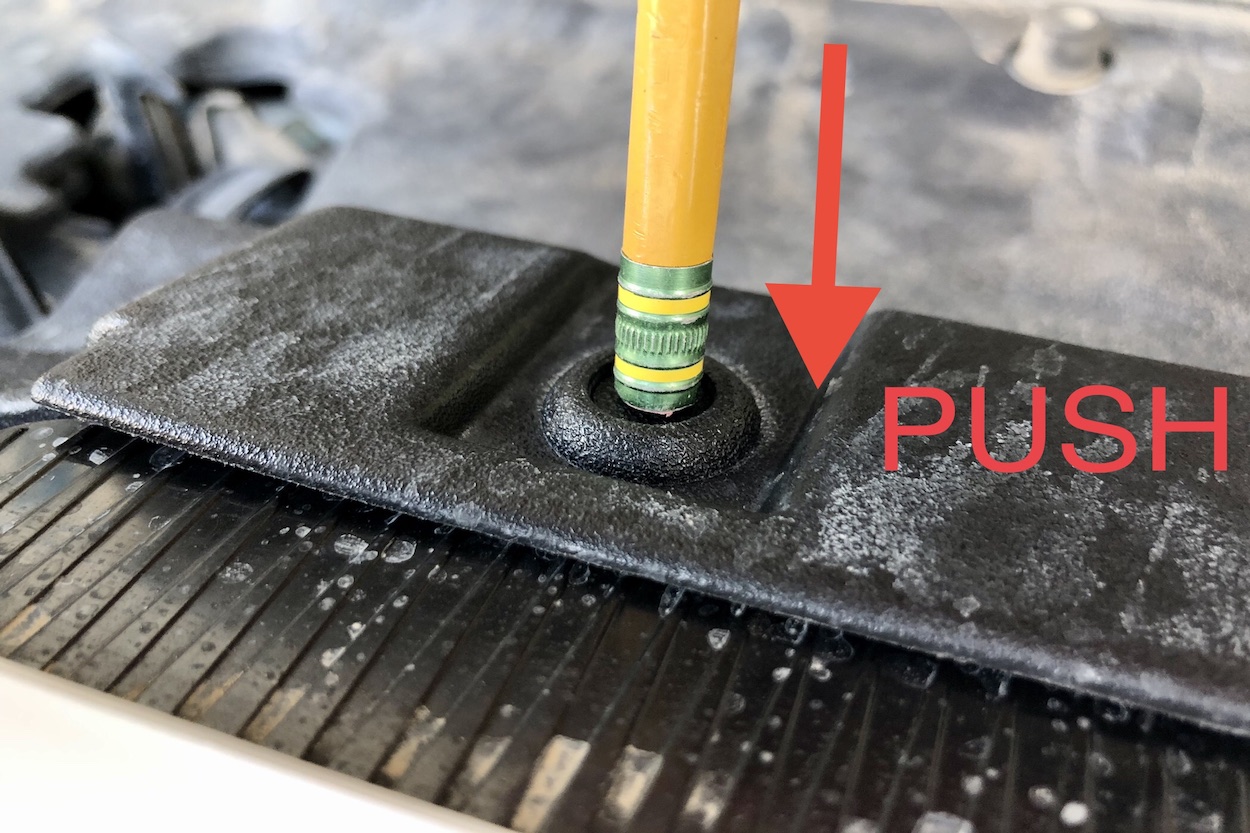
Pop the hood and remove the radiator cover (53292-35031). The radiator cover is held in place by 13 sight shield clips (90467-07211).

These clips are pretty easy to remove simply press down on the center section till you hear an audible “click” this indicates that the clip is no longer engaged and can be pulled up.

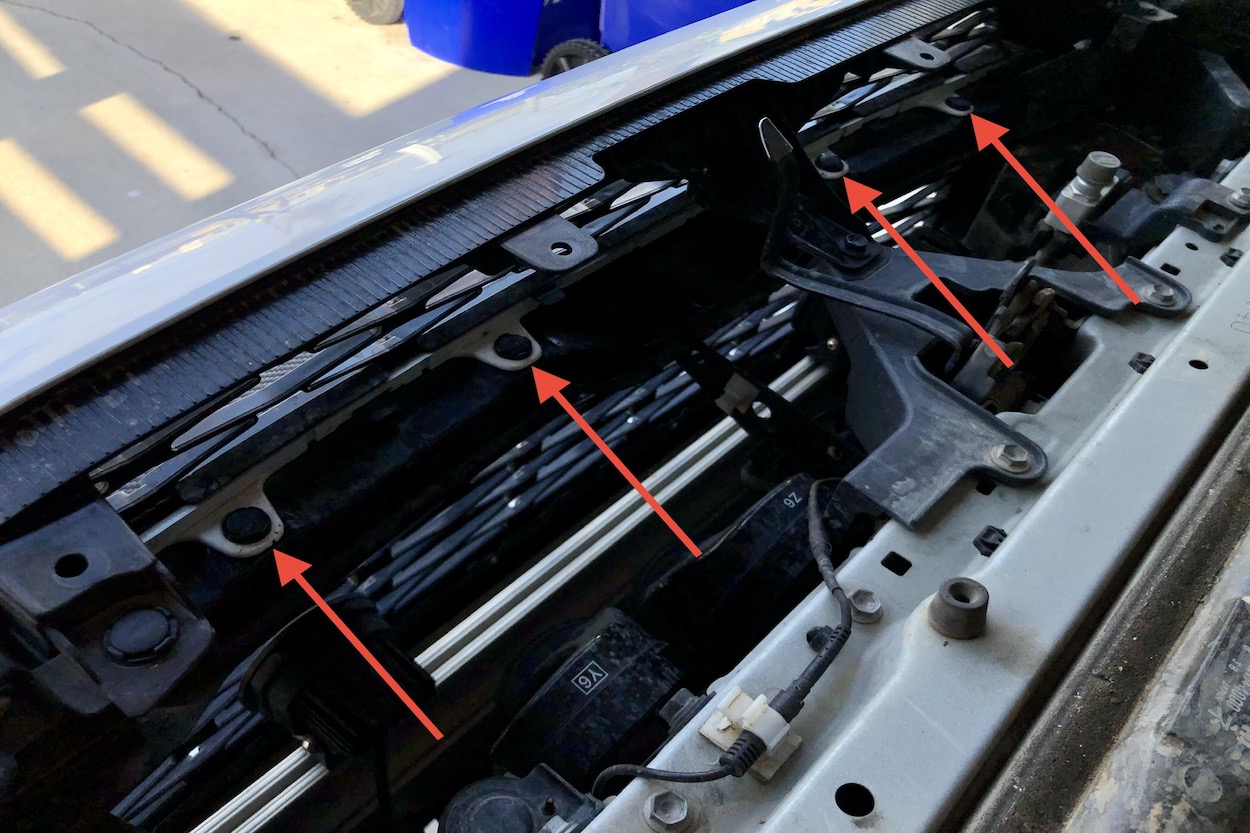
After the radiator cover is removed locate 6 bumper cover clips (52161-02020).

There are 2 directly under the radiator cover and 4 attaching the bumper grille to a metallic brace.

I find the easiest way to remove these clips is by using a flat head screwdriver and inserting it under the button head of the clip and twisting. This should pop the head of the clip up and disengage the lock.

Lastly, remove the screw right in front of the hood latch using a 10mm socket.
Step 2. Remove Lower Bumper Screws
Using a 10mm socket or Philips screwdriver remove a total of 7 screws holding the bumper to the fender liner and bumper impact bar.

The driver and passenger sides are asymmetrical, so take note of which screws belong where.

On the side, there are a total of 6 screws holding the bumper to the fender liners. Using a 10mm short socket remove these screws. The screws are not the same on both sides, so take note of which screw goes where.
Step 3. Removing Front Bumper
Using the plastic pry bar release the bumper from the fender liner clips. Start from the bottom and work your way up.

Once the bumper is free from the clips pull the bumper outwards. This will make a loud popping noise, which is normal. Repeat the process again on the other side.
Finally, get in front of the bumper and lift it up and towards you. The bumper should come off easily. Put the bumper down and disconnect the fog light connectors. The bumper now can be removed and set aside.
Step 4. Mount AJC LED DRL Switchback Control Module

Zip tie the control module to the brace shown above. There are two holes that the zip tie can pass thru to secure the module. Position the module so that the wires point down.

Run the zip tie between the black and red wire as shown.
Step 5. Run Cable to the Headlights

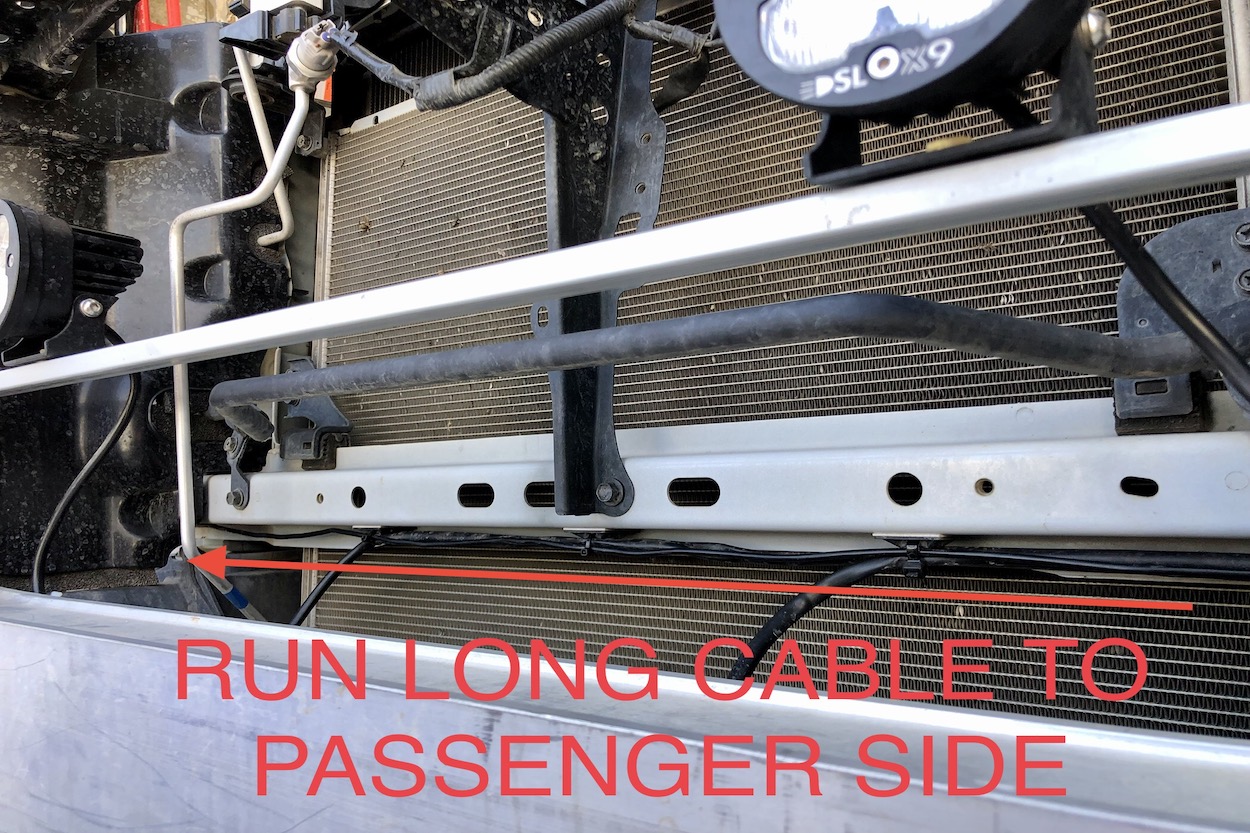
I already had wires from my X9 LED/Laser Light Pod going in front of the radiator support brace so I just zip-tied the cable to the existing cable mounting points. Run the cable all the way thru to the other side of the bumper below the headlights.
Step 6. Tapping Into Passenger Side Turn Signal

Using the plastic pry bar remove the two plastic fasteners holding in the splash guard. This will allow better access to the turn signal bulb.

Stick your hand behind the fender, find the turn signal bulb, and twist to remove the turn signal bulb.

For the passenger side locate the blue wire from the turn signal harness.

Using the supplied wire tap, splice into blue wire. Using a pair of pliers push and close the splice connector until you hear a “click” this means that the connector has been properly seated. Now apply dielectric grease and connect the yellow wire from the control module to the splice connector. Clean up the wiring by zip-tying the wires to the fog light wires.
Step 7. Tapping Into Driver Side Turn Signal

Just like on the passenger side, stick your hand behind the fender and headlights to remove the turn signal bulb.

For the driver’s side, the wire to tap is the yellow wire. Repeat the same process just like the passenger side.
Step 8. Run Power to Control Module

Run the black and red fuse tap wires to the engine bay fuse box. I followed the bundle of cables right below the front of the car battery. Open up the engine bay fuse box and locate the “INJ 10A” fuse. This is the fuse tap that will be used.

Pull the 10A fuse from the fuse box and attach it to the fuse tap.

Now run the red and black wires out of the fuse box. I ran my wires directly towards the fender and the grounding bolt next to the fuse box.

Now using a 10mm socket remove the grounding bolt and attach the black ground wire to the grounding bolt and retighten the bolt.
Once everything is in place, connect the AJC Bezels and perform a function check.
- 1. Turn ignition to “ON” and verify that the white LED DRL is turned on.
- 2. Turn on the hazard light and verify that the LED DRL is flashing amber.
- 3. Turn to one of the turn signals and verify that the corresponding LED DRL is flashing amber. Repeat for the other side.
Step 9. Install LED DRL Bezels

Pictured above: OEM vs. AJC Bezel

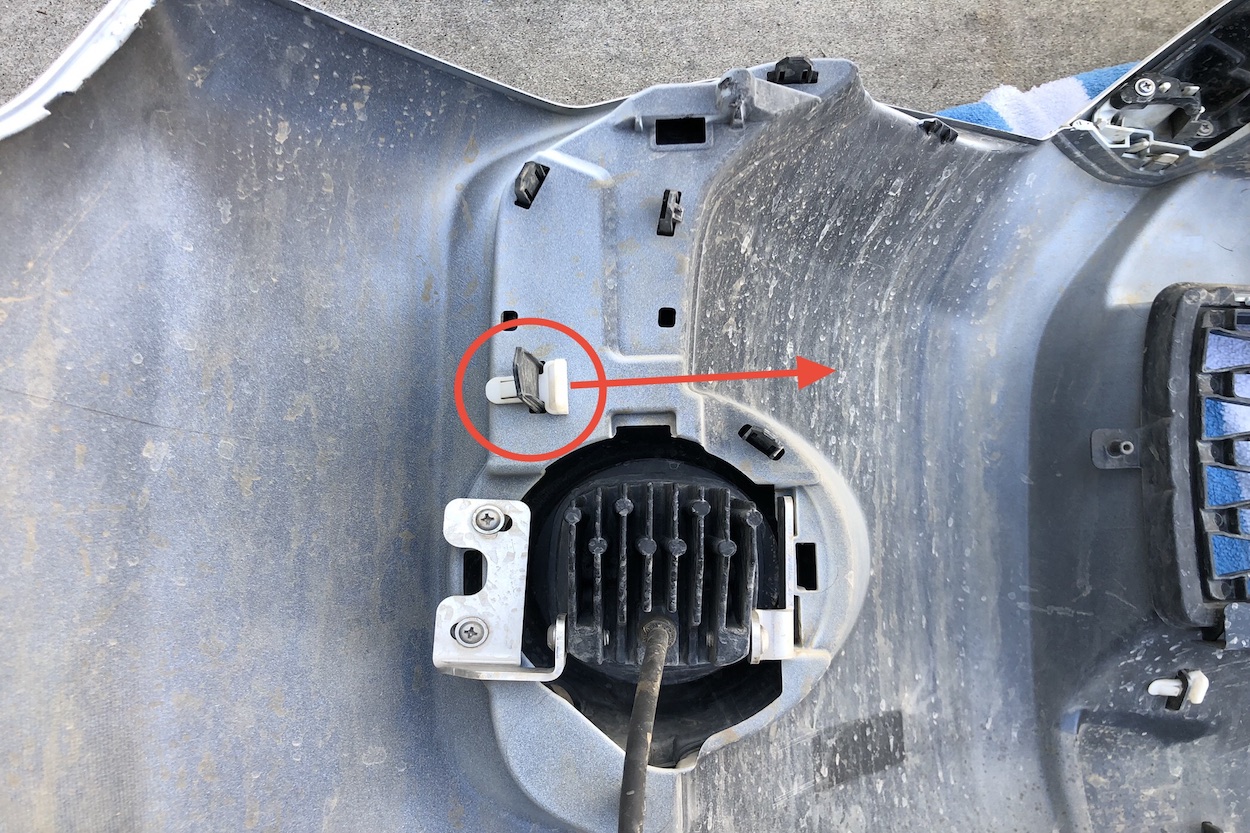
Remove the white clip locking in the OEM bezel in place. Once the clip is removed the “fingers” of the bezel should pop out easily.

Install the AJC Bezel in the reverse order by removing the OEM bezel. During the installation, run the cable from the AJC bezel right above the fog light opening. Once everything is in place install the bezel and the white clip to lock it in the bezel.
Step 10. Reinstall Front Bumper

Reinstall the bumper loosely and connect the fog light and AJC Bezel wires. Test the bezel LEDs again to make sure they are functioning properly.
The DRL should be white whenever the ignition is in the “ON” position and turn yellow when the turn signal or hazard is activated. Once satisfied reinstall the bumper in the reverse order as the removal. Take a step back and enjoy these new DRLs!
Final Thoughts

This AJC LED DRL Foglight Bezel kit definitely brings an updated “modern” aesthetic to the aging 4Runner. I’ve had these for a few months now and these DRLs have functioned flawlessly. Definitely worth getting if you are looking to do that something extra to differentiate your 4Runner from the pack.


Would it be ok to wire these in with the fog light. I have raptor lights hooked into my inj fuse
These guys are a rip-off. You can buy these on AliExpress for $70. 🤣. They come straight from China.
What do you think about installing them with a block heater being right there? I love the look but I don’t think they would work for me.
I really want to get these but every rig I see them on they are full of water. Recently at a meetup a guy said he was on his 3rd set. They look great new and work perfect but I just cant risk it considering what a PITA getting the bumper off is
Yeah, the quality is definitely a concern. Plus everyone I’ve talked to that paid AJC and then got the run around for months or years without getting any response but excuses. I don’t care how they look, dude will never get my money
That’s because it’s all Chinese junk. You can find them on AliExpress. These lighting kits are all made in China including all the headlights they sell on this site and others in the USA. They’re all a rip-off.