
It’s happened to all of us before – you’re out on the trail having a blast, when all of a sudden, an unexpected ditch makes your suspension bottom out. It causes a harsh impact, messing up your alignment and knocking everything in your cabin out of place.
How can you help mitigate this? Use upgraded bump stops.
Bump stops absorb the energy of a harsh suspension bottom out. Think of them like a stiff spring that engages only at the very limits of your suspension’s up travel. This protects your shocks and metal-to-metal contact with your frame. More importantly, you retain better control under extreme circumstances.
We’ve seen many designs come through in the industry – but PerryPart’s offering is one of the most interesting options currently out there. Let’s see why.
Table Of Contents
About PerryParts

Aftermarket bump stops range from rubber to several forms of polyurethane. All of them offer suspension protection during travel, but PerryParts describes a feature that hasn’t been advertised with other brands – variable compression damping.
It’s worth noting, all bump stop options offer progressive spring rates, which means that the more you compress them, the exponentially higher the force feedback is. This also goes for OEM bumps.
Compression damping is how the suspension reacts to the speed of the force applied to it – aka how quickly or slowly it is allowed to compress. To outline in more detail, variable compression damping occurs when (given the same amount of displacement) the force feedback from the bump stop varies with speed. In simple terms, considering that we compress the stop the same distance, at a slower speed, you will have a lower force feedback, and at a higher speed, you will have a higher force feedback.
Essentially, if you hit these stops harder, they provide more resistance on impact. Conversely, if you hit them slower, they will provide less resistance. To achieve this, PerryParts has a patent pending internal structure that controls airflow through the stop.
PerryParts says that they have not experienced any issues with port clogging affecting performance thus far. Based on their research, the ports can self clear. This is technically a mathematical theory, but real world results seem to support it.
In this article, we’ll answer the question of how these bump stops hold up to their claims and how they stack up against other options that are nearly double the price.
Step 1. Install Front Bump Stops
Tools & Materials
- Large Pliers (channel locks, pipe wrench, or similar)
- 14mm Socket + Ratchet (only necessary if your frame’s threads are rusty)
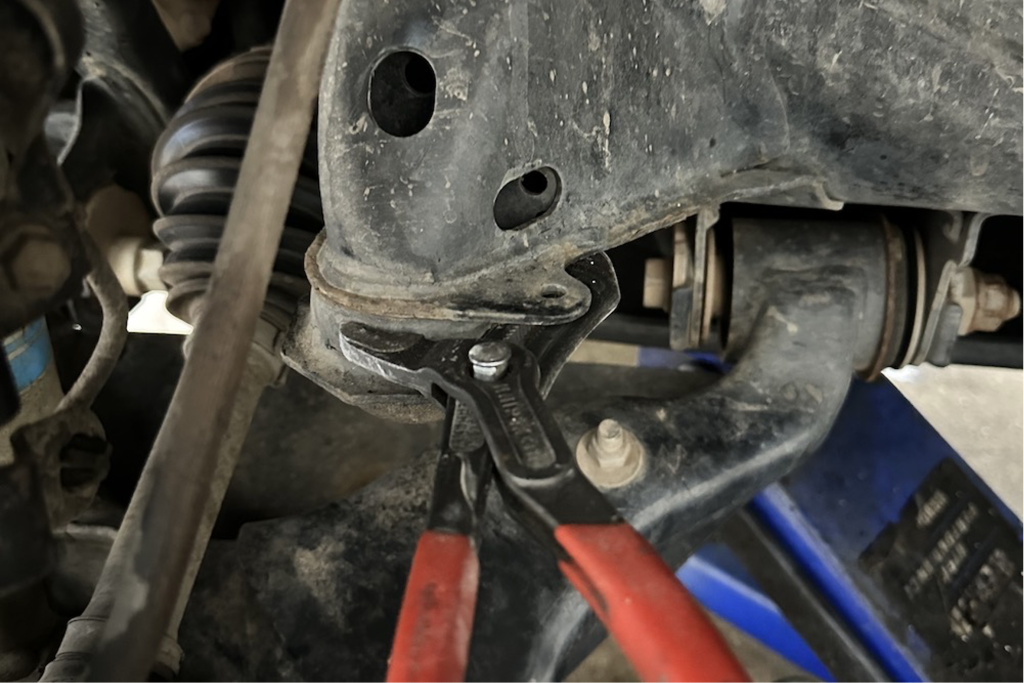
Using a pipe wrench or large pliers, unscrew the OEM bump stop from its mount counterclockwise. Then, clean up the mounting surface in preparation for the upgraded part.
Since the front stops can be installed without any tools, you don’t even need to jack up the truck to install them. This is a key advantage compared to the struggle of getting a wrench or socket past the control arms with other options.
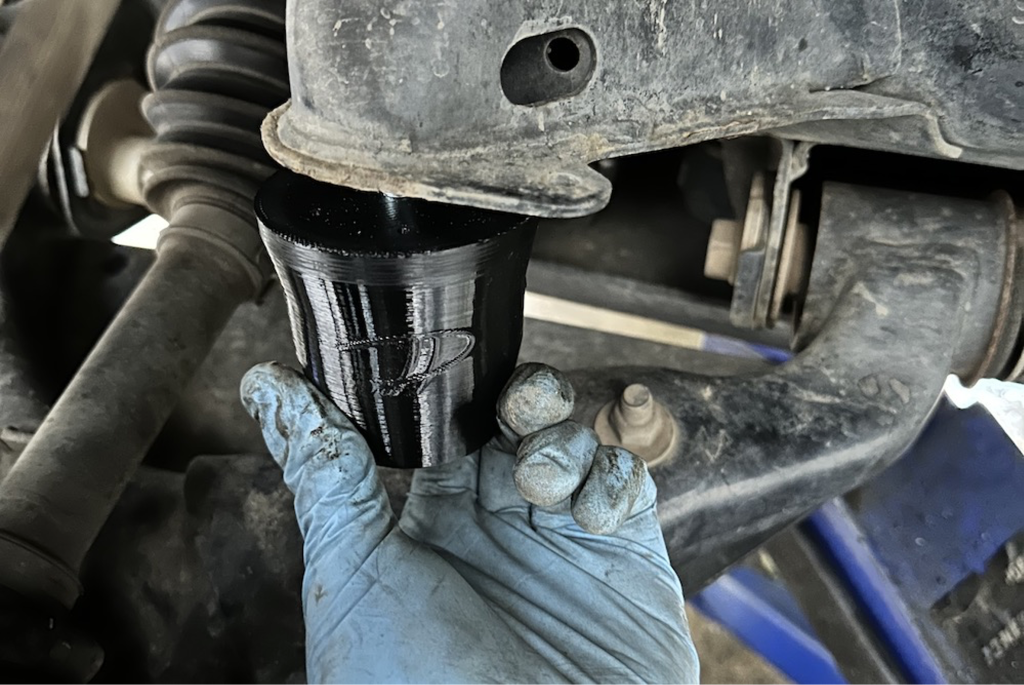
I did remove the tire for the sake of photos, however, I confirmed that installation can be done with all tires on the ground. Of course, this is dependent on your lift. If you have less lift, you may need to jack up the vehicle (don’t forget your jackstands).

When installing the front bumps, they’re designed to tighten by hand onto the frame perch. I found that “oil filter tight” was about the right amount of force (tighten with fingers until they start to slip). If the threads inside your frame are rusty or damaged, there is a 14mm bolt head inside the stop that can be used to tighten it down.
Step 2. Install Rear Stops

Tools & Materials
- 12mm Socket + Ratchet
- Ratchet extensions
In the rear, I upgraded from Durobumps DBR425 to PerryParts’ AB7RLT. The installation remains the same whether you’re upgrading from OEM or other products. Start by removing the two bolts on each rear bump stop.
The PerryParts rear bumps use the OEM hardware. Again, depending on your lift, you may not even need to jack up the truck. These went on with all four of my tires on the ground.
Once your existing stops are removed, position the new bump stop and tighten until the bolts contact the flange. Then, tighten further with one full turn.

If you need new hardware, I confirmed that PerryParts will provide it for free – you just need to add it to the notes on the website.

One neat feature is that the model number and driver/passenger indicators are formed directly onto the part. No stickers or ink that can peel/wear with time. In this case, you can see that “Driver” is molded right into the side of the part, making installation and orientation very easy.
Off-Road Performance

From left to right: Durobumps (2″ extended), PerryParts (LT version), and OEM (factory) rear bump stops in the image above.
The PerryParts AB7RLT (“long travel”) are a little taller, and are meant for extended travel shocks. When flexed out, I was satisfied with the travel produced. It’s good to note that they are not a direct comparison to my old DuroBumps 2″ rears (not meant for extended travel), because of the different intended use.
I upgraded from OEM bump stops in front and Durobumps stops in the back to PerryParts all around for this test. After some testing, I found that the PerryParts was a night-and-day improvement over OEM in the front. The suspension felt “bottomless”.
In the rear, compared to the Durobumps, I also noticed a small improvement. The PerryParts felt more damped & controlled and generally more comfortable. It wasn’t night and day, as compared to OEM, but it was noticeable, in my experience/opinion.
PerryParts also has a page on its website dedicated to the testing of their bump stops.
Final Thoughts
I’ve been running the PerryParts bump stops for about six months now and am still very pleased with them. They’re showing nearly zero wear and continue to provide their effects as advertised.
For the price, I believe they are by far the best suspension upgrade you can do to your vehicle. At less than the price of a single shock absorber for a full set, they’re a no-brainer. The no-questions-asked warranty is hard to beat as well.

Compared to OEM, these stops are a night-and-day improvement, and even compared to other expensive offerings on the market, they perform impressively. The feel of compression damping at the end of the suspension travel is incredible.
I have more confidence on and off trail in my 4runner, and I’m very happy to have the PerryParts bump stops installed on my rig.
Installed the full set on a stock 4runner. Noticed that with a small load I get strong impacts in the rear (Bilstein 5100 ans stock springs). Looks like the bump stops are to long for the stock suspension.
Anyone with a same experience?
Thanks
Hey there, did you order our extended travel or regular length bump stops? We almost always get this feedback when a customer orders the extended length ones on a setup that does not have the required corresponding lift.
Would these be okay to install on a stock 4runner without a lift?
These definitely work,dont listen to the debbie downers
I reccomend these highly. Thanks Patrick.
Seriously these are a blatant copy of Durobumps except these things are 3D printed and no way they will have the durability and longevity that Durobumps offers. Ditch these and get real progressive bumpstops from Durobumps.
If you’re really trying to boost DuroBumps, you should do your homework. Duro has been known to rip clean off the mount under extreme loads. A lot of people stopped running Duro a long time ago because of all the problems they’ve had. Built Right made a better product that solves the DuroBump problem. Duro is kinda trash dude and everyone has known it for quite some time. Just buy built rights if you want a rubber bump – they have a no questions lifetime warranty while Duro only has three year warranty. Link for reference: https://builtrightfab.com/products/4runner-2010-2024-front-bump-stops … Perry parts also has a solid product that actually works if you’re looking to save money, also with a better warranty than Duro.
Hi Jay,
No, they’re not. Every dimension on our bumps is different. We design in a different spring rate. We build in air passageways, and tune the diameter of them. They’re fundamentally a very different product.
The shape is similar on certain products, because there’s only so many ways to design bump stops. But not a single feature or dimension is copied from durobumps.
You’re welcome to watch the testing videos and review the data that proves Aerobumps offers real compression damping whereas Durobumps does not. You can’t argue with data.
Is CNN fact checking this article?
I think you’ve talked down to enough customers at this point. Those who have contacted and interacted with you have spread the word. A failed DuroBump clearly doesn’t matter to you. Your ego doesn’t have to accept it if you refuse to acknowledge it.
Is DuroBumps like FoxNews? Spreads false information?