
Baja Designs High Speed Spots Quick Installation Guide: An Alternative Lightbar Solution For the 5th Gen 4Runner
This is an overview on a custom Baja Design Lightbar with Baja High Speed Spots (Similar to Baja Squadrons) on a Baja Rack mounted on a 5th Gen 4Runner.
When it comes to picking a Lightbar for your rig there are many options out there. One thing I wanted was to be unique with my choice in a roof-mounted lightbar system.
To me, there are 2 options, mount a lightbar above or below a full-length rack.
With my BajaRack, I had an enormous amount of space below that something more than a standard lightbar could be utilized to fill the space.
So, after looking at other 5th Gen 4Runners on IG and seeing all the options that were out there I realized that I wanted the “classic round lights” look upon my rack. It offered a unique look and filled in the space between the roof and the fairing.
At first, I was looking into the KC HiLites PRO6 setup seen here, but the cost was a little steep.
XL Sports High-Speed Spots Lightbar System
I went with Baja Designs because I’m a stickler for making things match as I already have BD ditch and fog lights. But when sticking with Baja Designs, there isn’t much of a round light solution out there.
So after scouring their website, I ultimately found what would work for me and is within my price range: The XL Sports – High-Speed Spots through Rago Fabrication.
This line has been discontinued and replaced with the XL Linkable light bar.
- Baja Designs XL Linkable: Check Price
From Rago Fabrication on the High-Speed Spots:
“A longer and narrower 6° beam focus for illumination further down the trail or road. The Spot pattern is designed to be used in conjunction with additional Wide Driving and/or Driving/Combo beam lights.”
The Lightbar Build

It all started with printing out the XL High Speed Spots to the actual size and making a cardboard cut out to see how many lights I was going to need to make this project work.
10 lights are what I ordered, but only 9 of them ultimately ended up fitting.
Mounting the Lightbar

I decided to repurpose my stock roof rails to be the mounting point for the lights.
I had previously mounted my Baja rack by using some round bar mounts that I had leftover from mounting my awning.
Installing Clamp Mounting Kit

Some modification was needed to the rail to receive a longer bolt to thread through for mounting.
I drilled 2 holes on the tops of the rails and widened them so that way I can slip the mounting bolt all the way up and into the factory holes of the rails and then through the bar clamp mounts.
I also plasti dipped the stock rail so it would match the powder coating of the roof rack.
Hardware For Mounting Lightbar:
- 2 M6 1.0 bolts with Lock Washers: Check Price
- Everbilt M12 Zinc Plated Metric Hex Nut: Check Price
- 5-8″ Zinc Plated Steel Split Lock Washers: Check Price
Once I got the lightbar mounted, then the real fun began. When mounting the brackets, I used the existing bolt and flat washers from BD but used an M12 x 1.5 nut and lock washer.
The reason for this is when tightening down the brackets, it is nearly impossible to keep the bolt head from spinning inside the channel.
So, a lock washer on the inside of the channel helped keep the bolt from rotating.
Tighten All Brackets
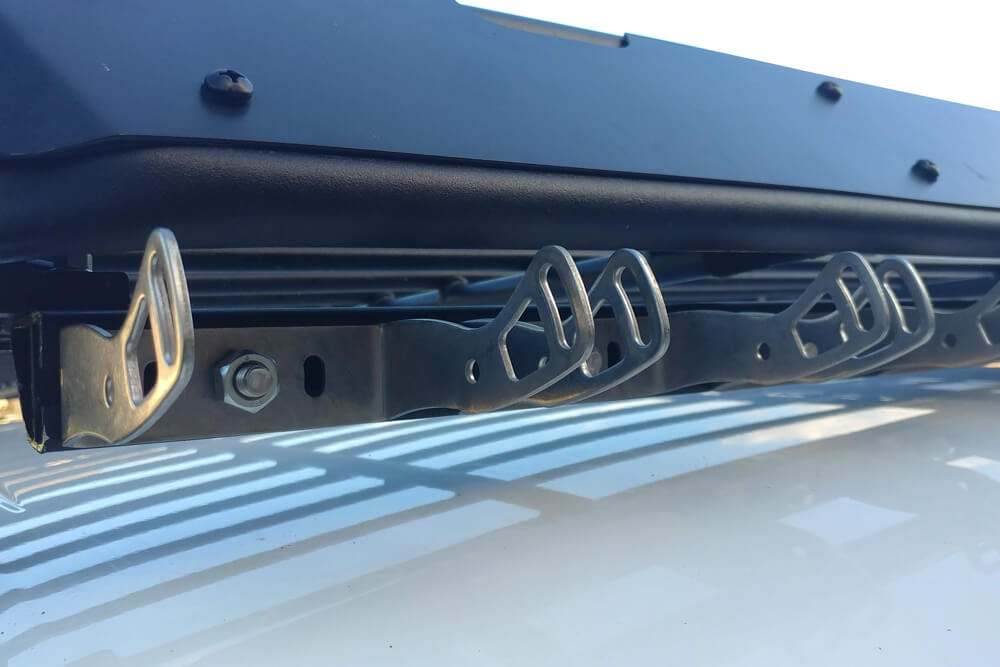
Using a #17 socket to tighten up all the brackets to the stock roof rail with about a fingers gap or 1″ of spacing between.
After getting all the brackets spaced out from the center out, I began test fitting each light to make sure there was ample clearance between each of them to thread the factory bolts through to mount the lights to the bracket.
Important note: Start mounting on the left side rather than mounting the lights on the right. From my experience, this is the fastest and easiest way for installing this lightbar.
Tighten Lights on Roof Rack

Using an #11 wrench I tightened all the lights down flush to the roof rack.
Once all the lights were tightened down, I made sure everything was straight and to my liking.
Wiring Lightbar System

I did not take many pictures on wiring up of the lights because by this time I was a week into this project and just wanted to get it finished. But here is the diagram that I followed.
In brief, I created a daisy chain harness out of the wiring harnesses that were sent with the lights and then ran the wires to a power distribution module that I have under the hood from Shrockworks.
From there I just connected it to my pre-wired air onboard switch that I wired up months before doing this build.
Final Thoughts & Conclusion

I’m super happy with the way this turned out!
These Baja Designs Spots are super bright, throw far, and they give off the look I was going for.
Not only did the gap below my rack got filled, but the lights look great and provide the extra light needed when out on the trails or dark back roads.
One addition I got was amber covers for daily driving use to protect the lenses from rocks and bugs.