
Hi-Lift Jack Mount for Factory Roof Rack + Shovel Accessory Mount on 5th Gen Toyota 4Runner – Full overview and installation
A few weeks ago I broke through one too many ice ponds finding my front skid plate jammed up on chunks of ice.
I had zero traction on the front tires and very little in the back.
Luckily, someone was there to quickly hook up a snatch strap and pull me out. I was thinking how horrible it would have been to stand in ice water and dig out the front end with the little army type shovel in my trunk, had I been alone. That’s when I decided to mount a full-sized shovel to my roof, one that could cut through some ice.
After some research, I went with the Dominion Off-Road Hi-Lift Accessory Bars and Krazy Beaver shovel combination.
Buy this Set-up:
- Hi-Lift Jack: Check price
- Quick Fist Mounts: Check price
- Krazy Beaver Shovel: Check price
- Hi-Lift Jack Mount to 4Runner Crossbars: Check price
- Dominion Off-Road Hi-Lift Accessory: Check website
This is a great option if you are looking for a recovery set-up on the factory roof rack crossbars of the 4Runner.
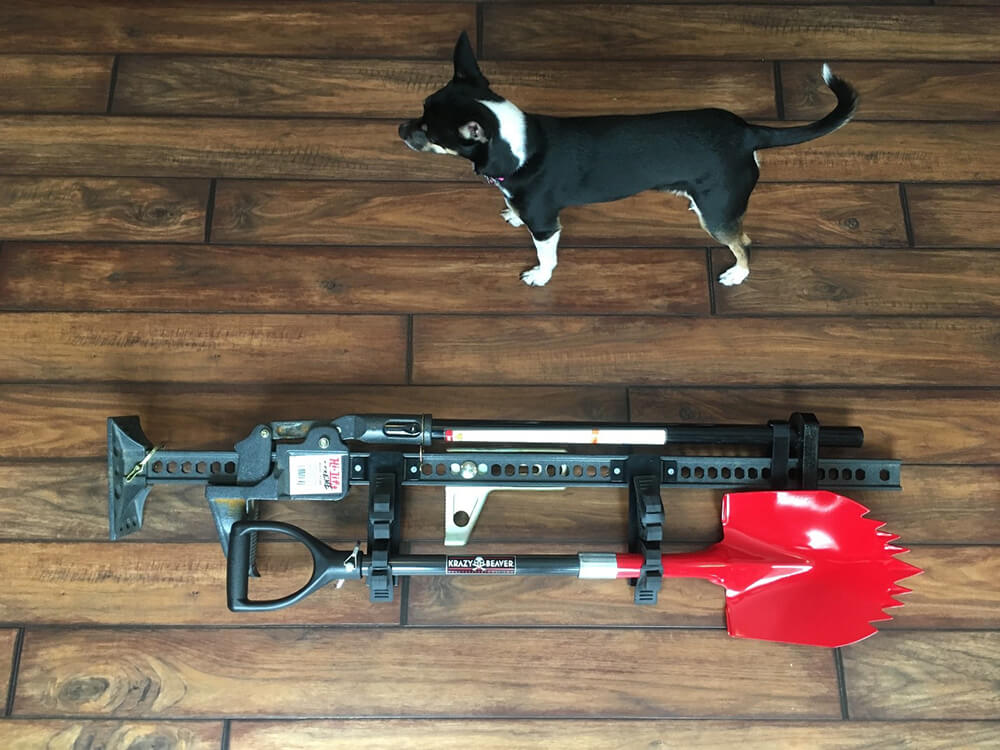
Dominion Hi-Lift Mount + Shovel Mount on Factory Crossbars

The inspiration for buying a full-size shovel above
The Dominion Hi-Lift mount came well packed and looked and felt solid right out of the box.
The primary application is to mount a shovel and/or ax to your Hi-Lift Jack. There is some flexibility to the mounting options, as there are several holes in the bracket and you could mount the Quick Fist shovel grips on the bottom or top of the bracket, vertically or horizontally.
I’d imagine you could mount the bracket on many flat surfaces, such as roof racks, by adding a backplate.
Note the bolt lengths (about 3/4 Inches) though, as they are permanently attached to the bracket.
So if you are doing a custom mount on a roof rack, with a metal plate backer or something, make sure the bolts will be long enough for your application.
THE HARDWARE

The above hardware comes with the kit and is all you need to attach to your Hi-Lift Jack.
To attach the four clamps to the mounting bracket, place the black rectangular inserts inside the clamps and run the Phillips screws through the inserts, clamps and then the mounts.
Then attach the locking nuts on the other side of the bracket until it is snug, but not so snug it is distorting the rubber clamps. To remove the mount in the event you need to use the jack, you simply unscrew the four wing nuts, the rest can all be left together.
Then reattach the four wing nuts when you are done and ready to pack up.
STANDARD ASSEMBLY

Above is the “standard” assembly to mount to your Hi-Lift jack (or with the quick fist grips on the other side of the bracket).
With this configuration, you could carry two tools (Shovel and Ax for example).
You can tighten the quick fist grips down to the desired level and latch them in. A thin handled shovel might not fit snug, so you would need to build up the handle with tape or some other method, in order for it to fit correctly.
The shovel I chose does fit without modification with the quick fist grips on the tightest setting.
ATTACH ASSEMBLED MOUNT TO HI-LIFT

As far as the two brackets, you don’t have a ton of choice on the lower mount on the jack, because of the available holes.
You really need to mount it just above the jack’s inner workings, but you can run the jack-up or down a little to find the spot you want. The upper mount on the jack has a lot of flexibility, with lots of holes to choose from.
I measured the length of my shovel to determine the placement I wanted. The mounts are made to slide right into the track of the Hi-Lift jack and you just tighten them down with the wing nuts underneath.
Now you are ready to attach up to two tools to your jack!
Features:
- Simple “Bolt-On” Install
- Rock Solid Jack Mounting
- Works with many Hi-Lift Jack Mounts
- Computer Laser Cut and CNC Formed
- Made in the USA
Costs:
Dominion mount as shown, I paid about $90 including shipping
- eBay: Check Price
- Amazon: Check Price
KRAZY BEAVER OFF ROAD SHOVEL
Now time to clamp that shovel on there.
I wanted a strong, full-sized, lightweight, rust resistant shovel that could do some damage to chunks or sheets of ice. After some research, I chose the Krazy Beaver shovel from Krazy Beaver Tools.
It fit all my criteria well, and it is pretty cool looking, which is a bonus. Once you dig in dirt or rocks, you will lose some rust protection, but that’s just inherently going to happen with a shovel, I feel like it is as protected as it can be.
I am really happy with the quality of the shovel and confident it will perform as designed.
Side note: Krazy Beaver Tools sells some shovel mounting brackets which look pretty nice but did not meet my particular needs.
As I don’t have a full roof rack, I have some limitations on my mounting options. The Dominion mount works perfectly for my situation, but you might check out the Krazy Beaver mounts, too.
Features:
- The “Krazy Beaver Super Shovel” is an All American Made Product.
- Measures 40 inches Total length. Excellent for Camping, Hunting and Off-Road use.
The Head:
- Manufactured using Heavy Duty 13 gauge heat treated tempered steel. Twice as thick as a normal residential shovel.
- Reinforced teeth to prevent bending and breaking.
- Powder coated both inside and out from the head to handle area to prevent rust.
- The “Krazy Beaver Super Shovel” can be used for regular digging and in extreme situations can be used to assist in penetrating Ice and Clay.
- Measures 11 1/2” Height X 8 1/2 wide.
The Handle:
- Made of a lightweight but extremely strong fiberglass
- Stealth Black Handle
- The head to handle connection has a permanently mounted solid 14” fiberglass reinforcing core to withstand breakage during the most extreme circumstances.
- At the end of the handle under the “D-Grip”, there is a hollow section that can be used for storage of emergency items such as matches, flint, hooks, fishing line, batteries, etc…
The D-Grip:
- Made of solid Polymer.
- There is no soft rubber on these grips. The reason for the use of the solid Polymer is because soft rubber overtime begins to break down and becomes sticky.
Costs:
- Krazy Beaver Shovel: Check price
- Locking the Shovel to the Truck: Check Price
Krazy Beaver shovel as shown, I paid about $100 including shipping
As suggested, I have rotated the shovel 180 degrees, so that the d-ring handle is facing forward. This should minimize the snagging of branches on the trail. It is riding like a champ up there. I did have to leave the dish facing up, in order to fit, but I think branches will still slide right over.
Locking the shovel to Truck
I also did wind up purchasing the 8417D Python Adjustable Locking Cable by Master Lock (link above). This is the 3/16 inch version, as I am pretty sure the more common 5/16 version would not fit. It slides right through the hole that is used to pin the handle on.
I then wrapped the cable around the Hi-Lift, which is locked to the roof rack. I don’t plan to keep the shovel up there all the time, but it’s nice to be able to lock it down a bit when I do have it on the truck. It could still walk off like anything else, but this will make it a little more secure.
Still really happy with the full set up.
Mounting Hi-Lift to Factory Roof Rack

I got a little creative mounting my Hi-Lift Jack to my factory cross bars.
I’m not going to guarantee this part of the install, as I did not use the product as it was designed, but I am really happy the way it came out and it feels very solid to me. I purchased the Hi-Lift Jack Hood Mount – HM-825 at the 4WP store.
This is intended to mount on the hood of a Rubicon, but I was able to drill three holes into each of my cross bars and attach the mounts to my factory rack.
I used a drill press, as I think this would be a very difficult task with a hand drill, as the holes have to line up perfectly.
I then purchased some longer bolts, locking washers, etc… to accomplish the install. All of this was done with the crossbars off the vehicle. This could not be done with the bars attached to the roof.
The cross bars are pretty easy to get off, you just need to carefully pop off the plastic end caps on the back of the roof to access the tracks.
Then loosen the large screws/wing type knobs on the crossbars to slide them off the back. I then purchased a locking knob to keep the jack from walking away. Ready to roll now!
Mounting Hi-Lift to Factory Roof Rack
- Hi-Lift Jack Mount to 4Runner Crossbars: Check price
- Locking knob: Check Price
FULL ASSEMBLY ON THE 4RUNNER

Above is the full assembly on my 4Runner, as I have my Hi-Lift jack mounted on my factory crossbars.
Certainly, your setup may look different, depending on how you store your Hi-Lift jack.
You may have it mounted on a bumper, roof basket, interior, etc. Everything feels solid, and the setup looks and works great.
I plan to run a small cable through the handle where the pin is presently located and lock it to the jack, which is locked to my cross bars. It should keep honest people honest, as they say.
Although I may just store it in my garage until I know I will be on a trail and just toss it up there. It’s very easy to clamp it on and off.
READY TO HIT THE TRAILS

Ready to hit the trails now!
The shovel is easily accessible on the roof. Just step on the Rock Sliders and unlatch the two rubber clamps and start digging! It’s nice to have the shovel so easy to grab.
You want to save your digging for the dirt, ice, snow or sand, not digging for your shovel in your trunk.
Conclusion
I’m really happy with this set-up.
The mount and shovel feel solid and worth the price to get something that will last and work when you really need it. I enjoy supporting small domestic companies that provide quality, specialized equipment for off-road enthusiasts.
I highly recommend you check out Dominion Off Road and Krazy Beaver Tools if you plan to mount a shovel on your 4Runner.
Where can I get this hi-lift factory roof rack mount for my 5 gen 4 runner
Please RSVP
Hi Dan, I used a Jeep Hi-Lift Hood mount to mount the Hi-Lift jack to the factory cross bars of my 4Runner.I had to use a drill press to get accurate holes through the cross bars to attach the mounts. I can’t recommend this as it is not the intended use of the mounts, but I can say I have had zero issues with mine. I purchased the Jeep mounts from the 4WP off road store. Good luck with your project!
Krazy Beaver sells a guard for the shovel head, it covers up the pointy bits, might help with the catching branches problem.
Thanks for the tip Greg! I didn’t know about the cover. I have been running it blade facing rear, pan up (as that is way if fits on mount best), but have not gone through a lot of low hanging branches yet. I only mount it when I know I am going to trail or ORV park, but I do get some looks in town when it is mounted on the roof. It’s not a subtle design. hahaha
Do you have any suggestions for mounting brackets for Prinsu roof rack?
What are you wanting to mount. Prinsu sells some mounting panels that would accept just about everything from the looks of them. Also the quick fist style mounts are pretty easy to mount to many different racks/surfaces. If you do have to drill make sure to seal up any exposed metal.
Have you had issue running the shovel with the pan facing forward or the tip up? I would think it would catch every branch instead of deflecting it up, or if flipped 180 it could be facing up or down and not catch.
Hi Jerome,
I just mounted it last week, so have been testing how it rides up there. It seems solid and not twisting or budging at all. I have been running around in deep snow, on the highway some, but not heavily treed areas yet. I think I instinctually placed it with the most clearance from touching my roof, roof rack or jack, as it looks like it could do some damage. However, I think you are spot on, I need to flip it 180 degrees, or it is going to catch on branches. Now that I see how stable it is, I will go ahead and make the change, and I do not think it will rub on my rig anywhere, as it does not seem to be shifting around. I do hit branches fairly often around here (lots of Ponderosa Pine) and have some scratches on my roof to show for it, so I think you are absolutely correct, I need to flip it around before I hit the trail. Thanks for the good input!
Awesome to hear it is working out. I enjoy the site and your write up. Glad I found this place!