
Step by Step Installation Guide for Dash Camera on 5th Gen Toyota 4Runner – Everything You Need to Know
After dinner downtown with my friends, I was heading home for the night when up ahead of me were two bright lights coming straight towards me.
A driver had somehow entered the roadway the wrong way and was heading straight for me. Blinded by our headlights, I couldn’t see the driver, nor could he see me.
Luckily both of us slowed to a safe speed, he moved and drove onto the median, and passed me.
After that moment, I realized how critical a dash cam could be.
This situation could have played out hundreds of ways, however, if the worst were to happen, it would all be recorded.
Whether it’s driving around town, or on the trail, a dash camera can help you catch those beautiful views or crazed drivers.
Install Time:
- 1 Hour
Product Used:
GRDIAN KRIOS mini w/GPS Antenna Cable
- Amazon: Check Price
Specs:
- Short video clip of video quality
- 156º Wide Angle View
- Full HD (1920 x 1080p) @30fps
- HD (1280 x 720) @30fps
- SONY IMX323 Image Sensor
- H.264/MP4
- Parking Mode Recording
- Loop Recording
- Built-in WiFi
- Built-in Mic
- Up to 128GB (~20 hours of recording at 1080p)
- GPS (optional)
Tools Required:
- 10 mm Socket Wrench
- Plastic Edged Tool
- Drill with Step Bit
- Zip Ties
- Glass Cleaner
- Plastic Pry Tool
STEP 1a. MAP-OUT PLACEMENT OF THE DASH CAM

The KRIOS mini is almost small enough to hide behind the factory rear view mirror. First, test fitted the position of the camera behind the mirror, with the GRDIAN app open. Triple check that it’s placement to have the best viewing angle of the road ahead.
STEP 1b. ATTACH DASH CAM AND GPS MODULE
Remove the VHB covers, firmly press to glass, adhering the unit to the inside of the windshield.
STEP 2. REMOVE A-PILLAR COVER


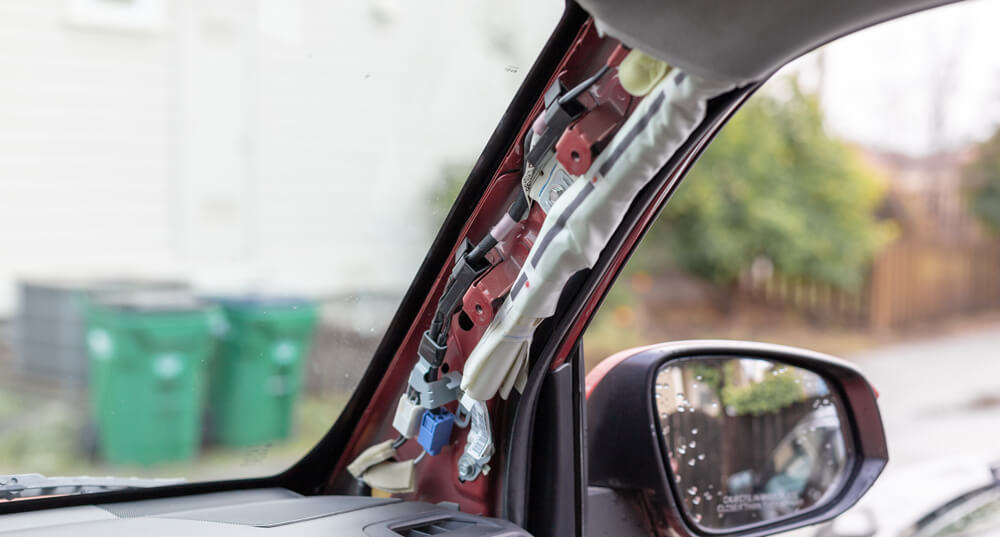
Remove the plastic caps, on the grab handle, covering the flange bolts that hold the cover to the A-pillar.
Using a 10mm socket wrench remove the two flange bolts holding the cover to the A-pillar.
STEP 3. REMOVE PASSENGER KICK PANEL

In the passenger footwell area remove the kick panel by pulling the plastic cover downwards towards the floor.
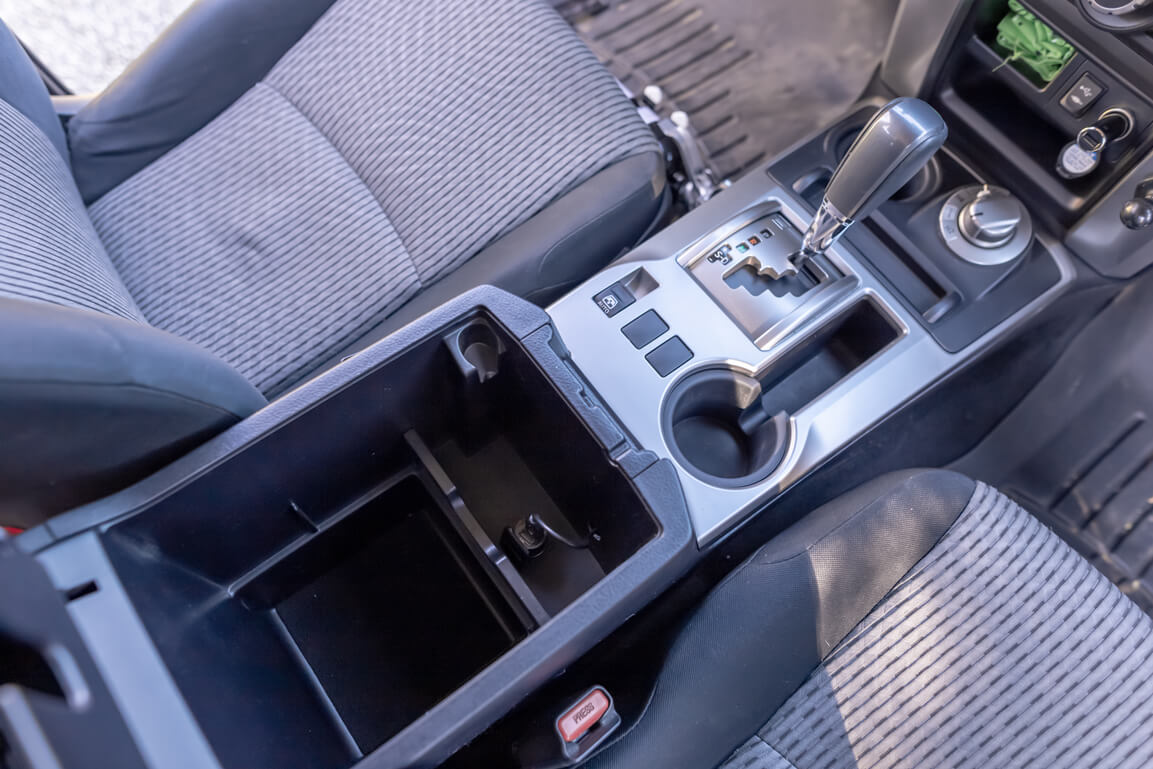
STEP 4. REMOVE PASSENGER CONSOLE TRIM

Pull the passenger side console trim out by gripping the sides and pulling out towards you.
STEP 5. REMOVE CENTER TUNNEL COVER

Gripping the sides of the center tunnel cover, remove it by pulling it upwards. If you choose to remove the centerpiece fully, it is attached by two wiring harness connections. Unclip both connections to fully remove the tunnel cover.
STEP 6. RUNNING THE USB CABLE


Run the USB cable along the top of the headliner to the A-pillar.
Gently press the USB cable into the headliner with a plastic pry tool. Run the cable down the A-pillar, dropping down into the passenger footwell.


Pull the cable through the footwell and across into the center trans tunnel, running it towards the center console.
STEP 7a. NO DRILL CENTER CONSOLE


If you choose to complete this installation without drilling, you can run the USB cable out between the cover and center console. Keep in mind that this might put strain or possibly pinch the cable between the two console pieces.
STEP 7b. DRILL CENTER CONSOLE (OPTIONAL)


Mark the location of the pilot hole with a pen. Then using a small drill bit, make a pilot hole for the step bit. Using a step bit, slowly drill out a hole large enough to run the end of the USB cable though. Connect the USB cable to the charger within the center console. Remember to vacuum out plastic shavings before proceeding.
STEP 8. REPLACE ALL TRIM PIECES
Finish by replacing all trim pieces in reverse order removed.
TIP: This is a great time to clean or wipe down your interior while most of it is disassembled.

NOTE: PARKING MODE

To utilize the Parking Mode feature, the camera will need to be plugged into a power source when the vehicle is OFF. In lieu of wiretapping a hot circuit for this application, you may also plug your camera into an external USB battery pack when parked.
FINAL THOUGHTS
The GRDIAN KRIOS mini is a pretty solid unit.
Installation of the unit was very simple. Just stick the glass, plugin, and right away it begins recording.
The whole unit, itself, is fairly small and tucks up behind the rear view mirror very well, almost completely out of sight.
So far the only drawback I found about the KRIOS mini was that it had a max of 30fps, which is common among most dash cameras. While a 60fps unit would create a more stable video over a 30fps unit, I found the quality and playback of the KRIOS mini still good.

After reviewing footage, during the day time was able to clearly read license plates in front of me while driving up until to about 20 feet ahead. It performed well during the night, even in the rain, even capturing a red-light-runner on my way home.
Overall, I am happy with my GRDIAN KRIOS mini. It captured good video during the day as well as at night. The GRDIAN app user interface is simple to use, and connects easily to the dash camera’s Wi-Fi to view, review, or download footage to my phone. I was very impressed with their customer service, and email response time to a few questions that I had with their product.
In the end, one of the largest advantages of having a dash cam is the extra sense of security that I have and I feel much more comfortable knowing that I can capture the unexpected.
Oh ok. Well the link you provided doesn’t tell much of a story as that website claims ( somehow) that only 9 of the 233 reviews were somehow cooked up. I’m really not sure how they came to this hair splitting conclusion of non relevance but whatever. The unit is rock solid thus far and extremely low profile. Seemless integration with their wifi based app on my IPhone. Works like a charm. I’m extremely happy so far and would reccomend it to others.
What product are you referring to? The DDPAI MINI 2?
No, im referring to the camera in this article (krios mini)
Btw… the unit he reviewed I didn’t see any reviews available for on amazon. That’s an auto deal breaker for me.
So I came across this product on instagram, it seems like they are small company based in california. I always love to support local small businesses instead of overseas chinese companies. For me I gravitate to local businesses because I can deal with them locally in case anything goes wrong. I find that the warranty process is much quicker and the customer support response is better and more sympathetic to issues. I’ve dealt with a lot of amazon products, and granted the reviews are a important part of the process, these larger companies are very clever with the amount of reviews that can quickly generate. Most of them I have found to be fabricated which is why Amazon has recently cracked down on illegitimate reviews. I’ve had the camera for about 1 month now and I am liking it so far. It is a lot smaller in person than I thought.
I use this
https://www.fakespot.com/product/ddpai-mini2-wi-fi-dashcam-hd-1440p-2k-night-vision-140-wide-angle-loop-recording-g-sensor-parking-monitor-built-in-supercapacitor-snapshot-button-storage-up-to-128gb-ios-android-app
to check out the product listing. Unfortunately I wasn’t able to check the krios mini as the listing looks like it was put up this year or early last year. So i would expect to see reviews rolling in after the product has been used for a couple of months. These would be solid reviews to base off of. Long-term quality reviews. Hope that helps for anyone deciding on this camera! I personally love it.
Sorry. Not trying to come across as a dick. Here’s my thoughts..
The cam reviewed here is big. It’s as big as one of those mini pop cans. Then you’ve got the huge suction cup. This thing is not discreet and kinda fugly. When I did my research for decent dash cam that didn’t break the bank and yet had not only all features I wanted including a discreet footprint, I narrowed it down to specifically the DDPAI mini 2P or the 3. First version had issues. Mini 2 had firmware glitches that have been worked out almost entirely.
The dash cam market is a developing market. Many big name brands like garmin are producing units with major issues and some of the Asian lesser known brands are delivering big. So it’s kinda hit and miss right now. Truly compact and discreet coupled with quality seems to be an issue out there. I’ve had nothing but great things to say about this unit. I really wish I could post pics for review here. The iPhone APP is super slick and feature rich and I can easily download firmware updates easily. My wire install was similiar to the seen here except I simply used a credit card to separate the headliner away from the roof and did the same thing between the right hand side handle column and headliner section while stuffing my wire behind them never to be seen again as I went inside and down the inside of the rubber trim piece down and into the underside of the glove box. I removed the cover like he did underneath and drilled out a small notch inside the back of the glove box cabin air filter access door. From there I have a 12 volt cigarette plug or USB port. Wiring took maybe 5 min doing it as described and I didn’t have to really dig into anything. It was super slick. If I didn’t have USB glove box option , I would have gone the route he described.
Hey Daniel. I appreciate the input, I found that the unit works great for what I use it for. Dash camera technology is fast evolving, the market is saturated various units, different specs, and price points. It was a lot of information to digest and sift through when picking a unit.
I chose this unit based on a personal recommendation as opposed to Amazon reviews. The goal was for myself to learn more about this product and share what I learned with others so that they may have this information when choosing a product for themselves.
As for the size, the KRIOS mini is only, 3.5in x 1.5in x 1.7in. It’s mounted to my windshield via a VHB 3M pad, not a suction cup. From my view, the rear view mirror blocks almost the whole unit, and I personally don’t find it distracting at all.
It sounds like you are more knowledgeable about the market of dash cameras than myself. Maybe write an article about a comparison, or the pros and cons?
Thanks!
To big. The DD PAI MINI 2p or the Mini 3 are much smaller units, bomb proof, have all the same features and full app functionality, AND a Remote wireless quick snapshot button. I have the USB port in the glove box so, my install was also much cleaner
Dan, looks like the DD PAI MINI 2p has mixed reviews on amazon. What do you mean by bomb proof? Franks install looks really clean. What was so much cleaner about yours? If it was the USB port in glove box, that’s a bit one-sided as not all of us have USB ports there. It sounds like you should write an article dude.