
How to Replace the Side Mirror Lights on 5th Gen 4Runner – Full Overview on the Puddle Lights
The puddle lights aka the side mirror lights on 5th Gen 4Runner are a pretty cool feature if you have them. Not all models come standard with these.
When you unlock your 4Runner, your puddle lights, as well as your dome light and map lights turn on. If you are looking for any of the other light bulb numbers, we wrote a post on that a while back.
When you are in a dark parking lot or out on the trail, it is nice to have bright clear light to shine on the ground. With our factory puddle lights, they will give you light but will not carry as much light output as a set of super bright LED bulbs.
With a set of bright LED bulbs on your side mirrors, you will light up much more ground than your factory bulbs.
If you swap out the factory lights with aftermarket LED lights, you will also have a much better look, overall. Replacing these lights in combination with your license plate lights, reverse lights and interior lights will give you a pretty good looking light set-up.
With the wide variety of lights out there, be careful about what brands of LED bulbs you choose. There are hundreds of options on eBay but I personally wouldn’t recommend much on eBay. What you need to focus on is a company with a reputable brand name, not knock-off brands.
Puddle Lights – T10 Flat Bulbs

- Mirror/Puddle Light × 2: Check Price
- Plastic Pry Tools: Check The Price
If you are looking to complete the entire 4Runner’s exterior lights with LEDs, please check out the list below.
4Runner Interior Light Kit & Bulbs
- Front Map Lights × 2: Check Price
- Rear Dome Light × 1: Check Price
- Rear Hatch/Trunk Lights × 2: Check Price
- Door Lights × 4: Check Price
- Vanity Mirror Lights × 2: Check Price
- Mirror/Puddle Light × 2: Check Price
- License Plate Lights × 2: Check Price
- Reverse Lights x 2: Check Price
Exterior Light Bulb List
- License Plate Light Bulb: 168 (X2 bulbs)
- Side Marker Light Bulb Front: 168 (x2 bulbs)
- Puddle Lights (Side Mirrors): 168/194 (x2 bulbs – T10 – T Shape with Flat Bottom)
- Turn Signal Light Bulb Rear: 7440A (x2 bulbs)
- Turn Signal Light Bulb Front: 7444NA (x2 bulbs)
- Parking Light Bulb: 7444NA (x2 bulbs)
- Back Up/ Reverse Light Bulb: 912/921 (x2 bulbs)
Step #1: Remove Mirror
UPDATE: You do not need to remove the mirror for this install. Please see comments at the bottom of the page.
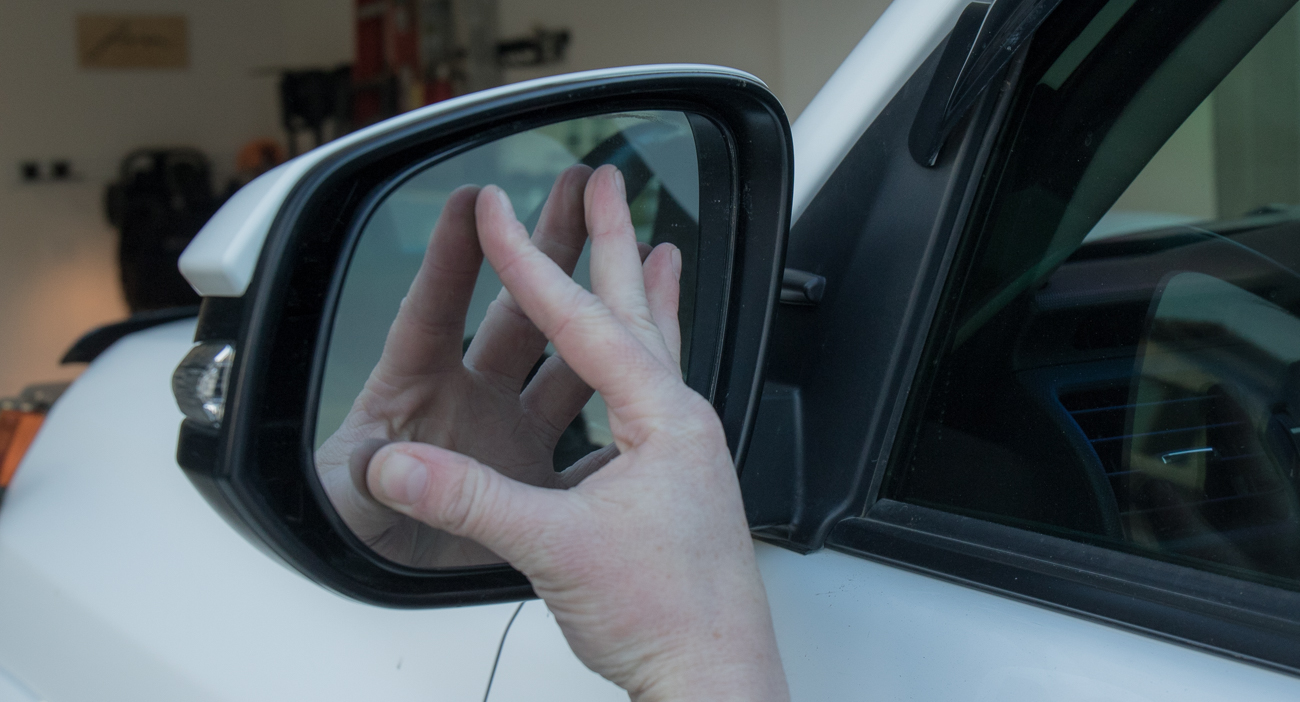
This whole process is a bit nerve racking but with patience, you will be fine. Start by removing the actual mirror. Grab the outside of the mirror and push out. Once your mirror is pushed out enough, you can grab the whole mirror housing with one hand and then pull the glass off with the other hand. It will pop right off. You won’t break anything here, it just seems pretty sketchy.
Step #2: Pop Tab on Cover
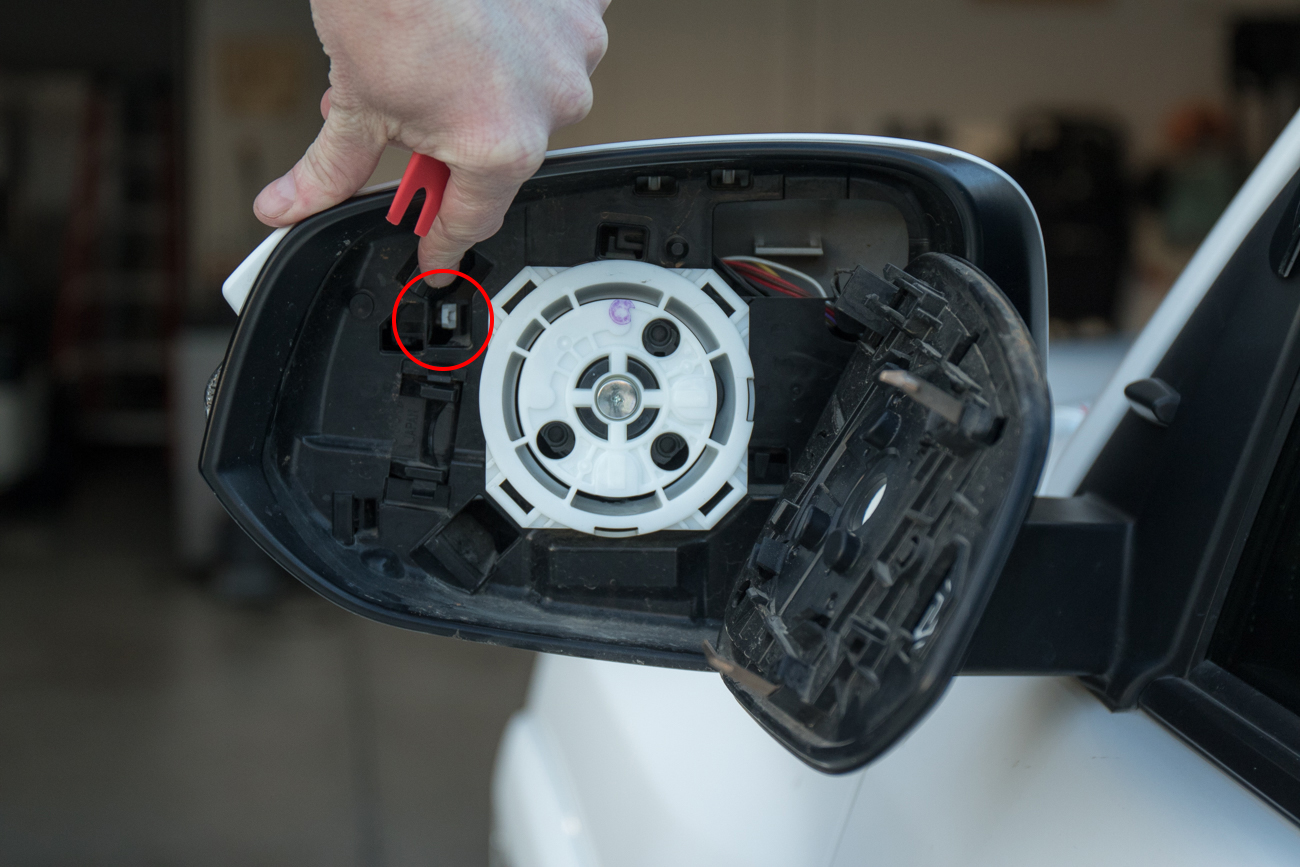
Once you have the actual glass face off, you will need to locate this little white tab. This white tab is holding the other side of the mirror into place. This one tab holds the whole white piece in place.
Step #3: Plastic Pry Tools for Tab
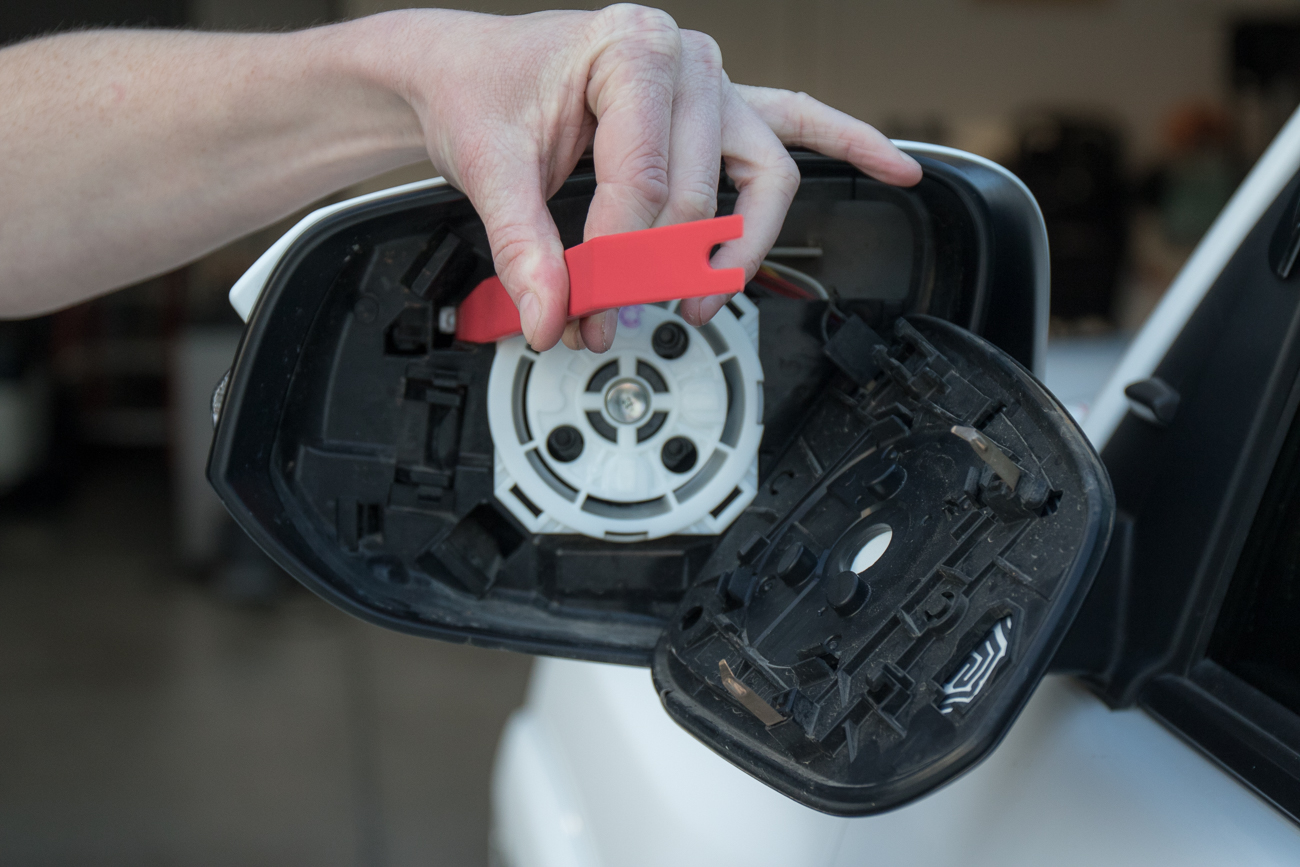
Using your plastic pry tools or a flathead screwdriver, you will need to pop this plastic tab. Once the tab is released, you can wiggle the white housing loose and pull it off.
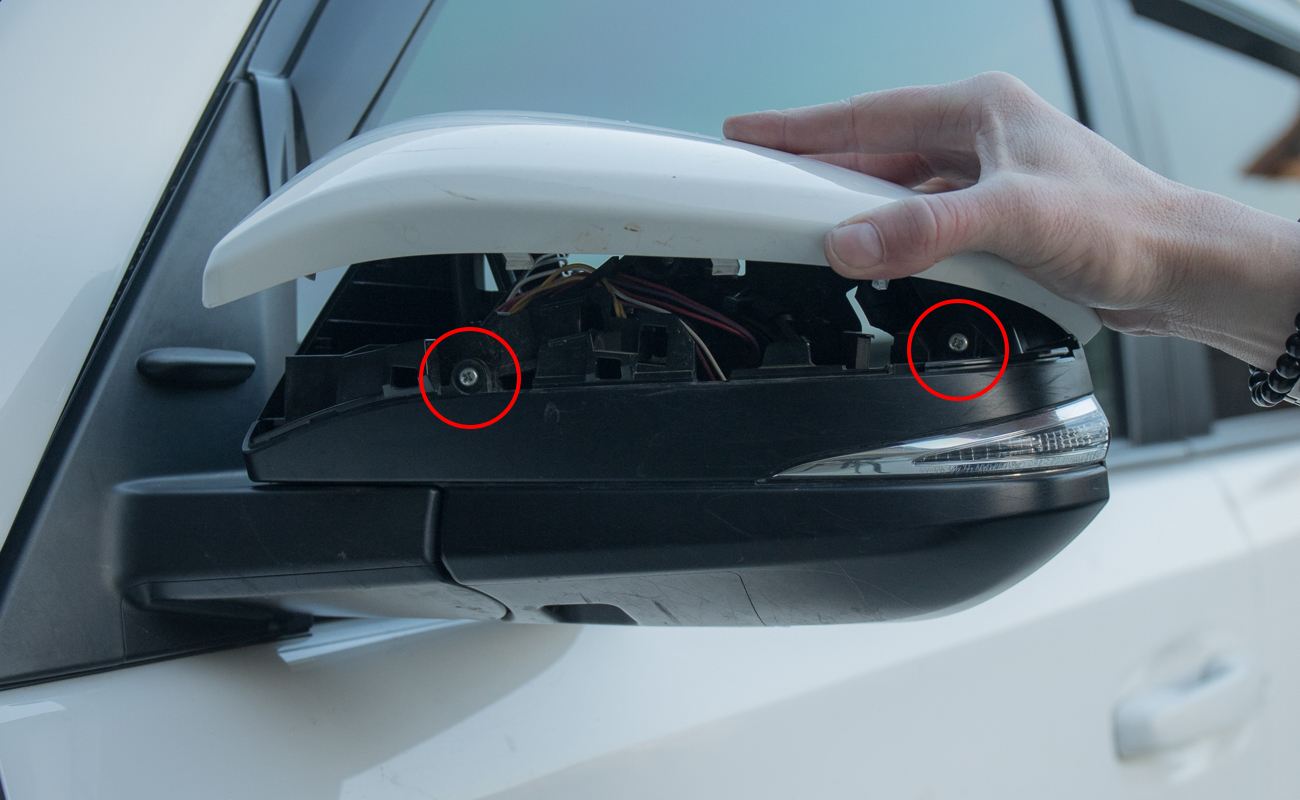
Step #4: Unscrew Housing
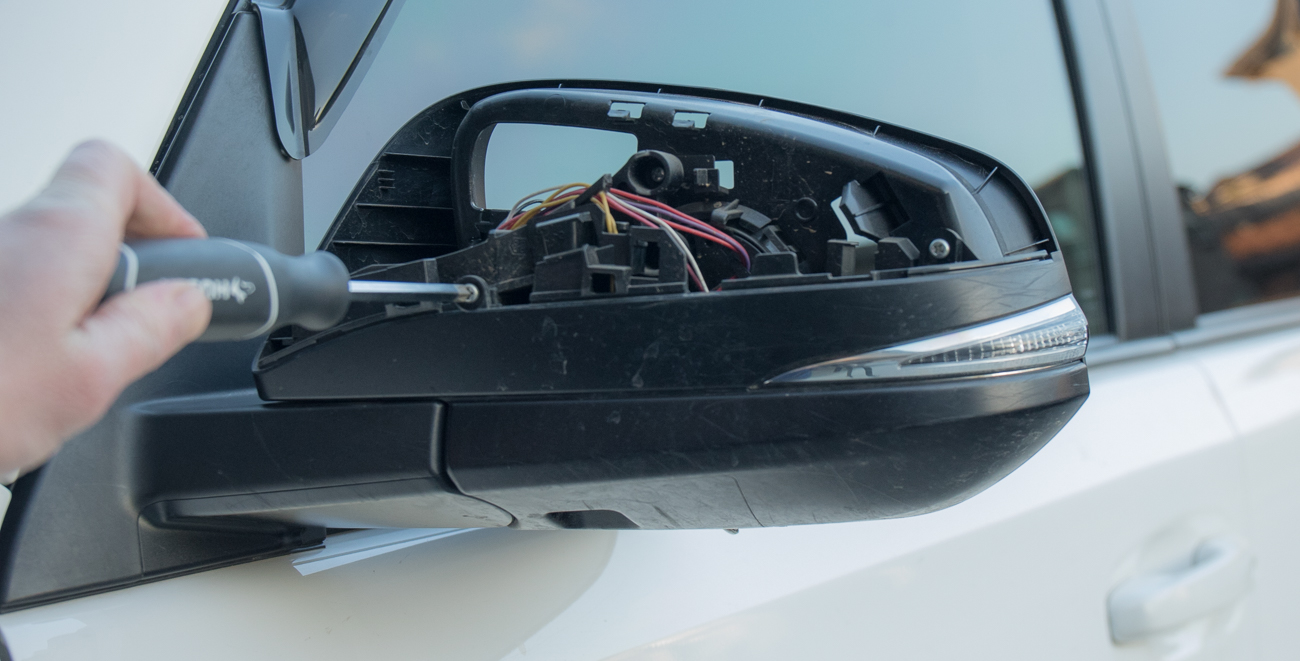
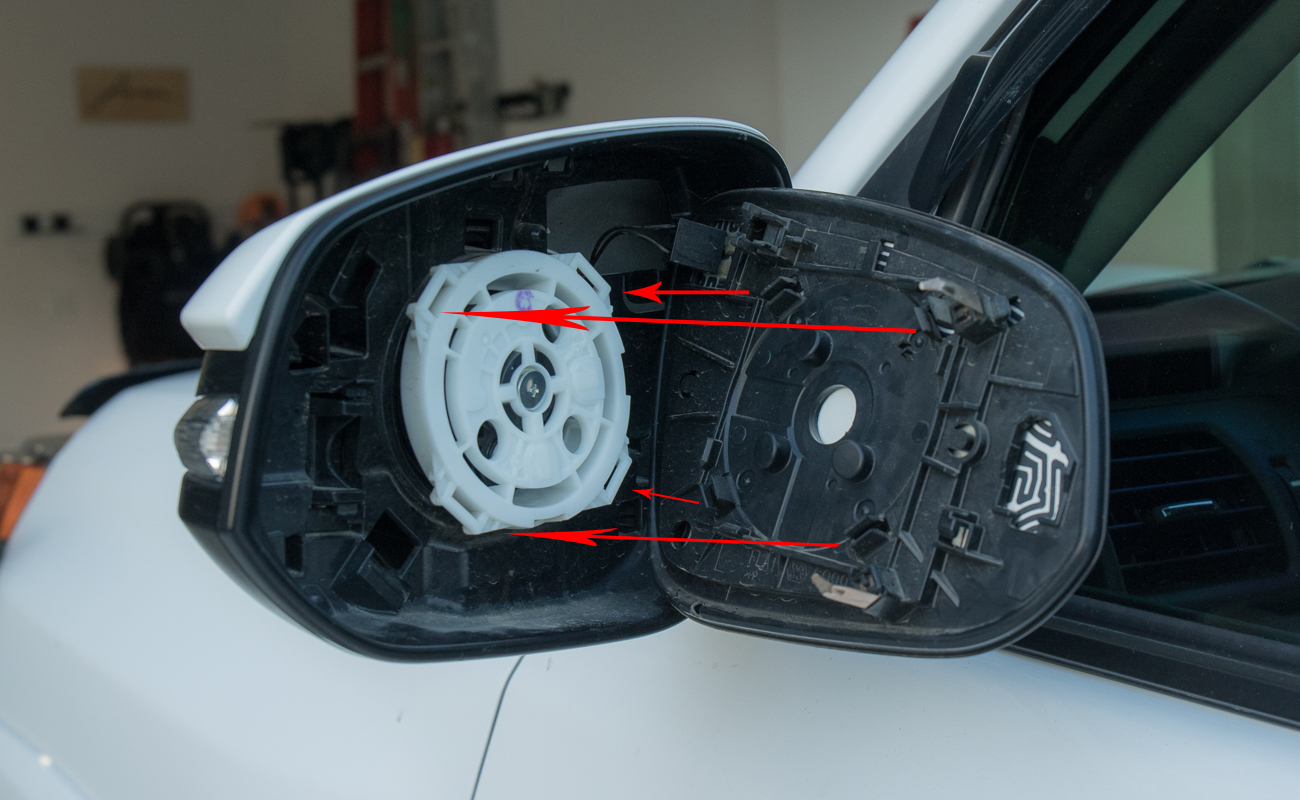
Step #5: Pull Bottom Housing Off
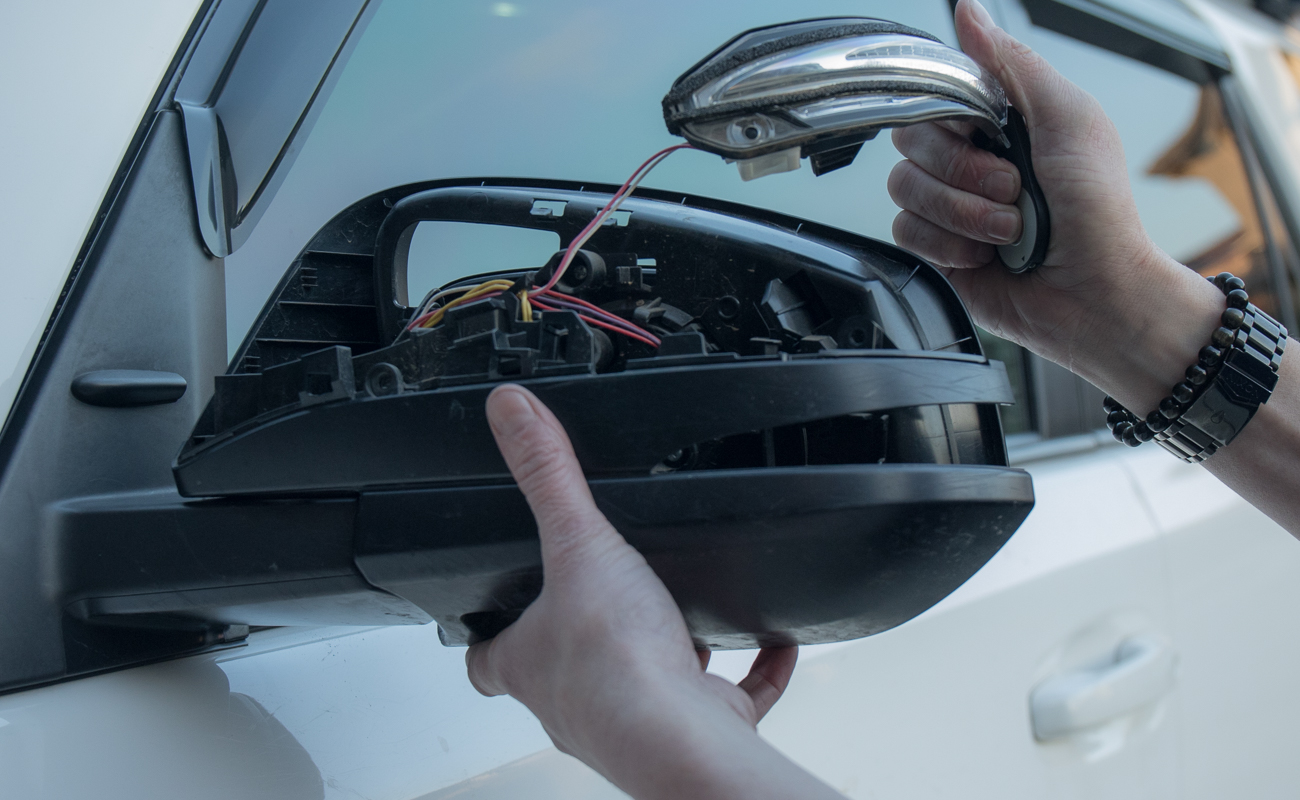
Here is where things get a little interesting. To access the puddle light bulb, you need to remove this lower black housing. There are multiple tabs on the backside of this housing that you need to release. Be patient with this section, as everything in here is very tight. Start by pulling and release tabs all the way around the bottom and top of the black housing. Once everything is semi-loose, you should be able to remove the whole assembly.
Step #6: Twist bulb housing to remove
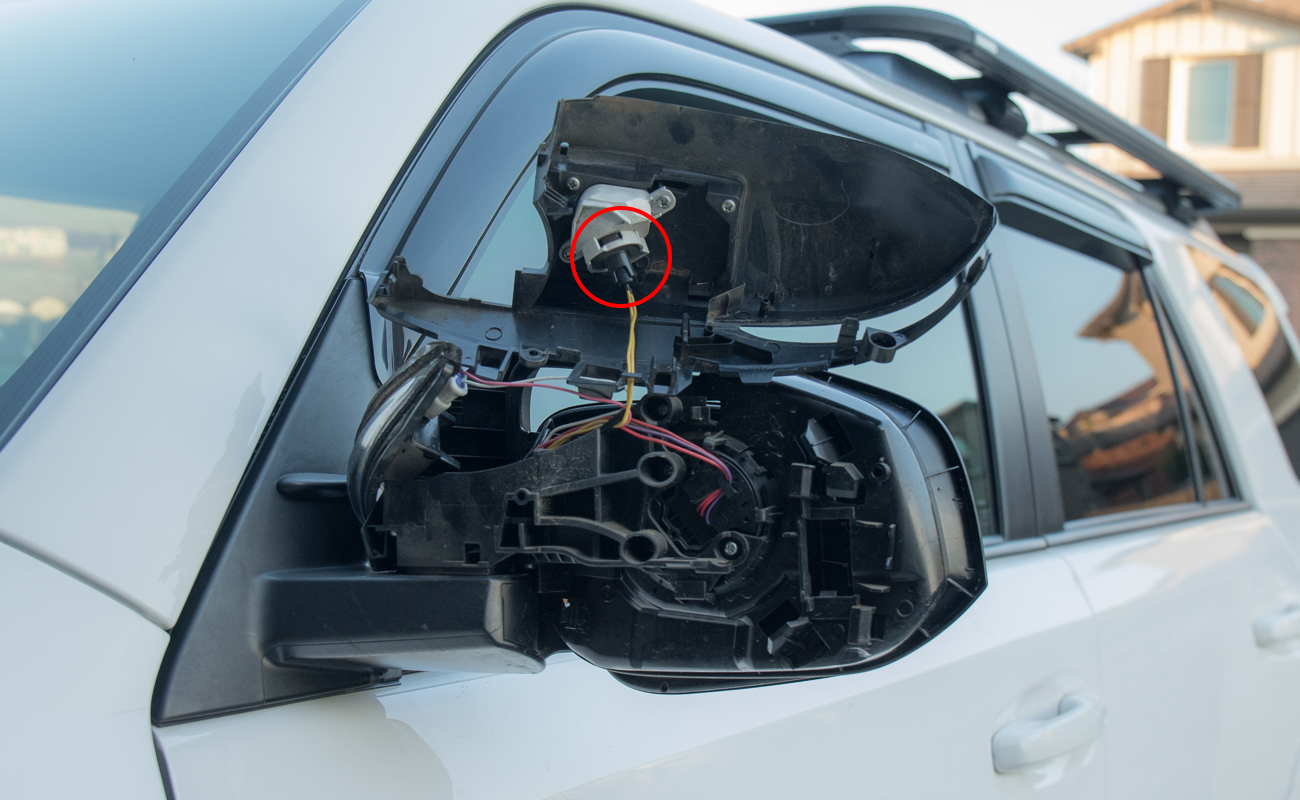
With the bottom assembly and housing removed, locate the bulb housing. Twist the bulb housing and then pull the light bulb fixture out.
Step #7: Pull out OEM Bulb
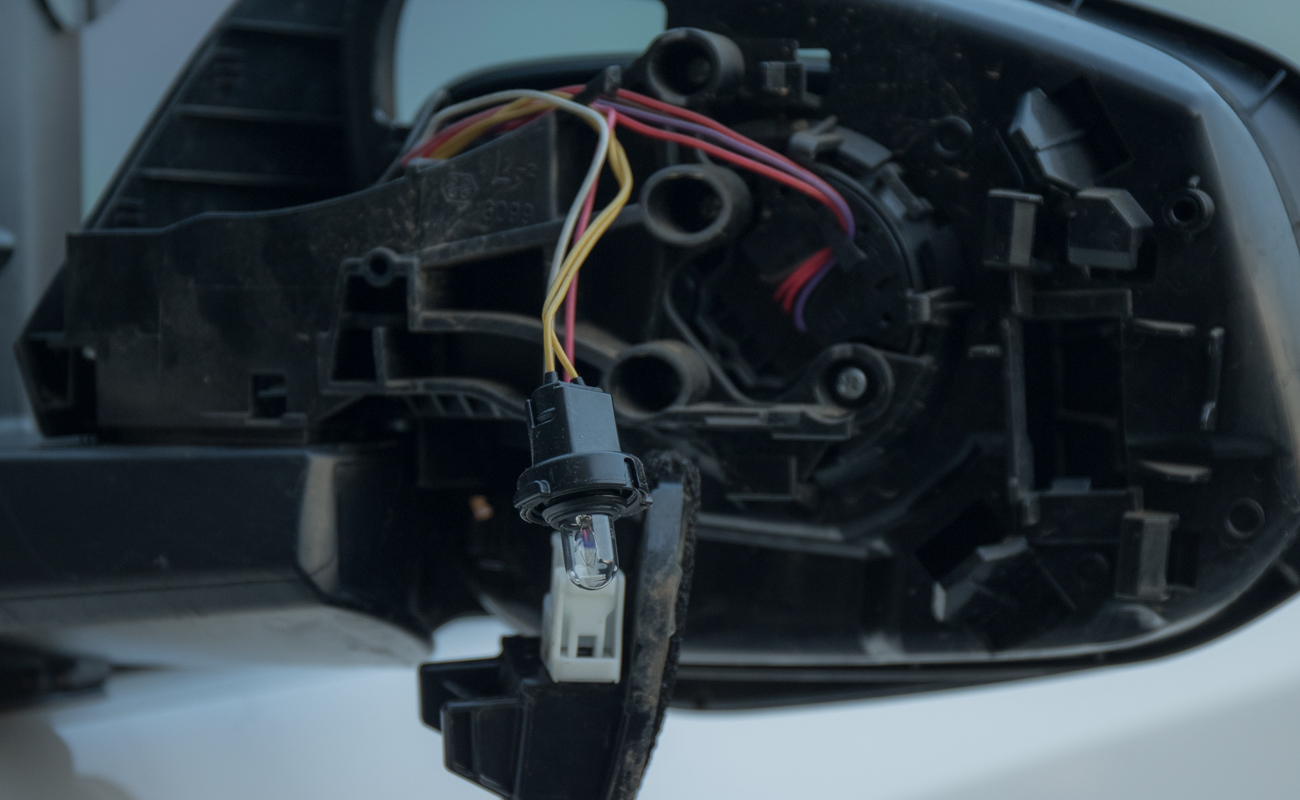
Step #8: Swap in New LED Bulb & Test Bulb

Step #9: Run Yellow Wire & Twist Bulb Housing in Place
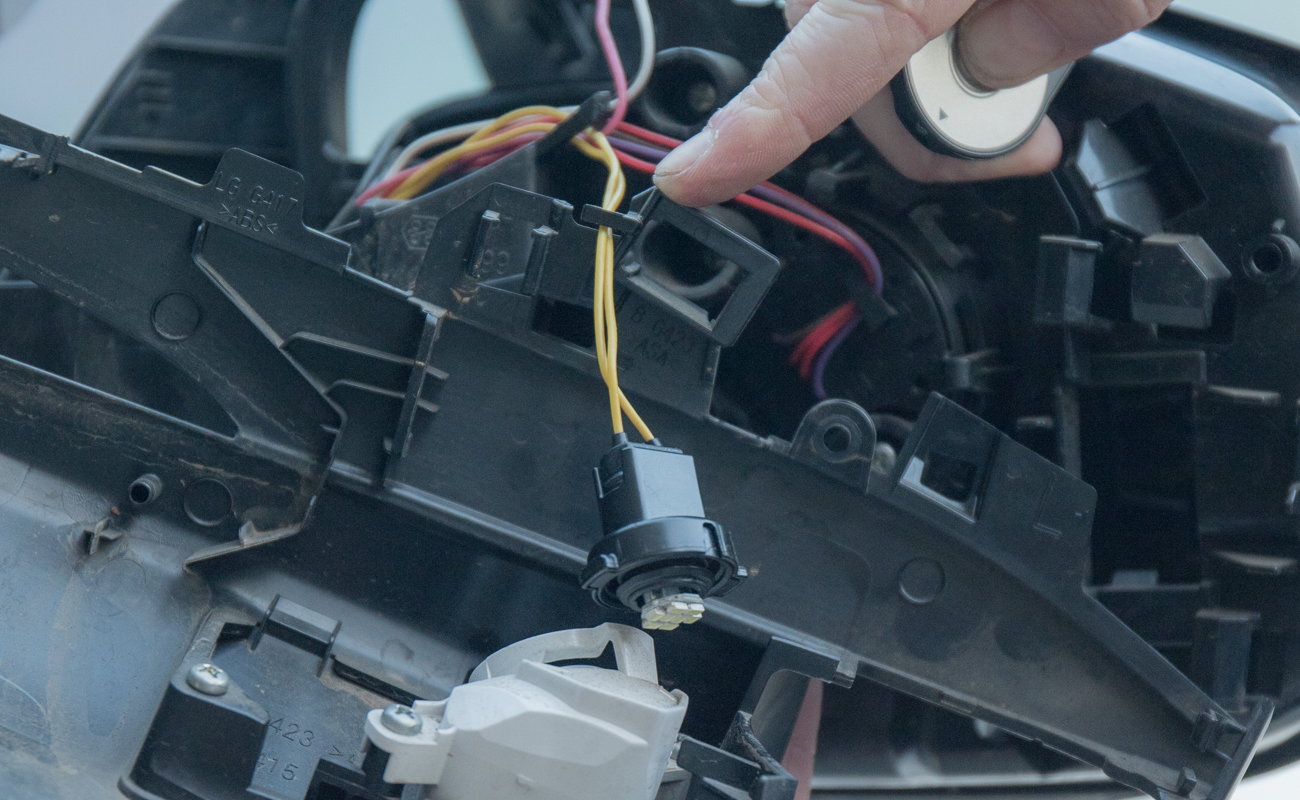
When you are putting everything back together, just make sure to run this yellow wire back to its original location. If you don’t run this wire back in the original location, you will probably be fine. But, it’s always nice to have things back the way they were.
Lock your light fixture back into the light housing. You are now ready to start putting everything back together.
Step #10: Button Up Housing
Start putting your assembly back together. Just make sure to put your turn signal light into place, before you start snapping down the lower black assembly. If you forget, you will need to pull it off again, and then align the turn signal light into place.
Step #11: Attach Mirror
Line up your tabs and watch everything very close. Make sure everything is lined up before pressing down on your glass plate.
Step #12: Firmly Press Mirror Into Place
Once you have everything lined up, press firmly. Everything should snap into place and your bulb swap is complete!
Overview
This light bulb swap was by far the most difficult of the 4Runner lightbulbs so far. As long as you have patience, you will be fine. The look of the side mirror with LEDs is much better than the OEM bulbs.
Thanks for the pointers! Managed to install the new lights with no issues! I’m so glad it wasn’t necessary to remove the mirror.
I say remove the mirror – it’s really not that difficult and you won’t risk snapping the tabs on the painted cover. Warm weather is key – makes everything more pliable. Thanks for the instructions!
I just changed these bulbs in my 2021 TRD off road premium. I definitely did not have to remove the mirror simply snapped the cover colored panel off took out the two screws released the clips for the lower portion of the mirror and worked it off. I was able to do the second mirror in less than 5 minutes. Thanks for all the information.
Anyone know since my 16 4runner didn’t come with mirror turn signal and I bought a paid what is all the stuff I need in order to install it? Thanks in advance.
what kind of bulb does the mirror turn signal lights take 168 or 194? trying to upgrade mine to LED this is for my 2013 sr5 4runner
Just put the Yokim 168 LED in without a problem. Got 10 on Amazon for cheap.
thanks just ordered them for my SUV. hopefully it will be an easy task to take out the mirror apart LOL
Is it possible tp swap the side views with no blinker to ones with a blinker? I have a trail 2016 and they are without blinkers. Is there a adapter preinstalled that will connect to?
you can totally just pop the top off, but be careful.
One small tab broke on each side mirror for me :/
Hi is it noticeable once you out it back on?
Brenan,
Great info on all the light upgrades! I’m getting ready to place an order as result but I have one question before I do. Why do you recommend using the 168/194 T10 “flat bottom” vs the standard 168 like in the license plate holder? Just curious if I missed something?
Thank you!
Steve
Depending on the actual manufacturer of bulb, most T10 “flat bottoms” are going to fit better in that housing. It’s tight for sure. Most 168/194s are technically compatible but they are too long to fit the actual bulb back into the housing.
I got the Yokim 168 LED in there without a problem. Same one I used for license plate, maps, doors, and vanity.
swapped all my bulbs including the mirrors using the revised method, pulling the painted shells. totally easy. 90 minutes all told.
I definitely want to upgrade the side mirror blinker light to LED, but I’d also like to upgrade the puddle lights. Is there is a way to upgrade the side mirror blinker light while I’m upgrading the puddle light.
The side mirror blinker is already a LED. Not sure with other t4r trims though but I’m guessing its only LED or nothing. Mines a 14ltd
I should have read the comments first. I removed the mirror first. I would give it a zero on the
“fun scale” and a 10 on the “nerve racking scale”. After that it was pretty easy and the results are awesome.
There are 4 clips that hold each mirror onto the white base. I ended up breaking 2 of the clips on one mirror and 1 of the clips on the other. Both mirrors are completely functional.
I think my biggest mistake was doing this in winter and out-doors. the plastic was cold and brittle. Definitely heat up the plastic before performing the mirror removal (if you choose to go that way).
Levi, damn, sorry about that man. I just updated the post for that section.
Recently got a 2019 TRD Pro, which doesn’t come with puddle lights or turn signals on the side mirrors. I’m sure I can order them easily, just wondering how difficult it would be to get the signals & lights to work properly?
Great posts and overall an awesome website. I did change the puddle lights and the painted side mirror cap comes off pretty easily by pulling it carefully, so you don’t really need to remove the mirror itself.
Thank you!
Hey Brenan, Great post! (as always)
I see this post was written in Jan of this year, how are these bulbs holding up ?
No complaints yet. I think it was worth it.
Just a tip….you do not have to remove the glass portion of the mirror. I had success pulling on the cap with both of my hands and it came right off. Just pull from the left bottom corner.
if im facing the mirror looking at the back of my mirrors to take it off which is the left side recommended? i just want to make sure i do this right without breaking anything. i even bought those plastic tool removing kit so i can do this right. thanks in advance.
You can grab the edge of the mirror and pull it straight back. There is a very small surface area to grip (maybe 1/2″ or less than). Grab that corner and pull it off. It may feel like you are about to break something but you won’t (hopefully).
David was correct. You don’t have to remove the mirror or mess with the white tab. Simply pop off the painted outer cap, then unscrew the two screws, and follow the rest of the instructions as written.
Good call! No mirror it is, lol.
David, That tab that holds the white surface cap on is pretty tight. To each their own for sure, if it worked for you, awesome. But, I would still pull the glass off. Thanks for the tip.
Which way would you guys pull the tabs?