
Behind-the-Grill LED lightbar Install of the upper top 4Runner grille
After I bought my 5th Gen 4Runner and started diving into the modifications world, I found lighting something easy I could tackle with my limited automotive skills.
As you might already know, some of the most popular mods are the interior courtesy lights, LED high and low beam, and fog lights, but probably the most popular is the “raptor style” grille lights. Well, I did all of the above already in the first few months of ownership and found all very useful with the exception of the grille lights.
I have to admit that I bought the grille lights mainly because they were so popular between 4Runner owners. But after running them for about 6 months, I started to dislike them and I finally got tired and removed them. At that point, I started to think to work on a new light upgrade that would actually be useful.
Behind the Grille – Upper or Lower?
So I did some research online about the installation of a small lightbar behind the grille. The majority of the solutions I found regards the installation of a light bar in the lower portion of the bumper grille (just above the front valance), but what I was looking for was something for the upper portion instead. I found a few options, but none of those totally satisfied me so I decided to work on my own solution.
The first step before deciding which way to go was to take a measurement of the space available behind the upper grille (more details on these later); after that, I went online looking to buy something that would fit that space.
After a lot of browsing and research, I found the perfect (at least for my needs) solution: a 25” long, white/amber single row dual LED lightbar.
The Lightbar

I’m not a lightbar expert by any means and I wasn’t ready to spend hundreds of dollars on some of the most famous brands when I wasn’t even sure I could make this project work, so I chose to give this lightbar a try.
Find It Online
- Off-Road Behind-The-Grill Lightbar: Check Price
I liked the fact that it’s a dual lightbar with a separate switch for each light and the reviews were mostly positive. Plus, according to one of the reviews, it looks like it’s made at the same manufacturing facility used by ExtremeLED (a more well-known brand).
Specs + Features

The white LEDs at the center function as a spot beam pattern and throw light quite far; the amber LEDs on both sides function as a flood pattern.
The main specifications according to the seller are:
- 9600-Lumen
- Cree 5w Chips
- Aluminum Housing
- Stainless Steel Brackets
- Waterproof IP68
Looks good on the paper and I’m okay with a generic brand. It checked all the boxes for me.
The lightbar arrived well packaged, with the mounting hardware included, a wiring harness (pre-wired), and a control switch. The quality is decent and the construction seems solid. The wiring harness is quite long and it includes two relays and one add-a-fuse. The switch has two buttons to control the amber and white lights independently.
I never saw an ExtremeLED lightbar in person, but looking at the pictures online, they really seem the same item with the exception of the logo. The only defect I found in mine is that all the LED covers are lightly scuffed and a bit opaque. Not ideal, but not a deal-breaker either since it’s barely noticeable unless you’re looking very closely.
Additional Parts Needed

In addition to the standard brackets provided and in order to fit the lightbar properly, I had to use some additional hardware.
The main goal here is to gain at least 1.25-1.5” horizontally (away from the grille) and 0.5” inches vertically (upwards) so that once mounted the lightbar will be perfectly positioned behind the upper grill, without any cutting or additional drilling required.
In my case, I found that 2” brackets (holes 1.25” apart) and 0.5” spacers worked just fine. Also, make sure to prepare additional screws, washers and nuts beforehand to hold everything together.
Behind Upper Grille Light Bar Install
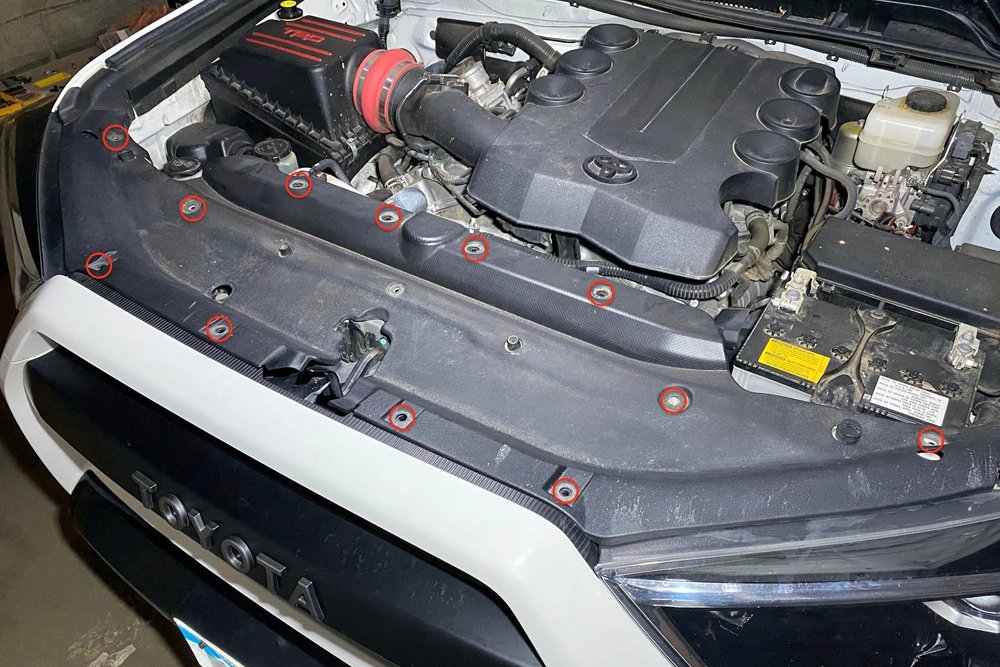
The first thing to do is to pop the hood and remove the plastic cover by pushing and popping out all the clips that hold it in place (circled in red above).
Step 1. Access Backside of Upper Grille + Build Custom Brackets

Once the cover is removed, you will have direct access to the backside of the upper grille; no need to take the whole bumper down!
Now, take a closer look at that area and you will find two holes at both sides of big metal support (pointed by the arrow below). These holes will be the 2 mounting points of your brackets.
Next, we need to build the custom brackets. You can find my final solution pictured above. Again, the goal here is to push back and raise the lightbar’s mounting points. Feel free to experiment with different bracket sizes as you might find a configuration that works better for you.
Note: While not pretty, this configuration works well for the time being. In the future, I’m planning to have someone fabricate better brackets to have a cleaner and more robust support.
Step 2. Loosely Tighten Brackets & Install Onto Grille

Once you have the brackets assembled, loosely tighten them and install both brackets at each side of the metal grille support mentioned above, so that you will be free to adjust them while inserting the lightbar.
With the lightbar in place, adjust the brackets’ position as needed. You will need to fiddle back and forth a little since the fit will be very tight.
While inserting the lightbar behind the grille, be careful to not scratch the lenses! Once satisfied, screw the lightbar to the brackets and then tighten all the other screws down.
Finished Look

If everything went smoothly and fits well, this is what it should look like from the front of the 4Runner. Good job!
Wiring
Congratulations, you completed the most difficult part and got the lightbar in place. Now it’s time to connect all the wires and run the control switch to the cabin. Since the wiring harness is quite bulky, I recommend having it in place and secured with zip-ties.
Step 3. Locate Two Mounting Holes For Relays

If you look just next to the battery and the fuse box, you will notice there are two mounting holes already threaded. I believe I have seen some company selling a custom made bracket to fit in that space but for the time being, all I needed was just to mount the two relays.
Step 4. Use Small L Bracket For Fender + Relays

I looked into my spare hardware box and I found a small L bracket that looked perfect for this. I mounted the short side to the fender and I used the long side as the mounting point for the relays.
Step 5. Connect Wiring Harness To Switch

With the relays in place, the next step is to connect the wiring harness to the switch. Simply remove the rubber grommet on the firewall, fish the switch cable from the cabin, then connect it to the harness.
Step 6. Mount Switch Anywhere Inside Cabin

Inside the cabin, mount the switch wherever you prefer.
For now, I just attached it to the left side of the steering wheel (under the other factory switches). The switch itself is a bit flimsy, but it works fine. I think that eventually, I will replace it with a Toyota OEM-style switch for a cleaner look.

Step 7. Lastly, Connect (-) Cable To Ground Cable and (+) To Battery

To conclude, get back under the hood and connect the negative cable to the ground and then connect the positive cable to the battery.
Do a quick test to make sure everything works as expected and then zip-tie the loose cables. All done!
Final Results


This is my first lightbar so I have no way to compare it to other brands. From what I can see it works well enough for me and I really like the way it looks behind the grille, both when it is off and on.
Here are some pictures for you to judge. This was definitely a fun project to do and I would recommend it to anyone. If you have any questions you can find me here in the comments below or on Instagram @the_runn4r. Thank you for reading!
Looks great! I have a 2020 SR5 with the forward collision panel in the lower position…any suggestions on how to straddle the “black box” for lower lights? OEM switches in the center console to control the different lights-who carries these as an aftermarket direct fit?
Not sure what are you asking, do you want to install lights in the lower part of the grille?
The outside looks good but:
The switch it came with looks like a cheap afterthought.
Hi David, the light output is great, considering this is a cheap lightbar, especially when using the spot lights. The floods are a bit more weak. I recently swapped lenses to make them all spot!
And yes you can wire it to a OEM style switch.
Looks great! Where did you get the brackets and other parts needed to make your custom brackets?. Do you have a parts list? I would love to recreate this!
Curious about this too??
Hey Ivan and Brandon, sorry for the late reply. The lightbar came with brackets already and for the rest I just uses some spare nuts and bolts I had laying around.
Wondering if you ever put in the OEM style switch? And if so, did you wire it so that there are separate switches for the yellow and white? Trying to figure that out at the moment. Thanks!
Hi Jeff,
I bought the OEM style switch with 2 buttons but I didn’t wire it yet. I have a front bumper coming soon and will mount another dual light bar. My idea is to use a single dual switch to control both.
great job and thanks for sharing! I have a 2012 trail (pre face lift) and am looking to finally do a light bar…do you know what is the maximum length if going with lower light bar install? Thx in advance!
Do you mean the lower grill? I’m not sure on your model… but you can easily measure yourself!
Can this be wired so amber lights work with parking and directional signals??????
Mike, the light bar comes pre wired and you can only control both amber at the same time. I’m not an expert so I can’t really tell you if it’s doable or not! You might be better off with individual lights.
Having read this may be a dumb question but here goes. Wondering if you think it would be remotely doable to run harness to my Spod?
I don’t own an Spod but I really think it should be doable, that’s what it’s made for!
Looks great! I like that it has white and amber lights. What was it about the lower grill lights that were bothering you? I’m finally ready for a light bar and I’m trying to decide between lower or upper grill.
Hi Katie,
Sorry maybe I didn’t express myself properly but I was referring to the raptor lights I had previously installed.
I got tired of those because they were useless and also because I could see them in many other 4Runners.
I much prefer now having the light bar so I can actually use it in poor visibility conditions.
Regarding your decision between lower or upper I would consider a couple of things:
• upper: very little space to work with, less “off the shelf” products
• lower: more space to work with, ability to install a bigger light bar (or 2!) custom brackets available to purchase. One con would maybe be that if you plan su install a aftermarket bumper that might obstruct the light output
Good luck!
Looks good! The only thing I would suggest doing is rotating the bracket for the relays to be vertical to mitigate water collecting in the terminals. Do you have any output shots in the night?
Hi Nick, thank you for the suggestion!
I don’t have much to show when using the light bar at night (due to the stay-at-home order I haven’t done much).
Here is a shot of the amber lights at night.