
Kenwood DNR876S Headunit Installation and Feature Overview For the 5th Gen Limited Edition 4Runner
Technology is constantly evolving, particularly when it comes to vehicle entertainment and its overall integration with the vehicle and interfacing with the user.
Practically everyone has a smartphone and the term infotainment is now used to describe the integration of information and entertainment in a vehicle today.
Unfortunately, Toyota seems to be behind the technology curve when compared to other auto manufacturers with its proprietary Entune system.
Most people I know do not use its features due to its difficult interface, operational issues, and they just rather use the functions on their phones.
Adding Improved Functionality Compared to Toyota’s OEM JBL/Nav System
For 2020, the 4Runners are finally getting CarPlay and Android Audio, but the underlying system will still be Entune and will require a wired connection with your phone.
I decided it was time for an upgrade as I have wanted better integration with my phone with CarPlay and due to my Entune JBL system continuing to lock up randomly.
CarPlay and Android Auto are now available on the 2020 models with 8” screens, but upgrading to a 2020 model for these and a few other minor upgrades did not make financial sense to me.
Neither does trying to buy a 2020 JBL NAV headunit to possibly fit into my 2014 when even the existing JBL NAV units are $4000-$5000. And you still have Entune.
You also have other options out there, like the Android T8 Head Unit and even the upgraded T9 Head Unit, but ultimately, I decided on the Kenwood for a number of reasons.
Why I Choose the Kenwood DNR876S Headunit
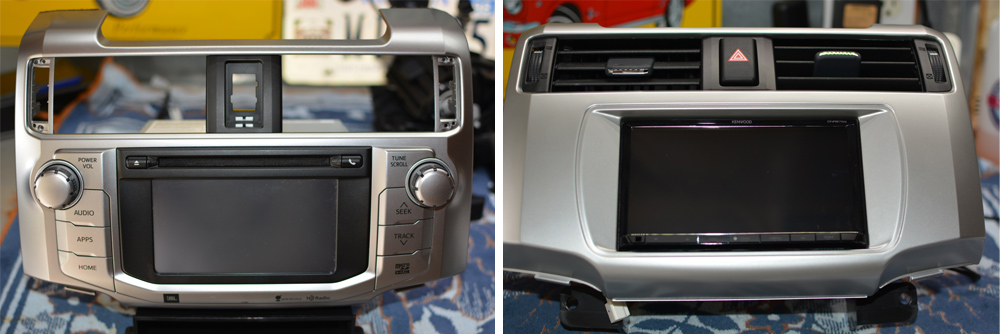
I decided to go ahead and go aftermarket with a Kenwood DNR876S.
However, I want to maintain the OEM JBL amps and speakers as the system sounds good enough for me and the new head unit would probably offer some improvement. However, if you are looking to take it a step further, you could go with aftermarket speaker upgrade options like the “4Runner speaker only upgrade” package from OEM Audio Plus.
This is the first aftermarket head unit installs I have done in over 20 years as the days of installing all-out audio systems are far behind me. The unit is at the higher end cost-wise with a price of $1200 but offers a lot of functionality and improvements over the JBL system with only a few minor negatives.
I will not concentrate too much on the specific details of the installation as this is the same as any aftermarket head unit installation found with a search on the internet and is described in available instructions, but I will provide more details of the functions offered by using a Kenwood, or other Maestro compatible, head unit with a 5th Gen 4Runner. This information is not readily available or clear.
Unit Features and Parts for Install
Beyond the normal radio functions, Bluetooth, sound adjustability, Sirius XM radio compatibility, and graphics-intensive interface seen in today’s head units, the DNR876S also offers the following:
- 6.95” screen (versus 6” OEM screen)
- Wireless connectivity for CarPlay and Android Auto
- No DVD/CD drive (I don’t use it and something else broke potentially causing other problems with the head unit)
- HD Radio (which I do use)
- Garmin navigation
- Works with OEM backup camera
- iDatalink Maestro compatibility where the unit displays vehicle performance data such as tire pressures, temps, and other data normally accessible through the OBDII port using a device like Scan Gauge for the 4Runner.
- Access to some vehicle settings that normally require a trip to the dealer or a laptop with Techstream connected to OBDII port.
I will provide more information and screenshots of the last two in later sections.
I ordered my unit through Crutchfield as the price for the DNR876S was about the same as anywhere else. You can get pretty much everything else on Amazon.
Parts for Installation
- Kenwood DNR876S: Check Price
- iDatalink Maestro ADS-MRR – the centerpiece and brain for integrating the head unit to the vehicle for steering wheel controls, OEM JBL amps/speakers, vehicle info and settings: Check Price
- iDatalink HRN-RR-TO2 – wiring harness to connect the MRR above to the OEM wiring harnesses and Kenwood Headunit: Check Price
- iDatalink ACC-SAT-TO2 – connects and allows the use of OEM GPS and XM antennas with Kenwood head unit: Check Price
- Metra 40-LX11 Antenna Adapter – connects OEM antenna cable to Kenwood head unit: Check Price
- Metra AX-TOYUSB – connect Kenwood head unit to the OEM USB port at the bottom of the center stack: Check Price
- Scosche TA2106B Silver Dash Kit – mount the Kenwood headunit into the dash: Check Price
Crutchfield also includes their MasterSheet Installation instructions with installation instructions and wiring diagrams. The above parts are also the same needed for those with 2014+ models with the base audio system or Premium Entune with Nav. For those with 2010 – 2013 models, the harnesses for the USB port and iDatalink Maestro are different part numbers.
I also ordered the Sirius XM SXV300V1 Tuner as I use XM service and it was free after the mail-in rebate.
Kenwood INSTALLATION

Step 1. Flash Maestro Unit For Your Vehicle

The first step for the installation is to flash the Maestro unit for your particular vehicle.
iDatalink has made this straightforward. Using a computer with a USB port, you simply plug the Maestro unit into the computer using the supplied USB cable.
You go to their website, create an account, and the system will connect to the Maestro unit.
Next, you will be walked through the steps of selecting your vehicle, the type of OEM system you have, and then the features.
Step 2. Connect Maestro & Kenwood Harness

I decided to use Crutchfield’s ReadyHarness Service where they connect the various Maestro harnesses to the Kenwood harness specifically for your vehicle.
This saves A LOT of time determining which harnesses to use and connecting wires. Plus it is neater than I would have done.
Step 3. Remove OEM Headunit, Heater Controls & Disconnect Wiring
Removing the OEM head unit is very straightforward.
Simply pull off the two vertical trim pieces on either side of the heater controls. Then pull off the heater controls and disconnect the wire. Then remove the 4 10mm bolts located below the radio and pull off the radio along with the surrounding trim piece.
The HVAC vents, vent controls, and pocket piece below the OEM clock are removed from the OEM dash bezel with a few Philips screws while the hazard light switch simply pops out.
The HVAC pieces and pocket are secured into the Scosche bezel using the OEM screws and the hazard lights switch pops right in. The Kenwood head unit is secured to the bezel using the brackets and hardware supplied with the bezel.
I set the depth of the head unit where the top and sides were flush with the opening in the bezel. This particular head unit has hard buttons along the bottom protruding further out than the rest of the front face.
The harness connections were made to the head unit.
Step 4. Connect Maestro Assembly & Place Into Dash Cavity

All the wiring can be intimidating; however, the connections are rather straightforward with each connector for the Maestro module and the truck being different and preventing screw-ups. The only two connectors that are common are the GPS antenna and XM antenna.
These can be mixed up, which I did initially. Everything gets plugged together until there are no connectors left. The assembly is then placed into the dash cavity.
There is enough space for all the wiring, but I pushed the Maestro module off to the side of the head unit to help as there is empty space to the left and right of the head unit in the dash.
Step 5. Find & Secure a Location For the Microphone
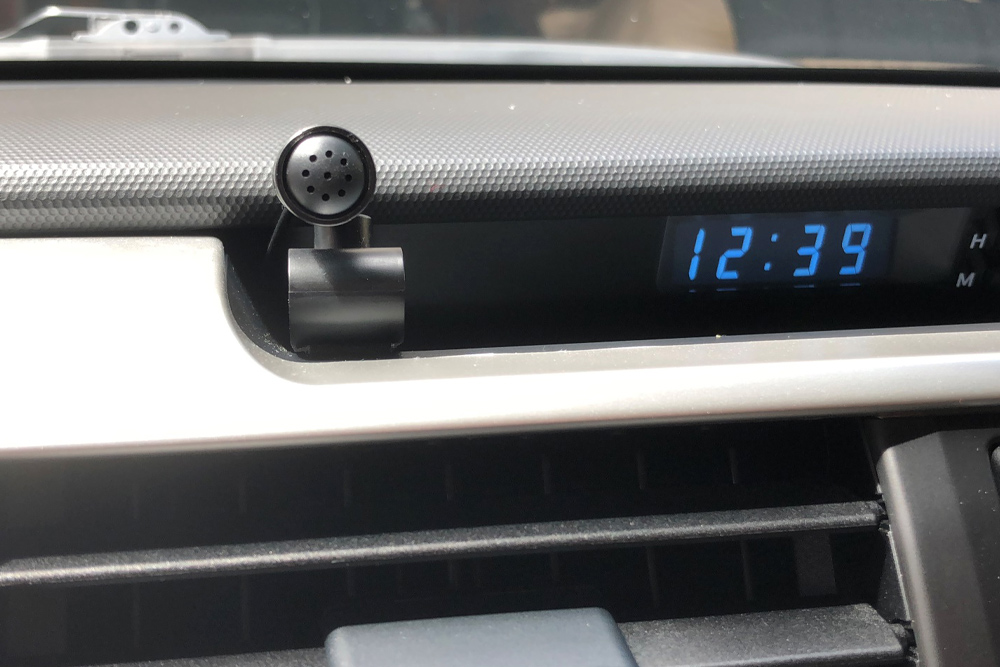
The one OEM item that cannot be used is the microphone.
You have to use the microphone supplied with the Kenwood. I placed mine on the left side of the pocket where the OEM clock is for a central location for both driver and passenger.
Step 6. Route USB To Blank Switch Opening (Optional)
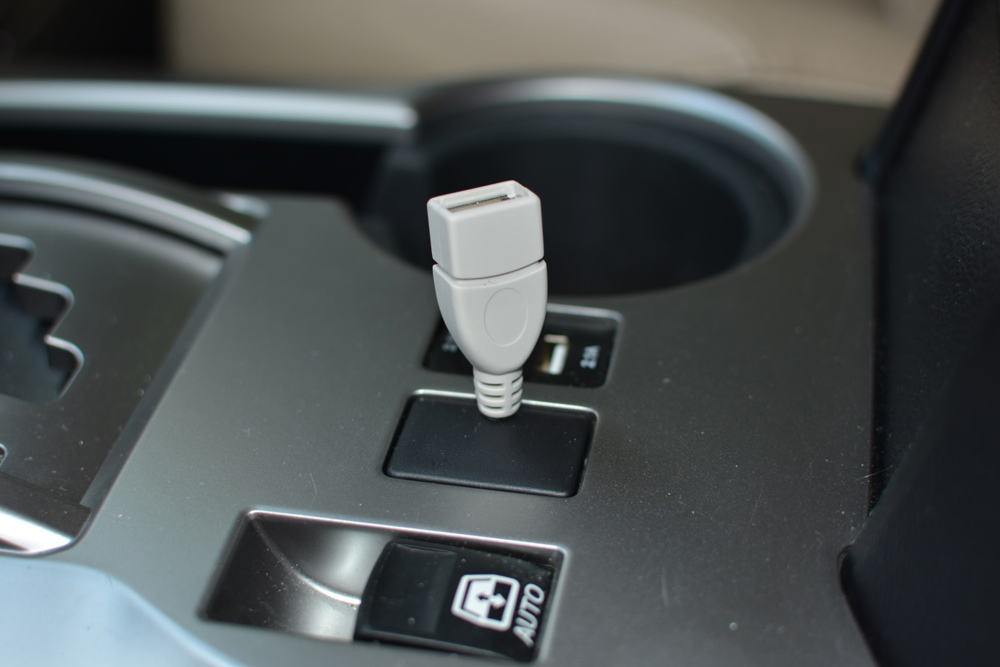
I decided to go ahead and route the second USB connection from the Kenwood to a blank switch opening I had in the center console for connection of another device if I ever wanted to.
The OEM USB connector at the bottom of the dash is connected to the first USB connector of the Kenwood and used for wired CarPlay if desired.
Sound and Overall Impressions

After having the new head unit for several weeks, I am very happy with the new head unit!
All the customization for personal tastes and usability is great and easy to perform. The color of the bottom hard buttons can be adjusted to match any OEM dash color and dim with the dash lights. Setting up everything to your liking can take some time due to the many options for sound and visual features. With the various adjustments for the sound, especially the 13-band EQ, the sound is noticeably improved even with the OEM JBL amps and speakers, especially the highs.
Wireless CarPlay works without any issues, both wired and wireless. I cannot comment on Android Auto however as I do not have an Android phone.
When you put the vehicle in reverse the OEM backup camera works as intended.
The unit has a hard button at the bottom right (CAM button seen in the picture) where you can turn the camera on at any time. The Kenwood adds parking guidelines just like the OEM system, but they are completely adjustable and move with the turning of the steering wheel instead of being fixed like OEM.

Steering Wheel Control Functions

The Maestro setup offers complete programming for the steering wheel controls.
Each button can have up to two functions. One function as a result of a normal button press and the other function result of push and hold. You can choose all the functions during the initial programming of the Maestro module. I have had zero issues with any of the steering wheel controls.
All have been working as programmed and consistently.
Vehicle Performance Data and Information

The Maestro module comes with an OBDII connector for connection to the 4Runner’s OBDII port.
Kenwood head units then have built-in functions to access vehicle performance data and vehicle settings. The performance data are various temperatures (yes, including transmission temperature), volts, MPG and other trip type data, distance to empty engine load, etc.
There are two screens with gauges where each gauge can be set to show the desired data. Simply push and hold on the gauge to bring up the list of available data to choose from.

Tire pressures have their own dedicated screen to display all four tire pressures.
Each TPMS sensor can be programmed to the actual position on the truck by running a setup where the air is let out of every tire one at a time in the order shown on the headunit screen and the system recognizes the drop in pressure for that location and assigns the appropriate TPMS sensor reading.
This screen also shows door and hood ajar information as shown by the yellow driver’s door.
Vehicle Settings

This capability was pleasantly surprising.
Most of you probably know there are vehicle settings that can be changed, but usually requires going to the dealer or using your own laptop with a “version” (wink wink) of Techstream to connect to the OBDII port to access the 4Runner’s computer.
The Kenwood head unit allows direct access to these settings at any time.
This is very convenient for adjustments. You can see in the pictures below the descriptions appear to be cut off, but pressing the arrow next to the words will make it begin to scroll and show the entire description.
Final Thoughts

I am very happy so far with the new head unit, especially with the sound quality and the many options for the steering wheel controls.
Pros:
- Complete compatibility with the JBL amps and speakers
- Wireless and wired CarPlay And Android Auto
- Improved sound quality with many more adjustments and options for fine-tuning.
- A large amount of control using the steering wheel controls
- Easy access to vehicle performance data and settings (other brands have these functions also)
- No more Entune! LOL
- Garmin NAV
Cons as nothing is perfect (all minor though in my opinion):
- Cannot use the OEM microphone and have to install the supplied microphone. Though it may be able to find the right wires for the OEM microphone and cut/splice, I’m not interested in doing this
- Programming of the steering wheel controls does not have the option to move through preset stations (XM and normal radio) only. The only option is to Scan up or Down for the next available station, preset or not.
- I used the built-in maintenance reminders in the OEM JBL radio and thus lost this option. Now I just use a phone app to help with reminders.
- The compass in the OEM center information display in the dash no longer appears due to the removal of the JBL head unit. However, the Kenwood unit as a compass “widget” which displays direction.
- Scosche trim piece has two locations along with the edge meeting up with the OEM pocket piece below the OEM clock that is rough due to poor trimming of the mold gates (locations where the plastic is injected into the actual part during the molding process). See the provided images on the post. However, these are not really visible from the seating position due to the angle of the pocket.
Hopefully, this write-up can provide some information to what is available to 5th Gen 4Runner owners in terms of aftermarket radios and available integration with our trucks.
It is impossible to cover all the various options and settings in this write-up, but if anyone has any questions please post them in the comments section and I will try and answer them.
I just had one installed and my ac/heat aren’t working. The climate control buttons all work and the air blows through the vents, but it’s hot air regardless of the settings. Checked all the fuses, reset the cars computer, and still no luck. 2014 Camaro. Any suggestions?
I installed the KENWOOD DNR876S with the Miastro system and it worked great for a month or so. Now I get a error I speaker wiring, check connections message. I’ve reconnected several times and it may work once and then same message comes up. Any ideas?
By installation KENWOOD DNR876S HEAD UNIT On SR5 4runner would performance data be also visible?
Thanks for the writeup, this looks great and I’m just about to do the same install this weekend.
I’m going through the same install. My concern is with going from 6 panel clips and 4 10mm bolts on oem to just 4 panel clips for the after market dash unit. I was looking at the oem metal bracket with the 4 10mm bolts and was wondering if that could be used on the after maker setup to better support the weight when off roading.
I’m having the same concerns. Did you ever find a work around?
I thought about modifying the oem mounts but just left it as is. 6 hard off-road trips later and it seems fine. The tip has some movement if I push on it but it doesn’t seem to rattle while hitting hard terrain.
I ended up buying some galvanized pipe hanging straps and modifying them so that the attached to the side of the head unit and then folded around to the front oem bolt points. Doesn’t look pretty, but that sucker ain’t moving. Thanks for the info!
I should clarify, that it’s all behind the molding, so you can’t see it with the trim reassembled. Seem to work great.
*top has some movement. I went with the kenwood with a drive DNX996XR.
I haven’t had any issues with my original install. However I haven’t been off-roading much. Also the headunit I installed is lighter than the OEM unit and has less depth (less leverage) as it does not have any type of disc drive.
Any suggestions for an alternative for the built-in maintenance app that we loose with an aftermarket stereo?
I now just use an app on my phone with reminders and to track fill ups and thus mileage
I had my KENWOOD and maestro installed in my 2019 4Runner and it won’t display the tire pressure or check any engine parameters or diagnostics. Gauges all work. Initially I thought my 4Runner was too simple and didn’t support these functions. Should I go back to the shop and get them to fix it?
Make sure the OBD plug is connected to the OBD port under the dash. Assuming it is, on the Kenwood headunit, go into setup -> AV -> OEM setup -> choose verify vehicle PIDs. The system will scan the OBD and find the information available to display using the gauges built into the Kenwood headunit.
I recently hooked my Kenwood up with the idatalink, but the reverse camera doesnt automatically come on when reverse is engaged. I see theres a reverse wire that comes out of the back of the radio itself, but I see no availablle/relatable wires to connect it to.
The Kenwood reverse wire is purple/white. In the picture of wiring harness above you can see it is connected to the Maestro harness that connects to OEM plug. The Maestro harness also uses same color purple/white wire.
There’s a purple and white wire from the radio harness to the Maestro harness, but my reverse camera will only come on if I manually press the camera button on the radio, and not when reverse is engaged.
I was wondering if the single reverse wire coming from the back of the radio itself, next to the parking break wire, was possibly causing it not to engage since it’s not wired to anything.
The reverse wire From radio should be connected to maestro harness which in turn connects to oem harness. Make sure there is a wire in oem harness at the pin location of the maestro harness. I am assuming you have an oem camera. If not then the oem harness may not have a reverse wire.
In step 4 of your write up, there is a big black connector in the bottom right of the picture with a single pink/purple cable leading to a smaller white plug on the harness. What did you plug the black cable into? I am trying to install the DNX996XR into my 2019 TRD Pro, but I have no idea where this black plug is supposed to be connected. All of the plugs have been used except for that one. Also I am not getting any audio sound from any source or even the radios beeps. Any insight into what the black plug is for, and where it is plugged into?
That plug is the OBD connector that plugs into the OBDII port under the dash to provide the vehicle performance data (trans temp, water temp, volts, etc.) to the Maestro unit. It has nothing to do with the audio of the system. I suggest double checking your connections and also the programming of the Maestro unit. Make sure the Maestro unit is also working OK when you turn the system on. It has an LED on the module. Look in Maestro documentation to determine the operating state of the module based on the LED illumination.
Great info Michael –
Have you or anyone seen these as an alternative ?–
https://www.youtube.com/watch?v=hRn_SJNKwW4
Thanks
A quick update on my install…….
1. I have had an issue where I would loose sound on occasion at random times even though the source is still playing. The only way to get sound back is to turn the truck off and restart. At least one other person with 2016 Limited is having same issue. It appears the JBL amp is shutting down for some reason. The issue is related to the Maestro RR unit. I am working with iDatalink Techs and Engineers on a solution. They have been sending me firmware updates to resolve. I am sure once we get it resolved, the changes will make it into the next public firmware update for the Maestro RR. Their support is phenomenal.
2. I have moved the Kenwood microphone off the dash and into the OEM location in the overhead console. A member of 4runner forum created a mount design for Kenwood microphones in the OEM location. I had the mount 3D printed at my local library for whopping $0.40 and fits great. I have not tested the new location with a phone call yet however. If anyone pursues this, I suggest leaving the OEM microphone plugged in as removing it completely will result in the red LED next to the SOS button to stay on anytime the truck is running. I simply ziptied the OEM microphone to the wiring harness and left it plugged in.
Thanks for the write up, this really helped me figure out what I wanted to do for upgrading my head unit. I went with the Kenwood DMX906s, very similar to yours, but without built in NAV. The speakers do sound clearer, but I have noticed that the JBL sub in my 2014 Limited doesn’t seem to put out like it did with the Entune system. When turning up the base on the Entune system I always noticed the sub getting loader and now it seems that turning up the base just increases the base on all of the speakers. Have you noticed this with your setup or do you have any suggestions to isolate the sub more? Love your website as well.
I noticed a very slight drop in sub output. But I made some adjustments in audio settings to compensate. As you also have a Kenwood, you should have the same options. In speaker setup I entered the actual speaker sizes and chose SUV for car type. I used the EQ to boost the bass some. At bottom of EQ page, Bass EXT” is ON, “SW Level” is 0. On Sound Effect page I set Bass Boost to 1, Loudness to Low, Space Enhancer to Small, Realizer to 1, and Supreme to ON. Everything else is OFF on this page.
Thank you for taking time to respond to my question. I tried your suggestions and it sounds much better now.
Glad I could help!
Very cool functionality, however, I wish it was bigger screen as there seems to be a lot of wasted space. I think I’m waiting to see how the 2020 4Runner radio update will go before changing factory head unit.
It does seem to be waste of space, but it is a standard double DIN size. The only other options I am aware of for larger screen is an Alpine Halo (which will block some of the center vents), the T8 or T9 units referenced in the article, or possibly 2020 headunit (which retrofit is unknown at this time). The 2020 head unit will also be expensive, the JBL verision should be around $5k as the existing JBL headunit is. Not sure about non-Jbl headunit. And you will still have to plug in your phone for CarPlay and Android Auto.
Wow that is a HUGE improvement over stock! I really like the OBDII integration as well.
I’m not sure how the TMPS work. Are you using the stock ones?
Also I wish the dash replacement came in black as well.
Yes I am using the stock TPMS, but it will work with any TPMS programmed to the truck. The radio pulls the information from the OBDII port and thus the ECU. The radio has a programming mode where you let some air out of each tire in a specific order to program the location into the radio. The radio tells you which tire to let air out. Once a location is verified, the truck’s horn will blow. Then you move on to the next tire. Obviously you need to do this where air is available to fill the tires back up. And the setup would have to be done after a tire rotation.
This is really cool, thank you. Which other unit models did you consider before purchasing this?
I only looked at Kenwood units with wireless CarPlay. I didn’t want to have to always take my phone out of my pocket and connect it to the USB port.
This looks epic! Thank you for the post. I have been desperately waiting for a better option than the T8-T9.
My question is….is this also doable on a non-premium 5th Gen model. (Standard SR5?)
Cheers!
Yes all this should be possible on SR5. Easiest way to see options is go to Crutchfield’s website, put in your vehicle information. The information provided should include what works and any potential limitations.
You would need to use the GPS antenna provided with the headunit (assuming you purchase one with nav capability), which can be easily mounted in the dash behind the headunit. And you would need to use an aftermarket XM antenna, again assuming you want this functionality. Actually…..I think yours has a XM antenna so you can use that.