
Autoease Power Liftgate Product Review & Install: Autoease’s Electric Powered Liftgate for 5th Gen 4Runner
When building out your rig, the hardest part might be where to start:
- Install a lift kit?
- Wheels and tires?
- Armor up with skid plates?
- Compressor under the hood?
- Dual battery?
- What about a winch?
While that intro isn’t exactly the point of this article, you can read more about where to get started under our complete overview of 4Runner Mods 1.
Let’s get one thing straight; if you’re reading articles on this page, you likely own a 4Runner and by default, that makes you tough as nails.
However, if you use your rig as the family caravan, a grocery-getter, or you’ve added rear accessories like a Gobi ladder, the liftgate can get pretty heavy.
You could simply upgrade the gas struts for a set that performs better with increased weight, or you can do what we did; go full-on lux-mode and power up your 4Runners rear liftgate!
PRODUCTS, PRICES & FEATURES
AutoEase Power Liftgate for Toyota 4Runner ($650)
The base kit comes with push buttons for both the liftgate and one that fits into a dashboard blank, all the necessary brackets, and electric power struts, all of the required wiring harnesses, and the brains behind it all, the control module.
For an additional $69, you can upgrade the kit by adding a foot sensor underneath the rear bumper.
Right now, AutoEase is offering a group buy for the 5th generation 4Runners where the kit comes with everything including the rear foot sensor, plus free shipping for $599 flat.
Power Liftgate Kit Step-By-Step Install
- Remove/loosen the Interior Panels
- Prop Liftgate & Replace Struts w/ New Power Struts
- Tap Into Can Wires, Insert Fuse Tap & In-Dash Button
- Fish Wires from Front to Back
- Drill Hole for Rear Liftgate Button & Fish Wires Through Liftgate
- Tap Into Existing Control Box & Connect All Wires
- Shut Gate & Test Height
- Zip Tie & Reassemble All Interior Panels
Lucky for you, we were more or less the Guinea pig for this kit!
AutoEase includes instructions in the kit, but some of the pictures reference a Toyota Rav4, which is similar, but the wiring locations you’ll need to tap into and how to fish the wires vary quite a bit.
On a DIY scale from 1 – 10, this kit was a solid 8 for us. One of the things that made the installation challenging for us were the instructions. If you need another perspective on running wires here, check out this reverse light mod installation step by step write-up.
We also picked one of the hottest days in Philadelphia history to do it and obviously, our 4Runner is black which added to the heat. We spent a fair amount of time trying to run the wires through the liftgate with a not-so-great wire fishing tool.
Having been a bit more prepared, saving the project for a cooler day and using a flatter wiring fish, it would have been more like a 6 on the DIY scale.
Just don’t go into this underestimating the work needed to fish the wires through the gate. We considered rolling the truck off a cliff a few times during this step alone!
TOOLS NEEDED
- The flattest but sturdiest wire fish you can find! – Check Price
- String or electrical polyline – Check Price
- Interior panel removal tool – Check Price
- Automotive grease of your choice
- 8mm hex/Allen key
- 10mm socket and wrench
- Electrical tape
- Plenty of wire zip ties
- Flathead screwdriver
- Philips head screwdriver
- 12” – 15” of an electrical loom roll – Check Price
- OE Toyota touch-up paint – Check Price
PARTS INCLUDED W/KIT
- Electric power struts (x2)
- Upper strut brackets (x2)
- Lower ball studs brackets and washers (x2)
- Control box (x1)
- Power cable with fuse tap (x1)
- Lock assembly (x1)
- CANbus cable (x1)
- In-dash button (x1)
- In-dash button cable (x1)
- Rear liftgate button (x1)
- “Buzzer” (x1)
- 8mm hex/Allen screws (x4)
- Zip ties
- Double-sided tape
- Hole saw bit
STEP 1: REMOVE/LOOSEN INTERIOR PANELS

Starting with the tailgate panel, use your plastic panel remover, gently prying from the bottom towards the left and right sides.
There are a series of clips along the bottom, but none on the top as the panel’s rear window interior seal sits on a liftgate ledge. The panel may fall, but the liftgate lights will still be plugged in preventing it from falling completely.
Remove the left light harness and then the right (both have a right-side harness entry).
Place the liftgate panel out of the way as you won’t replace it until the very end of this install.
Now, start loosening the left corner interior panels but note that it’s not necessary to remove them completely as you’ll only be fishing wires through this section.
Note: If you have Rago’s modular storage panels like our rig, it’s necessary to remove the driver’s side completely.
Once that panel was removed, flip up the tab on the left factory cargo tie-down and removed the 10mm bolt.
Using your plastic panel remover, locate the circle tab in the center of the left “hump”. Remove the tab, set aside with the rest of the factory hardware you’ve already removed, and remove the bolt using the screwdriver (P3 head if you have it).
Remove the two upper circle tabs and screws, as well as the jack stand door (it comes in handy later when fishing wires to have this door off altogether).
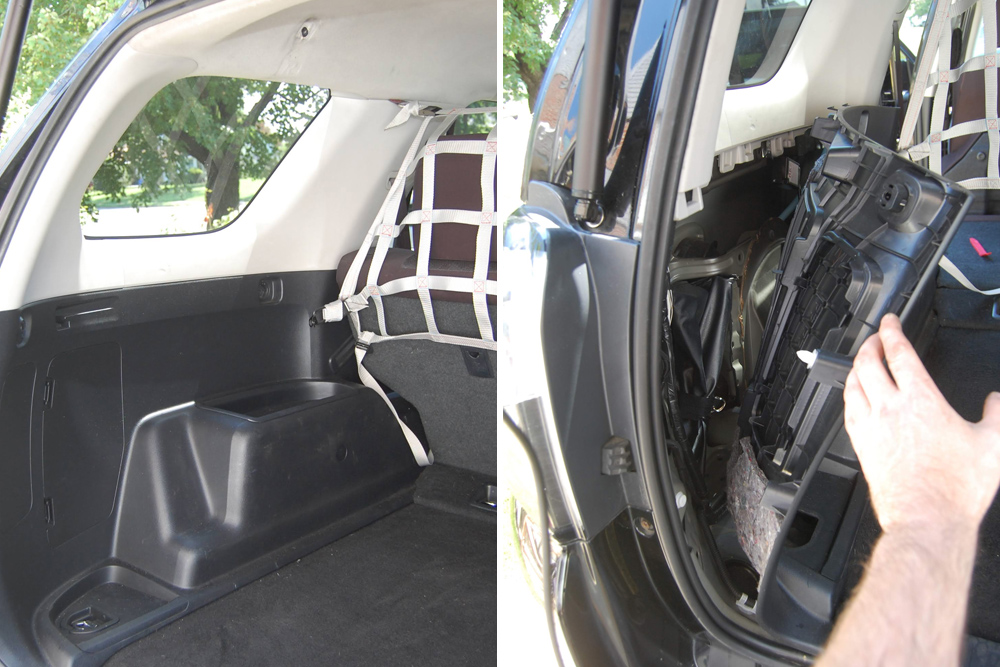
Using the plastic panel remover, slowly go from left to right prying the lower panel away from the upper panel. Again, this doesn’t need to be removed altogether; you just need enough space to fish your wires through and zip tie to points as you see fit.
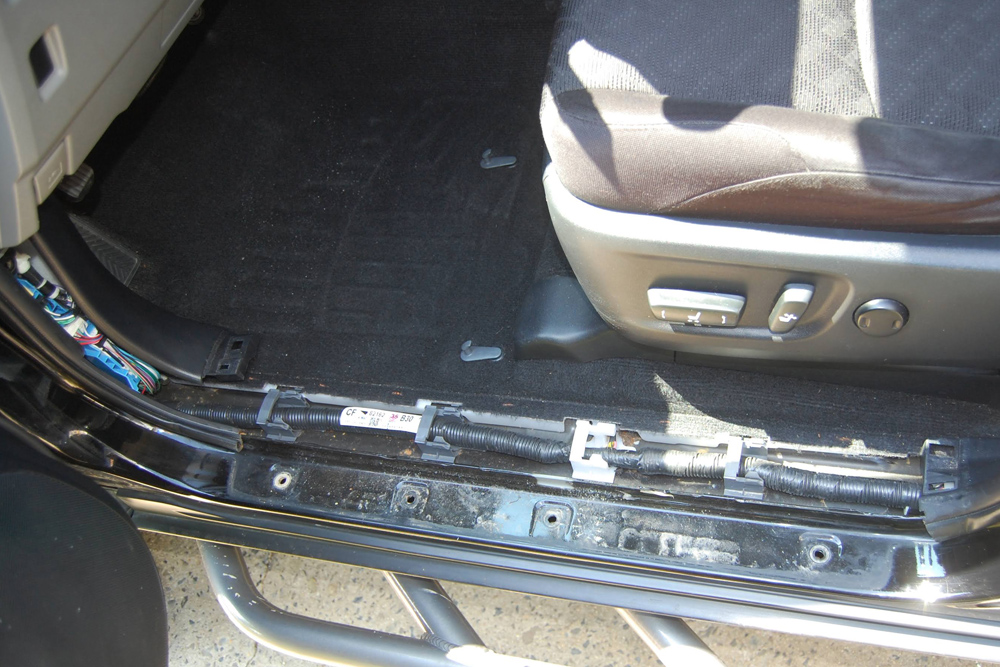
Next, remove the door sill plastic panels in both the driver side rear and front doors.
The panels pull up easily with a gentle tug but use the plastic panel removing tool if necessary.
We did not remove the panel on the “B Pillar”; you’ll get into loosening the seatbelt bolt and really you just need to fish wires under that section that’s easily done with the good old fashion “shove” method.
Next, remove the “A-Pillar” left kick panel using the plastic panel removing tool.
Towards the back right side of that kick panel, you’ll notice a “knob”; twist it counter-clockwise and it will remove the kick panel altogether.
STEP 2: PROP LIFTGATE & REPLACE STRUTS W/ NEW POWER STRUTS
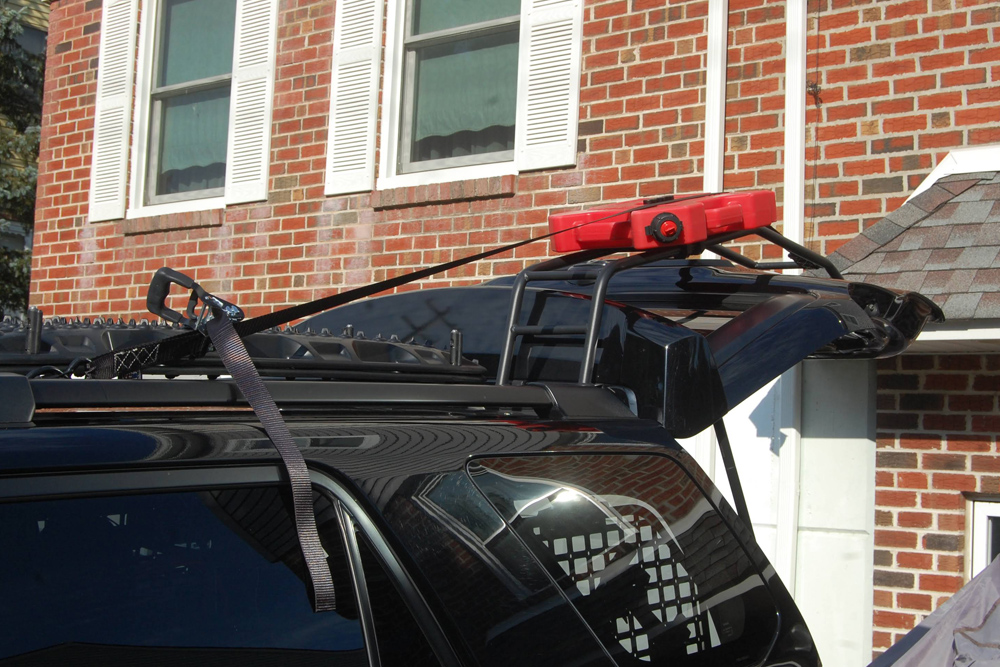
Whenever you’re replacing your liftgate gas struts, it’s good to have a second set of hands.
Since we were replacing the struts but also spending a fair amount of time fishing the wires, we leveraged the rear ladder and roof rack with a Rhino USA heavy duty ratchet strap!
You could use a 2×4 or have a friend hold the gate up for 2 – 4 hours, but the ratchet strap method kept the area free from obstruction and the potential of accidentally kicking out the support… and dying.
Once you feel confident your gate is properly supported, begin removing the existing gas struts. Both tops and bottoms have a retainer clip. Use the flathead screwdriver to back away those clips from the mounting points.
Once the clips are backed away, both struts should disconnect from the ball joints with a little force.

Next, remove the OEM strut ball joints on the bottom and the mounting brackets on the top using the 10mm ratchet.
Before installing the new hardware, we greased all the holes for good measure.
Now, install the mounting brackets provided with the kit. The upper mounting bracket ball joints should be facing inward towards each other. Use your 8mm hex/Allen wrench and tighten the brackets into place using the provided screws.

Next, make your way to the lower ball joints and make sure to tighten them into place using the provided washers.
You’re now ready to mount the electric power struts.
Making sure the wired-side is on top, simply snap the new struts into place.
At this point, you should be able to remove whatever mechanism you used to keep the liftgate propped open (the struts are strong enough to hold the gate into place, even without power).
STEP 3: TAP INTO CAN WIRES, INSERT FUSE TAP & IN-DASH BUTTON

Locating the correct CAN wires was the biggest challenge for us. Once we located the correct wires, it was pretty straight forward from there.
Locate the twisted blue and white wires behind the kick panel.
Note: There are a lot of blue and white wires back here! The CANbus wires, however, should be slightly twisted together and wrapped in a piece of green tape.
Using the pre-assembled wiretaps on the end of the CANbus cable, tap the blue CANbus wire with the white wiretap.
Then, tap the white CANbus wire with the yellow wiretap.
Because the wires were so thin, we wrapped a bit of electrical tape around the taps. Space is extremely tight back there, so taping them up can be challenging.
Update on 8/9/2019: AutoEase changed the wire colors from white to black, and from yellow to red:
- Original White (CANBUS H) swaps to new Black wire
- Original Yellow (CANBUS L) swaps to new Red wire
Now in the same location, you’ll need to remove the 30A fuse in location #10 from the fuse block.
Using the power cable with the fuse tap, reinsert the 30A fuse you just removed into the open space in the fuse tap (i.e., you now have two fuses in the fuse tap). Insert the fuse tap back into location #10.
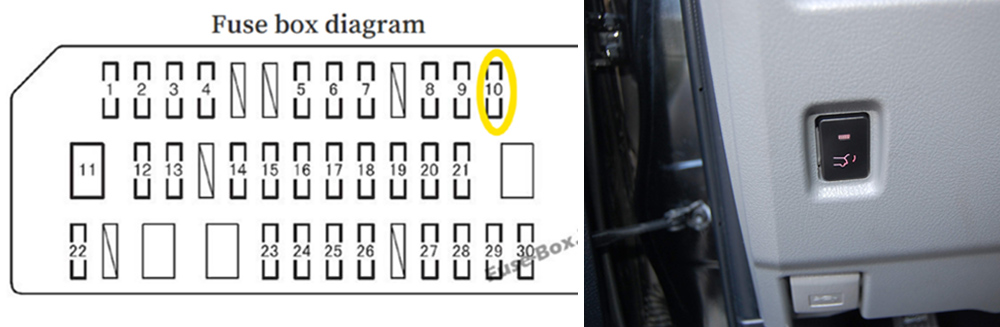
Once you’ve decided where you’ll place your in-dash button, connect the button to the back of the front button cable.
We installed ours to the bottom left of the steering wheel using an existing blank.
Lastly, connect the ground wire to the bolt underneath the fuse panel. You’re now done with all front side vehicle wiring.
STEP 4: FISH WIRES FROM FRONT TO BACK

We found that this was actually one of the easier steps.
With all of the panels removed, simply bundle the three sets of wires (the in-dash button cable, the power cable and the CANbus cable) and begin routing them through the plastic tabs on the floor panels. The tabs unclick making the path pretty easy to navigate.
We went back once everything was wired in and zip-tied everything to the existing black loom along the floor.
After you lay the wires down on the driver’s side front floor panel, we just tucked the wire bundle underneath the “B Pillar” plastic we chose not to remove.
Moving your way towards the back of the truck, follow the same process along the rear driver’s side floor panel leaving the wire bundle on top of the rear driver’s side seat.
From there, move into the trunk space and begin pulling the wire bundle into the slightly opened rear panel.
This is where having the jack stand door off comes in handy.
Again, once everything was installed, we went back and zip tied the wire bundle to various points behind this panel to avoid shaking, rubbing, etc.
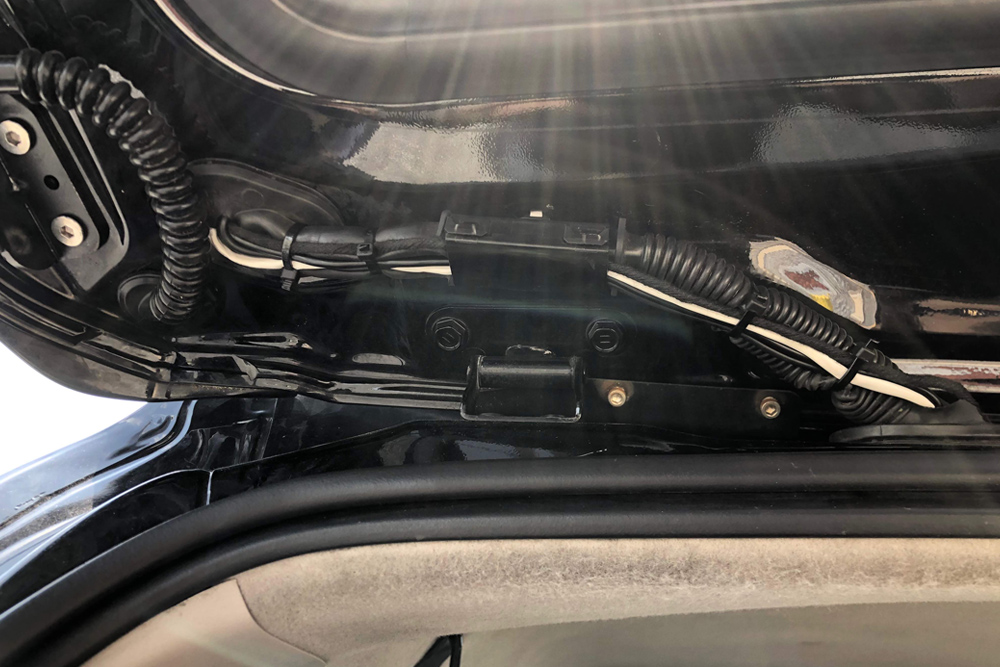
You’re eventually going to have to run that wire bundle up the left panel towards the liftgate hinge section. That small lighter colored panel just pops off. Don’t worry though, it easily pops back in.
You’ll notice three buttons along the back of the headliner.
Using your plastic panel removing tool, or a clean flathead screwdriver, pop those out as well. We started shoving the wires behind it, but it eventually bent the headliner.
Note: Don’t make the mistake we made; remove the three buttons and pop them back into place at the end of the install.
STEP 5: DRILL HOLE FOR REAR LIFTGATE BUTTON & FISH WIRES THROUGH LIFTGATE
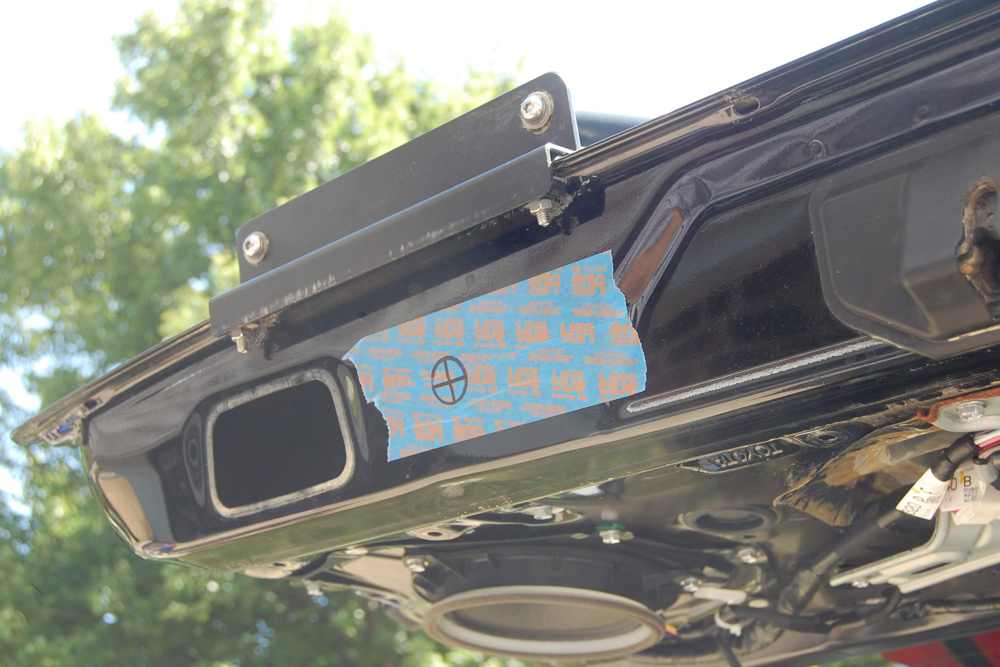
To get started, remove both speakers from the liftgate. You’ll use the speaker spacing to pull the wire fish through. Then, remove the left side liftgate plastic handle.
Prepare the area where you want to install the rear liftgate button. We opted to install the button to the right of the liftgate handle you just removed to give it an OEM look. Others have installed the button inside the actual liftgate plastic handle.
Tape the area off and trace the button’s rear circular shape to the location. We drew center lines and began drilling using the provided hole saw bit.
Once the hole was drilled out, we removed the tape and painted the exposed metal using a little bit of Toyota color-matched black touch-up paint. The whole is completely hidden by the width of the push button, but this was mainly done to avoid rust and any car body paint will do.
Once dried, we installed the push button and twisted the plastic nut on from behind which was easy to get to by removing the plastic liftgate handle.

Now is the really challenging part; fishing all of that wiring!
To the right and left of the newly installed power struts, you’ll notice two rubber blanks. It actually makes you think that Toyota had planned for the power liftgate down the road and just never executed on it to keep costs down.
Nevertheless, remove both rubber blanks. These will not be used as the new power strut cables will run through these holes and come with their own rubber grommets.
Now, locate the rubber grommets towards the bottom left and right side of the window.
Remove them and make a small hole in the center. You’ll pull the power strut wires through this section and retain the OEM grommet.
Time to start fishing and again, this is challenging.
We found that the best way to fish the wires through was to start through the hole near the power strut and make our way back to the speaker opening.
It took a few times and you’ll likely hit obstructions, but be patient and jiggle the wire fish around a bit. Eventually, you’ll see it poke through.
From there, we pulled a string/electrical polyline back through.
Using that string, pull the power strut wire through the OEM grommet and follow the process on the other side.

Once both wires are pulled through, make sure the wire is pulled all the way through leaving no excess by the power strut.
The wire can’t sit in the speaker hole forever, so back up the wire ends to the holes that you’re reusing the grommets from.
Then, pull tight on the wire and push the attached rubber grommet from the power strut through the hole where you removed the rubber blanks.

On the left side of the tailgate near the power strut, you’ll notice another rubber grommet with a rubber loom running through it.
The likelihood of being able to pull your wire bundle through that rubber loom is slim. We made a small cut on both grommets, pulled the wire through and temporarily zip tied the wire bundle to the rubber loom.
A few days later, we used a black electrical loom and wrapped those wires and used electrical tape wrapping around the plastic loom and rubber loom. We also suggest going back and using silicone on those holes.
Now you’ll need to pull that wire bundle through the rubber grommet hole and back through the speaker.
At this point, we pulled them through one-by-one and found that fishing through this larger hole was a bit easier.
STEP 6: TAP INTO EXISTING CONTROL BOX & CONNECT ALL WIRES
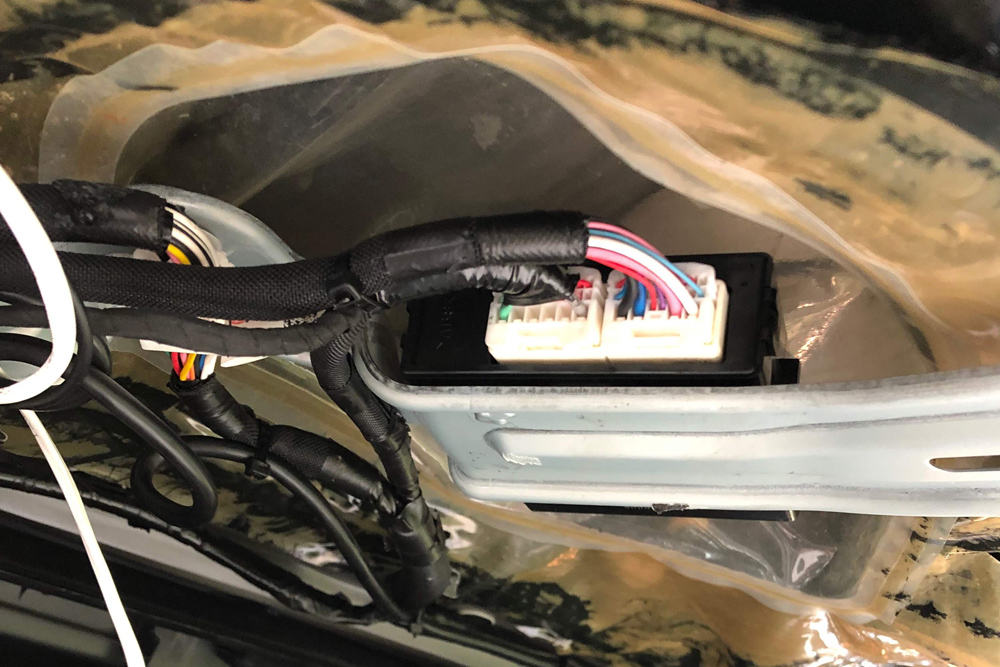
With all of the wires pulled through, you need to tap into one more existing line.
Take the purple wire from the lock release line and locate the gray wire on the left side pin connector connected to the OEM rear hatch control box. You may need to cut back some of the loom/tape.
Once tapped, we applied a healthy dose of electrical tape since the wires are thin.
Connect the rear liftgate button to the lock release line. Make all of the remaining connections to the control, but save the power cable for last.
Connect the buzzer line to the red outlet in the control box.
Once all connections are made to the control box, connect the power. If everything was connected and wired properly, you’ll see the red light on the control box blink approximately 15x’s.
Note: You may hear the buzzer go off as well, but don’t worry if that doesn’t happen.
STEP 7: SHUT GATE & TEST HEIGHT

Before you go back and reassemble all of the interior parts and call it a day, shut the liftgate lid and let the system initialize.
Run a few tests for opening and closing the liftgate by either clicking:
- the in-dash button twice;
- the rear liftgate button;
- or the unlock button on the key fob three times.
We suggest trying all three to make sure it works properly.
Also, adjust the height as you see fit. To adjust the height, open the liftgate using one of the methods mentioned above.
Then, manually pull the liftgate down to the ideal height where you and others accessing your cargo area will be able to reach the button.
Once you’ve found the ideal height, close the liftgate. Moving forward, the liftgate should open to that height each time.
STEP 8: ZIP TIE & REASSEMBLE ALL INTERIOR PANELS
Now it’s time to go zip tie crazy!
Make sure all of your wires are in places that won’t cause obstructions and that your tapped wires won’t come loose. Use electrical tape and zip tie where it makes sense.
Once you feel confident everything is secure, using the 3M adhesive strips, fix the AutoEase control box somewhere in the liftgate that won’t come in contact when the window is rolled down.
Also, be sure where you are connecting the box won’t cause issues when reinstalling the liftgate panel.
Follow all of the steps in Step 1 in reverse order and enjoy your new luxurious way of accessing your cargo area!
4Runner Automatic Power Lift Gate Review
All-in-all, we are very happy with the product.
The installation process described above is 10x’s better than the instructions that came with the AutoEase kit, so you’re welcome and pay it to forward to the 4Runner community when the opportunity comes up!
If you think the steps described above are just entirely too involved, buy the kit and take it to a shop to have it professionally installed.
We called a local Best Buy in the Philadelphia area and they quoted us $375 to have the kit installed, which will likely vary depending on the shop you take it to.
However, installing the kit following the instructions above can take anywhere from 2 – 5 hours and requires patience, especially when you’re fishing the wires through the liftgate.
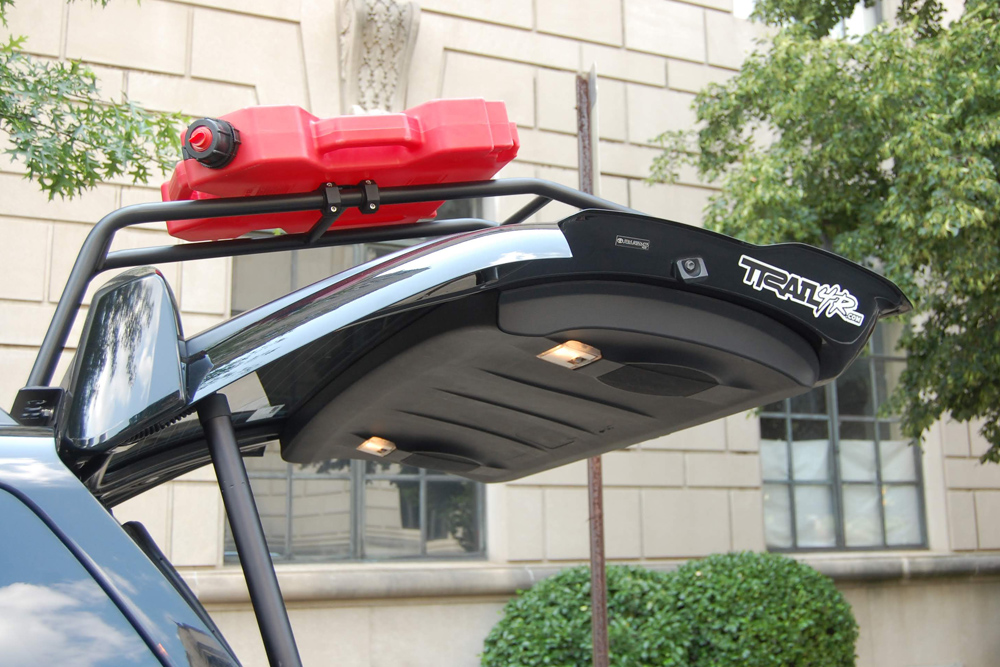
As for the look and feel, it’s as if the kit was intentionally designed to not look “aftermarket”.
It blends into the existing design of the 4Runner and like we mentioned before, some of the blanks on the tailgate lead you to believe that down the road, Toyota had plans of adding this as either an add-of feature or something specifically for the Limited and TRD Pro models.
Regardless, we dig it!
about to install this on my 2020 TRD. But seeing all the issues I am now wondering if its worth doing. Most people only post problems. any idea how many have been successful installations or is it more common to have problems
Has anybody tried reversing the power struts to have the wire down low and not in the liftgate
We installed this lift gate. The back close button and the front open and close button both work fine, but the 3x remote does not work. What could I check? 2023 TRD ORP
This might help. I called about this problem too. The tech on the line said to push the remote fob “lock” button 4 times not “3” as written. I am waiting for my lift kit, and already installed my remote start kit. That used “3” clicks. Hope this helps.
Hey all. I’ve installed this on a 2021 Kia Sedona. The kit works about 90%. All the buttons work to open/close except the key fob. I hard wired (soldered, not crimped) the yellow wire to the recommend “white” wire and the key fob doesn’t work. I’ve tried both long press on trunk button and 3 clicks on unlock button. I’ve also tried the OBD connecter and the key fob still doesn’t work. I’ve also tried different fuse locations, AND searched through the dash control menu, and there’s no options to turn on or turn off a “power lift gate” with the system preferences. Any thoughts? I’ve email the company, awaiting reply. Maybe a decoder is needed, or firmware update. Another issue I’ve noticed is that when the gate opens, there seems to be a lot of force on the initial unlock, it kinda pops out. Seems like the motors are pushing the gate a millisecond before the latch is unlocked. Any tips about fixing this?
Fitted one to BMW X3, strut not working after 3 years and damaged my boot, they said the system is very old and needs replacing, !!!!!! no spare parts.
Any positive long term feedback? Has anyone had this installed for multiple years with positive feedback?
Thank you
I have a 2015 4 Runner that I installed the auto ease kit on, it worked find for 7 months and then quite working. Checked all connections and they look okay. Anyone have any suggestions as to what I can check? Any help would be greatly appreciated.
Hello!
I have one of these, new in box, for sale if anyone is interested. Please shoot me a note to discuss. Thanks! 🙂
Hello,
how much are you asking for the kit?
BEWARE! I had the dealer install this kit on a brand new 2022 SR5 as they sold it as an aftermarket option. The dealer claimed it took their technician 8 hours to install. Within 30 days, the tailgate stopped working. One of the actuators broke and it got stuck halfway open. When I took it back to the dealer, they said that the tailgate hinges were bent and it would need to be repaired by the body shop. The dealer took responsibility for all the repairs and performed the necessary body work, painting, and replaced the kit with a new one. However, after picking up the vehicle, the tailgate stopped working after a couple of days. At this point, the dealer is offering to remove the kit and put back the OE latch and struts and refund the original purchase amount. It has become that much of an issue and liability.
getting ready to install this lift gate kit on my wife’s 2017 sr5. it has the foot sensor. does anybody have really good, detailed instructions? I am looking thru the kit and see a ton of harness connections and wires with no ends on them and they are not labeled good enough to see what connects to what. please e mail me directly at mkhwood@outlook.com
Will adding a power rear door opener void my Toyota 4Runner warranty
Does anyone know a mechanic/car repair that can install an after-market tailgate lift/close system for a 2021 Toyota 4Runner
Try your local car stereo/alarm shop.
I installed a kit this week on my friend’s 2021 4runner. The main tips I can add, are:
Hope these tips help someone. I’d give this job a solid PITA factor of 9/10. If it was my first car mod I would have broken some things no doubt…
Folks: I recently brought this lift kit with the foot sensor directly from the Autoease website. The kit is still in the box and going to sell to someone who can use this lift kit since we are going to sell our 2020 4RUNNER ORP. Message me if you’re interested. I’m located in Charlotte, NC.
Note: I’ll ship the lift kit on buyer’s expense.
If you still have this I’m in hickory nc and would be interested in buying! Please email me bhedrick447@gmail.com
Do you still have this kit for sale?
Hello I have a 2021 do you know if this will fit mine? Also I can not fund anyone who install’s these!! Do you know anyone in your area? Thank you
Hello. I have mine for sale if anyone is interested. Uninstalled and in the original box. Give me a shout! 🙂
Did you have any issues with the kit performing?
Is this still available?? lindseymjohnson9@gmail.com Please shoot me an email
I am having issues with my 4Runner not allowing me to open my rear hatch/use window. It says the main ECU is not communicating with the liftgate ECU. No one Can figure out why from the places ive taken it too. Does this kit allow me to bypass the module at all and open my liftgate? I doubt it from the instructions I read but can’t hurt to ask since I’m at my wits end trying to figure out what to do. Thanks!
I installed my lift kit in 2015 4 runner limited. Luckily, I saw an install on you tube and installed the control box next to jack. Worked okay for a few openings, then the dash switch would only close the tailgate, not open it. When I press dash switch to open it, it sounds like it is trying to open but does not. It closes the tail gate okay. Also, is there anyway to keep the tailgate from slamming shut? Other problem is my key bob won’t open the tail gate.
Can anyone give me possible solutions?
Thanks before hand for any help.
Ronnie, did you ever manage to fix this? I am having the same problem.
I have the kit for my 2018 SR5 Premium 4runner. The reason the dealer never installed the kits is because the position of the power struts cannot properly support the weight of the door. The interior push button and remote works yet the left gate doesn’t open. I open the gate with the external latch release. It sucks. Mainly it is a money making kit from Auto Lease which will make us consumers blood boil. Its sad because it would be useful if it worked properly with the foot sensor. It closes well with the remote, foot sensor and internal button.
2021 may not work with fob, mine doesn’t
New harness available for fob on 2021
Sounds like your rear hatch is not unlatching before the struts are trying to open it. check the purple (if I remember right), that goes to the latch in the tail gate. the key FOB issue is probably a bad connection for the CAN bus connections. I had bad results with the crimp connectors so I bared the wire back and soldered all connections. No issues after that.
Matt
We’re are you guys located?
Central Texas
Can anyone verify if the Groupbuy product referenced in this post is the exact same as the one listed on the autoease website? It’s $100 cheaper on Groupbuy, but I’ve never heard of this platform so wanted to check first before throwing my money that way!
Autoease link: https://www.autoease.com/product/liftgate/
Groupbuy: http://www.che1.com/groupbuy-power-lift-gate/?ap_id=toyota4runner
Thanks in advance 🙂
I brought one brand new directly from the seller and we decide to sell our 4Runner. Let me know if you are still looking to buy the lift kit. Mine has a foot sensor.
Have you sold it yet?
I bought mine from the group buy link in this article.
IMPORTANT UPDATE: Auotease officially claims they can not support a ladder. Through many hours, updates, and back and forth communications, I am sad to say I am removing this fun idea from my rig. I’ll be replacing with Heavy Duty Struts instead of the subpar motorized struts. I do recommended this company and their product unless you want to add weight to the door! They were very helpful and responded quickly through installation and firmware updates.
Finally, the system works great including the foot sensor. Thanks to everyone who helped.
how did you mount the foot sensor
Well I found out this weekend that the autoease will not work with a Baja ladder. The ladder is just too heavy and the tailgate will get almost all the way up then beeps and comes back down. I reset the control module thinking it was just not use to the extra weight, but to no avail. I have to admit that the baja ladder is pretty heavy, maybe I’ll try a Gobi or look for an aluminum ladder instead.
I have a Gobi ladder and just installed the Autoease this weekend. It works to lift the tailgate only when using the lock release on the liftgate. It will not open from the dash button or the key fob. It will unlatch but will not lift with the extra weight. It does, however, close using all 3 options – the dash button, rear button and key fob. Closing was actually the most important feature for me so I am keeping the install. I may not always have the ladder on the rig so it will be all set up to work well in the future.
I purchased the AUTOEASE power liftgate package for my 2016 4Runner Premium Trail XP. My friend who owns an auto repair shop has spent 2 days trying to install it. He says the install manual which Autoease sent via email, doesn’t include instructions for the foot sensor option which is now part of the package. Does anyone on this forum have a complete set of instructions.
Any new updates? I plan on doing to my 2016 as well.
dan.
Autoease sent me the instruction by email. I can forward to you. Also I found in internet some manual.
Hi Gloria, good evening, I’m having trouble installing the tailgate kit on my 4runner, can you send me those instructions please?, thank you very much
Thanks Gloria can send to my email
Jack@jacksold.com
I have a 2019 4runner limited that my wife because of her back just cannot close the rear hatch. The mortgage you are displayed would be great for het. Please respond with Information about the potential of having this on her vehicle. Once again it is a 2019 Limitef. Thanks in advance.
Link is in above article
Auto spell really screwed my post
I’m installing one in my 2020 limited. I was able to get all the wires and switches routes and installed. The only problem is I can’t for the life of me find the white and blue canbus wires? Did they change the color for the 2020? Any help would be appreciated or a contact number I could talk to someone about it.
Gibson,
I am also trying to install the liftgate in a 2020 Limited. I had to bypass the canbus per Tao’s instructions. Now the liftgate goes up when the car is started. Any suggestions or ideas? I am waiting on an email from support. Did you by pass the canbus? Anyother help would be great
I am having the same issue, waiting on a reply from the support email and WhatsApp, I do not have wires in the same pin location on the bottom plug (no white or blue wire slightly twisted together either in any position). The upper 30 pin connection has a red and a white wire in the correct location that are slightly twisted with a green tape but they are the wrong color. What did you end up doing?
It’s probably in the second location that is shown in the company’s installation guide? That’s where mine was on the 2020. Email me your contact info and I’ll try to call you if you haven’t figured it out buy now.
He sent an email describing the second option. Thank you
Gibson, I have 2019 Limited and I found it. I recommend you contact Tao, he will know.
You indicate that Tao may be the go to guy with questions. How do I get in touch with him?
Autoease <info@che1.com> he replied twice using this email
I dont think that Tao knows. I need someone who has recently installed it.
I will figure it out.
Thank you
I emailed him and I got it all worked out everything works great! I mounted everything in the jack compartment and mounted the rear button just aft of the jack compartment door. I used that small removable panel. Everything I was able to route through the OEM rubber wire conduits so everything is sealed and inside the truck.
Thank you so. much for this post!!! I just installed mine the same way this weekend. So much easier than trying to shove all that in the liftgate.
Gibson,
Can you tell me what wires you tapped in to. I am having the same issue. They changed the wiring harnesses from 2019 to 2020. Thanks
Were the strut cables long enough or did you have to splice in extensions?
My set came with extensions. I beleive enough to go from the right side to the left og the gate adn down into the gate or even to the jack area. I mounted my bos on top of the gate bood in the center.
Gibson, would you please help me to resolve the issues? After installed and initialization, my door kept open and refused to close.
Waoo, very good. I am having problem to trying to remove the panel. Any advise?
The panel that you showed in the pic
Hi all, I bought it today and I am going to install it. So I will need your help.
I got the manual and is very vague. Please reply with contact information if you want to help me, thanks. (I have a 4runner Limited 2019)
Your best bet is to follow the step by step above. You are right about the manual, it is lacking for sure. The hardest part is the routing of the wires, it can be very frustrating. Your best bet is to get a cheap usb based endoscope so you can see what your doing. use a fish wire to find the path and then pull the wires back through with it. Be patient, it not going to be easy. Feel free to contact me if you have any more questions.
Hi Matthew, I was installing the system yesterday and I couldn’t Fishing the power strut cable. The rest of the wires were fishing one by one and no problem. Any advise? …. thank you
Yeah, my mechanic had the same problem. He did contact Ryan (who wrote the article) and he advised him to cut the cable connection, fish it thru and then reconnect.
That’s exactly what I did. So far it’s working perfect. Today I noticed that I Have to glue the plastic of the strut and protect the screws from the hinges of corrosion.
Agian, buy a cheap endoscope ($15 on ebay) so you can see up in there and see what its hanging up on.
Thank you. It arrives today, will see if I can do it.
Thank you Matthew. I will
Was wondering if you had a video of how this autoease power lift kit turned out? Just wanted to see how it turned out.
Awesome article and as it turns out, great forum for troubleshooting. I am curious as to who has extra wieght on the lift gate (i.e. lader, fuel) and how the autoease is handling it. I put a baja ladder on and now when the lift gate gets to the top, it reverses and comes back down as if it had bumped into something. Upon reporting this to the folks at autoease, i was told they advise no extra wieght on the gate and offered no solution. So, who all is running ladders ect and hows it working out for you?
In reference to the part where you connect the purple wire (lock release) to the OEM control box, you stated the should be to the grey wire on the left connector, mine has two grey wires. One a very thin wire like for signal and one heaver gauge, more load worthy. Any of that sound familiar? Any idea which is the correct one to connect to?
It’s the skinny one
Awesome write up, Thank you! I had some major issues fishing the wires through the tailgate so I cut the plugs and resoldered them after they were through. I also notice if I am on a hill or something and facing down the lift doesn’t open. It will open if I pull it past a certain point but struggles with just the buttons. I also kept the unit in the original package, cut slits for the plugs and taped it back up to mitigate water issues. Will see how it goes, but I like it so far.
Hi I have a shop installing it and they are having problems with calibrating it. any suggestions?
Initially the firmware update worked out the calibration issues. Then, two weeks later, it rained for days and nothing worked correctly. They sent me a new controller. I flashed the firmware, but still had no luck getting things back working.
Took some time for it all to be processed, but I did receive a full refund. The credit card company did give up at one point but because I had an email from Autoease stating that they would issue a refund, they reopened the case and pursued it to the end.
Did you ask for a refund? And did they give it to you?
They have agreed to do so. It is being processed. Will update when complete.
They sent a firmware update. That didn’t work. Now the installers think that it needs a new brain.
The controller is the brain. Don’t wait too long to request a refund.
DO NOT BUY THIS 4RUNNER LIFTGATE KIT!!!!
I installed one last month (November). Autoease stopped responding to my emails after I discovered a FLAW in their system for 4Runners. As you all know, 4Runners have a retractable rear window. The instructions and the wiring harness for the liftgate product dictate that the electronic controller for the liftgate must be installed inside the liftgate. Well, the liftgate is not sealed from weather. Rain can and does flow through the liftgate and drain out weep holes in the bottom of the liftgate. After completing my installation I had everything working well for about two weeks until we got multiple days of constant rain. My problems began after driving just a few miles in the rain. I was sitting in a parking lot talking on my phone via the 4Runner bluetooth while my wife was in a store shopping. The installed liftgate beeper, which normally only beeps on and off briefly, began with a constant tone. I pressed the dash button to open the liftgate and IT DID NOT WORK!!! I tried to open the liftgate from the outside by using the key remote and the liftgate factory latch, still nothing. All the while the constant tone of the beeper continued. To stop the tone I had to pull open the footwell cover next to the parking brake to get to the power connection so I could unplug the liftgate.
Leading up to this time I had multiple correspondences with Autoease during the installation and they had been quite responsive – responding within the 24 hour period stated on their website. So, that evening (November 27th) I emailed Autoease stating what had just happened to me. NO RESPONSE! I emailed again the next day. NO RESPONSE! I emailed again December 1st. Today is December 3rd. STILL NO RESPONSE!
My only recourse now is to dispute the purchase with my credit card company. I submitted that dispute this morning.
I wanted this liftgate because my wife has physical challenges and the factory liftgate is challenging for her to close. Consequently, I am severely disappointed with Autoease. The existing instructions are terrible. Between the instructions and the inherent delays in dealing with replies from their tech support in China (typically an email reply came after 10pm local time to me), the whole installation took me two weeks. I even offered to work with them to rewrite their instructions as I have significant technical writing experience. They were interested and even offered to work out a payment for doing so. Honestly, I’m not too interested in this anymore.
The other Autoease liftgates are probably fine because those liftgates are sealed from the weather. The 4Runner is an anomaly with the retractable rear window. So, until a redesign takes place that relocates the controller to a protected area of the 4Runner (and I did suggest a new location to Autoease), DO NOT PURCHASE THIS 4RUNNER LIFTGATE KIT!!!
On which side of the lift gate window track did you install the control box? Is there room to install it on the inside of the window track or on the interior panel, near the top?
I didn’t use the window track. I made a simple mount spacer and mounted the controller to the lowest speaker screw mount on the driver side. That placed it on the inside of the rear window. I didn’t see room anywhere else. I am going to add some wire to the group of wires that go to the latch and move it inside the cabin to the open space just behind the jack. You need to think about access to the micro-SD slot in case you need to update the firmware. I did have to install an update to make it work correctly.
What were some of the issues you were having prior to the firmware update? Did you have any alignment issues after the install and prior to the firmware update? I just had this kit installed and now there is alignment issues with the gate.
Autoease has mentioned to me that the hinges on 4Runners are weak and they have a reinforcement to deal with this now.
where did you find the update?
Autoease emailed it to me.
Any interest in helping out for another install? I’m in the philly suburbs.
Thank you so much for your instructions. I’m in the middle of installing mine. Going at it alone in 30 degree weather, so have to take breaks to thaw out. Did you run into the problem of the power cable connected to ground being to short? Mine will not reach all the way up the tailgate.
My wife’s 4Runner is a Limited, and the fuse box is under the hood; so I had to go through the firewall to get power & ground. I spliced an extension onto that cable, using the same gauge wire and adhesive/shrinkwrap tubing to cover the mechanical splice (as I have those materials for my boat).
I had the same issue, but a ground can go anywhere, so I cut it off short, attached a new ring terminal to the end and grounded it on a bolt in the jack storage area.
Is this a power liftgate that allows users to also manually operate the trunk door (i.e. will the door sense that you’re pulling it open and allow you to continue opening manually)? I like having a power liftgate but would prefer to keep the option of opening the trunk door manually when necessary.
Yes it does, but you have to open/close slowly
Help Ryan! I love your install instructions. I started my wife’s 2016 4Runner limited last night. Only problem is I don’t have a twisted blue/white wire. The only twisted pair I have is black/white and they are nowhere near the CAN bus location in your instructions or the ones AutoEase sent me. I’ve got tons of pictures of the plugs that I’ve sent to them but they have been no help. do you have a pin diagram or anything you could help me with. Again, really appreciate your help
Did you ever get photos of the blue and white wires? I’m struggling to locate them.
Did you ever find the blue/white twisted wire? I see the same black/white but cant find the one listed in the manual
Has anyone made a video of this instalation
Not sure, but my write up here has been used by others and they’ve had successful installs.
Any chance this could be made to work on a 4th gen? 2007 Limited V8 4wd.
They’re in the process of making one for the 4th gens from what I understand.
When will this group buy end? I see that this article was published early Aug of this year. Also, when will I receive my entire kit from the group buy? Does not mention on their site. Thanks!
I ordered mine 2 weeks ago and it came in a week
Not really sure, but people have said they purchased on a Monday and got their kit on a Friday. So, turnaround seems to be pretty quick. It’s not really a traditional group buy. Just special pricing I think to grow their 4Runner footprint.
I love this! After 3 minivans i’m so happy to be back in a 4Runner – (don’t judge, ok!) – however I do have to admit that I’ve been spoiled with amenities that I now miss. Plus my C4 ladder gets installed Monday and so my arm workout is going to get tougher. This would be like having the best of both worlds! The Group Buy says 3rd generation. But your article says it’s for 5th generation. If I buy with the link and select 2019 will I get the right one? I also need to check with a local source to install because there’a no way i’ll diY this kit!
I think it’s the 3rd generation/iteration of their kit, but I assure you it’s for the 5th gen 4Runners.
Somewhat unrelated question… What bracket are you using to attach your rotopax can to your ladder? 🙂
Hit me up on IG @gibburnz and I’ll send you pics and links. Cheap amazon purchase and works great.
Got my kit in June, installed it and this was before they included the replacement black door ball joint mounting brackets. While they did quickly send them, my door hinges were already bent.
I have bought new hinges and now have to install them on the rear door….
The system is great and fishing wires is a feat of human endurance.
Nice write-up, planning on doing this once I get my C4 ladder with accessories. Sort of unrelated question, I really like the look of the side marker light you have behind the c-pillar. Any info on where you purchased that and install would be awesome.
That is a reflection of a street lamp.
Welp, that’s embarrassing. Would be a cool look for another amber side marker though. Thanks for the response.
Awesome instructions! Two quick questions: Did you look into the foot sensor? If so, why’d you pass on it?
The site says that the key needs to be near the sensor/car for it to work, but is there any way of using the factory key, the ones they don’t come with keyless entry chip/sensors, or do you have to keep the Auto Ease remote on us?
For the cable that has the ground ring terminal that goes on the fuse box bolt, what is the wire with the QD terminal for?
Referring to your “Toyota had plans of adding this as either an add-of feature….” Those buttons do look very similar to the buttons that’s used on the 2019 RAV4 power tailgate.
Yeah good point. Even where the electric liftgate strut wires tie into blanks right to the left and right, it just seemed too perfectly placed. Like, what else could those blanks have been used for? We installed this on our 2011 Trail so if Toyota plans on putting this feature in the 2020 4R (last year of the 5th gen), that’s an odd last minute decision. Regardless, it looks stock and that works for me!
While installing mine i noticed that there are two more cut outs along the top in the center, after popping out the plugs I realized that all 4 have a nut in the bottom of the hole that hold on the lift gate air foil. So much for Toyota having good intentions. It did however work out well for AutoEase!
You are right that would be an odd last year decision to make. It’s also weird that they never decided to move forward with, since it’s a tech that’s not expensive or fragile for off-roading. Maybe it’s the US versions that didn’t get the option??? Oh well at-least this kit is out for people that want to do so and it’s not too expensive for people to shy away from.
Curious about that net you have to separate the trunk from your back seats.
Dude… Raingler Cargo Nets! I have the “Behind 2nd Row Seats Rear Half Upper Barrier Divider Net”. Check out their 4Runner products at the link below.
https://raingler.com/collections/2010-newer-toyota-4runner-heavy-duty-cargo-netting
This is awesome!
Does it have a safety feature that keeps from crushing little kids or gear that isn’t stowed all the way?
Hey Trevor. Thanks for dropping a comment/question!
I probably should have called out that feature specifically. People with swing-out bumpers might be worried that the gate could open into the shut bumper. The control unit has sensors in it that if during opening/closing it meets an obstruction, it stops and goes in reverse order (i.e., if it’s shutting and hits something, it will reverse and go back towards the fully opened position). I don’t have a swing-out, but when I do, I plan on putting a small 3M piece of 2-sided foam in an inconspicuous spot on the swing-arm so if the gate taps it, it’s tapping foam and not metal on metal.
Hope that answers your question!
My Technician just installed mine and we are having trouble with it top fin where brake light is rubbing makes horrible noice , I need help can somebody reach out to me 714-900-1708 Ed.
Are you still able to open and close it by hand or do you have to use the power liftgate every time?
Yep. Before I had the whole thing powered up, I did a few test opens and closes to make sure my brackets were mounted without any obstructions.