
Window Storage Panel from Orange Boxx Fabrication
I saw this MOLLE panel one day and had to have it. It’s a rear window storage device that bolts to the existing 4Runner mounts, designed for quick access to off-road items that are a pain to store.
The MOLLE panel concept is great, and it’s offered by a few manufacturers like Orange Boxx Fabrication and Rago Fabrication. The one I bought was from Orange Boxx Fabrication. However, my experience wasn’t smooth.
When I received the first order, the rack arrived scratched, like it had been used. The hardware was thrown in a shipping envelope, disorganized, and the wrong size hardware was included. After receiving a second package, the rack was new, but once again, the hardware was wrong.
Despite the frustration with the shipping and hardware issues, the panel is still functional and looks good. I’ll need to visit Home Depot to get new black hardware and reset the top hardware.
I would not recommend this product or this company to anyone. Go with Rago Fab, CarTrimHome, Cali Raised LED, or anyone else.
Find It Online (other panels)
- R4T MOLLE Mounts: Check Price
- Size: 1″x1.5″ or 1″x0.75″
- Fits: Rago Fabrication Panels
- Fits: Cali Raised Panels
- Cali Raised LED Molle: Check Price
- Cali Raised LED Molle Panels and Shelf: Check Price
Installation
1. Remove Coat Hook

Start by removing upper coat hook with a 10mm socket. Next, move onto removing small grocery bag hook in the rear corner of your 4Runner. This is located towards the very rear of the 4Runner. Remove the screw from this location and set aside (you will not need this screw). You will also need to remove the screw in the lower corner towards the front of your 4Runner. Set aside (you will not need this screw either).
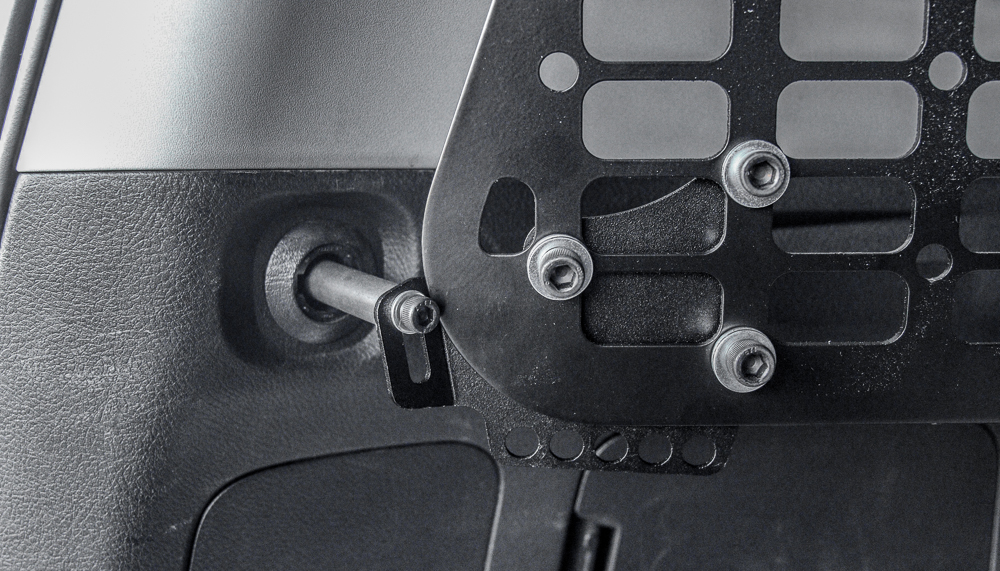
2. Mount Top Bracket

Using your 10mm socket, hand tighten or lightly tighten coat hook through Orange Boxx Fabrication bracket. This will set you up for mounting the actual rack onto this bracket.
3. Mount Rack to Top Bracket

Yeah, that’s seriously the hardware we were given, the second time around. Hopefully, you will get the correct set of hardware. This is where you need to mount the actual rack to the top bracket. You want to hand tighten everything at this point.
4. Mount Rack to Bottom Bracket
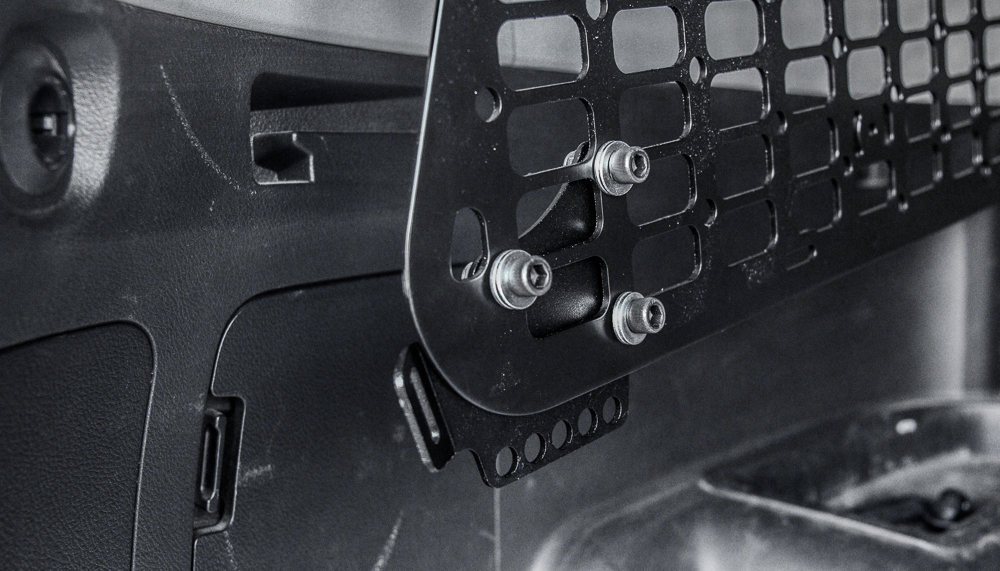
Mount the rack to the bottom bracket. You can see it clear as day here but we had to guess for a second to see where and how this bracket mounted to the rack. With all the holes in this rack, this can be confusing. What would be nice is a vector graphic showing exactly what holes hold what bolts, in terms of installation.
5. Mount Rack to Bottom Bracket Spacer Screw
Now, you need to mount the rack to the bottom bracket spacer screw. This is the smallest spacer screw that comes in your “kit”. Again, hand tighten this screw as you will want to adjust everything before you tighten everything down.
6. Mount Rack to Bottom Front Spacer Screw

Once you have hand tightened the rear spacer screw to the rear bracket, you can then align and tighten down the bottom front spacer screw. If things don’t line up correctly at first, keep adjusting. This is why you want to hand tighten all of the hardware at first. Adjusting this rack is key to proper positioning.
7. Add Spacer in the Middle of Storage Rack

From here, just drop in your middle support spacer and you are good to go.
8. Tighten All Bolts Down and Enjoy!

After all of your hardware is set, tighten down all nuts and bolts that were provided.
Mounting Gear to the rack
Maglite with Mount Brackets

Added Another Light + SmittyBilt Axe

Added ARB Inflator

Added MOLLE Pouch (Large and Small)
This was taken the other day and I thought I would throw it on this page where it belongs. I am still not finished with the panel. There are still a few more items to go on. I will update the page as the panel begins to fill out. Also, I still need to figure out where the fire extinguisher is going to go.

Off-Road Accessories and Gear
Head over to the post we wrote on accessories and gear to see what’s going on down below.

Coming Together
We are working on an overview of what we added to our panel.
This should serve as a good overview of what you can add to your MOLLE panel. We have also installed the Rago on the passenger side. Check out the post above to see everything on the panel.
Once your window storage rack is in place, you can get creative with mounting gear. Being a Type-A personality, I love keeping things organized, and this rack is a great help for storing the items I use more often in my 5th Gen Trail Edition.
Instead of mounting everything all at once, I’m going to add items one by one as I encounter common needs. I’ll keep this page updated as I add new gear. One thing I definitely want to mount is a Maglite, as it’s a must-have tool for any 4Runner owner.
Don’t say you weren’t warned:
https://www.toyota-4runner.org/5th-gen-t4rs/237456-terrible-experience-orange-boxx-fabrication-psd-rack.html?highlight=boxx
https://www.toyota-4runner.org/5th-gen-t4rs/306190-orange-boxx-rear-window-molle-dropped-today.html
Great article. What are the mounting straps used here for the hatchet? I’ve been searching for something like this and can’t find the ones like this.
Quick Fist Mounts Universal Rubber Mounts
Would love to get this for my 96 GMC suburban 4×4.
You know. You should just remove all the installation instruction for the OrangeboxxxFab and only mention they suck. Because I only read the title of this article like a month ago and didn’t even finish the first sentence. Then I purchased their PSD. The most unpleasant experience I ever had, especially at the time I talked to the owner. He made me feel I was begging him to buy their product. I contacted Paypal and disputed the purchase. Orangeboxxfab SUCKS!!!!
Yeah Nate, I am with you on that one. And so are 100+ other guys in the forum on Facebook and everywhere else. Orangeboxxfab does suck, as a human, a company and a business person. Some people just don’t get it.
Structurally, how big of a difference is there between the rago and OB? looking for durability… I can live with the shoddy packaging and finding my own hardware if they are similar in durability
There is a difference, and the win goes to Rago. Rago fab has dual mount points on the top that makes it much more stable than Orange Boxx. Also, Rago is sucked back into the window more than OB, which makes it more stable in my opinion. This is a downside, though with Rago. Becuase Rago is sucked further back in towards the window, it makes mounting additional accessories kind of a pain. You have to demount the lower portion of the panel to fit your hands behind, in order to hold bolts/nuts in place. The overall win goes to Rago Fabrication, though. I am sure most owners would agree.
Ill have to get one of each. I liked the fact that it stuck out a bit because I have things that need to hang down off of it and not scratch up the plastics.
Gentleman thank you for all your comments about our products. We strive to make our equipment for you and the future users of our products. Thank you for the wonderful write up and to help is improve our product.
UPDATE: We sold this product. Actually we gave it away for free. What a piece of garbage. This product rattled super bad and was just overall a horrible experience. Good luck guys but take it from me, I would NOT order from this company. HORRIBLE experience overall.
Brenan,
This looks awesome , but will this instal prevent the cargo cover from closing?
Yousif,
Yes. Most of the 4Runner MOLLE panels out there will not allow you to run your cargo cover. The panel mounts in the location where the Toyota cargo cover locks into place, so a cargo cover is out the door with the MOLLE panel.
What kind of harnesses do you use to attach tools and items to the panel?
William,
Good question, we really should have added that to this blog post. We will have to update it since we have been adding to the MOLLE panel. We purchased these:
Rubber Clamps: Super Universal Rubber Mounts/ Clamps
You will need to buy hardware to mount them, though. We used #8 and #10 screws from home depot with washers on the front and back end. Also, depending on where you mount your gear, you may need larger size diameter #8 and #10 washers as the openings in these MOLLE panels are quite large and the large washers allow you to mount rubber clamps anywhere.
What drove the decision to use Orange Boxx over Rago?
There is really no good answer for this one. It was a spur of the moment buy. I saw it on another 4Runner and then instantly headed over to their website and then pulled the trigger. Moving forward, we will probably go with Rago. There were a few reasons why we were not with Orange Boxx overall but mainly their product is sub-par. We have a rago panel on the other side and its much better.
Hi Brenan,
THANK YOU for these instructions. I can’t find any good pictures anywhere and the instructions that come with the PSD suck to say the least.
In steps #5 and #6, what do the spacers screw into? In #5, I have a tie down strap for the top of a net.
Also, in step #7, I think the space is supposed to go into the hole that is over half a square and up. It’s the odd hole with what looks like commas on either side.
Thanks
Mark,
Hey there, yeah there was not much out there on the MOLLE rack.
On step #5 and #6, the spacers do not screw into anything. Those spacers just sit on top of the plastic. You want to thread the long provided screws into the OE threads on the 4Runner. In #5 and #6, you just have the pop the factory caps off, drop in the spacer and screw, and then thread the screw into the factory openings.
For #7, you are probably right. For our rack, we ended up with two of those spacers, so I wanted both of mine to be on the bottom to have a more consistent look and feel. Also, with the spacers on the bottom, you can more room to work in that center section of the rack.
I don’t plan on adding anything too heavy in that area, so we should be fine.
If I plan on mounting a bunch of heavy stuff on the rack, I will just go to Home Depot and replicate that spacer to give the rack more support all the way around.