All it takes is a quick Google search to see that Nitrochargers are a go-to for owners looking to give their ride a boost. They might not boast the glamor of a long-travel coilover or the external reservoir of desert racing suspension, but overlander after overlander turns to OME for one reason: reliability.
When shopping for a lift, it’s important to remember that race-level suspensions require race-level maintenance. That long-travel suspension kit will undoubtedly improve your rig’s off-road performance, but don’t be surprised when it’s time for a complete shock rebuild. On the other hand, OME’s Nitrochargers rival, or even exceed, the reliability of Toyota’s factory shocks.
Now, after years of success with their Nitrocharger Lift Kits, ARB has decided to give their most affordable product line a shiny new look. The Plus boasts a handful of new features over its predecessor while maintaining that iconic Australian reliability. Today, we’ll review this new lift kit, providing you with a step-by-step guide to install it on your own.
Thank you to Mudify for hooking us up with the new lift kit!
Table Of Contents
What’s New?
This is the first time ARB has updated their entry-level suspension system in years, and with the Nitrochargers already being so fine-tuned, little change was necessary. With their BP-51 suspension and all-new MT-64 lineup for those looking for a more race-focused setup, ARB’s focus with the new Plus kit wasn’t on sheer desert performance. Instead, ARB sought to reinforce what the Nitrocharger name was already known for: reliability and dependability.
Compared to its predecessor, the Plus offers a handful of new features. Most notably, the front coils now come with an adjustable coil seat, which gives you the option to adjust the preload of the front suspension as you add heavier components (i.e. front bumper, winch, etc.) to the front end. Additionally, you now lift your 4Runner a true 3 inches, while the original Nitrochargers tended to max out around 2 to 2.5 inches.
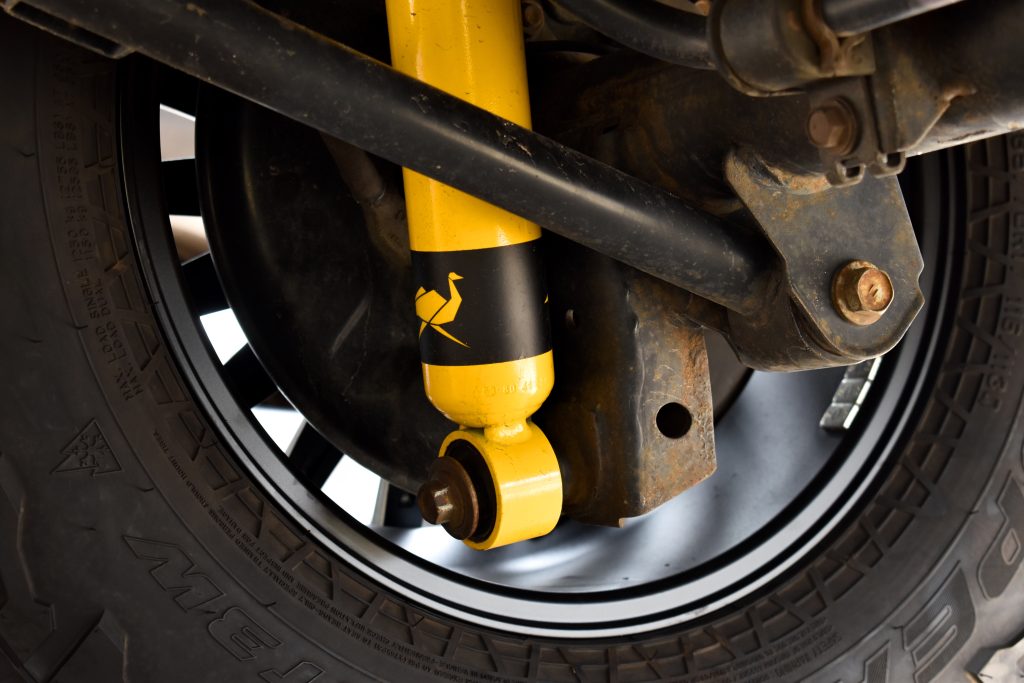
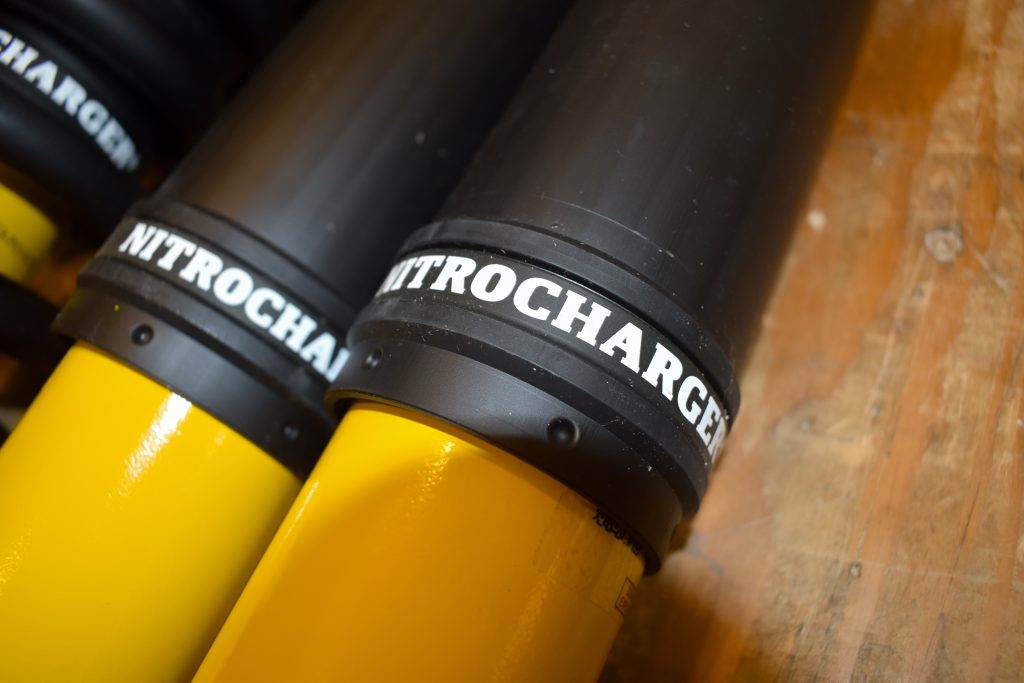
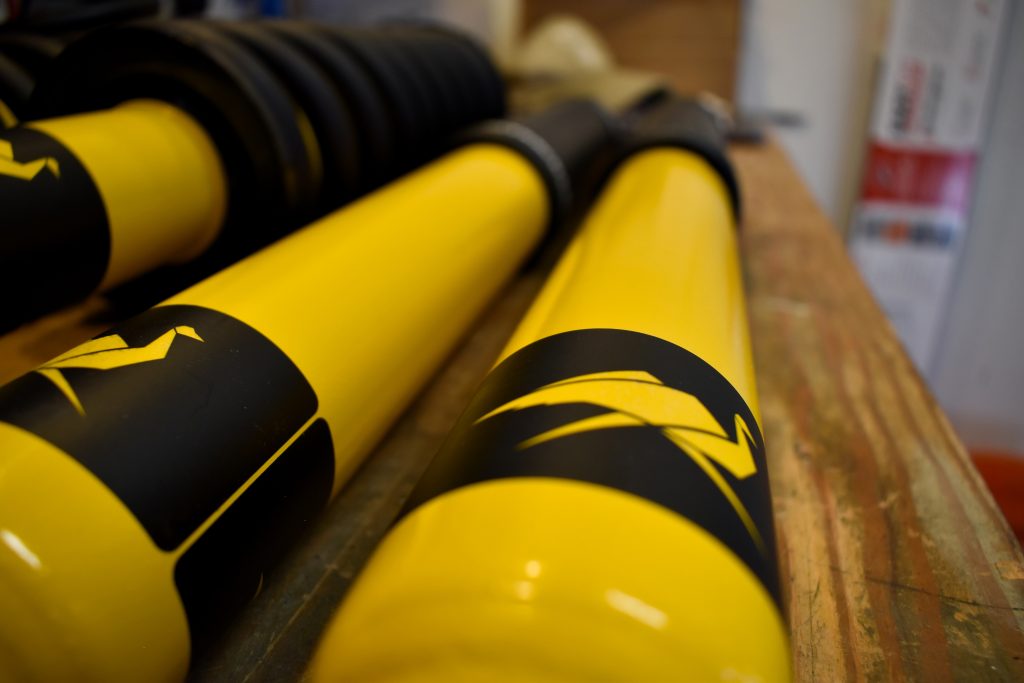
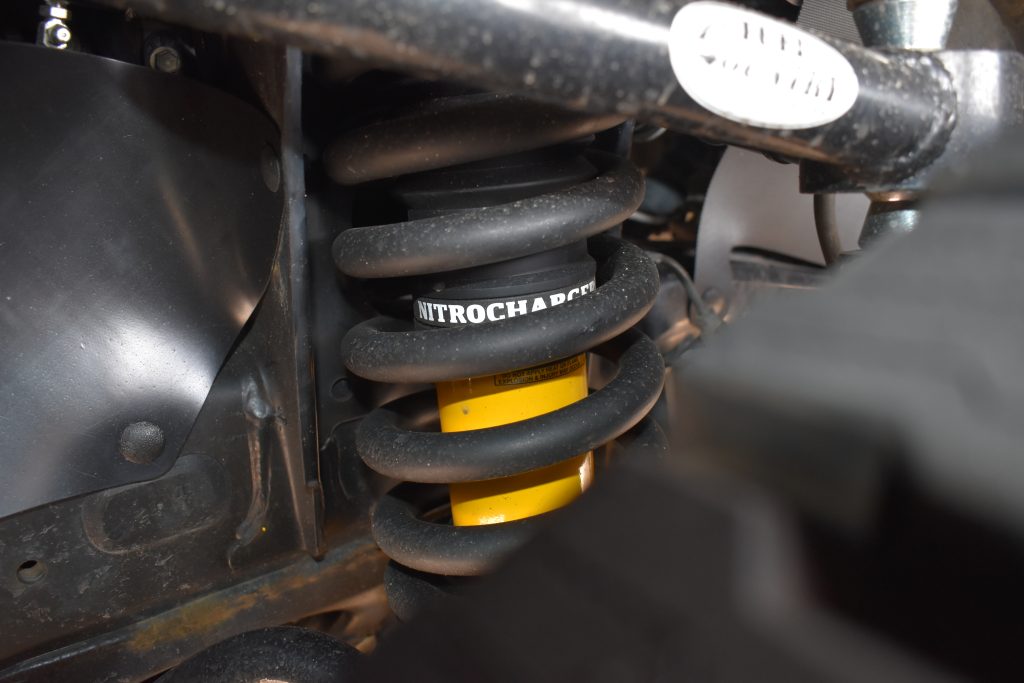
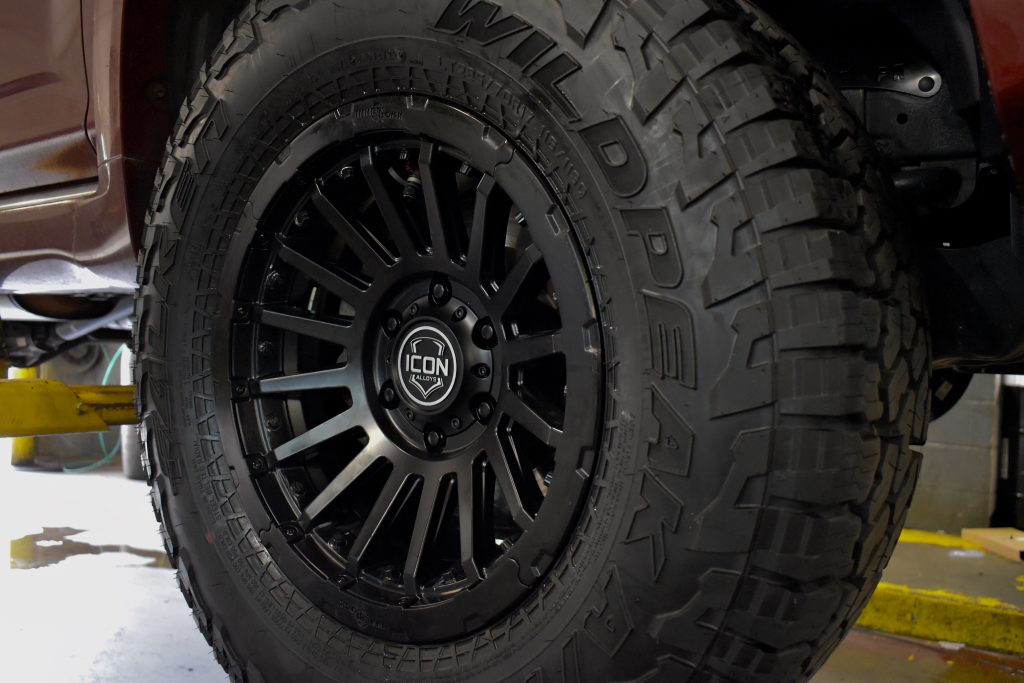
Both the shocks and springs have been swapped for slightly larger ones and the powder coat has been strengthened for greater rust protection. You’ll also notice that the shocks have received a refreshed design, trading a simple sticker for a painted OME logo and the phrase “Nitrocharger+” embossed into the plastic dirt guard.
Aside from that, ARB’s entry-level suspension kit has largely stuck to its roots. You can still opt for three different spring options based on the anticipated weight of your rig, the classic yellow paint job hasn’t gone anywhere, and most importantly, you can drive with confidence that your suspension won’t be the first component to fail. ARB has also announced that the new kit will cost the same as the outgoing Nitrocharger Sport, so you can rest assured that these upgrades won’t come with a larger price tag.
Is Nitrocharger Plus Right For Me?
Thousands of off-roaders turned to the Nitrochargers before they were updated, and now, they’re even better. The reliability lends itself to a lot of missions. They’re ideal for most daily driver setups because you can practically “set and forget” them without the hassle of fine-tuning and wrenching on the shocks, as you’ll often see with race-level suspension. You’ll also see them on rigs going on long expeditions, where reliability is more important than speed.
If you’re someone who daily drives your vehicle, goes on long expeditions (especially to places without easy access to replacement parts), or tows frequently, this is for you. If you’re looking for maximum flex for the hardest off-road trails or cushion-like dampening when hauling down fire roads, check out the OME BP-51s. If you find yourself in the middle, stuck between both missions, read our other post on the new MT-64 setup, which offers closer performance to the BP-51s in a larger body shock.
It also can’t go without mentioning that the Nitrocharger is significantly more affordable than a long-travel or high-performance suspension setup, coming in at about half the cost of the BP-51s. That investment will also last you far longer; around a decade of typical off-road use without needing a rebuild, instead of a year.
Installation Guide

The process to install is the same as practically any entry-level system on the market. In this article, we’ll document the installation process on a non-KDSS 5th Gen 4Runner, starting with completely stock suspension. Owners of 4Runners equipped with Toyota’s Kinetic Dynamic Suspension System (KDSS) may encounter additional hurdles, which I’ll try to mention throughout the install.
If you’re taking the time to install the lift kit yourself, you may also consider replacing the factory upper control arms (UCAs) with aftermarket ones that are designed for the geometry of a lifted vehicle; I decided to go with Tuff Country’s Uniball Upper Control Arms.
As you go, you may find that certain bolts are seized, especially if your 4Runner is on the high-mileage side or has lots of corrosion. Take your time on these bolts and take care not to strip them. I found it helpful to spray all of the major joints with some penetrating oil the night before.
Difficulty: Moderate
Time & Assistance:
- Hours: 6-8, less if you’re mechanically inclined
- People: Can be done with one, but a second set of hands really helps
Tools & Materials:
- Floor jack
- Jack stands
- Socket/Ratchet set with extensions
- Wrench set (ratcheting wrenches are super useful here)
- Tire iron
- Impact wrench (optional)
- WD-40 or other penetrating oil
- Breaker bar
- Torque wrench
- Rubber mallet
- Shop gloves
- Trim removal tool
- Channel locks
- Needlenose pliers
- 6mm Allen key
- Coil spring compressors (if coilover doesn’t come assembled)
Step 1. Prep Front End
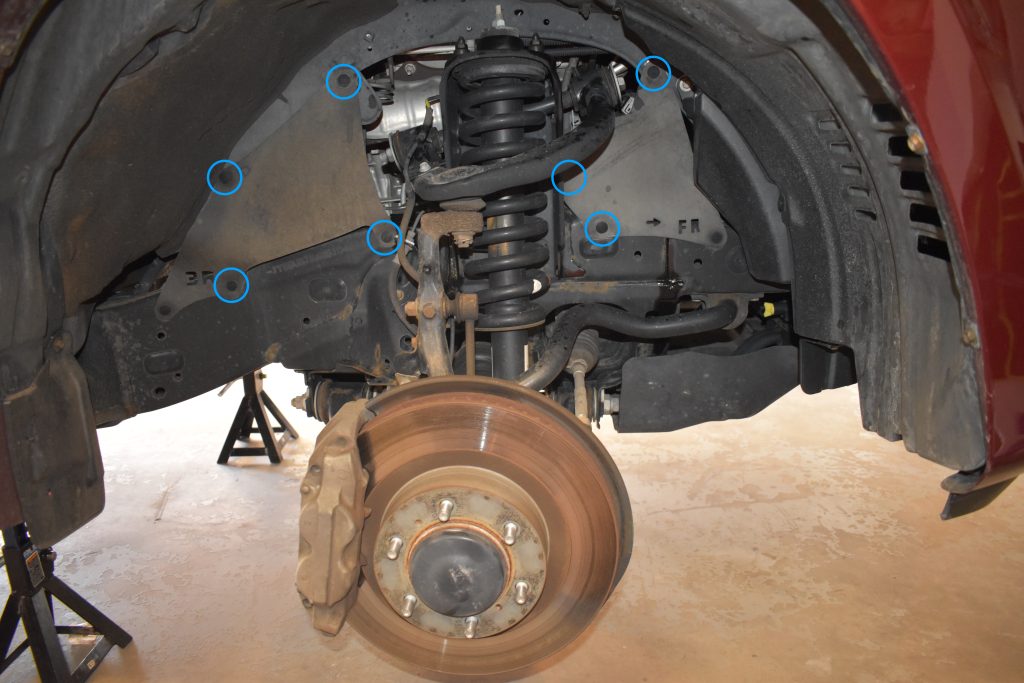
You can start with either end, but I prefer to begin with the front suspension so I can get the difficult part done first. To start, block the rear wheels to prevent the vehicle from rolling and loosen the front lug nuts. Then, lift the front of the vehicle with a floor jack and secure the jack stands to the frame behind the wheel well on either side. My go-to jack point for the front end is the circle protruding from the rear engine skid plate.
Next, remove the front wheels and tires using a socket. Some also find it helpful to remove the engine skid plates, which can be done by loosening the four 10mm and four 12mm bolts holding them in place. Last, remove the mud guards using a trim removal tool.
Step 2. Disconnect Sway Bar Link
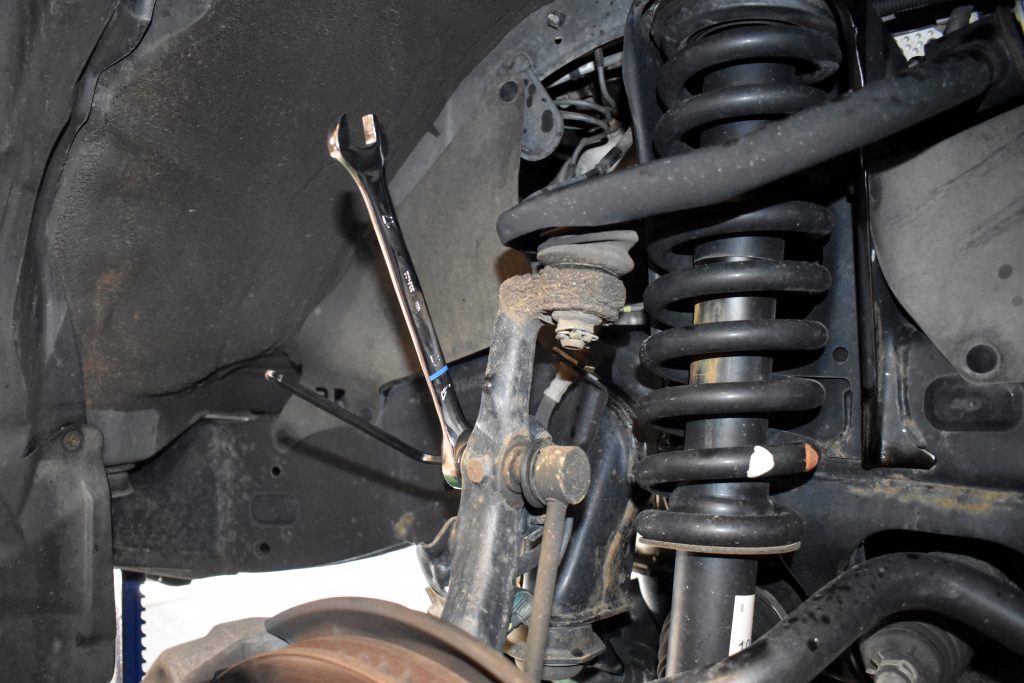
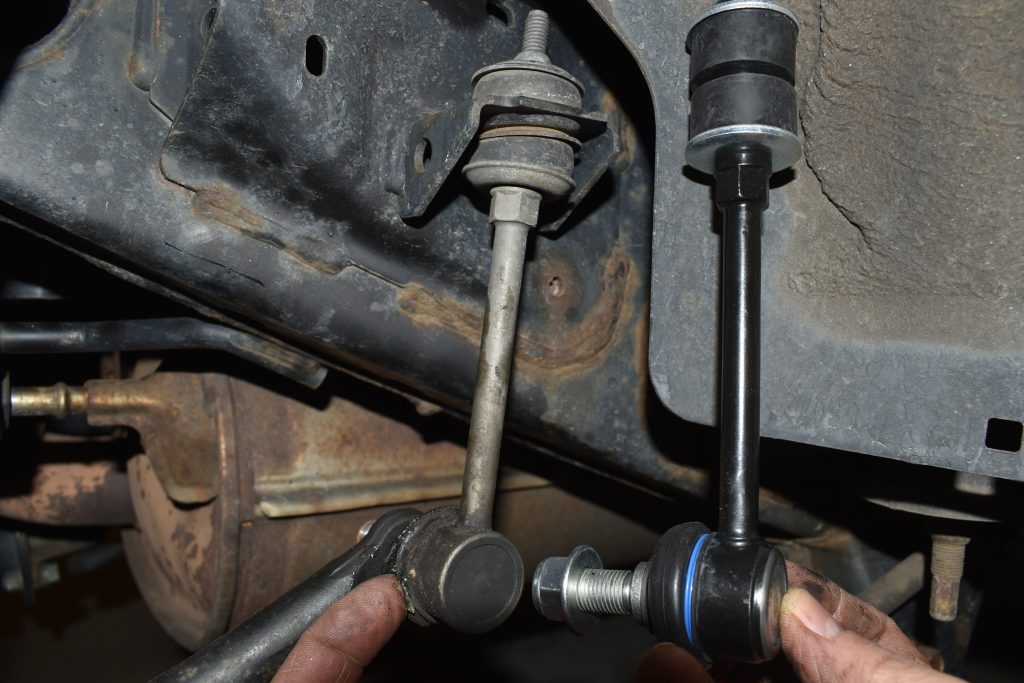
Next, we’ll detach the sway bar so that we can move it out of the way, beginning with the sway bar end link. I recommend starting with the passenger side because it makes the installation easier later on.
Find where the sway bar meets the steering knuckle, and place a 17mm Allen wrench over the nut. Then, insert a 6mm Allen key into the keyhole. You may need to use a small screwdriver to clear out the keyhole first. While holding the Allen key in place, turn the Allen wrench counter-clockwise to loosen the nut.
Author’s note: If your vehicle is on the higher mileage side like mine, you may find that the rubber seal on the end link has split open. I went ahead and replaced both front end links, along with the rear.
Step 3. Disconnect Sway Bar
In order to move the sway bar completely out of the way, we’ll also need to remove the two brackets holding the sway bar in place. Each bracket is held on by two 14mm bolts.
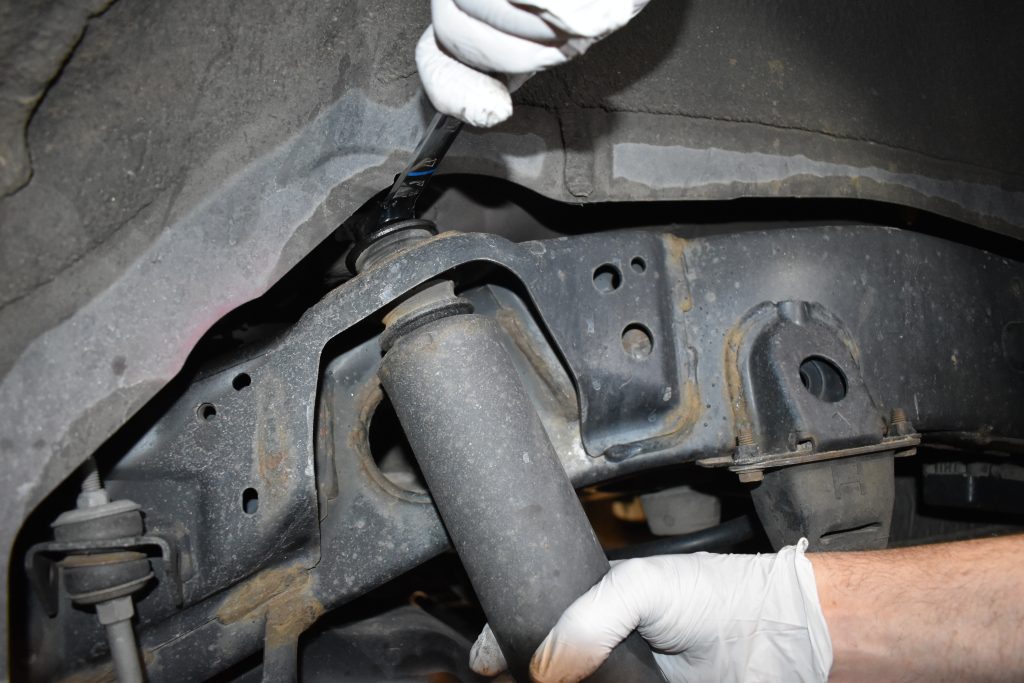
Step 4. Disconnect ABS Line
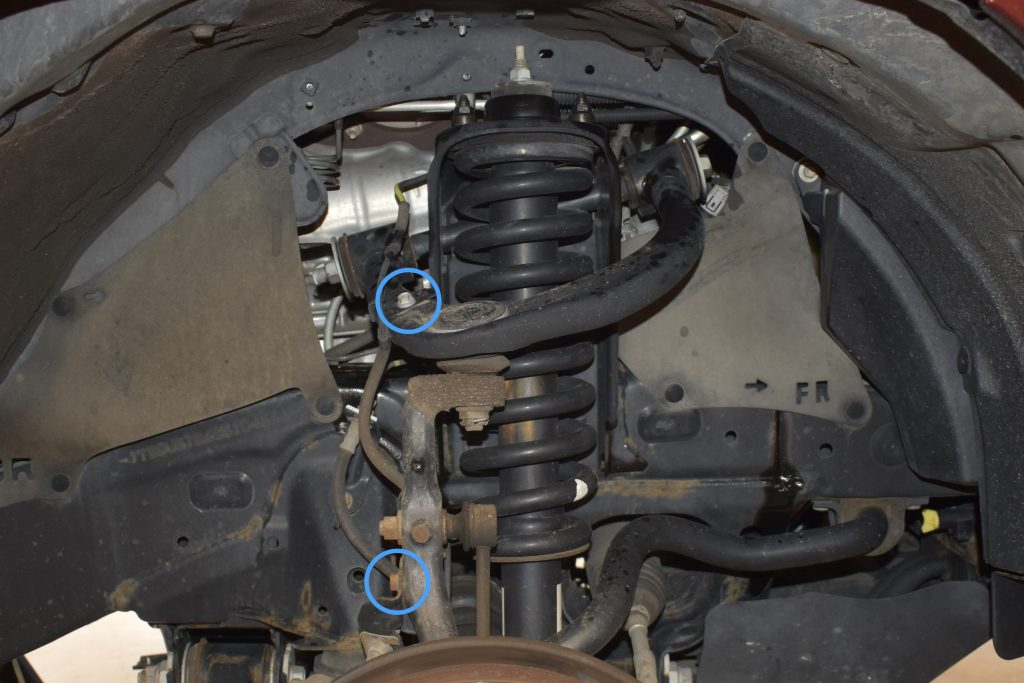
To be able to access the coilover without pulling the ABS line, you’ll need to disconnect it. There are two brackets that attach the line, one on the UCA and the other on the spindle gusset. Use a 10mm socket to remove both bolts.
Step 5. Disconnect UCA
Use a pair of pliers to remove the cotter pin from the castle nut at the base of the ball joint. Then, use a 19mm socket to remove the crown nut; you’ll probably need the breaker bar for this one. If the UCA doesn’t immediately come loose from the steering knuckle, tap the top of the steering knuckle with a rubber mallet to break it loose. Avoid hitting the bolt itself with the mallet, as this can damage the threads and render the UCA useless.
Author’s Note: The ball joint on my driver’s side was especially seized, so after about an hour of hammering and WD-40, I decided to grab a $20 ball joint separator from my local auto parts store, which solved the dilemma in about 5 minutes. Save yourself the time and get the tool if you find yourself in a similar position.
Step 6. Secure Steering Knuckle
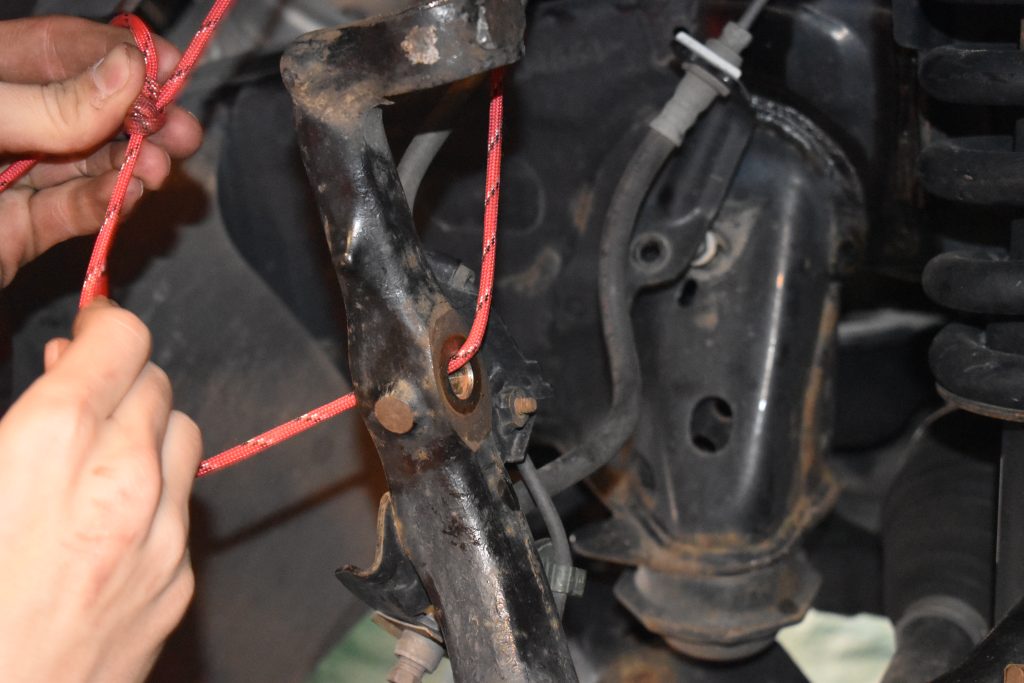
To prevent damage to the ABS lines after the steering knuckle is disconnected from the UCA, it’s important to secure the knuckle so that the wheel hub assembly isn’t able to dangle by the ABS lines. Some might consider this step optional, but after hearing from a friend whose dash lit up like a christmas tree after he accidentally overextended his ABS lines, I didn’t want to take any chances.
At the very least, I’d recommend placing the floor jack underneath the lower control arm. I also went ahead and tied the steering knuckle to a secure point out of the way.
Author’s Note: This photo was taken at a later point when I decided to resecure the knuckle. The taunt-line hitch is a great knot for this purpose.
Step 7. Remove UCA
Using a 19mm breaker bar, loosen the bolt that runs through the UCA. Pop the hood, and loosen the opposing nut from inside the engine bay while a friend holds the bolt in place. On the passenger side, you may find that an AC line prevents you from completely removing the bolt. This is where it helps to start with the passenger side; loosen the bracket holding the AC line in place using a 10mm socket, then gently push the line out of the way.
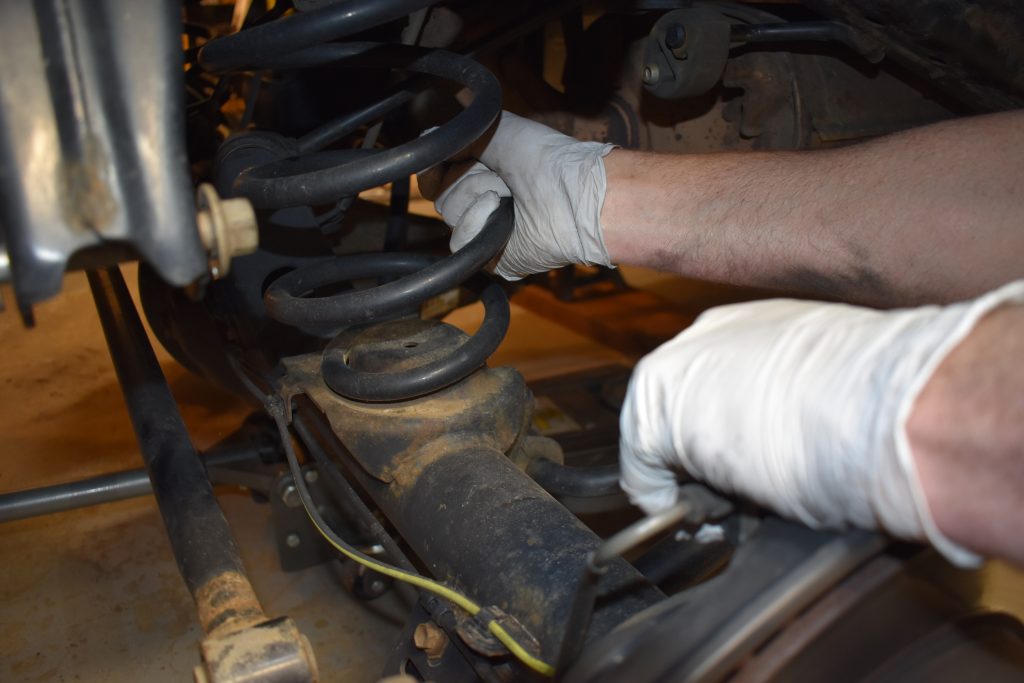
Step 8. Remove Factory Coilover
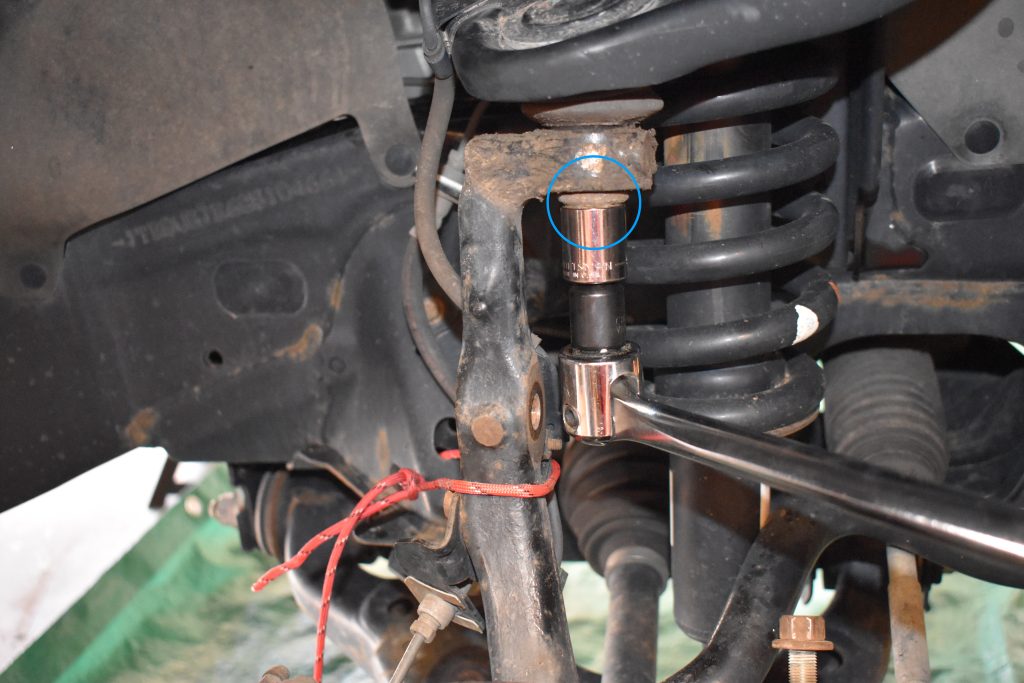
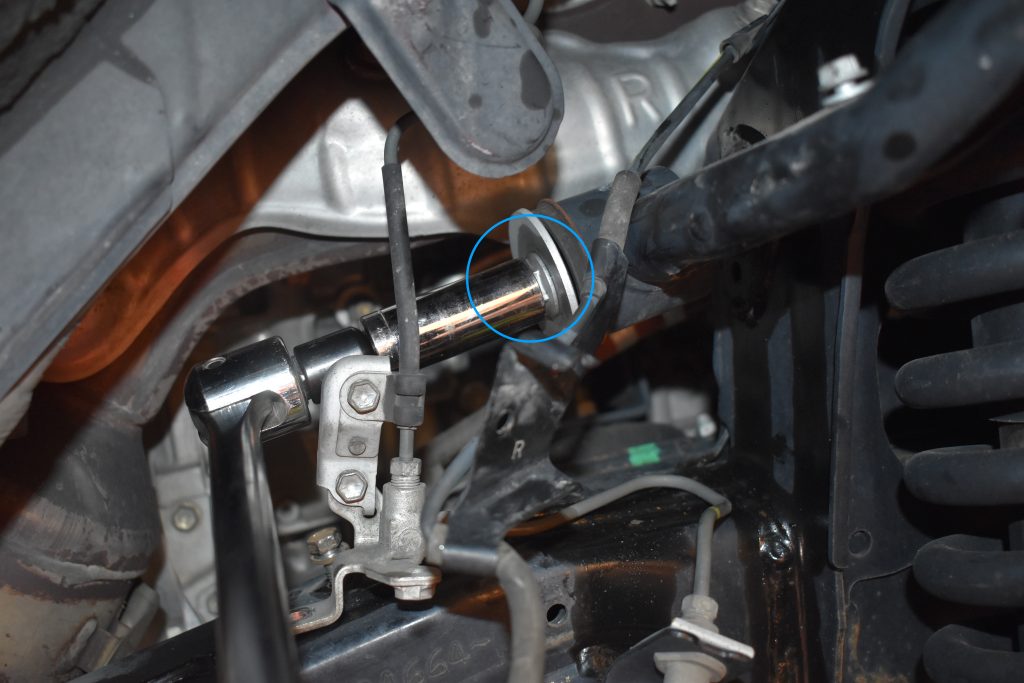
Out with the old! To start removing the coilover, loosen the three 14mm nuts holding the top of the strut assembly. Then, loosen the 19mm nut and corresponding bolt at the bottom of the coilover. You may need to gently tap the bolt out using a blunt screwdriver and hammer. Once the bolt is out, gently shake the coilover loose and pull it off. If your 4Runner is equipped with KDSS, you may need to have a friend use a crowbar or 2×4 to hold the lower control arm down while you remove the coilover.
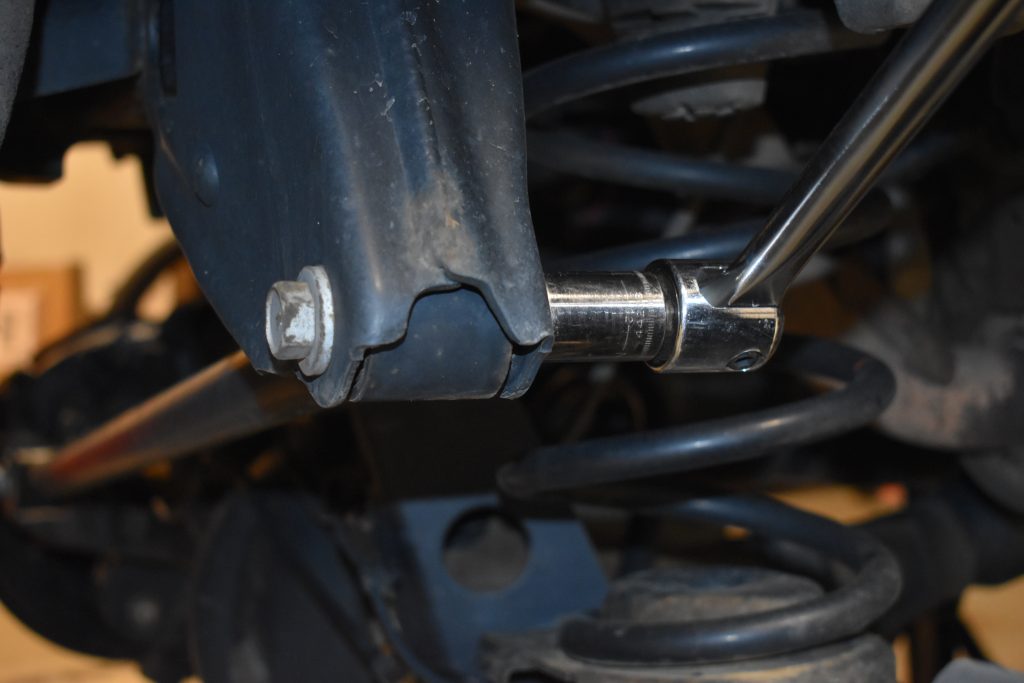
Author’s Note: You’ll notice that the third 14mm nut behind the shock tower is in an extremely difficult place to access. If you’re struggling to get this one loose, here’s a cool trick: the wrench-ratchet method. Take a 14mm ratcheting wrench and place it on the nut. Then, take a 1/2″ square drive socket wrench and place the drive into the open face of the ratchet (as pictured). Then, loosen the nut in a similar fashion to a bent ratchet.
Step 9: Assemble New Coilovers
If your coilovers came pre-assembled, congrats! You get to skip this step. Otherwise, there are two ways to go about this, depending on how brave you are. The first is to order a spring compressor and do it yourself. If you opt to go this route, please find a couple of reputable tutorials and be safe. The second option is to pay a professional shop to assemble them for you, which can run around $50 to $100. I prefer my limbs intact, so I opted for the latter.
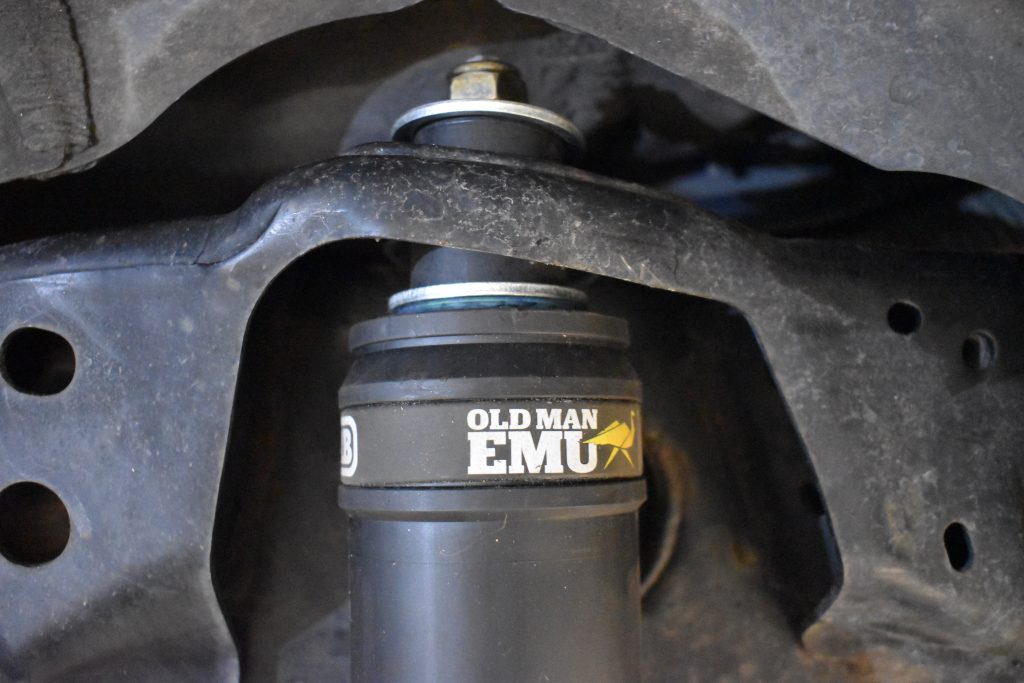
Step 10. Install New Coilovers

In with the new! You’ll find that the new coilovers are harder to fit into the shock tower because they’re three inches longer than the factory strut. This is where it becomes especially helpful to have a second set of hands.
Start by aligning the three bolts protruding from the top hat with the three holes in the shock tower. Again, the wrench-ratchet method will be useful for that third bolt.
If the bottom end of the coilover doesn’t immediately align with the receiving slot, feed a screwdriver through the bottom of the strut and twist it into alignment. If you’re opting to install aftermarket UCAs, now’s your chance.
Step 11. Reassemble Front End
Now, we repeat the entire process in reverse. Reassemble the front end, ensuring that you torque each bolt to the proper amount specified in our 5th Gen 4Runner Torque Spec Sheet. Also, don’t forget to reattach the ABS line brackets, cotter pin, mud guards, and AC line bracket. Align the floor jack, remove the jack stands, return your 4Runner to the ground, and for a brief moment, take in the view of your 4Runner resembling a squatted truck.
Step 12. Prepare Rear End

With the difficult part now out of the way, it’s time to move on to the back end of the vehicle. Like with the front, you’ll want to jack up the vehicle and place it on jack stands. For the rear, I used the diff pumpkin as a jack point and again placed the jack stands under the frame on in front of the wheel well on either side of the vehicle. Using a socket, remove the rear wheels and tires.
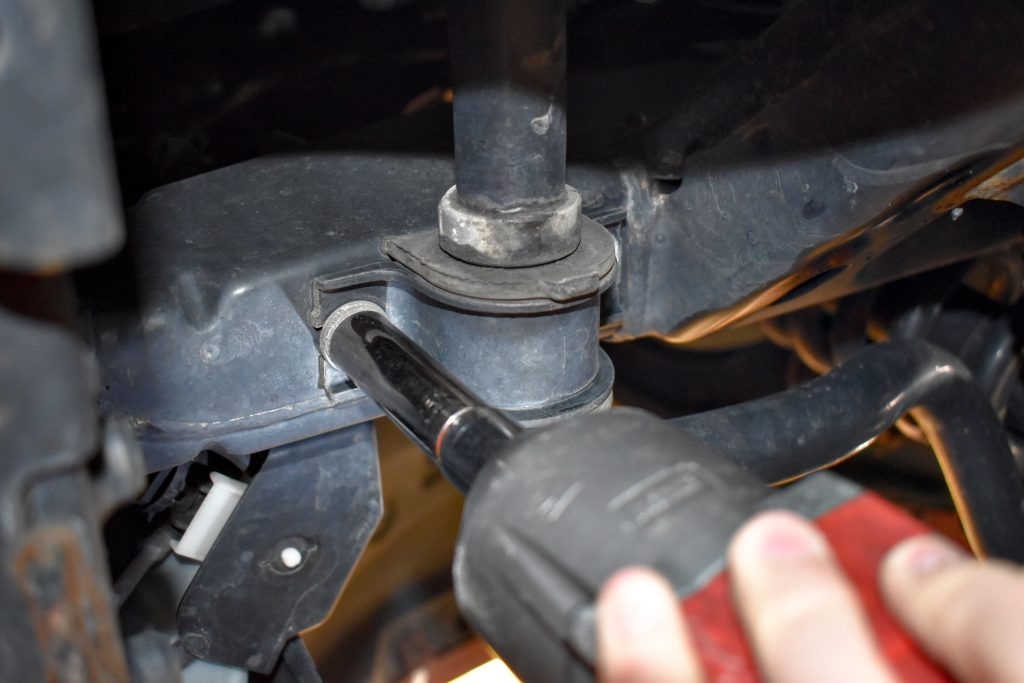
Step 13. Disconnect End Link
Next, remove the rear sway bar end links (as previously mentioned, I ended up replacing these). The top nut is 13mm and the bottom nut is 17mm. Like with the front end, you’ll need a 6mm Allen key to hold the keyhole opposing the 17mm nut. If the end links are seized, you could instead undo the two brackets that hold the sway bar itself. Otherwise, I didn’t find loosening the whole sway bar to be necessary.
Step 14. Remove Factory Shocks
Break the two 17mm bolts holding the rear shock in place loose. You’ll notice that the fender liner prevents you from fitting a ratchet and socket on the top bolt, so you’ll need to use a wrench in this case. If you’re unable to get sufficient leverage with the one wrench, try the wrench-ratchet method mentioned earlier in the article, except use a 1/2″ drive to fit into the larger wrench.
Step 15. Disconnect Track Bar
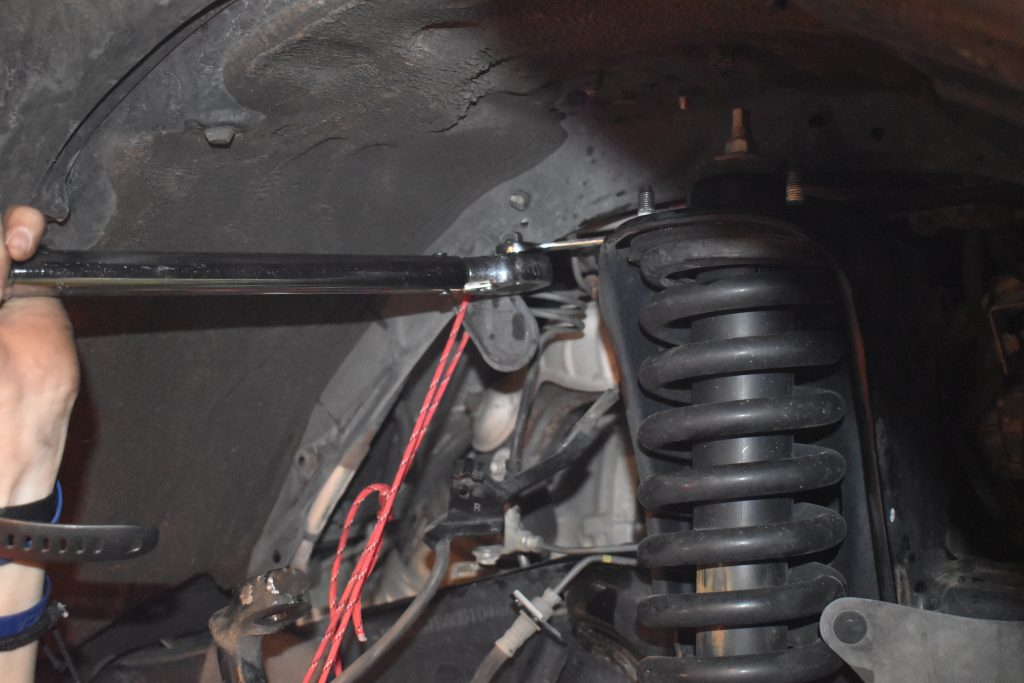
Before we can remove the springs, we’ll need to disconnect the track bar to allow the differential to sway as much as possible. Find the bracket holding the track bar in place on the passenger side and break the 19mm bolt and nut loose; you’ll likely need a breaker bar for this one. Make sure someone is holding the track bar when you pull out the bolt and gently lower it to the ground.
Step 16. Remove Factory Springs
Replacing the rear springs can be quite a project, especially if you have a KDSS-equipped 4Runner. I’d recommend wearing some shop gloves for this step. Here are a few tips I’ve come across to help remove them:
- Have a friend press down firmly on the brake assembly
- Jack up the opposite side of the differential, allowing the working side to droop as far down as possible
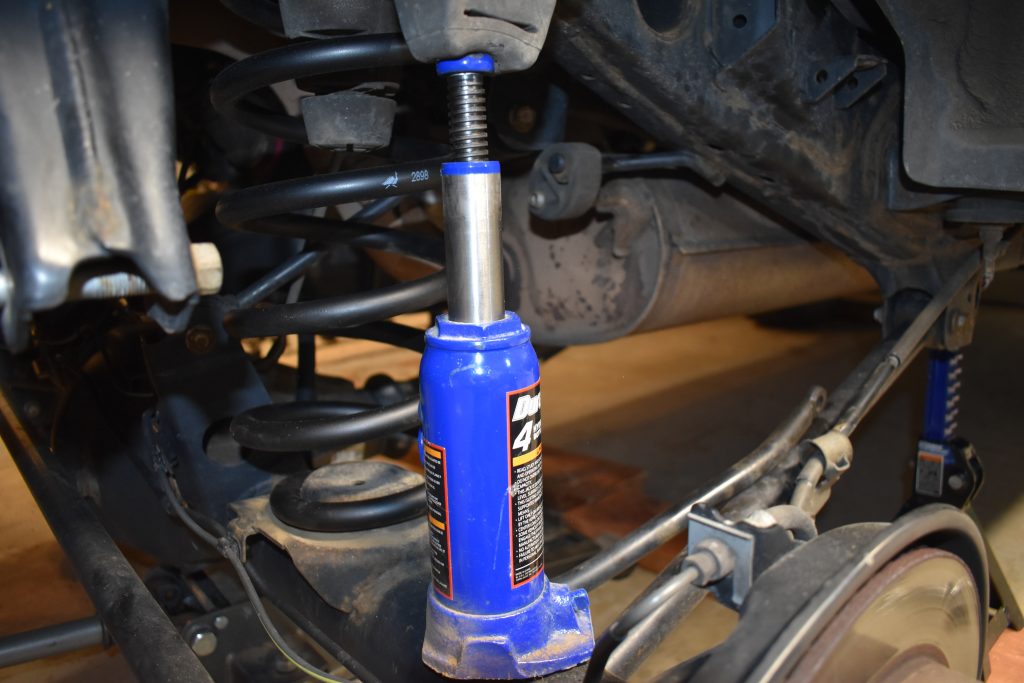
- For additional leverage, place a bottle jack in between the differential and the rear bump stop (see step 17). This is especially useful if you’re on your own.
- If all else fails, use a spring compressor to compress the spring in order to remove it.
Using a combination of these methods, and maybe some brute force, you should be able to remove the factory spring. With the factory spring removed, take the cone lodged in the top of the spring and place it on the top of your new springs.
Step 17. Install New Springs
Now that you’ve got a longer spring, installing the new spring can be even more tedious. Be patient, and use the tips in step 16 in conjunction to get the new spring in place. Ensure that the factory cone is placed on the top of the spring and the coil is seated properly in the notch at the bottom.
Step 18. Install Rear Shocks
To install the new shock, feed the bottom of the shock onto the factory mount, then place the provided washer and rubber spacer on the top of the shock as pictured. Next, use your floor jack to raise the differential until the top of the shock aligns with the factory mount. It helps to have one person guide the bolt into the mount and hold the other washer and rubber spacer in place while the other slowly raises the floor jack.
Once the shock is in place and the washers/spacers are in the correct order, thread the provided 19mm nut onto the top of the shock and torque to 22 ft/lbs. using the wrench-ratchet method. Then, torque the 17mm nut at the bottom to 70 ft/lbs.
Step 19. Reassemble Back End
You’re almost there! Simply repeat steps 12 and 13 in reverse, again making sure to torque to factory spec. Here’s another link to the torque spec sheet.
You’re probably wondering, “What about the track bar?” I had a really difficult time getting the end of the track bar to align with the slot due to the change in the suspension’s geometry. I found that the easiest way to reconnect the track bar was to lower the vehicle back to the ground once everything else had been reassembled, then carefully play around with jacking the rear differential up at different points/heights until the track bar came into alignment.
Once you’ve tightened down the last bolt, congratulations, you’re all done! Give yourself a pat on the back, you’ve just installed a lift kit on your own vehicle!
Next Steps
As with any lift kit, it’s important to go and get an alignment since you’ve changed the geometry of your vehicle’s suspension. You might also want to look into improving some of the surrounding hardware, including extended brake lines, aftermarket UCAs, and a diff drop. Mudify can supply all of these as well.
Once you’ve driven for a few miles on the new suspension, go back and check to ensure that none of the bolts have come loose or failed. Also, don’t forget to re-torque the lug nuts.
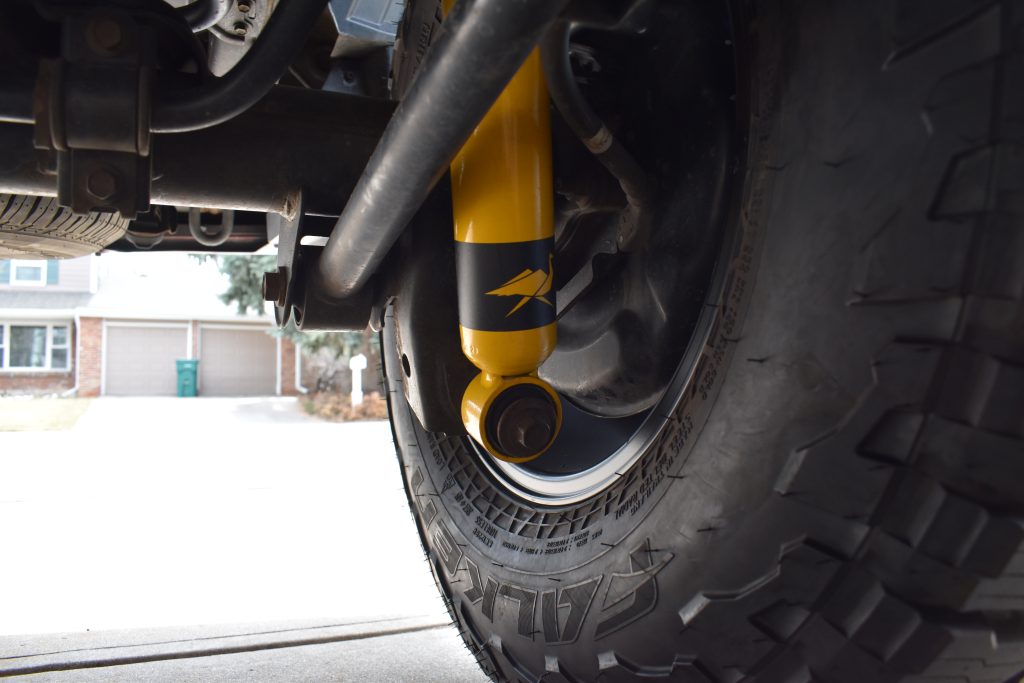
Results
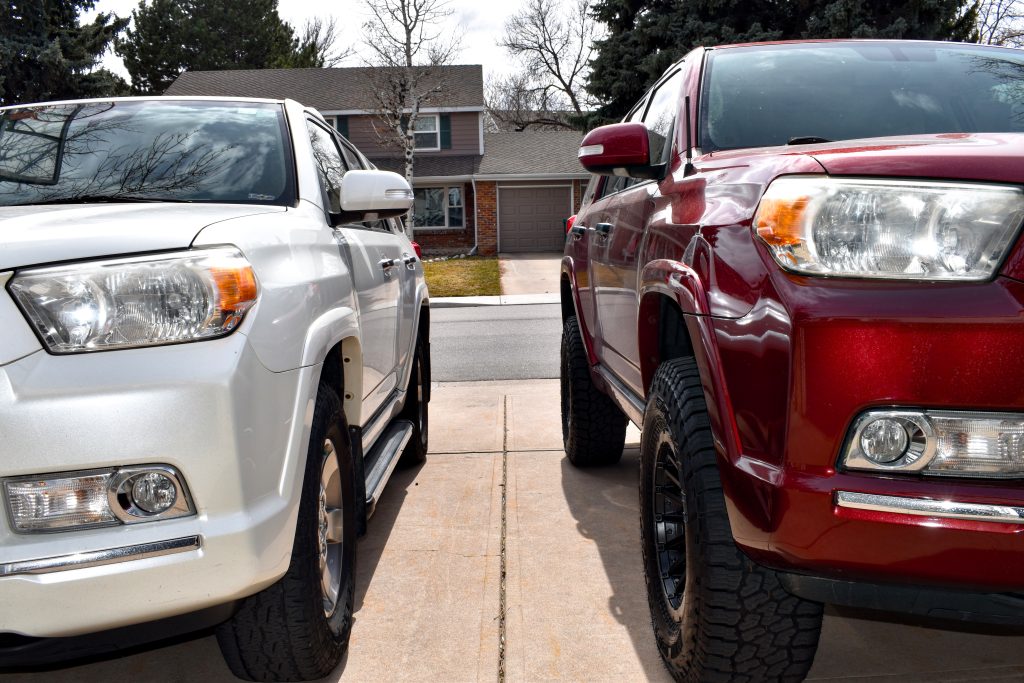
I was lucky enough to have a stock SR5 5th Gen 4Runner to compare the lifted rig to. Above is a side-by-side comparison of the two vehicles’ fender clearance. It goes without saying that I was shocked by the difference– it’s amazing how much a simple three-inch lift can achieve for the 4Runner’s aesthetic and driving position. Keep in mind that the lifted (Salsa Red) 4Runner is also running on 285/70/17 tires, while the stock (white) 4Runner is running on the factory 265/70/17 tires.
Driving Impressions & Review
The first change I noticed when I got behind the wheel was a massive difference in handling. The 4Runner’s notorious body roll was no longer, and I could comfortably take corners at noticeably higher speeds. Similarly, the 4Runner doesn’t pitch nearly as far forward when I apply the brakes.
Knowing that I’d ultimately put an aftermarket front and rear bumper on the rig, I opted for the medium-weight springs. Until those are installed, the 4Runner is pretty underweight for its springs, causing it to ride really stiff. However, when loaded down with a bike rack, four bikes, four passengers, and gear for a trip to Moab, the 4Runner softened up and handled like a dream. This just goes to show how important it is to choose your springs carefully.
The last major change is in the stance of the rig. Three inches doesn’t sound like a lot, but it completely transforms the driving experience. You’ll notice that you’re sitting taller than the cars around you, and it’ll become a lot easier to spot the roof of your 4Runner in a parking lot.
Aesthetically, the Nitrocharger Plus is a game changer. As you saw in the previous section’s photo, next to a stock 4Runner, it looks like a completely different vehicle. In my opinion, a lift kit and 33-inch tires are the two mods that transform a 4Runner from a car into a rig.
Final Thoughts

Old Man Emu really knocked it out of the park on this one. If dependability is important to your mission, there’s no other lift kit I’d recommend to you. Best of all, the Nitrocharger Plus allows you to retain that Toyota reliability while gaining greater ground clearance, better handling, and adequate space to fit 33-inch tires with minimal rubbing.
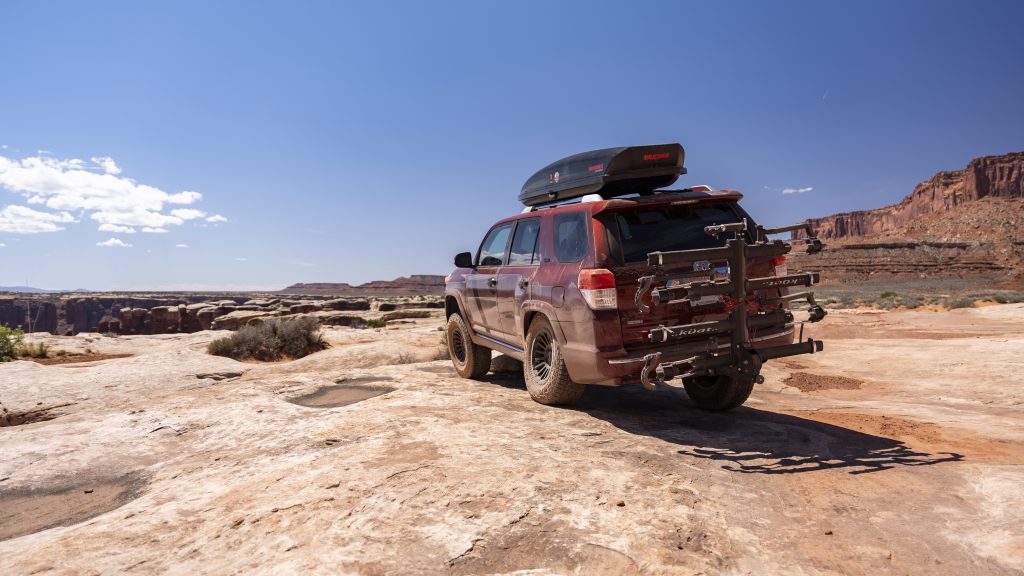
33s and OME Nitrochargers can seem to fit the mold of a “cookie-cutter” 4Runner build, but thousands have turned to them because they know it works. The updated setup only builds on that reputation. My rig serves as both my daily driver and a Search and Rescue vehicle, so being able to depend on my suspension isn’t only a matter of convenience, but a determining factor in whether or not I’m able to respond to calls off the beaten path.
If you’re entertaining purchasing a lift kit, I’d strongly encourage you to look at this one. It’ll get you far off the beaten path (certainly further than my driving abilities will take me), and it’ll allow you to do so with the peace of mind that comes with knowing you’re suspension won’t be the first component to fail.

Did you need a spacer to correct drivers side lean?
What front and rear springs are on this kit and how much pre load did you add in front and did it correct Driver side lean?
Do you know how this setup compares to the 2019 TRD Pro Fox suspension? I’m ready to move to a 3” lift and my suspension needs replacing anyways but don’t want to back track as far as performance is concerned. I’m mostly a daily driver and then run the rig on logging/fire roads some which are fairly rutted out or have downed trees forcing me to drop down into the ditch to go around.
Solid post, Garrett! Great photos and you always go into all the relevant details. Glad to see OME updated their entry level stuff.