
We love the SR5 4Runner’s aggressive styling, but some of us wish it came with the factory hood scoop like the TRD trims do. The more aggressive look that it provides has some major allure.
A quick review of the online 4Runner forums shows a lot of interest from SR5 owners wanting to swap their plain hood for a TRD hood, but there are a few takers. So, your chances of finding someone to swap with are pretty low.
If you have the money, you can order an OEM hood and scoop insert through your local Toyota dealer, and have it painted by a local body shop and installed. However, this could cost you close to $1,500 when it is all said and done. If you do not have that kind of money, you can check Craiglist, eBay, or OfferUp to see if you can locate a TRD hood.
I was able to find an OEM TRD hood on OfferUp for a few hundred dollars. However, it was Army Green and my rig is Super White. I decided to vinyl wrap it to maintain the white theme for my rig. The hood I purchased did not come with the scoop insert, so I purchased an aftermarket one on eBay for under $30.
This is a pretty simple mod to do, but because the hood is so large, it’s best to have a second set of hands during removal and installation.
Find It Online:
- OEM TRD Hood (53301-35210): Check Price
- OEM TRD Hood Scoop Insert (761801-35080): Check Price
Tools Required:
- 12mm box wrench or ratchet
- Pry tool
- Small to medium-sized flathead screwdriver
- Optional:
- 8mm box wrench or ratchet (for hood scoop insert)
- Torque wrench (9 ft/lb for hood hinge bolts)
- Second set of hands to help with removal and installation (highly recommended)
Table Of Contents
Step 1. Open Hood

The hood latch mechanism is located at the lower left side of your dash. Pull the bottom of the latch to pop the hood open.

Use your fingers to lift the latch upwards, allowing the hood to fully open.
Step 2. Remove Old Components
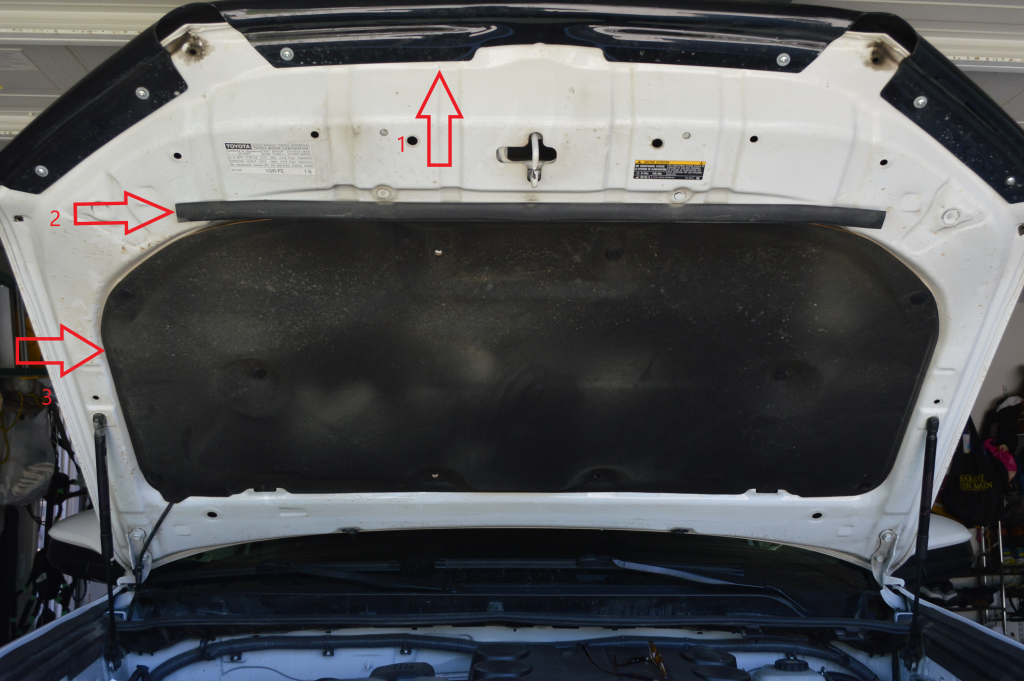
Once the hood is up, you will want to remove:
- Any bug/rock guards
- The long strip of rubber called the radiator support shield
- The hood insulation pad
Radiator Support Shield/Rubber Strip
The radiator support shield is held in place by seven small push clips. Use your upholstery remover or pry tool to remove each one. I was able to remove these without breaking them. If yours breaks, the replacement part number is 90467-08011.
Set the support shield and clips aside for reinstallation on your new hood.
Hood Insulation Pad

The hood insulation pad is held in place by 10 clips. Use your pry tool to remove these; I broke most of mine. The replacement part number is 90467-A0003.
Set the insulation pad and clips aside for reinstallation on your new hood.
Step 3. Remove Windshield Washer Fluid System

Once the insulation pad is removed, the windshield washer fluid delivery system is exposed. The first thing you’ll want to do is to find this tension fastener on the passenger side hood hinge. Pinch and push it through the hole on the hinge toward the driver’s side.

Free the washer fluid tubes from their plastic C-clips, there are three in total.
Next, disconnect the passenger side and driver side washer fluid tubes from their respective connectors. I lubed up the connectors with some soapy water. After waiting a few minutes, I used my plastic pry tool to begin prying them off the connector. Finally, I used my fingers to gently peel them off.
Be very careful as you do not want to tear these.
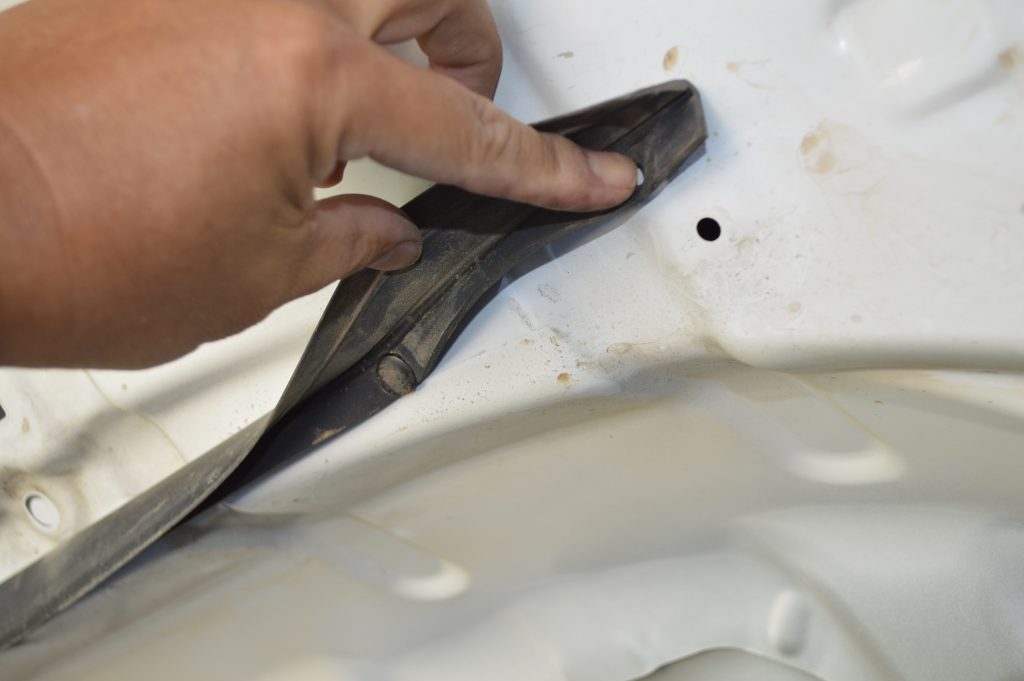
Step 4. Remove Washer Tube Clips From Old Hood

It will be easier to wait until your hood is off to try and remove the clips. The first one is the furthest over, on the passenger side of the truck, and is rectangular shaped.
The washer fluid tube was taped onto this clip and I was simply able to slide the tube off of this clip. In order to remove this clip from the hood, you need to use a small, pointy tool to push the friction tabs inwards. Once you do that, it should slide out of its hole. Patience is the key.

There are three C-clips that hold the washer fluid tube as it travels across the underside of the hood. These are removed using the same principle. Use a pointy tool, like a pick set, to help you push these inwards. Be patient and you will eventually be able to wiggle these out.
Set these clips aside as you will need to reinstall them on your new hood.
Step 5. Remove Windshield Washer Sprayers

Use a small flathead screwdriver to pry out your hood squirters. Slide the flathead in from the side near the rear part of the squirter and pry it out. The squirter will come out and have its feeder tube attached to it.
Set them aside for reinstallation on your new hood. The passenger side tube is shorter than the driver side tube in case you forget to mark it.
Step 6. Remove Hood Struts

The 4Runner’s hood uses two small shocks (one on each side) to assist in opening it. You will only need to disconnect it from where it attaches to the hood, not remove it where it attaches to the body of your truck.
There is a small metal band that is in the shape of a “C” that holds the shock around a small metal sphere attached to your hood. Pry the metal band off the shock. Once that is removed, the shock may fall off of its attachment point with the hood.
There are a couple of things you need to do here:
- Make sure your friend is supporting the hood
- Make sure you put a sheet, blanket, or towel over your engine bay.
The metal band is under tension, and if it flies off, you want it to land on the sheet, blanket, or towel. Otherwise, it will ruin your day if you have to go to the dealer for a new one. Set these metal bands aside and you will reinstall them later on your new hood.
Step 7. Remove Old Hood

Before you unbolt the hood from its hinges, there is a little prep work to do first. It’s not mandatory, but I would recommend putting some thick hand towels underneath the corners of the hood near the windshield. That will give the hood something to rest on if needed.
Begin loosening your bolts with your 12mm ratchet or box wrench. There are two bolts on each hinge that attach the hood to your 4Runner. I had a buddy on each side of the hood supporting it as I removed the bolts. Once the bolts are removed, set them aside as you will need them to install your new hood.
Set the hood upside down on something soft and remove the washer tube clips as described in Step 4.
Step 8. Prep New Hood

You will be reinstalling the following items to your new hood before mounting:
- x1 Rectangular tube clip on the passenger side.
- x3 C-clips that go across the inside and hold the washer fluid tube.
- x2 hood squirters (push them back into place). The longer tube goes on the driver’s side; gently pull the tubes from each squirter through the hole first so they are ready to connect to the mainline upon installation.
- Optional: If your new hood didn’t come with a hood scoop insert, you could install it at this stage if you like (see Step 9). I waited until the hood was installed because I painted my scoop and did not want to scratch it
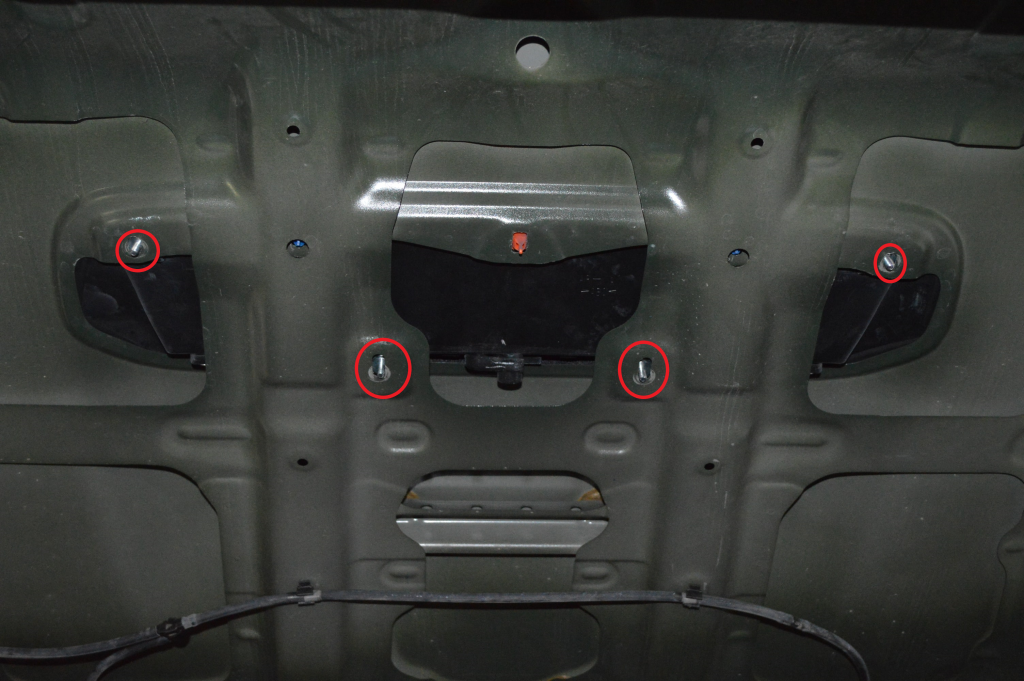
Step 9. Install New Hood

With the help of your friend(s), pick up your new hood, position it over the hinges, and carefully line up the bolt holes. Insert two bolts on each hinge and snug them up using your 12mm ratchet or box wrench. The factory manual recommends torquing the bolts to 9 LB/FT.
If you do not have a torque wrench, you may want to consider using some blue thread sealer and snugging up the bolts with your 12mm ratchet.
With your friend(s) supporting the hood, reattach the hood supports and secure them by attaching the metal c-bands. I started by sliding them into their slots near the top of the attachment and then pushed them down into place.
Once the hood is secure, you will connect:
- Hood squirter tubes to the main washer fluid line
- Washer fluid line to the three C-clips
- Washer fluid line to the one rectangular clip
- Main fluid tube attachment by pushing it back through the passenger side hood hinge
- Radiator support shield/rubber strip using seven clips
Once your windshield washer system is reassembled, test it to ensure it works (squirts washer fluid onto your windshield).
If you have already installed your hood scoop insert, you can skip to Step 10.
Step 10. Install Hood Scoop Insert

My scoop insert was an aftermarket part. It came with self-adhesive rubber strips that I had to peel and stick around the perimeter of the underside of the insert. I believe this was so the plastic would not be in direct contact with the paint on the hood.
Once I completed that, I inserted the scoop through the top of the hood. Line up the four protruding bolts on the scoop insert with the corresponding holes in the hood.
Once the scoop bolts are through the bolt holes, use your 8mm box wrench or ratchet to snug up the nuts onto the bolts. My kit did not come with locking nuts, so I used blue thread sealer to ensure a good seal.
Step 11. Reinstall Insulation Pad
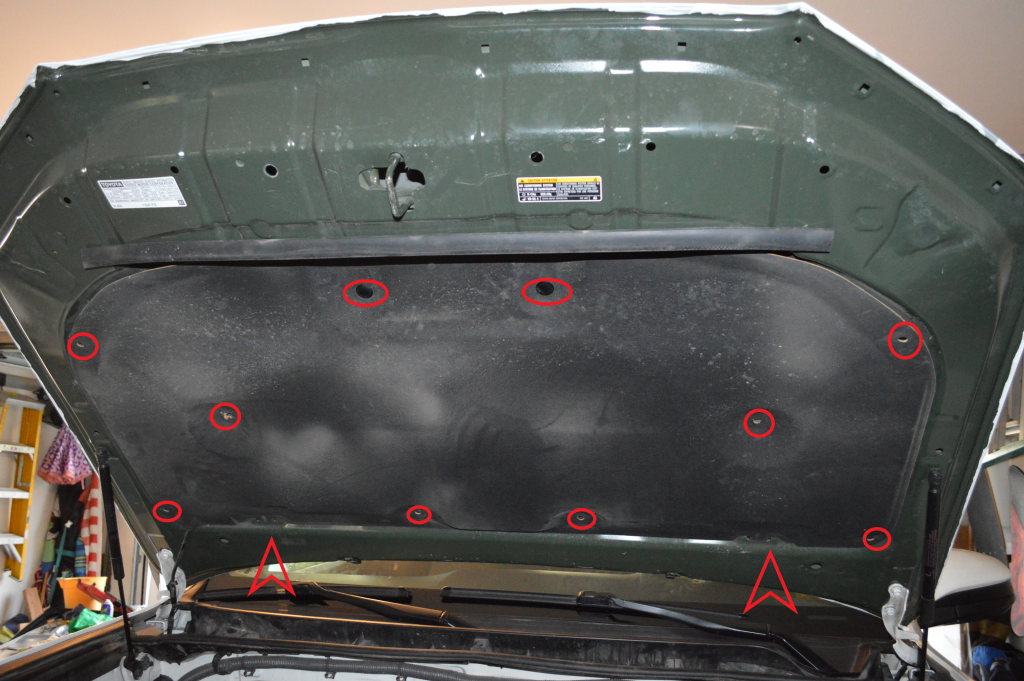
The insulation pad should be black-side down (toward the engine). There are two tabs on the pad that will slide into their corresponding grooves towards the back of the hood (depicted by the arrows).
Next, use 10 clips to secure the insulation pad back to the hood by pushing them through the corresponding holes in the insulation (depicted by the circles).
Make sure you test your hood to confirm it opens and closes correctly.
Final Thoughts

This mod was a little more involved than I anticipated. There is some prep work to do before the hood can be removed, and the entire process took me about 2.5 hours to do. Granted, that included taking pictures and documenting the steps for this guide. If I had to do it again, it would probably only take an hour.
Overall, I am really stoked about how it came out. I feel that the hood scoop adds an aggressive look to the 4Runner’s front end. I usually prefer to spend my money on mods that will enhance my off-road performance. However, this is one mod that I could not pass up!
I have a white hood without a scoop. Will swap for a hood with a factory scoop. Live In California.
I’m in Utah with a non scoop hood and would love to trade for one with a scoop if anyone is nearby.
I have the same glare issue that Randy mentioned with my TRD Pro. I was actually thinking about doing the reverse swap and installing a non-scooped hood.
I wish my Calvary Blue TRD Pro did not have a hood scoop. I added a black hood scoop decal to kill the reflection into my eyes. I wonder if anyone will notice this after the swap