
KTJO 4×4 Door Bowl Lighting Kit: Budget Friendly Mod To Add Ambient Lighting To Your 5th Gen 4Runner’s Interior – Install & Review
We all know that the 5th Gen 4Runner lacks the tech and features of modern cars, SUVs, and trucks today. When I purchased my 4Runner, that was one of the selling points for me. I didn’t really care for all the tech and luxury, just as most 4Runner owners probably don’t.
As time goes by and you really get used to your 4Runner, then comes the mods. You start to realize the things you want to change or improve. That can range from the exterior in the form of LED headlights to the interior with chrome delete kits.
For a recent trip, my family recently rented a BMW SUV (not something I would personally own), but it was nice. The moment I was in the driver’s seat, I recognized a lot of small luxury features. Footwell lighting, interior, and exterior door bowl lighting, trims, textures, digital instrument cluster, and much more. All of those things add up; as even the tiny features can give it a more luxurious feel.
At this point, I wanted some of those small features for my 4Runner’s interior. I really appreciated the small details. When I found the KTJO 4×4 door handle bowl lighting kit, I was immediately drawn to it. KTJO 4×4’s door bowl lighting kit fits directly into the existing door bowl plastic and looks like it came straight from the factory.
Find It Online:
- KTJO 4×4 Door Handle Bowl Lighting Kit (5th Gen 4Runner): Check Price
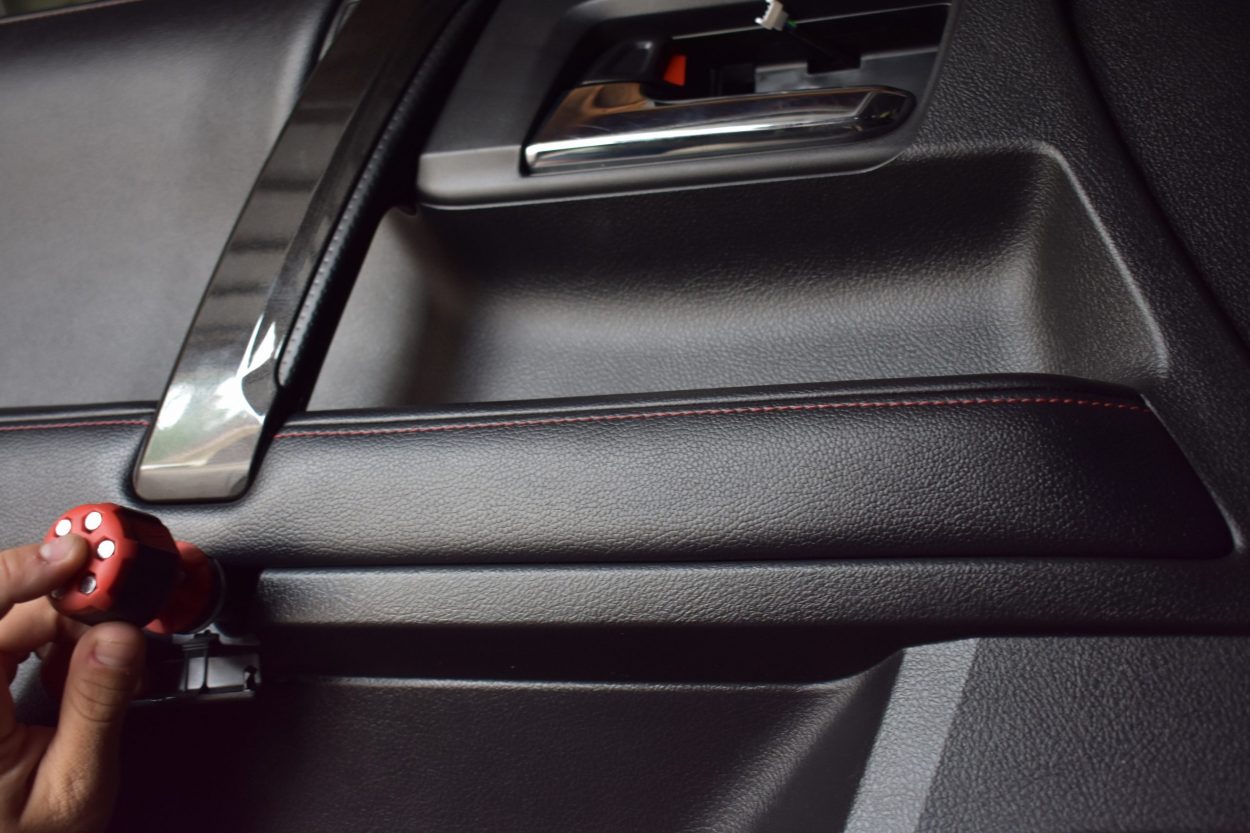
Door Bowl Lighting 4Runner
Lighting Kit Details

Everything needed for installation is included with the kit, which comes with wire harnesses and ABS plastic door bowl covers. The quality of the covers is on par with the OEM Toyota covers. The actual LED isn’t visible unless you closely look at the door bowl plastic, which makes for an OEM+ look.
The whole kit is completely plug-and-play and the installation is pretty straightforward as long as you are comfortable with pulling the door panels off.
A remote is also included to change the color, mode, and brightness of the lighting. It’s definitely a nice touch of convenience.
Installation

The tools and supplies required are very minimal. I no longer have the stock battery terminals, and if you have changed yours, then you will need whatever it may be to remove them.
Required Tools:
- Philips Screwdriver
- Trim Removal Tool
- Various Socket Sizes (To Remove Battery Terminals)
Note: The harnesses with the larger connection belong to the front doors, and the smaller ones belong to the rear doors.
Step 1. Roll Down All Windows

This one is just a technique that I found super helpful for install of the door panels. I highly recommend this, as it will make your installation of the panels a little less frustrating.
There is a groove on every panel that has to fall back into the lip above. This step will come later.
Step 2. Disconnect Battery

For your safety and the safety of your rig, disconnect the battery to make sure you don’t short or fry anything.
Step 3. Prep Front Door Panel For Removal

Each door panel, whether it be the front or rear doors, is relatively very similar. The front panels have caps over where the mirrors connect to the door, three Philips locations, and various connections on the backside.

Starting with the cap over the mirror mounting location, pry up on the forward side until it pops off. It is held in place by two clips.

Next, pull the caps off all three Philips head screw locations and remove them.

Now, pull up from the bottom right side of the panel near the speaker to start the release of the clips.

Follow the trim of the panel all the way around to release the clips.
Step 4. Remove Front Door Panel

Before allowing the panel to be free from the door itself, disconnect the lower left-hand light harness now. That way, when holding onto the door and trying to disconnect the rest of the connections, you don’t have to try and reach down to the bottom of the panel.

When removing the panel I found it easiest to make sure the bottom of the panel is lifted up slightly. Then, using the door grab handle, pull up on the panel at an angle. This will allow the inner window seal groove at the top of the panel to separate from the door.
Once separated, you will still need to disconnect two more connections, starting with the window and door lock control harness from the top of the panel shown above.

Lastly are the door handle cables, shown above. The white and green clips slide away from the panel and the cable ball can come out of its slot.

Once complete, the door panel should be free!
From this side, you can see all the clips that hold the panel on, along with the inner window seal groove.
Step 5. Install New Lighting Harness

The window and lock control harness removed earlier is where you will plug in your new harness. The harnesses will only fit the correct door locations, taking out the guesswork.
Once complete, the connection should be the truck’s wire harness, the new wire harness, and then the connection to the window and lock controls. The small wire will go to the light, disconnect it from the door bowl light so you can run the wire through a hole in the door later.
Step 6. Reinstall Front Door Panel & Light

This will be in reverse of the disassembly steps. Start with the door handle cables, and make sure to push the cable guide clips into place.
Following the cables, insert the new end of the window and lock the control harness into its place. Next, run the small wire for the bowl light through the upper hole in the door handle area. Make sure to pull enough through so it doesn’t fall back into the door while installing the panel.

This next part can be tricky but starting with the inner window seal groove at the top should help it go smoother.
Once the groove of the panel is over the lip on the door side, press in and pull downward to seat it in place. When it’s in place, the door panel should be able to securely hang on its own from the top.
Next, connect the small harness for the bottom door light.
Before completely reinstalling the door panel, connect and test the door bowl light now. That way, if there is anything wrong, you will find out before everyone is put back together. To do this, connect your vehicle’s battery for a moment and turn the ignition to the ACC position. This should illuminate the bowl lighting. Also, you may want to test the functionality of included the remote.

If all is well, take out the key and disconnect the battery again if you still need to finish the remainder of the lights. You can leave the light dangling as long as it’s not in your way of installing the panel.
Now that your inner window seal is in its groove, you can now press in on the outer rim of the panel to push the clips into their locations. After pressing those into place, install the door bowl screw and feed your small wire for the bowl light back behind the panel. Install the final two screws and the mirror mounting location cover.

Press the door bowl light into its place, it should lock in place with the clips on the backside.
Step 7. Finish Remaining Doors

The installation process for the rear doors is essentially the exact same as the front doors, minus the mirror mount location covers. It can be a little harder to get the inner window seal groove over the lip on the door, due to the small section of the window that does not go down. Rolling the windows down prior will be a lot of help when it comes to panel installation.
Note: It is possible to swap over the harness quickly without pulling the whole panel off and all of its connections. A second set of hands would make this really easy. I was able to accomplish this by having the harness ready to go and everything right next to me as the panel was partially separated from the door.
Remote Control

This is a pretty sweet addition to having ambient lighting. The remote has a pretty good range of functions over the lights. The list below is the various functions:
Colored Buttons
This will choose the lighting color for all of the lights.
Bright “+”,”-“
This will adjust brightness from almost nothing to a full power setting. I did notice that pressing the “-” button once adjusts brightness by a couple of levels. When pressing “+”, it was adjusted by one level at a time. I really appreciate this feature so you can adjust the lights down to a level that’s comfortable for you.
Color “+”,”-“
This will change from one color to the next in the desired direction.
Mode “+”,”-“
This will change the mode of how the lights act. I couldn’t get the lights to do more than cycle through all the colors slowly. So, the “+” and “-” buttons might just be placeholders on the universal remote.
Speed “+”,”-“
This will adjust how fast the colors cycle through when you select “Mode”.
Demo
I believe this function is just the same as selecting “Mode”. Nothing notable or crazy happens when pressing this button. This could also be a placeholder on the remote.
Power
Turns the lights off or on (returns to the previously selected setting).

As for the remote, it works surprisingly well. I did notice you need to be somewhat aiming the remote in a certain direction. If you find one of the lights not in the selected color or mode, you can select the desired color again or power off and then select the color desired. This will take care of any out-of-sync lights.
Also, If you don’t want to have a remote sitting in your console or just sliding around somewhere, throw some Velcro on it. That way you can just throw it somewhere on your headliner as pictured above.
Final Thoughts

If you’re in the market or are looking for some interior upgrades, these are a great addition. I love having ambient lighting at night in my 4Runner and the OEM styling is awesome.
Ambient lighting is also helpful for passengers. Rather than having a dome or map light on, which could be overwhelming at night, these provide just enough useable light. This light is adjustable all the way down to barely on, so it should never be distracting or bothersome. The above photo is at full intensity.
As well as being helpful or nice to have, the KTJO 4×4 door bowl lighting also gives the interior a more upscale feel. In conjunction with other mods, you can really update your interior to be in the present time period. You spend a lot of time in your interior, so why not make it more pleasant to be in?
Question for anyone else who may have installed these: I have my set to red (keeping up with a theme), and bowl lights, while I like them, have a tendency to a lot of times to change colors at random. And that’s WITH the remote tucked away. Hell, sometimes, the lights will cycle through the various colors (and I’ve never touched the remote). So question is this: is there a setting adjustment somewhere or am I just SOL and just have to keep going back to red?
I’ve noticed this as well. After cycling power to the vehicle quite a few times, they tend to have a mind of there own. What I usually do is turn them all off with the power on, then choose the color that I would like. This helps keep the color the same and steady.
Pretty cool install. How about the remote and changing colors; does the remote control all lights simultaneously or do you have to point the remote at each light in order to change the color or setting?
If you point the remote in a general direction of all the lights, you are able to control all 4 at once. If you point to one side you will see that you might only control 2 or 3.
Nice review! Do these need to be manually turned on/off each time in/out of the vehicle? Thanks!
Thank you! No need! They come on when the key is past Acc/, and vice versa as Eric mentioned bellow.
per the wiring it looks like they are ignition controlled. If ignition is in acc/ on then they will be on, but off when acc/ ignition off.