
Fumoto Drain Valve for 5th Gen 4Runner – Easy and Clean Method for Changing Your Engine Oil
So the dreaded day has finally arrived, your 4Runner’s Toyota Care has expired.
Now it’s time to think about doing your own oil changes, but changing your own oil is so messy. Unscrewing the oil drain plug and hopefully, the oil hits the pan and doesn’t splash everywhere.
Afterward awkwardly pouring the used oil into a container for transport to the recycling facility. All of this just sounds like a pain, right? Well, what if I told you there’s a product out there that can make this whole process a breeze?
Introducing the Fumoto valve.
It’s a ball valve that replaces your oil drain plug. Made in Japan, the valve consists of a forged brass body paired with stainless steel hardware and a chrome-plated brass ball valve.
Their valves come in different configurations each with a different size profile and drain tube connectors. The valve has a spring-loaded locking feature to prevent any accidental opening of the valve, but as an extra precaution, it also includes a locking clip for that additional peace of mind.
Find it online:
- F133: Check Price
- F133S w/Hose Kit: Check Price
- F133N w/Hose Kit: Check Price
Interested? Please read on.
F133: ORIGINAL OIL DRAIN VALVE

The original Fumoto valve is the most compact one out of the three, however, it is also the only one that does not have the ability to attach a drain hose.
Since the 4Runner drain points straight down, a funnel or a bottle with wide opening can be used to minimize the mess.
Specifications
- Thread Size: M12-1.25
- Body: Forged Brass
- Handle: Stainless Steel
- Spring: Stainless Steel
- Ball: Chrome Plated Brass
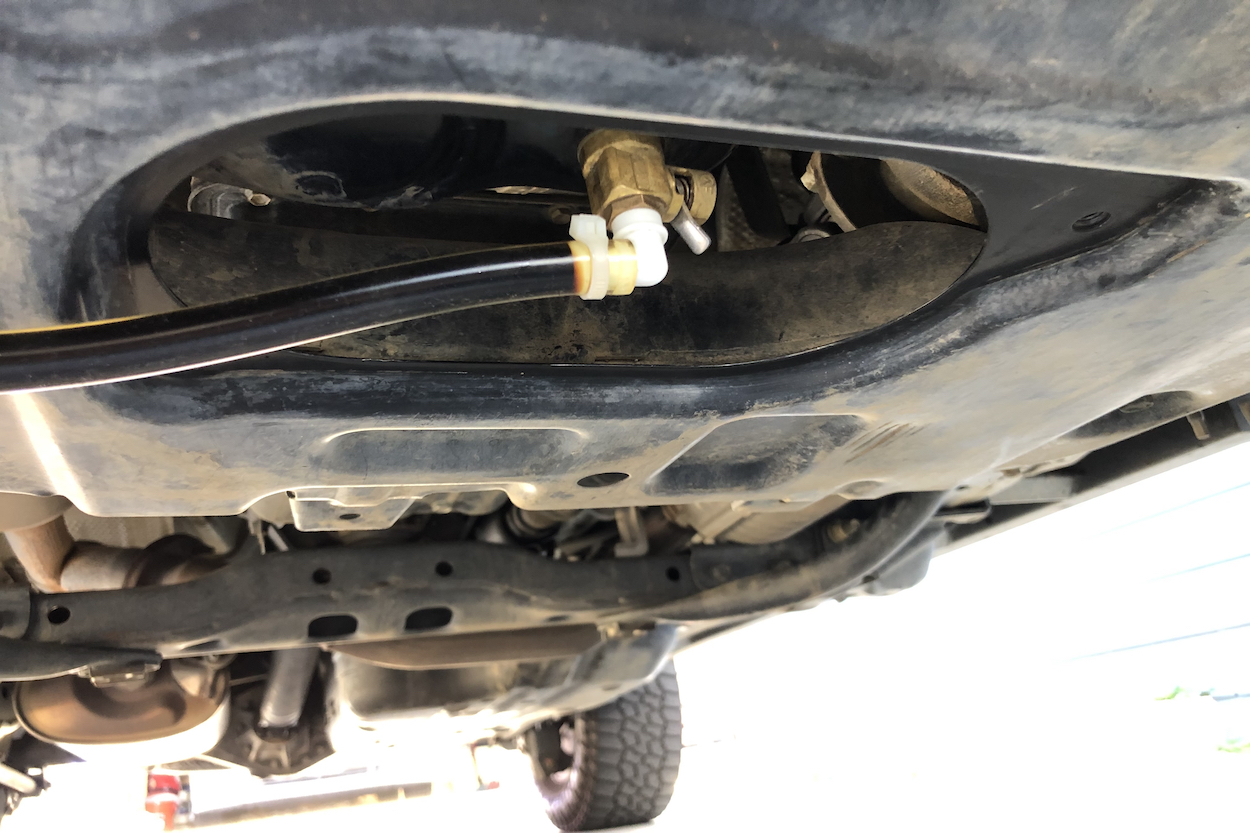
F133S: SHORT NIPPLE OIL DRAINE VALVE

The F133S comes with a short nipple and it uses a hose connector to connect itself to a drain hose.
Specifications are the same as the F133, but with the addition of the following:
- Nipple Diameter: 3/8″
- Nipple Length: 0.2″

The hose kit for the F133S comes with two connectors; a straight and a 90 degrees bend. Both connectors have locking features that will secure themselves onto the short nipple. If additional tubing is required these connectors use tubing with a 3/8″ inner diameter.

Here is the drain tube connector connected to the valve. Always make sure the connector is seated securely to the valve before draining.
F133N: LONG NIPPLE OIL DRAIN VALVE

The F133N is the longest of three since its nipple also acts as a connector to the drain hose. Simply connect a 3/8 inner diameter drain hose to it and it’ll be ready to go.
Specifications are the same as the F133 but with the addition of the following:
- Nipple Diameter: 3/8″
- Nipple Length: 0.5″

Here is the drain tube connected to the valve. This is probably the most secure connection to the drain tube.
INSTALLING THE FUMOTO VALVE
Tools & Materials:
- Brake Cleaner
- Shop Towels
- 3/4″ Open End Wrench
Step 1. Remove Oil Drain Plug
Drain the oil from your engine like you would during an oil change. For reference on how to do an oil change, check out the article done by one of our Trail4Runner writers Clint Taylor here.
Step 2. Clean Oil Drain Area
Using some brake cleaner, clean the area around the drain. Make sure the area is completely clean and the area making contact with the Fumoto valve is flat.
Step 3. Installing the Valve

- Install the blue fiber gasket onto the Valve.
- Thread the valve into the oil pan by hand and make sure that the valve doesn’t cross-thread during the install.
- Once the valve bottoms out on the oil pan and can no longer be tightened by hand, use an 3/4″ open-end wrench on the valve body and tighten it further a 1/4 turn. Alternatively, you could also use a crows foot and torque the valve to 15 ft lbs.
Step 4. Close the Valve and Install


- Make sure the valve is closed and the lever clip (locking) is installed.
- Fill up the engine with new oil.
- Start the engine and let it run for a few minutes and check for leaks.
- Clean off the oil drain access panel and reinstall it.
- Check back after a drive to verify that the valve is leak-free.

USING THE VALVE
I went with the F133S because it is the most compact valve with the ability to attach a drain hose. Simply remove the locking clip, connect the drain hose, open the valve, and gravity will do the rest. This setup makes draining oil a mess-less breeze.

*Close the valve during container switches to minimize spill
Final Thoughts
I’ve had the Fumoto F133S valve on my 4Runner ever since my Toyota Care expired. At the time of writing this article, I had just completed my 65K oil change and the valve has been leak and issue-free. In my opinion, Fumoto valves have been one of the best mods I’ve done to my 4Runner in regards to DIY maintenance and I recommend them to anyone who does their own oil changes.
Are you supposed to keep the white connector on there or remove it after oil changes? I can’t get it off unless I use pliers. Any advice would be welcomed
Take it off after you’ve done. You’re right it’s tough to remove, but it’s made to last for such a long time
This sits way up into the pan so you don’t get the oil out that is sitting at the very bottom of the pan. I measured and drilled a small hole through the threaded section so that the hole sits at the very bottom of the pan and all of the oil drains.
Maybe you could share that great idea with Fumoto, certainly a valid point
How far on the thread did you drill the hole? I didn’t want to drill it too far down and create a potential leak.
That’s a great idea! Might just have to do it when I do my oil change. Did you drill a thru hole or was it just thru one wall?
We did both our 4R and Tundra and well worth the investment. Great thing is you can change the oil when hot or warm I don’t suggest it cold though lol.
ooh hell no! no way.
haha someone’s old school.