
12V Solutions Remote Start (Push To Start) Plug & Play Kit Step-By-Step Install and Review For the 5th Gen 4Runner
The Toyota 4Runner is a lot of things but luxurious is not one of them.
I know some will say “if you want luxury then get the Limited”, that’s what my wife wanted. However, I weighed the pro’s and cons of purchasing the limited and realized that we would be losing some of the capabilities such as Locking Rear Diff, CRAWL Control and the amazing aggressive look, and not to mention – I think very few of us want that mass amount of low hanging plastics. I will admit, I promised my wife that I would add some of the luxuries back, so here you go wifey.
With the 2020 4Runner, Toyota has introduced modern amenities such as keyless entry, push start, and dual climate control. I can’t see trading my beloved 2018 TRD Offroad, just for those. Plus there are better aftermarket alternatives to have the best of both worlds. Such as DIY Leather Seats and New Head Units. There are not quite keyless entry options out, but you can add a remote start to that list. Although remote start has been offered on the 5th Gen 4Runner it was rarely found. Only on limited models, and a few other models would you find a remote start spec 4Runner. They are rare, to say the least. The majority of them out there do not have a remote start option.
Remote Start Using Your 4Runner Factory Key
The 12V Solutions Remote Start utilizes the factory key, so no need to have another clunky fob added to your keychain.
If you did decide that the range is a bit short, there are options to use an additional fob or an app on your cell phone to extend the range to fit your needs. Living in the Arizona Desert comes with some extreme temps. While I don’t suggest that you should let your vehicle idle for long periods, it is very pleasant to be able to turn the vehicle on and have a few degrees cooler or warmer by the time I get in.
Find It Online:
- 12V Solutions Remote Start: Check Price
While 12V Solutions did a great job designing a system that is plug and play, they dropped the ball with the complete lack of detailed installation instructions and videos which can make the installation more challenging than it should be. We also did a video to assist with the installation and better showcase the functionality.
Step 1. Remove the Switch Panel

The first step of the installation is to get to the ignition and the rest of the wiring underneath the dash.
To begin, turn the key to On position to make it easier to turn the steering wheel as shown in the image above.
Step 1A. Access Cross Head Screw

Turn the steering wheel to the right to access the cross head screw. Once you’ve located that, remove it.
Then, turn the steering wheel to the left and repeat this process.
Step 1B. Separate Lower Column Cover

Using a soft plastic trim tool, directly under the wiper switch, separate the lower column cover. It will sound bad, but it shouldn’t break any of the clips.
Step 1C. Pull Upper Portion of Switch Panel

On the left side of the steering wheel, firmly pull on the upper portion of the switch panel.
Pro Tip: No need to disconnect the lower portion of the panel, but disconnect the panel switches and use the pry tool as a prop as there is enough room to operate.
Step 2. Install Wiring Harness

Now that the workspace is cleared, it’s time to plug it all in. The great thing is that all of the factory connectors that are disconnected have matching connectors on the 12V harness.
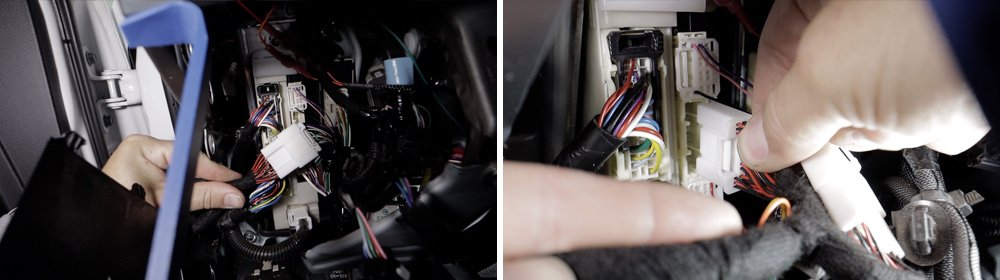
Starting with the Main Ignition Harness (the one with 3 connectors and fuse), unplug the large white connector under the ignition as shown in the image above.
Step 2A. Attach Factory Ignition Harness To 12V T-Harness

Next, plug the factory ignition harness into matching 12V T-Harness, plug-in 12V harness under ignition. Run the harness under the steering column and tilt, keeping clear of any moving parts.
Note: The larger 12V harness containing the OBD2 Harness has multiple connectors. Don’t get discouraged as it seems to be a universal harness for multiple vehicles and the set up only uses a few of the connectors.
Step 2B. Remove OBD2 Harness From Mount Under Dash

Remove the OBD2 harness from mount the under dash mount. Connect the factory OBD2 to the 12V T-Harness and place the new 12V OBD2 port into the mount. Feed the harness into now open panel cavity.
Step 2C. Disconnect Large Middle Connector Under Dash

Under the dash is a cluster of connectors in two columns, this is the BCM. On the column on the right side, disconnect the large middle connector.
Step 2D. Plug BCM Connector into 12V T-Harness
Plug that into the 12V T-Harness. Plug the coinciding 12V connector into the vehicle BCM port.
Step 3. Install 12V Module

All 5th Gen 4Runners should utilize the same module harness connector set Y30, however, verify with the code on the box.
Step 3A. Connect Y30 and Module Connectors

For this step, connect the small connectors from Y30 to their corresponding connectors located on the module.
Step 3B. Connect Main Ignition Harness Connector

Lastly, connect the large connector from the main ignition harness.
Note: Do not secure the module yet!
Program Module

Prior to securing the module and wiring harness or replacing the panels, you will need visual access to the LED lights that are not very apparent.
Programming Sequence:
- Turn the key to ON position
- Wait LED “1” will turn Green for 2 Seconds
- Turn the key to OFF position
- Start 4Runner for 15 Seconds
- Press and Hold Brake Pedal
- Press and Release the Module’s programming button
- Release the Brake Pedal
- Wait, LED “2” will flash Green; signifying complete!
Test out the Range
I have noticed that not all key fobs are created equally but more importantly, the vehicle’s environment may dictate the range that the fob will connect. If you haven’t tested how far it will operate, try it in parking lots with other vehicles and from inside buildings.
Also, battery life may affect signal strength. If you do need more range they offer a few options of remote fob or smartphone module.
Find It Online:
- Long Range FOB: Check Price
- Smartphone Module: Check Price
Start It Up
- To start the 4Runner, just press the LOCK button on the fob 3 times.
- Hit UNLOCK on the fob or use Key to unlock the door.
- DO NOT PLACE FOOT ON BRAKE! This has been the biggest habit for me to break.
- Insert Key into the ignition and turn to ON position.
Clean It Up

Zip tie the module and wiring harness so they do not rattle or more importantly interfere with steering.
Reinstall All Panels Removed for Installation

The last thing you’ll want to do is to replace all the panels in reverse order of disassembly.
Operation Notes
- All Doors have to be closed for the remote system to operate.
- If you don’t turn the Key to ON in 15 minutes it will shut off on its own.
- If you change your mind the only way to shut it off without waiting 15 minutes is to press the brake pedal.
Final Review
After a few months of using the remote start, I have had zero issues. Being still in the colder months, I use it mostly in the morning, to start the defogging and knock off the chill a bit. One of the key things is to remember to set the climate controls to the setting that you will be using next time you get in the vehicle.
For example, it was 75 degrees during the day, so I actually have the windows down and A/C off during the day. However, when we get up to go to the gym at 5 AM it is in the low 30s. So a few times when we forgot to set the controls it didn’t help out. The 12V Solutions system is a better alternative than the dealer add on as it adds another fob, and from reviews
I’ve read it doesn’t extend the range that much more. Plus having the availability of adding unlimited range with additional modules to fit your needs is a cool bonus.
I can’t find any information about running this one a 4Runner with a Magnusson SC. Any feedback if the programming will interfere with the tune at all?
I don’t see a Y30 on their page. I purchased one and I’m unboxing it now. All parts seem correct, wen’t back to the sight as if I was to buy one again for my 2019 Toyota 4Runner TRD ORP with my key Fob and it shows y25. You think that was an update? And also can you send detailed images of where you zip tied your harness and module?
It could be an update not sure. I don’t have any additional images as it is hard to really get one with all the wires and closed up area of the dash. Just make sure it is not interfering with any of the steering or pedals and you should be good.
Purchased this during the Black Friday sale. I live in the PNW with my car parked outside and leave for work at 5:30am. Having a remote start for the winter will be a huge help. Followed the write-up here and the install took about 15min, no hiccups or issues. Thanks for doing this install and write-up!
Glad it worked out for you, Thanks for the positive feedback!
I’m interested in the 12V Solutions remote starter kit for my 2013 4Runner limited. Can you recommend places that will install the kit? I’m not mechanically or technically astute. Thanks!
Have the install done can not get module to program never get first green light thanks for any help
I’m having the same issue now in my 2020. Would you mind sharing what the fix was.
Thanks for the detailed install, as always. Just moved from LA to VA couple of weeks ago and now I’m strongly considering this solution. Discount/promo codes?
I picked mine up on a Black Friday sale.
I had nothing but issues and electrical gremlins with my 12V Solutions kit. It looks like they’ve upgraded and improved it so I’m glad to see that. I have had zero issues with my Accessorides kit which was head and shoulders above and better than the 12V Solutions kit. Just my experience
Thanks for the comment. In the reviews I’ve read it was more in the lack of install instructions, than quality. Haven’t had any issues after months of use.
Any idea how this compares to adding the OEM kit (P/N: PT398-89140) our 4Runners? That kit runs about $300
In my research it is similar in function. However, it adds an additional keyfob remote.
Pretty sure the factory solution only works for push to start models. Lucky you if you own one 🙂
The listing I found states “Please note if you have push button start (smart key) or standard/no smart key. Different instructions depending on which you have.” That’s From Toyota Scion South in KY. But you may be right.
I did the Accessorides remote start install. Its pretty much an identical install to this one and works great. It has been really nice in the sub-freezing weather to heat up the 4Runner and have nice warm cockpit and heated seats when we climb in.
How long the 4Runner stay ON before it shuts off with this one? Same 15-min?
I haven’t timed it but it’s around that from experience. One thing to note is that if you keep your headlights in the on position and you use the remote start, they will stay on even if the remote start turns itself back off. So it wouldn’t be a good idea to remote start it and forget about it for hours and hours. You may end up with a dead battery.
Will the vehicle shut off if you try to drive it without the key in ignition?
Alex, Thanks for the question. Simple answer yes. If you don’t put the key in and turn to the On position it will shut off in 15min. Also, to put the vehicle in gear you have to put your foot on break and it will shut off the engine without the key in the On position.
Why would you put your foot on break?
because you always put your foot on the brake when switching driving modes
Trevor, great write up. I’ve been looking for this solution for the same reason. You clearly have a key-start model like mine, but the description on 12V website says “Push button start models only”. Did you clarify with 12V before making the purchase or did you just jump in and planned for work around as needed? Thanks, Richard
Sorry about that Richard. Thanks for letting me know I had the wrong link in there. It is fixed, but here is specifically for the G Key.
https://www.12volt.solutions/products/2010-2018-toyota-4runner-plug-play-remote-start-kit-g-key
Cheers,
Trevor