
Midland MXT275 GMRS Two-Way Radio + Detachable Mount Setup: Step-By-Step Install on the 5th Gen 4Runner
We started with a CB radio about a year ago and we were not a fan of the range, along with having to tune the radio and just how the radio setup turned out after it was installed.
Running the CB setup left the inside of our rig with the handheld always out and a big floppy antenna on the hatch that was constantly hitting things. This is not what we wanted.
The idea and the plan came a few months back when I assisted a good friend of mine with this install.
While most of this mirrors the install, we did change a few things for our application, needs, and desires. Instead of putting the GMRS on a switch as most people do or making it a constant power ON, we decided to put a constant hot 12V outlet near the control unit.
This will allow it to be powered on when we want and off when we choose. It would also allow us to put in other 12V powered accessories when not using the radio.
Why I choose the Midland MXT275 Two-Way Radio

For a seamless look, and to keep the control unit out of the way, we decided to put the control unit in the glove box. This leaves all the wires to be routed behind the glove box, as well as, giving us the cleanest possible look we could ask for.
This is also a big reason for using the Midland MXT275 Radio. This control unit can be stashed away since the handheld is fully integrated.
However, this meant we would need to extend the microphone connection, so when in use, we didn’t have to run the microphone wire into the glove box and leave it open or crush the wire when closing the box. And this is where the RJ45 Coupler came into play.
The result of all of this was what we felt was the cleanest install we could have done, leaving the dash as seamless and as functional as possible.
Installation Overview
First thing first, SAFETY, you’ll start this process no different than doing any other work on your vehicle by disconnecting the power to the vehicle.
In this case, especially, we knew we wanted all the wiring to be behind the glove box and on a 5th Gen 4Runner, that means that the passenger-side knee airbag will have to move.
MXT275 Radio Step-By-Step Install
Parts For Install
- Midland MXT275 MicroMobile® Two-Way Radio: Check Price
- Browning BR-450 Antenna: Check Price
- K400SNMO Trunk/Hatchback Antenna Mount: Check Price
- RJ45 Waterproof Coupler Socket Connector (The connector used in the dash to make the handheld connect into the dash vs the control unit. This leaves the dashboard seamless when the handheld is removed and stored when not in use): Check Price
- 5E Cable: Used to extend the microphone jack on the control unit to the RJ45 coupler; one 3’ cable worked for our application but others may a longer one): Check Price
- Handheld Mount to Dashboard: Nite Ize STEELIE®ORIGINAL DASH KIT (We went with this option so we could attach our phone when not using a handheld): Check Price
- 12V Blue Seas Outlet (This is a fused constant hot power source): Check Price
- Ancor 12 AWG Primary Wire in
- Red: Check Price
- Black: Check Price
- Ancor 12-10 AWG (Female fully insulated nylon disconnects): Check Price
- Heat Shrink Check Price
- Waterproof Ring Terminals: Check Price
- Wire Sheathing: Check Price
- NMO Dust/Rain Cap: Check Price
Tools You’ll Need:
- 10MM Socket
- Ratchet Wrench
- Step Drill Bit (min. 7/8 – 1-1/8) or 1-1/8 Drill Bit
- Drill
- Flathead Screwdriver or Plastic Pry Tool
- Wire Crimping Tool
- Wire Stripping Tool
- Heat Gun or Torch
- Dremel w/ Plastic Cutting Blade
- Fish Tape or Wire Hangar
- Stubby Philips Head Screwdriver
- Zip Ties
Step 1. Disconnect Power & Remove Interior Panels
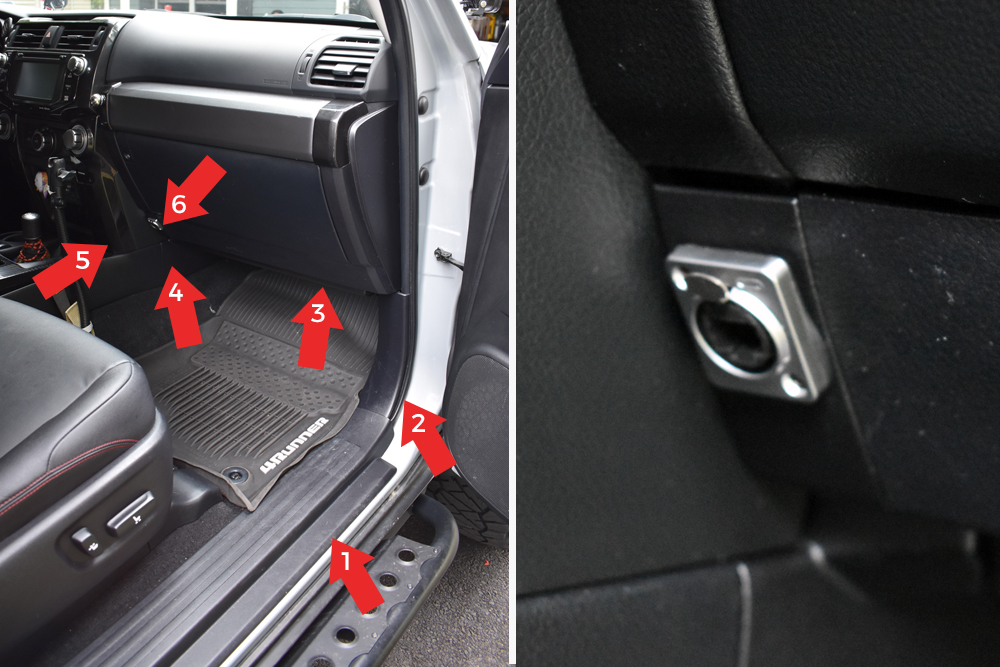
First, disconnect the power on your 4Runner.
Then, remove the passenger side kick panel and the other associated panels.
While removing the interior panels, you’ll find there is a small little cover on the lower left side on the bottom of the glove box. You’ll need to remove the cover that’s concealing one of the three bolts securing the airbag.
Note: Keep this small cover closed. This is where we chose to put the RJ45 coupler.
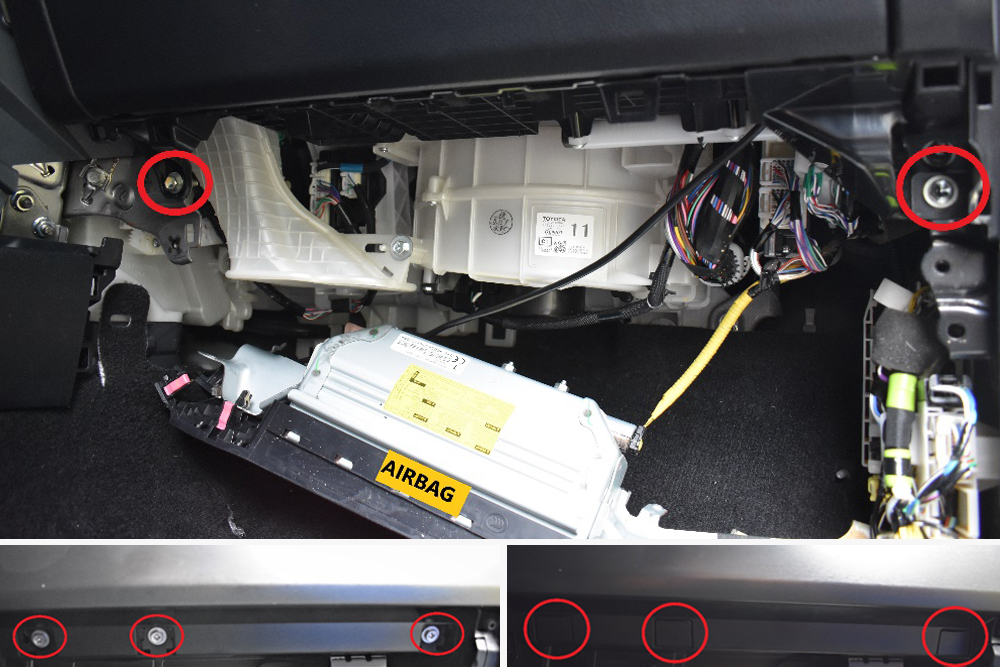
Step 2. Remove Three Bolts For Passenger Airbag

With all the panels removed, you’ll now have access to the three 10mm bolts securing the passenger-side knee airbag.
Once you remove the three bolts securing the passenger-side knee airbag, you will have to pull on it as it’s secured with plastic clips to the bottom of the glove box.
Note: I found that starting from the door side and working toward the center of the vehicle worked best for me popping each clip one by one.
Step 3. Unbolt & Pull Out Glove Box
Once the airbag was free, I did not disconnect it.
Personally, I am not a fan of playing with airbags, so I simply moved it and set it down in the footwell where it would no longer be touched.
With the airbag out of the way, you will now have access to the two (x2) 10mm bolts securing the bottom of the glove box which you can now remove.
Next, you will need to pop open the glove box and using either a flat head or your plastic pry tool remove the three (x3) plastic covers concealing the three (x3) upper mounting bolts.
Once the mounting bolts are removed, take out the glove box by pulling on the top and bottom simultaneously.
There are two (x2) plastic clips that hold the wiring for your glove box light in place. You’ll need to press the sides of the clips in and remove the light to free the glove box from the vehicle completely. This step is useful to give you additional room to work with.
Step 4. Remove & Drill Glove Box Covers For 12V Outlet

With everything removed, assemble the glove box and prepare it for the new 12V outlet.
In the glove box, there are 2 covers on the left side:
- a circular one which looks like a 12V outlet belong;
- and a rectangular one.
Remove both covers by pressing on the tabs on the back of each. The circular cover can be discarded or saved since the Blue Seas 12V outlet will take its place and the rectangular cover will need to be kept.
With the covers removed, drill out the circular hole with the 1-1/8 drill bit or step bit in order to fit the 12V Blue Seas outlet. You won’t be drilling much, but it is enough to fit the outlet.
Once drilled, install the Blue Seas outlet.
Now, take the rectangular cover and use a Dremel to cut a pass-through for your 12V power socket from the Midland MXT275 Micromobile® Two-way Radio.
The Midland power has a disconnect so it just needs to be big enough to pass the connector through the inline fuse. This can be taken apart easily to pass through and reassembled.
For the last part of this step, reinstall the rectangular cover to the glove box with the 12V socket through it.
Step 5. Connect 12V Outlet, Antenna Cable & Main Unit Power

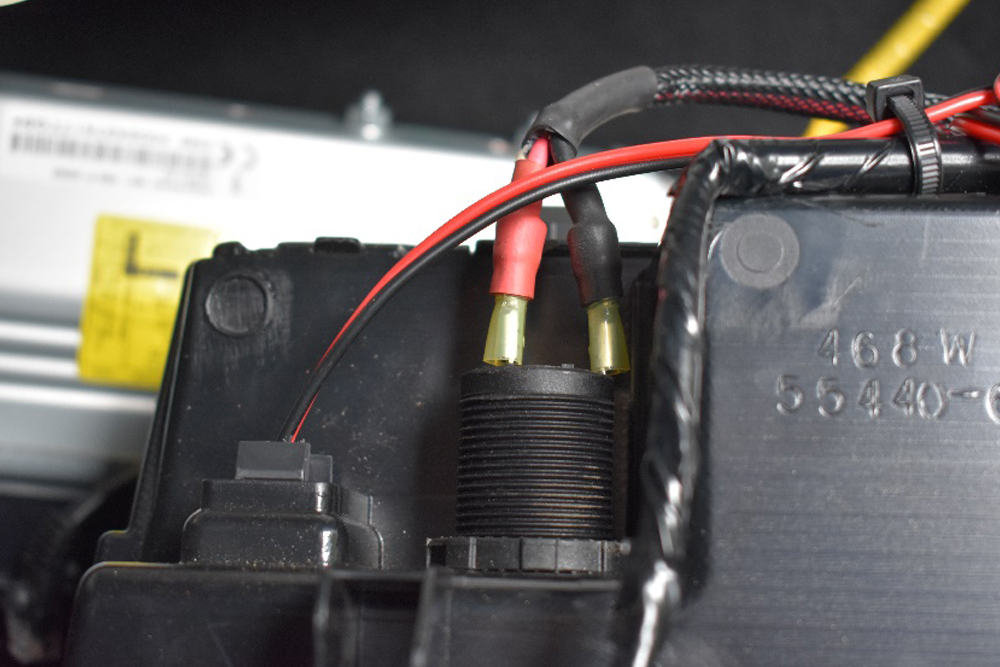
Now we need to figure out a way to power the 12V outlet.
Important Note: We knew we wanted an always-on socket, to not just power the radio, but also to power anything else with the radio disconnected. We already had a Power Tray unit installed on our vehicle which holds a Blue Seas 6 circuit fuse block. We ran our power from there as this added the necessary fuse for the 12V outlet and utilized what we had already set up for this exact purpose.
For this step, measure out the desired wire length based on our fuse block position and put the sheathing on the wires.
Then, use #8 nylon insulated ring terminals and connect to the fuse block (remember the power is disconnected still).
Next, run the positive (+) and negative (-) wires along with the back firewall and through the main grommet on the passenger side firewall with fish tape. Try and pull the wires and the antenna cable through at the same time if you plan to run the antenna through this grommet as well.
Once the wires are through the firewall and routed, secure it all in place crimped on 12-10 AWG female fully. The Female fully insulated nylon disconnects so we can connect it to the back of our 12V Socket.
Don’t install the glove box or connect anything just yet since we will still be working with the glove box.
Next, find a place to mount the antenna
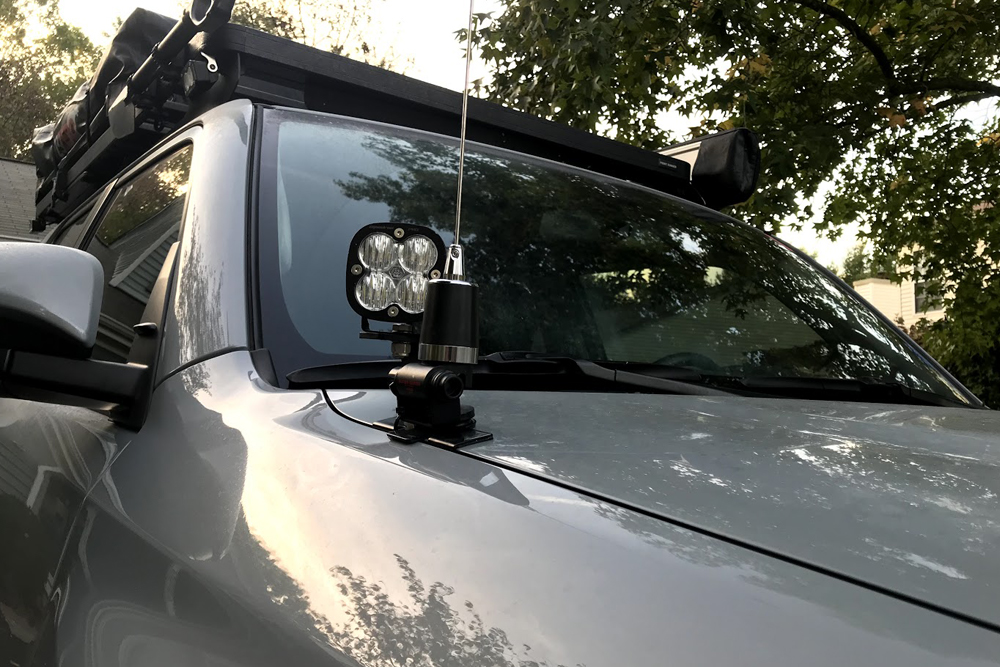
Mounting the antenna is pretty straight forward and is completely up to the user for placement.
If you choose to place the antenna on the hood, make sure to check your clearances, ensure the mount doesn’t rub against the fender and the set screws are nice and tight.
You’ll now route the cable through the same grommet if you haven’t already. Pull the excess cable through the grommet and bundle nicely and secure it away from anything that will pinch it and tuck it behind the glove box when reinstalling.
Now, mount the main unit and secure placement

Moving onto mounting the main unit, this is up to you for placement within the glove box.
The Midland main unit comes with a mount and mounting screws. To begin, drill a hole through the right side of the glove box. This allows the antenna cable, power cable, and the 3’ Cat.5E Cable to be passed through.
Note: You’ll need to drill the hole large enough for the connectors to protrude through so the main unit will sit flush up against the side of the glove box while hiding the cables/wires from the back of the unit.
Reinstall Glove Box
The next step is to reinstall the glove box light and put the clips holding the wires back into their respective places.
Be sure to secure the mount for the main unit with a stubby Philips head screwdriver with the provided hardware.
Connect the antenna cable and run the wire that powers the main unit alongside the wires for the glove box light. Once you’ve done that, connect the positive (+) and negative (-) wires to their respective position on the back of the 12V outlet.
Note: Don’t forget to heat shrink and seal all connections.
Step 6. Connect Cat.5E Cable To Main Unit
Make sure these parts are connected to power:
- 12V Outlet
- Antenna Cable (Connected To Back Of Main Unit)
- Main Unit
With everything hooked up to power, you’ll now connect the Cat.5E cable to the front of the main unit.
Be sure to run the 3’ cable through the same hole as the antenna and other connections and then reinstall the glovebox and airbag in reverse order from the beginning. Run the Cat.5E cable down and across the back of the airbag to where the RJ45 coupler will be.
Next, grab the small cover concealing the bolt we removed in the first steps and, with your step bit, find where you would like your RJ45 Coupler to sit and slowly drill the hole to fit the coupler.
Use the provided hardware and secure the coupler into place. Then connect the Cat.5E cable to the backend and reinstall the cover onto the vehicle ensuring the cover is fitting properly.
Step 7. Secure New Placement of Nite Ize Mount

Now we can reinstall all the panels back onto the vehicle in reverse order and, then, thoroughly clean that area.
Make sure you attach the antenna to the mount and then connect the handheld unit to the RJ45 coupler and ensure there is the power to the handheld unit and that it works, I hit the weather button and ensured the transmission was clear.
You can now figure out the placement of you Nite Ize mount.
You can see where I put mine. I removed the mic mount on the back of the handheld unit and put the flat portion of the Nite Ize mount there with a drop of RTV to ensure it wouldn’t fall off.
Final Thoughts

You now have a very clean install you can have out when you use it or stowed away when being a grocery getter.
I would also suggest getting a cover for the antenna mount if you take the antenna off and on.
How did you get the plastic cover itself off of the knee airbag? I need to replace the cover on mine.
Follow Step 1 and 2 of the process and you have your answer it’s very simple!
If I just wanted to mount a light Ram Mount ball to the trim above the glove box, do I need to do the full disassembly to get that piece off or can I just pop it off as detailed in Step 3 without removing the airbag and glove box?
You will have to remove everything to get that piece off!