
REDARC Tow-Pro Elite Trailer Brake Controller
If you have ever towed a trailer off-road, even a lightweight one, you have probably felt the rush of a few thousand pounds pushing you down a steep decline or off a large drop.
Not the most fun aspect of overlanding but a necessity when operating a trailer in the backcountry.
Even with a traditional trailer break, there is not a huge improvement as they are designed for on-road use and add little benefit once you depart the asphalt.
There are a few trailer brake controller models in the United States that are available that even come close to the REDARC Tow-Pro Elite.
What sets Tow-Pro Elite apart is the dual settings. The normal setting is the Proportional Mode, which senses inertia of the tow vehicle for highway conditions.
The second setting is the User Controlled Mode, which the braking can be dialed in depending on the terrain, vehicle type, and driver preference to meet off-road challenges.
Tools & Parts To Install Brake Controller

Equipment & Parts Used:
- REDARC Tow-Pro Elite Trailer Brake Controller: Check Price
- Tekonsha 3041P Proportional Wiring Adapter: Check Price
- REDARC TPSI-001 Tow-Pro Switch Insert: Check Price
Tools You’ll Need For Install:
- Drill with 5/32 Drill Bit
- Socket Wrench with Extension and 10mm Socket
- 12mm Wrench
- Machine Bolts #8 with split washer and nut
- Pliers
- Wire Cutter
- Lighter or Heat Gun
- Utility Blade / Exacto Knife
- Weatherproof Butt Connectors 12-10 AWG
- Weatherproof Butt Connectors 16-14 AWG
- Zip Ties 5”
- Lights for Under Dash Illumination
REDARC Tow-Pro Elite Trailer Brake Controller Install
- Cut Electrical (Driver’s Side Footwell)
- Set Up Tekonsha Wiring Harness Pigtail
- Connect Wiring Harness Pigtail
- Unplug Harness from Factory Connector
- Ensure Proper Gauge Connection
- Twist Ends of Wires
- Crimp Ends of Connectors & Shrink Wrap
- Secure Wiring Harness Connector with Bolts
- Connect Wiring Harness to Bolt & Reinstall
- Locate Panel & Remove
- Locate Final Placement for Mounting
- Tighten Bolts for Trailer Brake Unit
- Paint Bolts Black (Optional)
- Remove Fan Speed Cover
- Attach REDARC Panel Insert
- Shave Down REDARC Panel To Fit
- Assemble Knob Using 12mm Wrench
- Remove White Space / Indicator
- Run Switch Cable To Control Unit
- Connect Cable & Reinstall Panel
- Connect Wire Harness & Switch Cable
- Reinstall Panel
The install and set up is fairly straight forward, with the majority of it being plug and play with the exception of splicing a few wires.
The most difficult aspect lies in determining the location for mounting the adjuster/selector knob.
Step 1. Cut Electrical Tape By Driver’s Side Footwell

Locate factory trailer brake connector plug under the driver’s side footwell behind the e-brake.
Carefully cut the electrical tape securing the harness to allow for more working flexibility.
A trailer brake jumper harness was provided by Toyota when I purchased the 4Runner. However, the length was not long enough for my install.
Also, the Tekonsha wiring harness matched the REDARC wiring color organization so there would be no confusion; it also came loomed.
Step 2. Set Up Tekonsha Wiring Harness Pigtail

Locate and set up the Tekonsha wiring harness pigtail. The original packaging for the trailer brake jumper wiring from Tekonsha is shown on the left.
In the next step, we’ll connect the Tekonsha wiring harness pigtail to the factory trailer brake connector plug.
Step 3. Connect Wiring Harness Pigtail

Then, run the Tekonsha wiring harness pigtail to the desired mounting location of the REDARC trailer brake base unit.
Add in the length of the REDARC base unit connector that must be wired in.
I chose to mount it behind the panel on the right-hand side of the footwell.
The REDARC trailer brake base unit uses inertia to detect braking. This means that the unit may not be zip tied or just tucked into the dash, it must be hard mounted.
I did not illustrate how I ran my wires as everyone has varying opinions on how to accomplish this. Just ensure that it is not impeding emergency brake, brakes or accelerator pedals.
The unusual, yet, good thing about the 4Runner accelerator pedal is that it’s electronic so there are no mechanical parts above the pedal hinge.
Note: The base unit must be hard mounted; do not zip tie it!
These Gear Aid Lights are extremely handy. Their compact size and light output allow for unobstructed views under the dash. Because of the tight spaces, the camera flash could not be used, all under dash light was from the lights.
Once the pigtail is run to the desired location and you know the overall desired length of the wiring harness, then trim off the unnecessary connector along with any extra wiring.
Note: Don’t cut the wires while the harness is plugged into the vehicle. If it is, then only cut singular wires.
Step 4. Unplug Harness from Factory Connector

So, in my haste of installing this in 106 degrees Arizona Summer temperatures, I forgot to unplug the harness from the factory connector.
Lesson learned: I ended up blowing a fuse without knowing.
After the install was complete, I had thought I messed up the wiring; it took a few minutes of troubleshooting and a trip to auto parts shop to realize my error. The 30 AMP Fuse is indicated below to demonstrate.
Also, note that the fuses are the low-profile fuses.
Step 5. Ensure Proper Gauge Connection

There are many ways to make wiring connections and I am by no means an expert.
I choose to use the weather-resistant butt connectors since they incorporate shrink tubing and offer a secure connection.
Others may choose to solder, as it is the most secure electrical connection.
Also, make sure that you’re using the proper gauge connector on the correct gauge wire.
The REDARC pigtail has the wire usage designation printed onto the wires as well. This will be of assistance if you choose to use the factory pigtail or if, perhaps, you’re color-blind.
Step 6. Twist Ends of Wires

Strip and twist the wire ends for each of the connectors.
Step 7. Crimp Ends of Connectors & Shrink Wrap

Crimp each end of the connector. Once connected give the wire a tug to test the crimp and ensure a positive connection.
Then, use a lighter or heat gun to shrink up the wrap and protect the connection.
Ensure that there are no gaps between the shrink tube and wire. If done properly, the wire will have a magnification effect through the tube.
Step 8. Secure Wiring Harness Connector with Bolts

Locate the grounding point for the wiring harness.
I choose to use a bolt on the left side of the footwell which is about 6 inches behind the factory harness connector.
A wrench extension is a must in order to reach this; be careful not to drop it as you would have to remove more panels to retrieve the bolt.
Step 9. Connect Wiring Harness to Bolt & Reinstall

Connect the white ground wire from the Tekonsha wiring harness to the bolt and reinstall.
Make sure to position the wire to run to the front of the vehicle towards the factory location, so you don’t bind any wires.
Step 10. Locate Panel & Remove

Locate the panel located on the right side footwell, next to the accelerator pedal.
Remove the panel by pulling the top and bottom of the closest edge.
Step 11. Locate Final Placement for Mounting

For this step, start by locating the best place for mounting the unit.
There is only one place that I could find that wouldn’t need additional modification. There’s also plenty of clearance on the inside of the panel to allow for the unit to be installed.

Once you ensure placement, hold it in place and drill holes from the back side.
Step 12. Tighten Bolts for Trailer Brake Unit

This is the final orientation of the unit. And, yes, it is upside down.
The REDARC trailer brake unit can be installed in any orientation (as long as it is hard mounted), the system will learn how it’s situated in the vehicle once it’s calibrated.
Step 13. Paint Bolts Black (Optional)

This next step is optional. For a low profile appearance, you can paint the bolts black to match the panel. But, again, this isn’t necessary, just an option.
Next, Choose Location For Control Head
The next steps are the most difficult of the install. Keep in mind that this is how I installed it and you may have different needs or ideas on how yours is installed.
For my install, I chose to put the control head on the right-side blank near the ignition.
There are many factors that go into this but the main reason for doing it this way was so that it would be on the right-hand side; so if I needed to manipulate it while driving, it would be easier for me as I drive with my left hand and use my right to engage all of the user switches, such as traction control and the radio anyway.
The second reason is the blank’s location and the fact that it’s recessed will offer protection for the knob from getting bumped into or broken.
Step 14. Remove Fan Speed Cover

After you choose a location for the control head, remove the left side fan speed cover.
Step 15. Attach REDARC Panel Insert
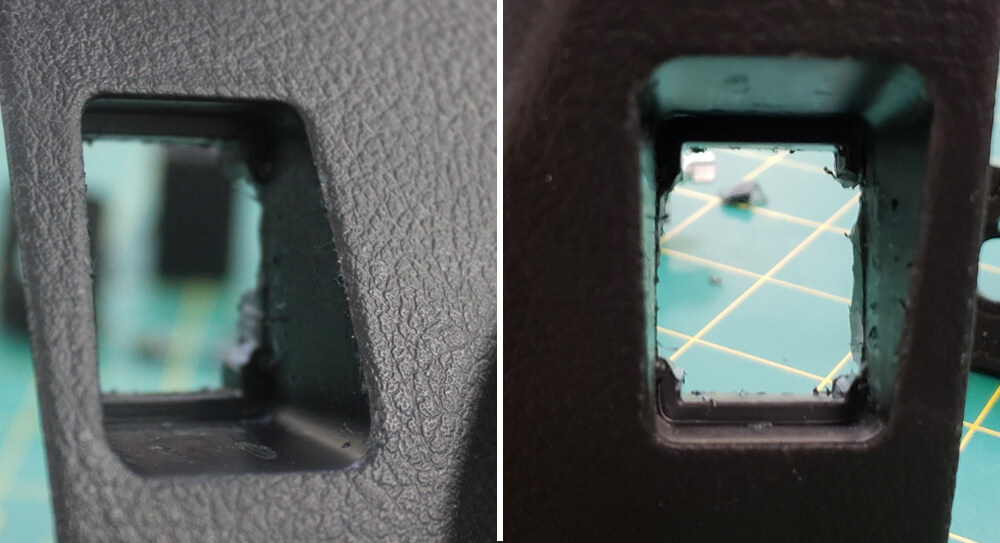
The REDARC panel insert is universal so the inner of the blank must be cut or ground out.
Step 16. Shave Down REDARC Panel To Fit

I also shaved down the REDARC panel to fit into the blank.
Step 17. Assemble Knob Using 12mm Wrench

Once the fitting is complete, then assemble the knob using a 12mm wrench.
After installing, I noticed that the knob was easily depressed or turning freely.
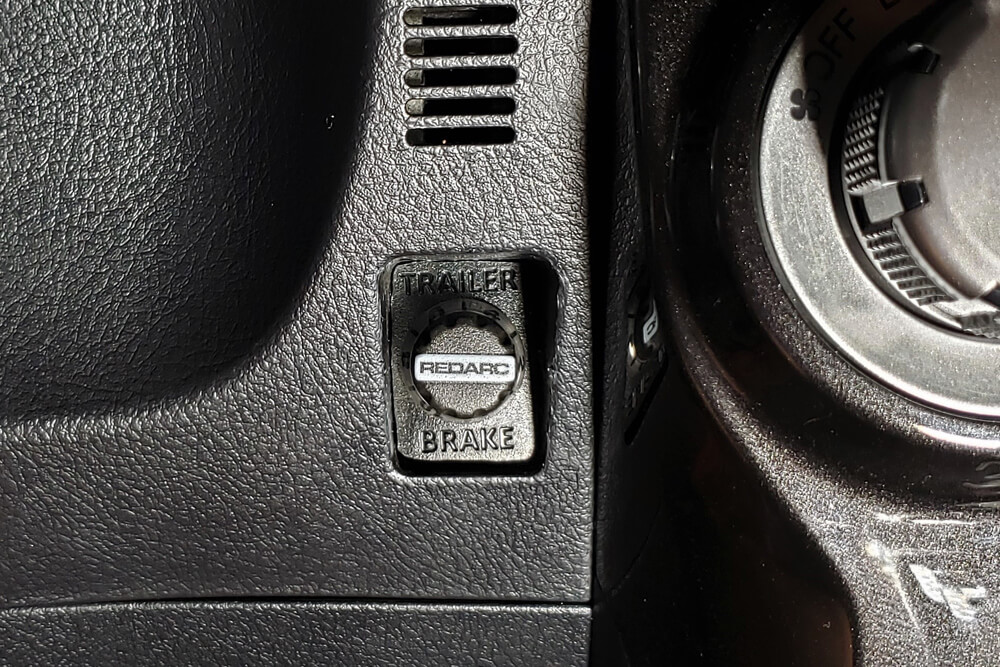
Step 18. Remove White Space / Indicator

The White Spacer/Indicator was bowing from tightening even slightly. So, I removed it without impacting operation.
Looking at the switch in profile shows how low profile it is while remaining easily accessible.
Step 19. Run Switch Cable To Control Unit

Run switch cable through dash to control unit.
Step 20. Connect Cable & Reinstall Panel

Connect the cable to the switch and reinstall panel.
Step 21. Connect Wire Harness & Switch Cable

Connect wire harness and switch cable to control unit. Zip tie any access cable.
Step 22. Reinstall Panel

Reinstall panel tucking and cords inside. Zip tie all cables securely double checking pedal and foot clearances.
Completed Trailer Brake Controller Install
Calibration
While the system is now installed, calibration still needs to be completed.
The LED display will flash Green/Blue as it orientates is the axis. This is done by accelerating and stopping around 20 times. Once the LED turns blue it is complete.
If you do not have a trailer connected, then no lights will show; however, calibration is still happening.
When you do hook up a trailer and it is already blue than calibration was completed.
Usage
The knob is set 0-10 with 0 meaning ‘no braking’ and ten being ‘max braking’. Remember:
“Lefty-loosey” and “righty-tighty” works as clockwise turns increase breaking.
Setting the controller will be based upon user needs so see instructions for more info.
A red LED lights up when brakes are in use. The intensity of the light will also reflect on the setting.
To switch from Proportional Mode (road conditions) to User Controlled Mode (off-road), apply your vehicle’s brakes and rotate the knob counterclockwise.
Push down on the knob twice within one second and, then, release the brakes. Light will change to green.
There may be times when you want to control the momentum of the trailer and not the vehicle.
Just push down on the knob to activate the trailer’s brakes.
Since this article was written, there is a totally easier way to install this. REDARC has a 4runner specific kit that has a no drill no mess option.
https://www.redarcelectronics.com/us/landcruiser-sequoia-4runner-brake-controller-kit
Am I correct is saying we DO NOT use the factory trailer brake wiring harness if the tekonsha wire harness is purchased? Just cut the one end of that harness off and splice it into the redarc harness that plugs in to the module?
will this unit work on a 2013 FJ Cruiser??
When can I bring my runner over?
Actually, if you are in AZ that can happen!
Actually, if your in AZ that can happen!
Is there a specific reason you didn’t use the Redarc Toyota specific wiring harness Part # (TPH-021)? Is there something that the Tekonsha 3041P Proportional Wiring Adapter does better than the Redarc?
I don’t believe that the REDARC wiring adapter was available at that time. I would go with the REDARC one just to keep everything together unless the price was steeper.
I had the tow pro elite installed on my 2019. However I’m getting a warning indicator for my ABS and VSC when I invoke brakes manually, any thoughts?
Hmmm, sorry to hear that. The only thing I can think of is a bad connection in the wiring or ground. If you figure it out keep us updated.
What size bolts did you use to hard mount the controller?
Trevor, Thanks for the write-up. Can you edit your posts to recommend the correct part? Panel insert: REDARC TPSI-002 Tow-Pro Switch Insert
Great write up. Some of your tips were helpful but I opted to make changes in my install for a cleaner look on my 2020 TRD ORP 4runner. When it comes to the Redarc panel insert they make one specifically for the 5th gen 4runners. It doesn’t say it’s compatible with the 5th gen 4runners but it is and the manufacturer should update it cause it avoids the frustration and time in modifying the one you have listed in this write up. I will leave the model number down below for you to check out and possibly switch up your link in your write up. Overall the install was straight forward and didn’t take long! I love the clean look and performance!
Panel insert: REDARC TPSI-002 Tow-Pro Switch Insert
That’s awesome! I’m glad you mentioned it as this will save a lot of extra work. Literally the hardest part of the install was getting that button to fit right. Thanks!
Thanks for this terrific write up Trevor. i recently purchased this same brake controller for my new 2020 4Runner, and was curious to see what you thought of this controller after having it a year? The OEM Toyota brake controller harness has 5 wires, yet the Tekonsha has 3041-P has 4. Can you confirm if using this harness (3041-P) controls both the running lights, and brake lights on the attached trailer when used?
I love this system, it is so easy to adjust and I’ve used on some steep rock terrain and it kept the trailer from pushing me down the grade. I cant really speak to the 2020 but I wouldn’t think that was a change since it’s still a 5th Gen. I had a connector from the factory in my glove box, but required some splicing. It may be useful to see that connector. On my set up the running, brake and turn all work.