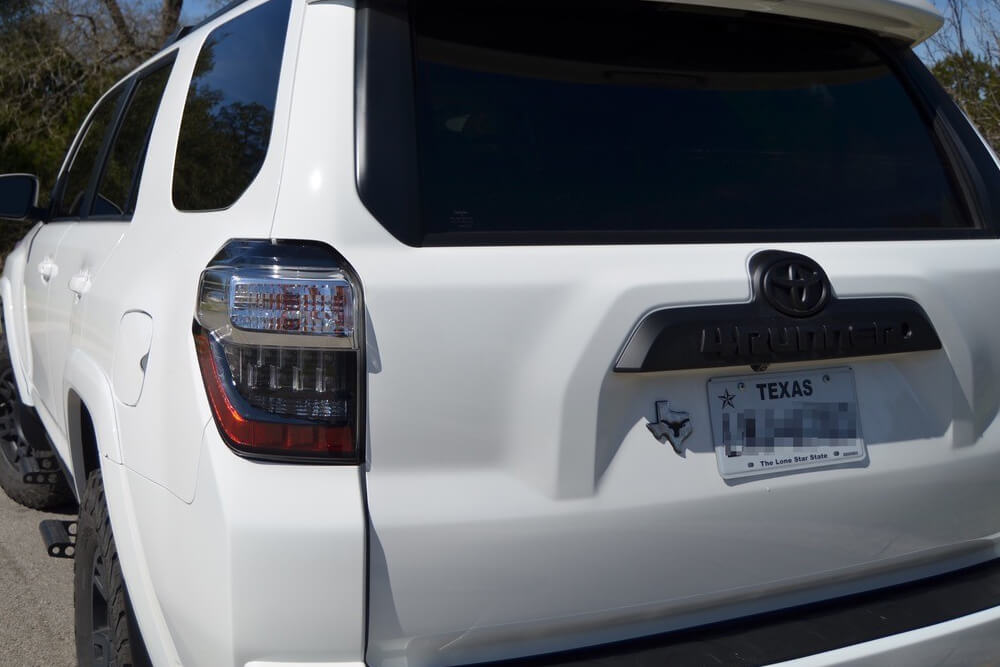
How To Remove The Rear Hatch Trim – 5th Gen 4Runner

Removing the rear hatch cover and the valance behind the letters on the 5th Gen 4R
The following overview will work for a few mods. This is a step-by-step process on the removal of the rear hatch trim piece (the piece that says 4Runner) on a 2018 SR5 Premium and painting the letter valance.
Whether you are looking to blackout rear hatch lettering valance, swap out your speakers, run some aftermarket LEDs, or mount some accessories to the back hatch, this overview will at least help you take off your rear hatch cover.
My trim piece was body colored but I wanted it to be matte black and was not willing to shell out $150+ for an OEM piece – let’s be honest, that money can be used on more important 4Runner upgrades.
The steps below can also be used if you need to (1) replace a faulty trunk handle, (2) replace the screws that hold in the rear license plate, or to (3) gain access to the rear camera.
PARTS USED:
- 10 MM Socket
- 10 MM Wrench
- Philips screwdriver
- Plastic trim tool – check price
- Hulk strength
- Matte Black Paint – check price
STEP 1: REMOVE THE INTERIOR PLASTIC PANEL

Before you get started, be sure your rear window is rolled all the way up.
Open the rear liftgate and locate the trunk handle/strap. Pop off the black cover using a plastic trim tool.
STEP 1A: Remove the bolt underneath with 10mm
Using your 10 MM socket, remove the bolt underneath.
STEP 2: REMOVE THE FIRST PORTION OF CARGO PANEL

Located along the rear passenger side, there is a small opening in the panel that allows you to insert a plastic trim tool.
I started from there, moved towards the front of the vehicle to pop off two of the clips, then worked my way back down and around to the driver’s side. You will need to use a little bit of force to get the clips out, especially if you haven’t done this before.
STEP 3: UNCLIP CONNECTIONS AND REMOVE ENTIRE PANEL

In all, there will be 10 clips that need to be removed.
Once the interior panel is hanging down, gently hit the entire panel towards the front of the vehicle. This will allow the front of the panel to disconnect from the railing, revealing two connections for the trunk lights.
Unclip those connections – the entire panel can be removed.
STEP 4: REMOVE METAL BRACKET

Using a Philips screwdriver, remove the 3 screws holding in the metal bracket.
Then, remove the bracket by popping off the two white clips by pulling straight down. Unclip the three connections.
Step 5: DISCONNECT THE 3 CONNECTIONS

When reconnecting during reassembly, the connection that has the label with a ‘T’ goes on the far right and the connection with the label ‘70’ goes on the left.
STEP 6: REMOVE THE PLASTIC LINER AND LOCATE THE 6 NUTS

The plastic liner is held on by black sticky goo.
For me, the best approach for removing the liner was to gently pull down on the plastic with one hand while cutting back the black sticky with a box cutter. This made it fairly clean and allowed me to reapply the plastic liner back to the black sticky during reassembly.
You don’t need to remove the liner entirely, just enough to gain access to all the nuts that need to be removed. I removed it 3/4 of the way then taped it to the outside of the liftgate with painters’ tape so it wouldn’t dangle down and get in my way.
Be careful not to get any of the sticky goo on your hands – it will transfer over to other surfaces and cleaning it off isn’t the most fun of activities.
Don’t ask me how I know.
STEP 7: REMOVE ALL 6 NUTS WITH 10 MM SOCKET

Using your 10 MM socket, remove all 6 nuts that secure the trim piece to the trunk.
There are 2 in the middle, 3 on the passenger side, and one tucked away on the driver’s side.
Note: you may need to use a 10 MM wrench for the driver’s side screw as there isn’t much space.
STEP 8: REMOVE REMAINING CONNECTIONS + 2 CLIPS AND PULL HARD

From the outside of the trunk, lift up on the bottom piece of the trim (the piece that says ‘4RUNNER’).
Looking underneath, you’ll see that there are two clips holding the trim in place. Lift until those pop out then remove the last connection to avoid breaking any wiring.
The connection is the large bulb looking item on the left side in the picture below.
Still, from the outside, you’ll notice you can lift up the bottom of the rear piece, but that something is firmly securing the top of the trim to the vehicle.
This step took me close to 25 minutes to complete because I didn’t want to break the trim.
I kept checking and re-checking to see if there was a screw or something holding in the top part of the trim piece.
There is not. This bad boy is held in by the mightiest of all clips (very top of the picture above).
YOU WILL NEED TO GO HULK MODE TO GET THIS OUT
With the bottom of the trim piece disconnected entirely, I wiggled my fingers as close as I could to the center of the top from both sides, then pulled really hard (basically, try to pull from the center so the force is even).
Once the trim piece is out, I recommend removing the 6 screws that hold in each of the lights (2 screws per light) and the lift handle (2 screws) to make painting easier. This will allow you to remove all the electrical connections from the trim piece.
If you’d rather tape off everything instead, more power to you.
I didn’t expect the trim piece to come across heavy traffic, so I settled on a matte black paint + primer rattle can from Home Depot.
I used 5 to 6 coats, applying a fresh coat every 20 minutes.
STEP 9: REASSEMBLE AND ADMIRE YOUR 4RUNNER MOD

Reassemble everything.
Stand back and admire the beauty with an ice cold beverage.
Final
Where can one find this actual part though? Seems kinda hard to track down a legit one
Who has a 10mm socket, come on now! 🙂
Need some help here. After pulling back the Vapor barrier, I tried the two center 10mm nuts and the entire bolt is spinning as well. The nuts aren’t coming off the bolt and I cannot access the bolt head from underneath the garnish.
I have the same problem, did you ever find a solution?
No, I did talk to a guy on a 4Runner forum and he basically said I’m screwed. I’d have to break this one off and order an entirely new piece. Haven’t committed that atrocity yet lol. He said some nits come off easy and others don’t come off until the stud breaks with them. Let me know if you figure something out.
Did you have any issues with seals leaking after this making it sound like the back window was open all the time
FYI the 6th nut that you said needs to be reached with a wrench (step 7) is easily accessed with a 10mm socket and extension. Just need to pop out the rubber grommet that’s directly over it.
Hey, how can I access the two wires
coming off the back hatch opener switch? I don’t want to remove the trim just to find out where they go. Can you tell me where they are routed into the door? Maybe some
Pics? The two wire colors should be light green and gray.
Tyler, you may want to try searching a few threads on the site. Try searching “Rear Hatch” or “Lift Gate” or something similar.
how can I do this if my 4runner (2012) doesn’t have that interior latch to gain access
Unfortunately, I don’t have access to a 2012 to be able to see what would be different. Maybe you can take a plastic tool and start prying down along the trunk liner and when you feel some resistance, verify that there isn’t a cover with a screw underneath? I would think the process should be very similar.
So right now I’m doing this for the 2019 TRD Pro – Looks like there are some extra steps for that one!
I found it best that after disconnecting the last fasteners to let it hang and remove both the left and right plate lights and the hatch button housing, pull the three entire assemblies out, then it’s free.