
Every once in a while, there comes an epic mod, so epic you think about it all day and into the night. Seriously, I was blown away when I first saw the Gullwings mounted on the 5th Gen.
Gullwings aren’t new by any means, as they’ve been retrofitted on defenders, land cruisers, and many other off-road platforms for decades. For the 5th Gen 4Runner, though, this is definitely something new and exciting that has now landed in our community.
A company by the name of Velox Offroad out of Katy, Texas, designed the Gullwings pictured here today. They streamlined the manufacturing process, which allows them to mass-produce a precision-cut, waterproof, and dustproof Gullwing window, all while being somewhat affordable for the end-user.
Table Of Contents
What’s a Gullwing?
What is a Gullwing Door? In the automotive industry, a gull-wing door, also known as a falcon-wing door or an up-door, is a car door that is hinged at the roof rather than the side, as pioneered by the Mercedes-Benz 300 SL – Wiki
Prior to the Velox Offroad Gullwings, there were a couple of prototypes in the forums and a few companies that said they were going to mass-produce them, but that never happened. Fast forward to 2020, and the product was officially offered by Velox Offroad.
Velox Offroad was more or less the first one to market, and they currently offer a pretty kick-ass line of not only Gullwings but Gullwing-compatible MOLLE Panels and Rear Window Delete Exterior MOLLE Panels (Accessory Panels).
Without any more introduction, meet Velox Offroad and their lineup of killer Gullwing Products.
Choose Configuration

Velox Offroad offers a wide variety of configurations you can run.
- Gullwing + MOLLE Panel: Mount your gear on both sides of a MOLLE panel—access one side from the gullwing and the other from inside your rig. Double your MOLLE real estate and gear access.
- Gullwing + No MOLLE panels: Give your dog a dedicated window, access to your overland fridge, and access to general cargo stacked up. This is a great option if you are running rear bumpers, tire carriers, bike racks, or hitch-mounted items that get in the way. Running only the gullwings keeps everything wide open and easily accessible.
- Exterior MOLLE Panel: Remove your glass, mount a 1/8″ aluminum plate, then mount a heavy-duty exterior MOLLE panel for overland gear, tools, and accessories.
They make gullwings for a wide variety of Toyota and Lexus applications.
- 5th Gen 4Runner (2010-2022)
- 4th Gen 4Runner (2003-2009)
- 3rd Gen 4Runner (1996-2002)
- Lexus GX460 (2010-2022)
- FJ Cruiser (2007-2014)
Gullwing Windows – What are they?

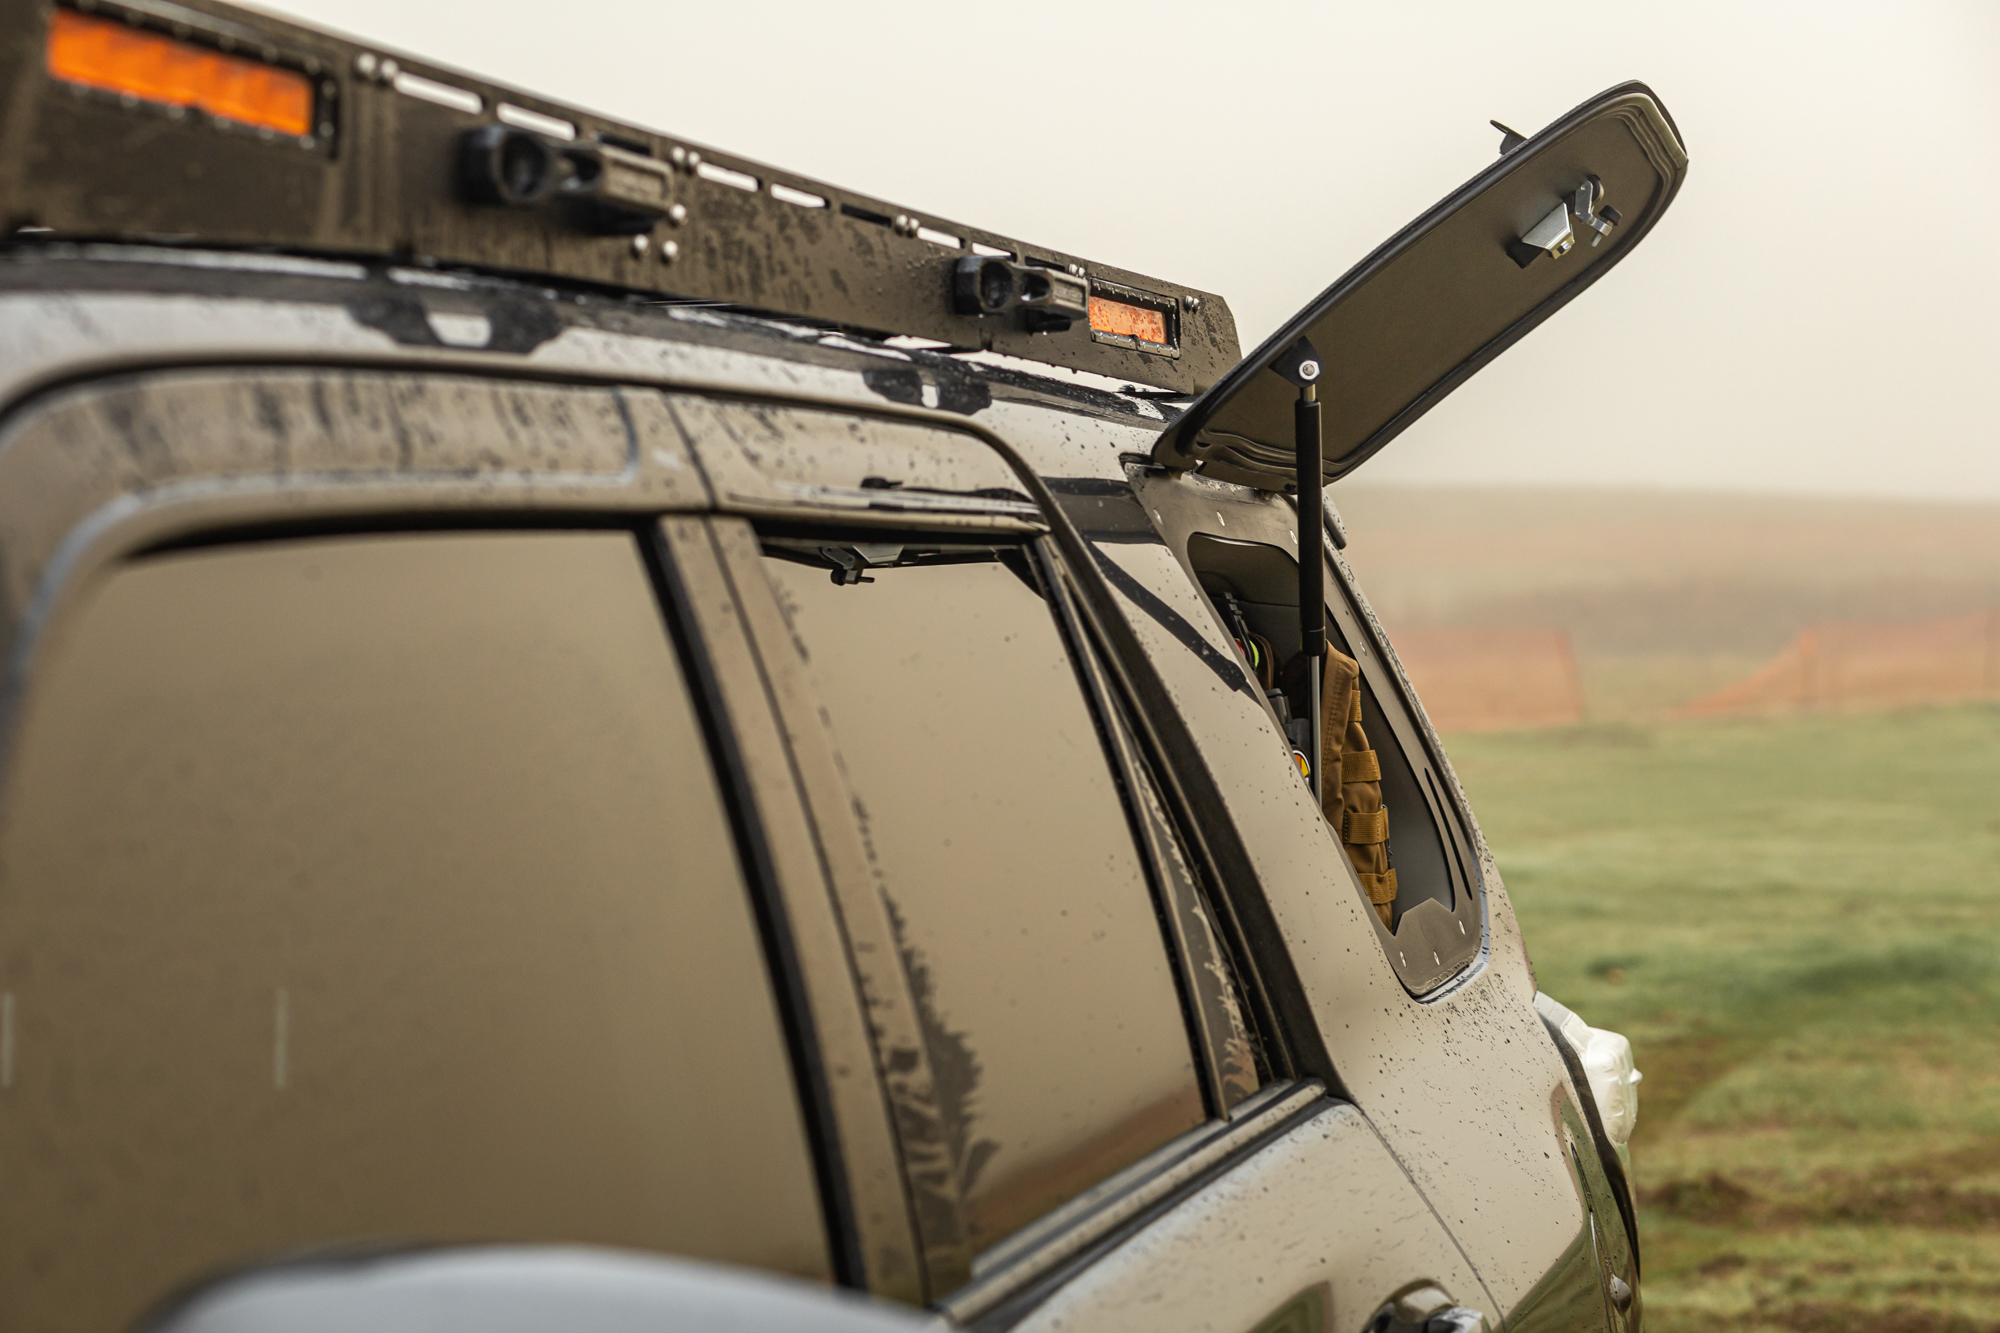
The rear window Gullwings are a direct replacement for the window between the D pillar and C pillar on your 4Runner. They adhere directly to the body of the 4Runner using double-sided tape and then bolt to the body using stainless steel hardware.
The Gullwing windows are wind and waterproof, made of 1/8″ Aluminum, CNC cut for a precise fit on all applications, and finished in a black powder coating, but are available in many colors upon request.
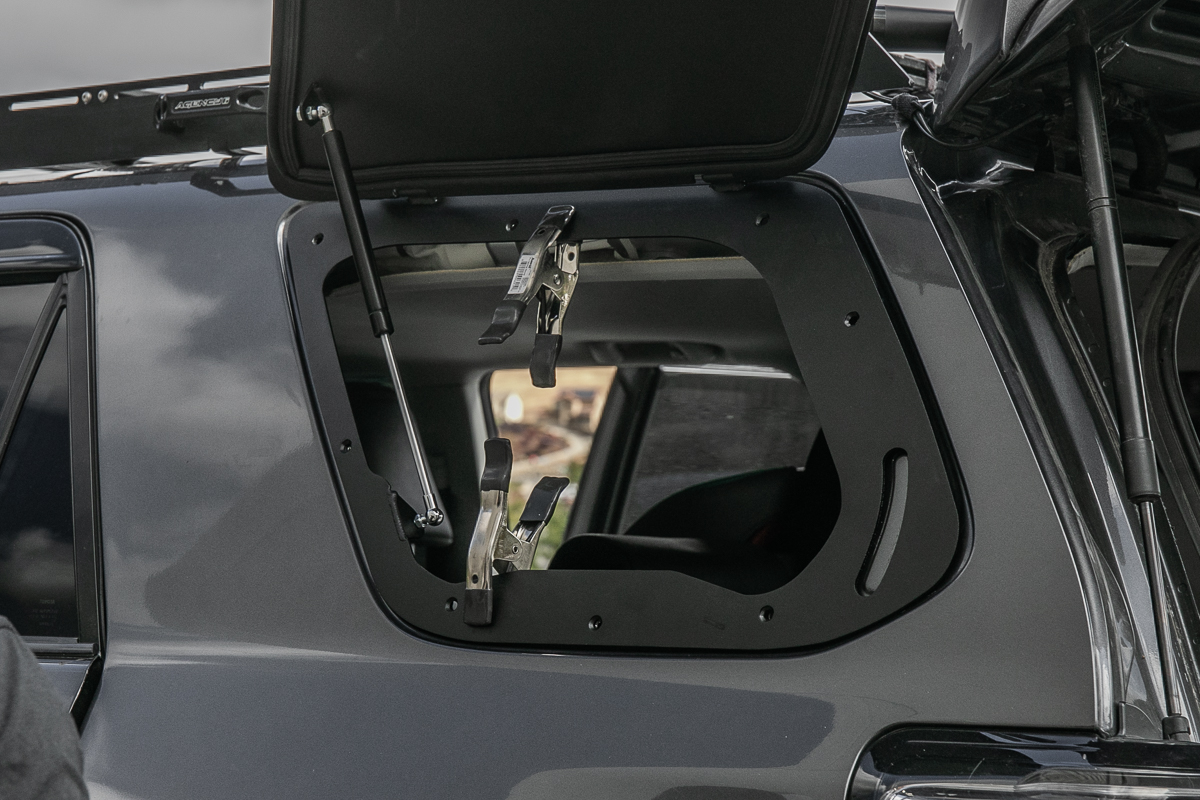
For added security, they include one locking latch with two keys and one 25-lb piston. Velox Offroad offers a 5-year warranty on all its products against workmanship and material failures. Finally, the Gullwings are finished off in a nice black powder coat. The fit and finish of these are pretty nice.
Company & Experience

The Gullwings are packed with features, and today I wanted to break down a few of them. I’ve been pretty happy running the actual products, and interacting with their team has definitely been pretty impressive as well. You can tell their entire team really cares about the manufacturing, fulfillment, and customer service for what they’re selling. They’re incredibly passionate about what they do and very excited to bring this product to market as it’s such a new, unique, and game-changing product.
I had the opportunity to meet with Willie (one of the founders) and his wife, Jenn, as they were on their way through Northern California from Katy, TX. We were able to spend the day together installing a set of Gullwings and one of their MOLLE panels on Jade, our 2016 TEP. It was an awesome day filled with genuine laughs. The people behind this company are authentic to the core, and it was a pleasure meeting the people who run this company and back this product.
Easy Access (Driver or Passenger)

To start, I think the biggest selling point of a Gullwing is that they make it incredibly easy to access the rear cargo area. You can hop out of the driver’s seat, walk around the rear window, pop a wing, open it, and grab whatever you need. You don’t have to deal with tire swing-outs, bumpers, bike racks, or anything else in order to access your cargo area.
Whether you are looking to mount weapons, lighting, first aid kits, tear-away MOLLE systems, or anything else, the Gullwings make it beyond simple to access the sides of your rear cargo. I might eventually swap out my current fridge setup and remove one panel to make it even easier to access my fridge through the Gullwing window.
The options are endless for what you might need to access.
Dead Space Behind MOLLE Panels

Another big selling point of the Gullwings is that you finally get to utilize the space between your MOLLE panel and your rear window. Prior to the Gullwings, no one was really able to mount anything to the backside of a MOLLE panel because there’s really no way to access it.
With the Gullwing, you can mount whatever you want. There’s actually enough room to mount a full-blown twin ARB compressor – which is amazing because in most other scenarios it takes up a ton of real estate, whether that be in your engine bay, rear cargo area, or somewhere else. With the Gullwings, you free up so much space for accessories to be mounted in the 4Runner.
MOLLE Panels or No MOLLE Panels

Choose to run with no MOLLE panels, like the image above.
The Gullwings from Velox Offroad are compatible with any other MOLLE panels on the market, or you can obviously run their line of MOLLE panels as well, but if you’re running another set like I am, that’s cool too. I am running a set of Finn Fab Power Grid MOLLE panels from YotaMafia.com on the passenger side, and the Gullwings work well with it.
If you don’t want to run MOLLE panels at all, that’s cool. The Gullwings work with or without MOLLE panels, and many people actually prefer to run them open.
Design and Material

As we mentioned above, the Gullwing windows are wind and waterproof, made of 1/8″ Aluminum, and CNC cut for a precise fit on all applications. They come shipped to your door in a matte black powder coat; however, they can be ordered in virtually any color you would like. This is obviously going to increase your price, but if you are looking to color-match your rig or you’re looking for some special powder coating, Velox Offroad will accommodate your request.
There is a weather seal on the backside of the panels and then a double weather seal on the inside of the panel between the backing plate and the swing-out window. If you are questioning the waterproofness, go check out my Instagram video where I drown them with a water hose and then open them up. They were dry to the touch.
Really killer design and only the highest quality materials.
Velox Offroad MOLLE Panels

The MOLLE panels themselves might be the strongest MOLLE panels on the market because of the reinforced gusseted shelf on the backside. The bottom portion of the shelf that runs along the distance of the panel from the back to the front reinforces the strength overall, as does the secondary gusset that runs vertically up the C-pillar. There’s no other MOLLE panel like this on the market. Secondary to that, Velox Offroad also accommodates a Blue Sea Systems 12-volt DC power system, just like the Finn Fab MOLLE panel system.
On top of strength, you have an impressive design. The MOLLE system panel is actually MOLLE compatible, consistent with most MOLLE packs, straps, and backings on the market. The slots in the panel are designed to fit the exact straps that come on a MOLLE pack.
MOLLE Panel Shelf

Just below the flashlight sits a shelf you can set things on (gloves pictured here)
This shelf measures almost 3″ in distance and runs the entire length of the MOLLE panel. It’s a pretty cool place to open your window and set some stuff down. You can tell a lot of thought went into the design and manufacturing of the product.
Exterior MOLLE Panels

The exterior MOLLE panels are exactly as they sound: exterior-mounted MOLLE panels. Velox refers to them as Exterior Accessory Mounts. This Exterior Accessory Mount system, offered by Velox Offroad, is extremely stout. They start by deleting/removing your rear window, and in its place is a 1/8″ aluminum plate. Once that plate is mounted to the body of the 4Runner, the exterior MOLLE panel is then mounted to that plate. These things are strong. Can you imagine how much weight you would be able to stack on these! They quote a 400lb rating, and I’d be hard-pressed to see anyone even try to outfit these with 400lbs.
Installation Overview

Installation Options:
- Professional Install (Katy, TX): If you’re located near Katy, Texas, just have Velox Offroad do this installation for you. VeloxOffroad.com.
- Professional Install (Sacramento, CA): If you are located in the Bay Area/Sacramento, CA, reach out to Stellar Built. StellarBuilt.com
- Professional Install (Worldwide): Call a company like Safelite Autoglass for Window Removal ($60-$100)
- Google “Mobile Suto glass repair & Windshield Repair” in your city. Plenty of other random companies out there that can get the job done.
- DIY – Break Glass or Cut Weather Stripping Manually: Not recommended, but it does get the job done.
Step 1. Remove 10MM Hardware Holding Plastics

Start by removing all of the hardware holding the plastics together.
Step 2. Remove Weather Stripping

Pull back the weather stripping around the D-pillar and C-pillar. This will help you get access to behind the plastics.
Step 3. Pull Pillar Plastics

Start separating the plastics from each other and completely remove the light grey plastic (top) from where it’s connected to the dark grey plastic (bottom). There is a seat belt running through it, so you will need to set it aside somewhere out of your way so you can continue to work.
Step 4. Pull Top Plastics
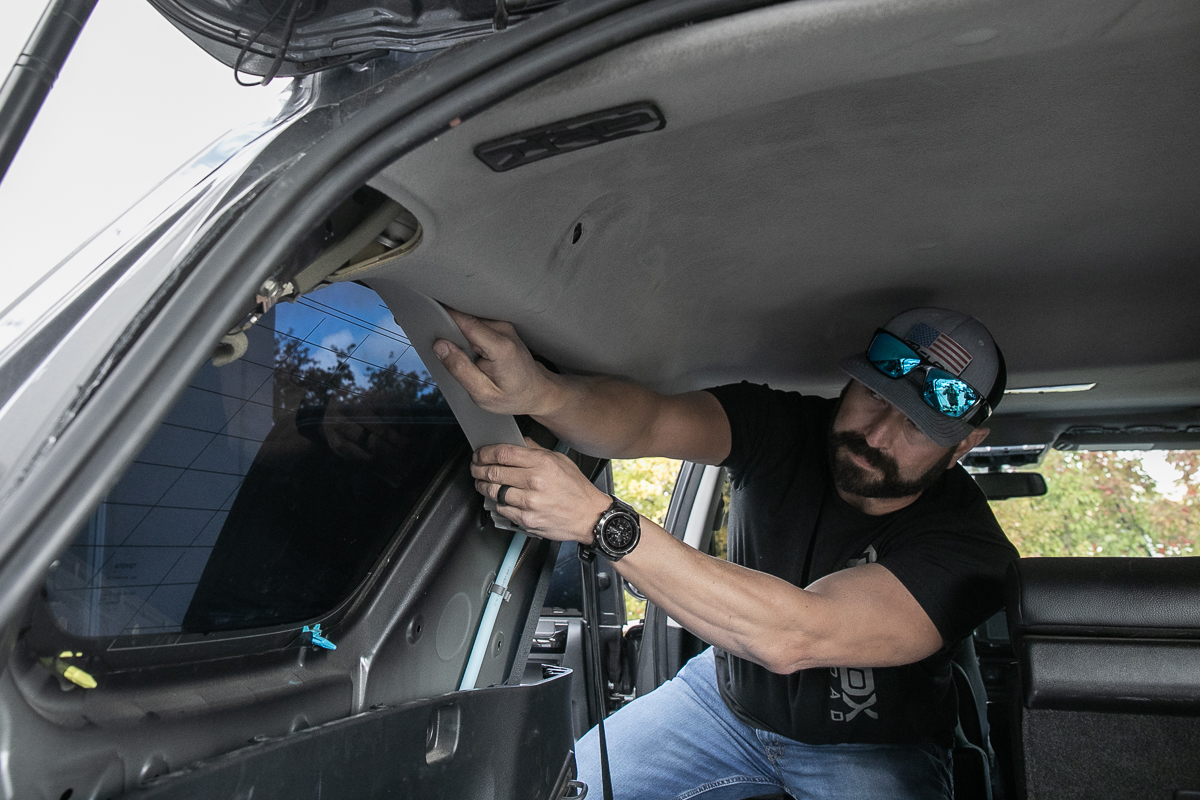
Pop off this top plastic trim piece.
Step 5. Unclip Radio Wire

Step 6. Window Removal Tool

This is a professional window removal tool that Velox uses to remove window glass. Again, you should have this job professionally done if you want to do it the right way. If I were to do it on my own, I would call Safelite, have them remove the glass, and continue with the rest of the install on my own.
Here is a link to the window removal tool.
Step 7. Window Removal Tool Insert Line

Pushing the cutting fiber line up through the windshield glass from inside to outside.
Step 8. Pull Cutting Fiber Line

Pulling the cutting fiber line through the window.
Step 9. Wrap Cutting Fiber Line Around Glass

Once the line is out, you wrap it around the window glass.
Step 10. Window Removal Tool

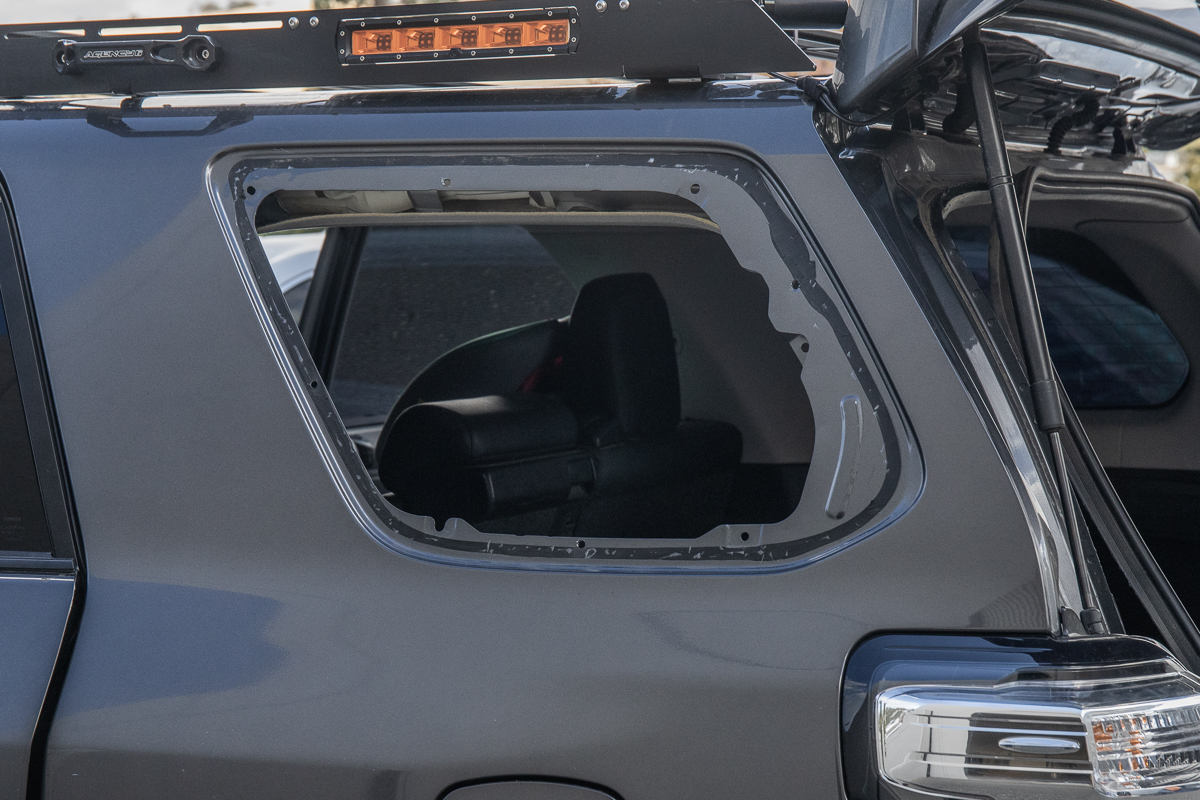
Once the wire is wrapped around the glass, you can take a cordless drill with the glass removal tool to torque the line in, cutting the weather seal on the glass to the body. This will free the glass, allowing it to be pulled out.
Step 11. Tape Window and Remove Glass

Put some masking tape on the glass so it doesn’t fall and shatter.
Step 12. Remove Weather Seal

Use your preferred weather seal removal tool and remove any factory weather seal still stuck on the 4Runner. Willie uses a German Super Sharp Hoof Knife.
Step 13. Clean Excess Weather Seal

Step 14. Prep Gullwing Window

Before positioning the Gullwing on the 4Runner, open the window.
Step 15. Position Gullwing
Step 16. Position, Mark, and Drill

Once you have the Gullwing fully in position, you can mark and drill your pilot. Then come back through and drill out the final size once the panel is off the truck.
Step 17. Final Look Before Installation
Now drill your final size—9/32″ bit.
Step 18. Prep Double-Sided Tape

Remove that double-sided tape backing before you install.
Step 19. Install Hardware

Step 20. Hardware Installation – Inside Looking Out

Step 21. Radio Wire Relocation
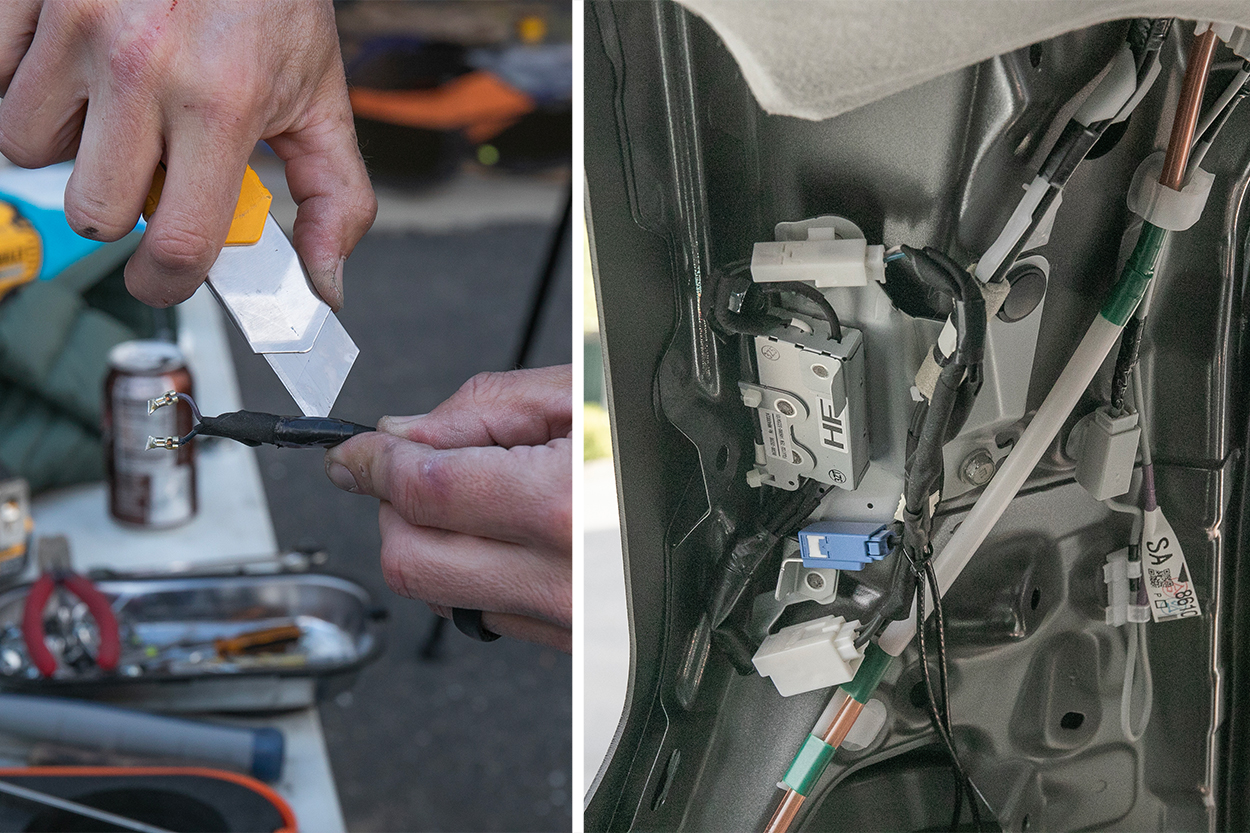
Driver Side: Velox ships out a replacement male connector to plug into the female connectors. Unplug and then plug back in.
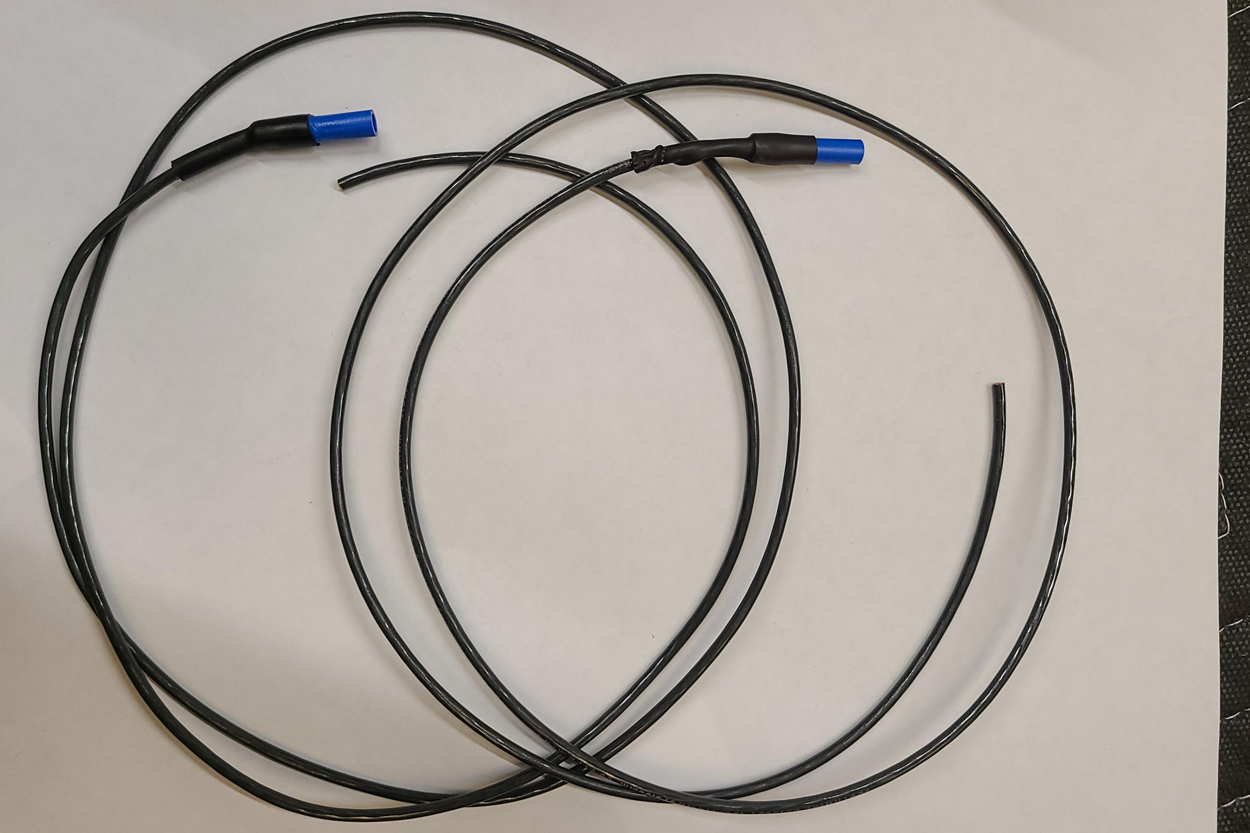
Passenger Side: The difference on the passenger side is that the AM/FM wire and HD radio wires are soldered to the glass. You need to cut this off, and that’s what you see above (the Y). Unplug the other end of this harness from the module so you can work with the harness a little better. Then strip the ends of the wires, and attach the supplied butt-splice connectors (also pictured above with the blue connectors).
The other ends of the wires are fed into the fender well. They do not connect to anything else. These are essentially replacement antennas that retain your AM/FM and HD reception. Velox provides fender well zip tie connector points to run your replacement antenna lines down into the fender well along the sheet metal.
Step 22. Reconnect all Interior Plastics

Step 23. Install MOLLE Panels

This one is pretty straightforward, as we’ve seen multiple Molle panel installs here on the site.
Final Thoughts

Initial Thoughts
They’re great. After installing both wings and the interior MOLLE, I really want to see what one of their exterior MOLLE panels looks like on Jade. I think if I were to start over, I would do an exterior MOLLE panel on one side and a gullwing + MOLLE on the other side. Hard telling though – I really like having wings on both sides. This setup is really cool, how I have it. Velox offers a few configurations here, so your options can get pretty tailored.
Any Downsides?
A potential caveat to this install is patience all the way around. You need patience when you’re pulling your plastics off and even more when you’re putting them back on. If you miss a clip or two during the reinstall portion, your plastic lines will be off, and you will have to start over. That’s not fun. It’s also really easy to break plastics, so buying an extra set of OE white clips wouldn’t be a bad idea. We broke at least five during my install here. Just make sure you take your time getting those plastics off and back on.
One other potential challenge here is that you have to drill into the body of your 4Runner. With that said, though, it’s getting covered up by the Gullwing itself. And if you ever choose to return your factory glass back in place, the glass will also cover up any new holes that were drilled.
Finally, the glass. Removing the glass is the biggest hurdle here, but getting over it is simple. Just call Safelite and have them remove the glass for you, and then continue with your install like you would any other mod we’ve seen on Trail4Runner.com. Don’t overthink it.
Velox Products
The MOLLE panels are incredibly stout with that shelf and gusseted c-pillar extrusion. It’s really a cool product when you see it in person.
The Gullwings themselves are just a WOW product. People see it and go “wow – that’s pretty cool”. It’s an impressive mod.
Takeaway
I think the Trail Takeaway here is that for my setup, we’re doubling the real estate we have on our MOLLE panels, and it gives me a ton of opportunities for permanently mounting gear and being even more prepared than I already was. What I am really stoked about, though, is having an entire side dedicated towards photography gear; multiple tripods, lens filters, lens swap bags, a DJI gimbal for video, cleaners, dusters, etc.
If you guys have any questions, let me know. Cheers!
It would be nice if they were contoured to the quarter glass, poor after market design. I should know,I have been doing autoglass for 37 years
Seems like the perfect solution to a non-existent problem… but whatevers!
I know these are on sale @4Runner Lifestyle as well!!
Just went over there and saw them at the retail price. Maybe you need a coupon code? But yeah, wherever you get them, you can’t beat their sale right now. 30% Off is massive.
Have any photos of the panels with the Blue Sea cut outs? Are we able to request that as part of the group buy?
Do they have a shelf they support for the panels too? Assuming I can use one of my existing shelves if needed.
How is your radio reception now with these new antennas and where they are placed? Is it worse than when the glass was there?
When I tested the radio it worked fine. But, I don’t use my radio on a regular basis so it was not in-depth testing. I turned it on, flipped through a couple of stations and that was about it. Bluetooth Spotify or Pandora for me.
Just called a glass removal company in SLC and they quoted me $125 for just one side removal. Does this sound like a fair quote?
Yeah, it’s not horrible. I’d pay that. I called another one out here in Sacramento recently and they quoted $115 so yeah for a private automotive glass installer/remover I don’t think it’s a bad price.
Very cool. A nice option would be to have a glass wing!
My Defender dreams are coming true but with the Toyota reliability intact!
I really enjoyed this installment. It really looks great. looks like it would be really functional. I don’t have a need for it but I can see where it would really come in handy for you guys that are out on the offroad way more than I am. Very cool though
Mind blowing. Any pics from the outside with them closed?
Yeah sorry about that, just added one at the bottom and another closer to the top.
Cool product! What did you do to keep your radio in service since you just removed your radio antennas?
Circle back to Step 21 here.
They provide new wire harnesses that connects back in. Sorry I missed that step. Let me add that back in there.
Wonderful! Glad they accommodated that. I thought I missed something. Thanks for the edit. 🙂
Super impressive.
Love these things! I’ve been following these gullwings for awhile now, as this is something I wanted for years, but there was nothing on the market. Adding a few notes from our install:
I did my install over the weekend and would definitely recommend a professional to remove the glass to get a perfect surface to adhesive to. I called Safelite and a bunch of other glass shops, and no one would ever consider touching it (based in Florida) for liability. I posted in our local 4×4 group and had 3x people that wanted to come out the next day.
Having a good drill bit was key – the one I had was pretty dull or not for metal and made a mess of the first hole – I ended up borrowing one from a neighbor. Throwing some paint on those drilled parts is not a bad idea.
With the interior all pulled out, I used the opportunity to sound deaded the entirety of the rear and run some extra wiring to the rear. With some better management of the molle panel, I was able to take what I had on both sides of my old panel into one side, front and back, with the gullwing version. I destroyed so many plastic clips, so extra are necessary!