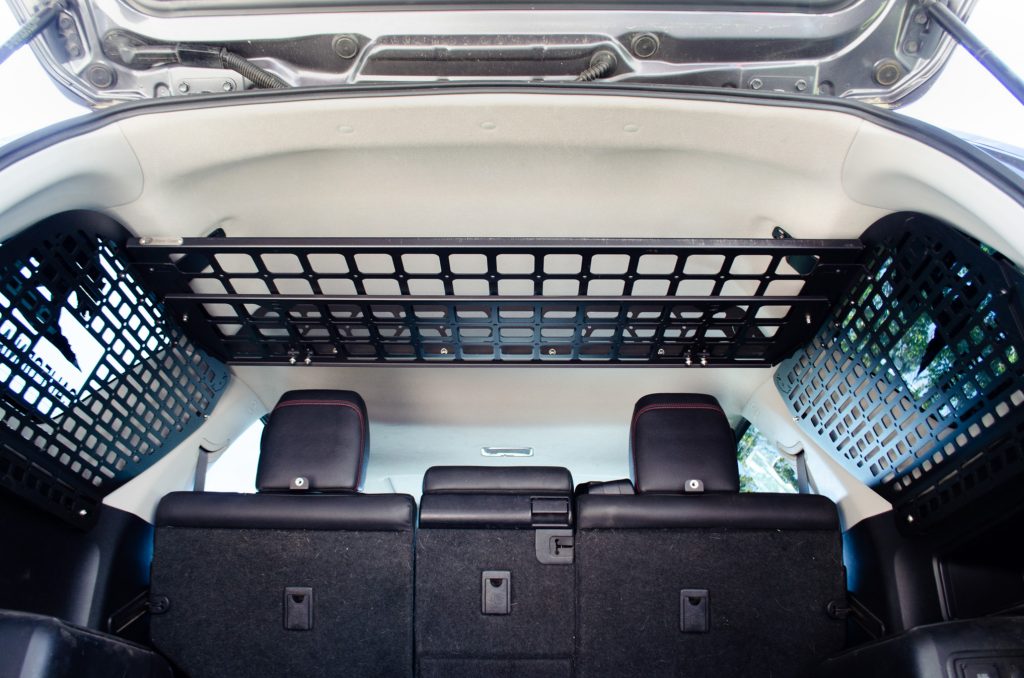
There are only so many ways to stack boxes, bins, and oddly shaped equipment in the already restricted cargo area of your 5th Gen 4Runner. Bison Gear has developed an entire MOLLE-based storage system for our magnificent machines, beginning with their Rear Window Panels. This durable set mounts inside your rear cargo windows, freeing up valuable floor space while keeping everything easily accessible.
But they didn’t stop there. In addition to the rear window panels, Bison Gear has developed a shelf that spans across the upper area of your 4Runner from window panel to window panel, expanding your storage options. From there, this epic shelf system burns skyward with additional options such as a flip-down barrier and storage compartment designed to house a folding camp chair.
In this article, I’ll break down each component in detail and explain how they come together to form the Voltron of storage systems (or MegaZord for you youngsters).
Table Of Contents
Interior MOLLE Panels
Having the right gear for your adventure is key to a successful trip. However, sometimes the difficulty of securing those items inside your rig can hinder your excitement or even keep you from going out altogether. This is where being as efficient as you can when packing out can make all the difference.
Overview
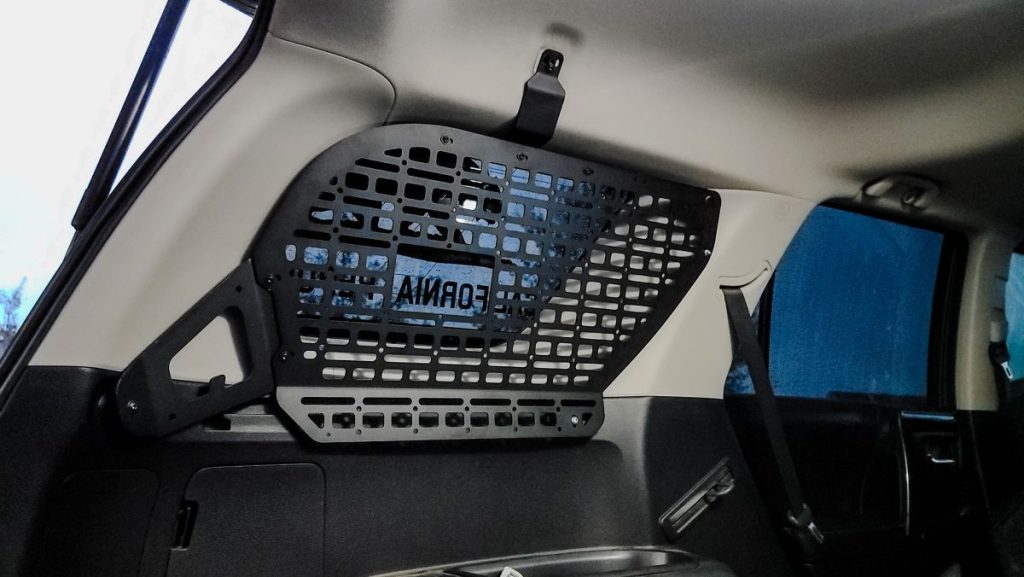
Made from 1/8″ steel and powder-coated to resist scratches, Bison Gear’s panels are ready for whatever you throw at them. Their rigidity and strength can handle all sorts of gear without warping or flexing. This makes them an ideal addition to storing any gear you need to access quickly for emergencies.
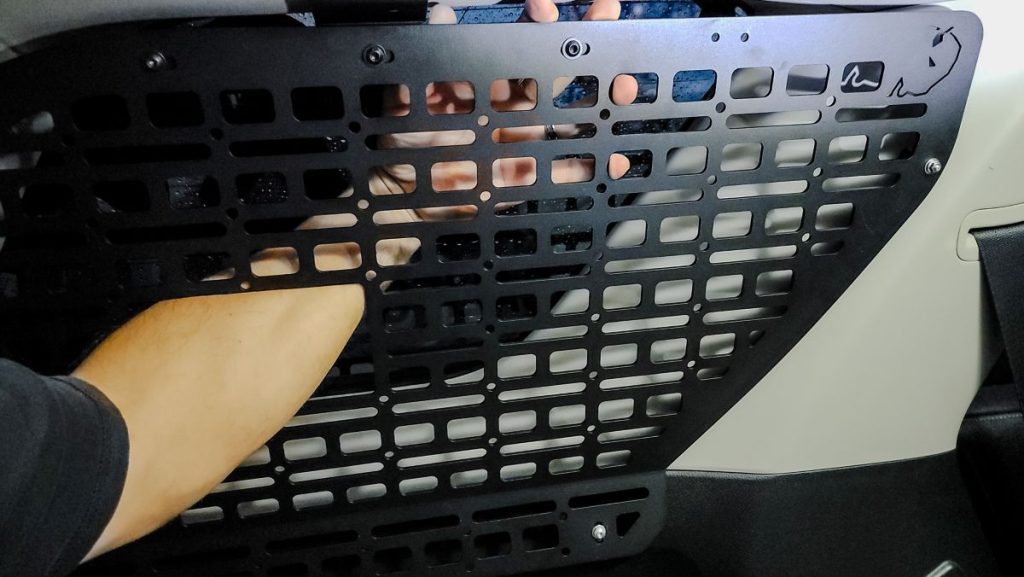
A common issue with cargo MOLLE panels in the 4Runner is that it is difficult to get your hands behind them to fasten MOLLE straps. Bison Gear came up with an ingenious solution: a cutout large enough to easily get your hand behind the panel.
Bison Gear explains that this access allows you to store other items between your window and the panel, such as blankets or lightweight jackets. At first, I thought this to be a bit of a novelty, but after utilizing this space for a while, I can say it really does come in handy (no pun intended).
If your rig already has a dedicated use with, say, a VELOX gullwing, you’d be pleased to know that Bison Gear also sells these panels as single sides, if you only need one.
Installation
Installation is pretty straightforward and should take less than 30 minutes.
Tools Required:
- Ratchet
- 10mm socket
- P2 Phillips screwdriver
- Flat-head screwdriver or small pry tool

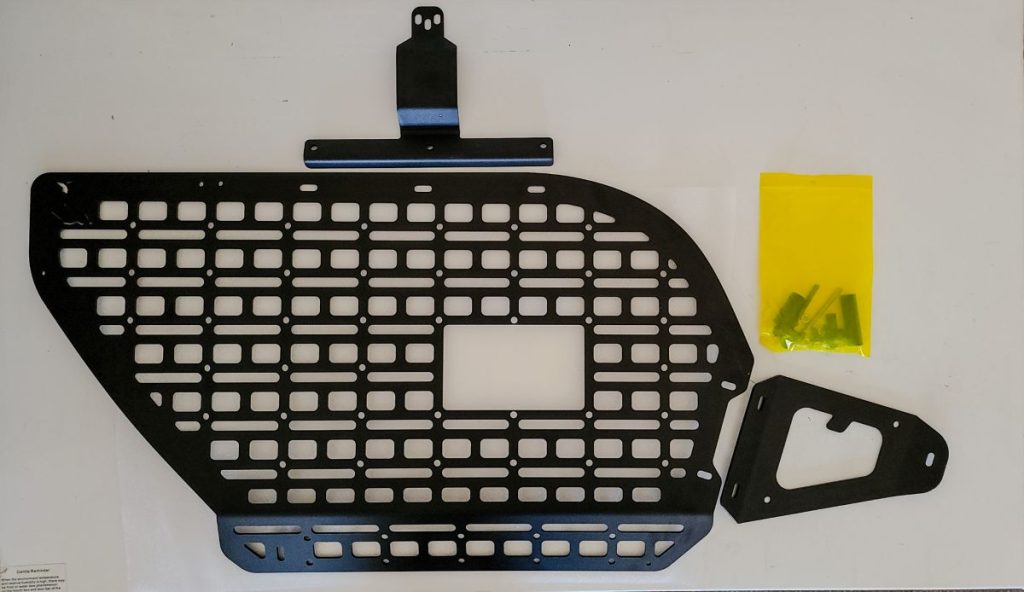
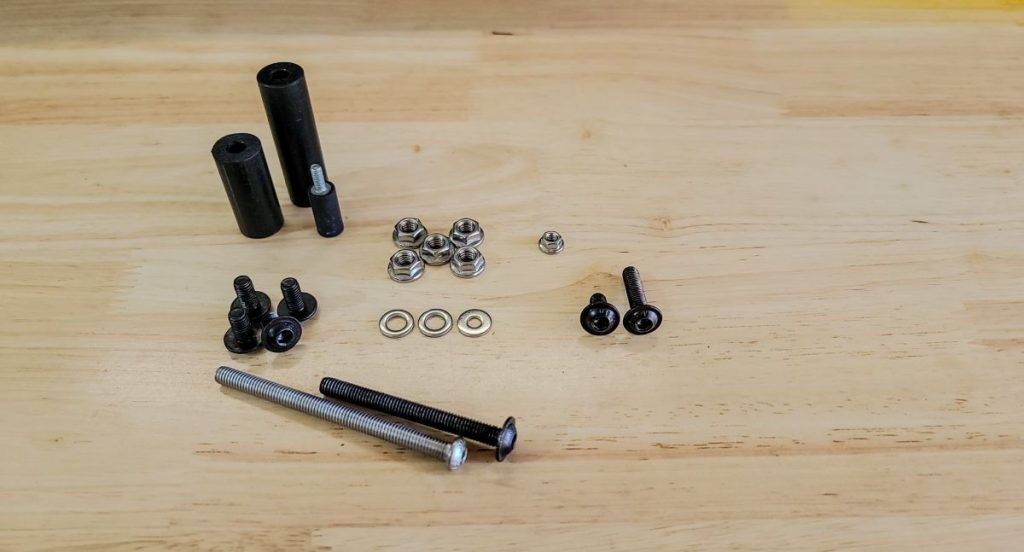
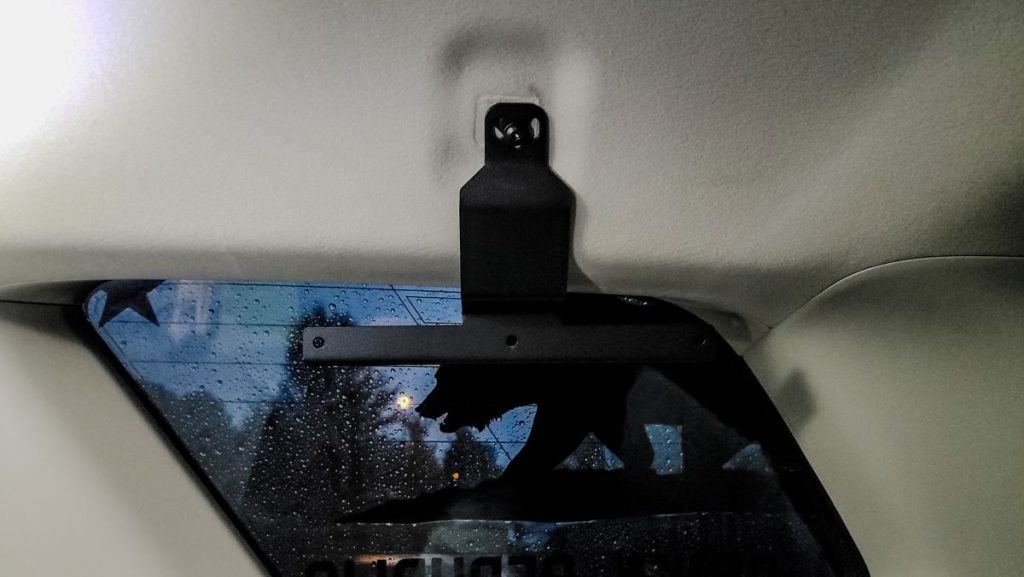
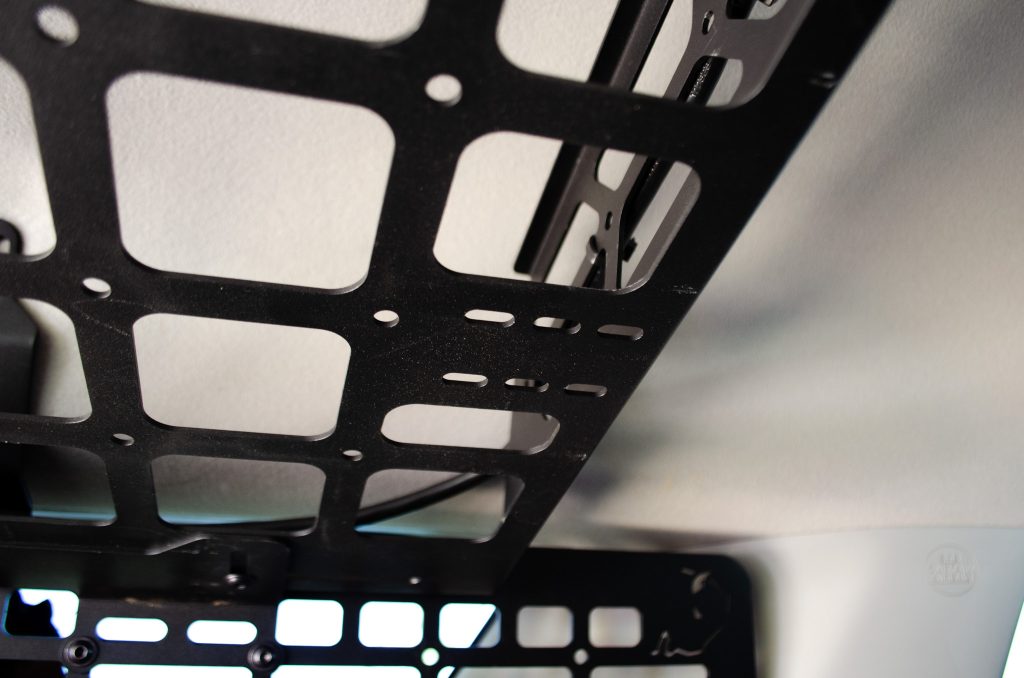
Bison Gear provides each panel with the necessary hardware for installation. The panels will be installed to the (3) mounting points pictured above.
Step 1. Remove Cargo Mount Hook
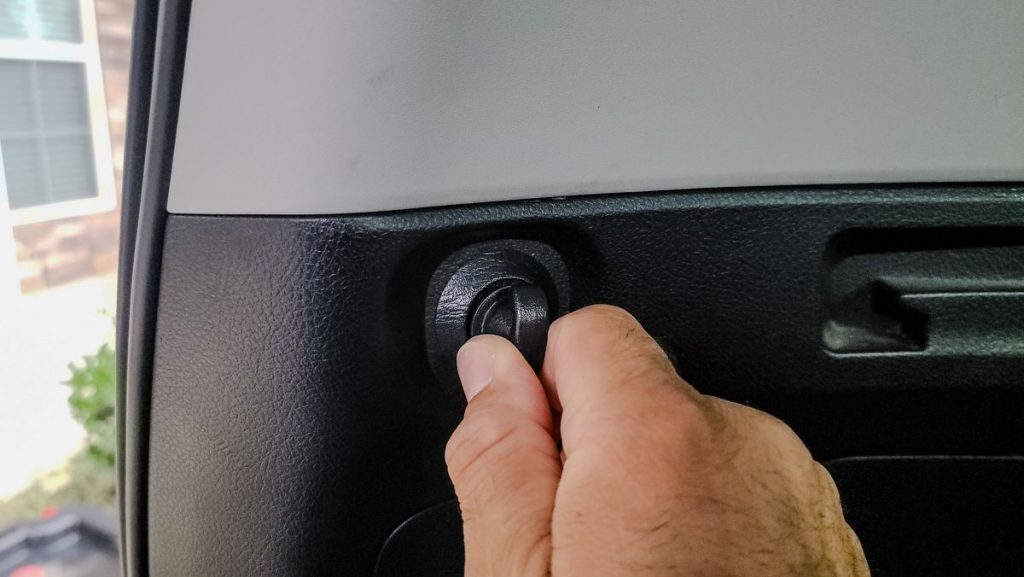
To remove the cargo net mount, rotate the hook 90 degrees and pull it toward you. There is a Phillips screw behind there that you will need to remove and discard before installing the panel.
Step 2. Remove Clothes Hanger
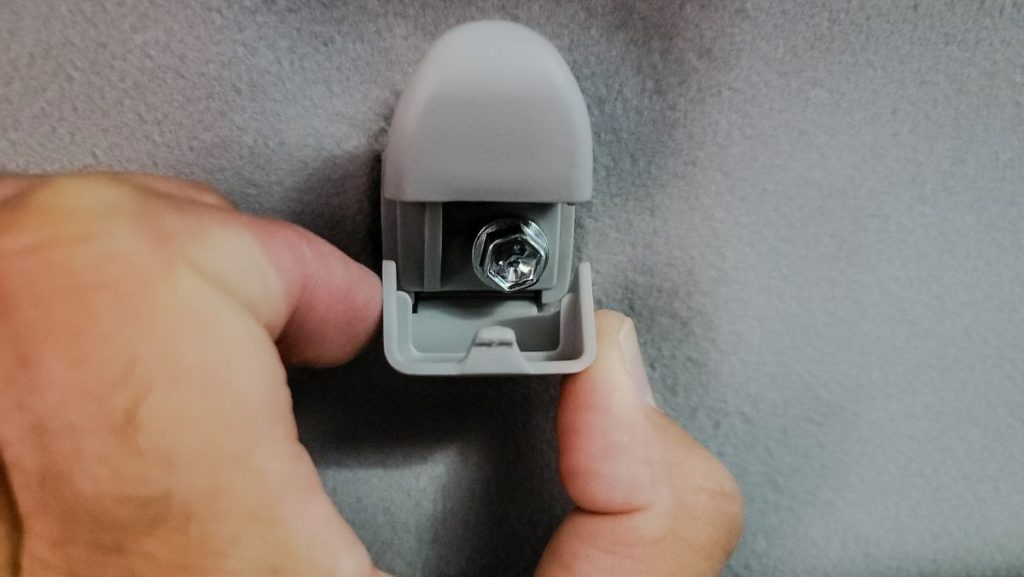
To remove the clothes hanger mount above the window, slightly squeeze its lower half and pull it down. You may need to use a small pry tool to open the casing. With the 10mm bolt exposed, remove it and the entire hook assembly.
Note: This OEM clothes hangar hook does not need to be reinstalled and will not fit back into place without some minor trimming to the plastic on the back, but it can be done. Reinstalling it is entirely up to you.
Step 3. Remove Cargo Bolt Cover
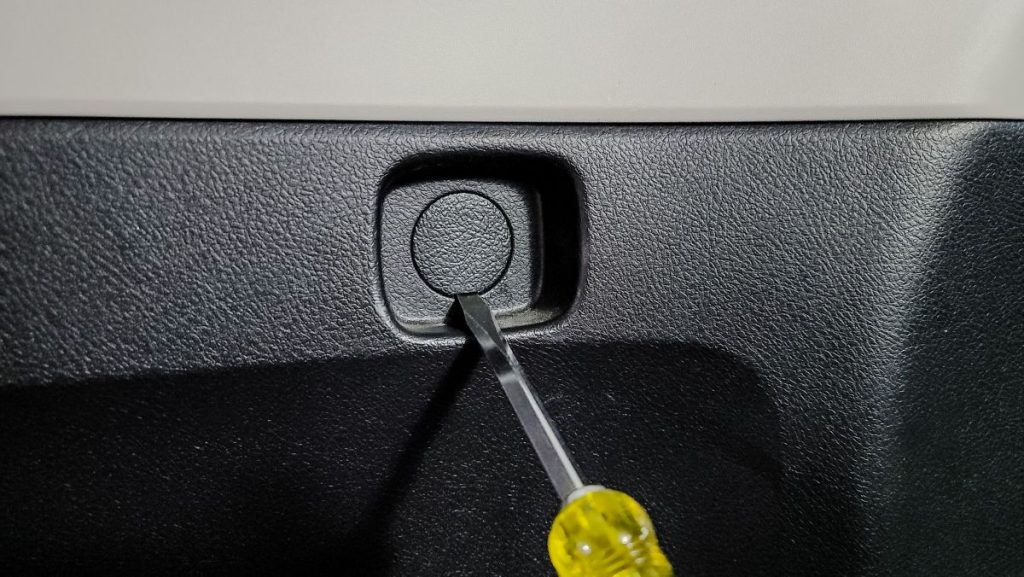
To remove the plastic screw cover from the foremost location, use a small pry tool and pop off the screw cover before removing that screw as well. This should either be a 10mm bolt or a Phillips head screw. Remove it and discard it, as you will be replacing it with the hardware provided.
Step 4. Assemble MOLLE Panel

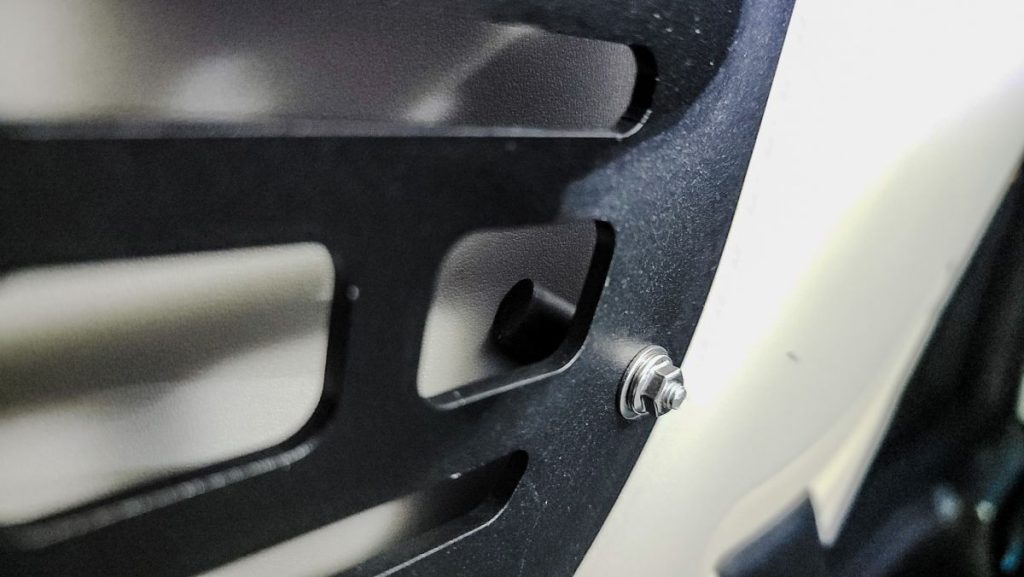
Before mounting the panels, attach this spacer pin to the foremost area below the Bison Gear logo. This little spacer keeps the panel from vibrating against the side panel of your 4Runner while traversing those rough trails.

From here, I tried two different methods of mounting the MOLLE panels.
First, I tried loosely bolting all the parts together, lifting the assembly into position, and attaching it to the vehicle.
The second method involved installing the mounting brackets on the truck first before bolting the MOLLE panel to them.

Both methods had challenges, but I found it easier to hold up the completed assembly and focus on securing the top bolt first. You can gently allow the panel to hang with that support while you thread the remaining (2) bolts into place.

The lower bolts both use a spacer provided between the panel and the mounting point. The longer spacer is for the side towards the front, and the shorter one goes where you removed the cargo net hanger.
Once you have all (3) bolts secured, double-check to ensure you haven’t accidentally flattened the anti-vibration bolt. If so, just back out the main bolts until the panel has a little play, then straighten it. Finally, tighten all bolts, and you’re ready to go.
Overall Impressions
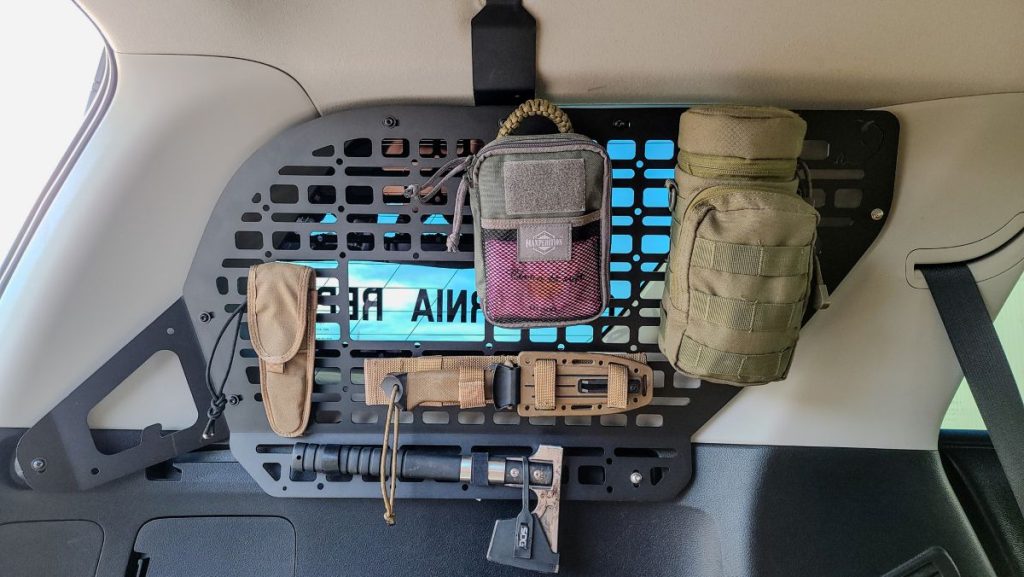
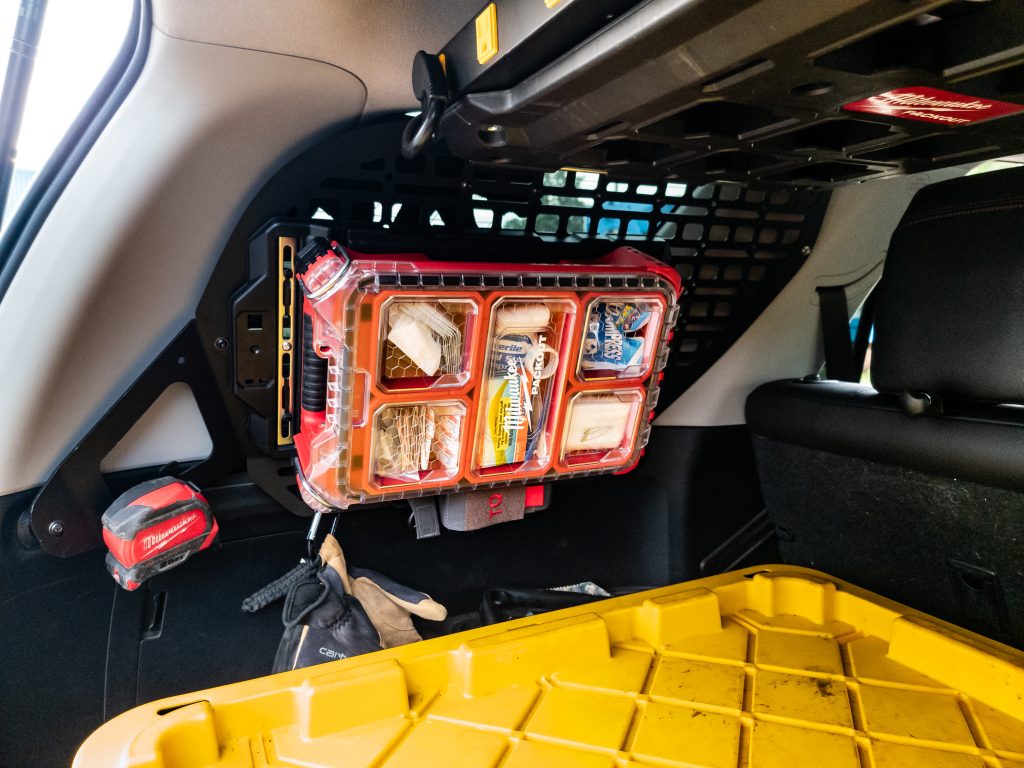
There’s no shortage of cargo MOLLE panels for the 4Runner. What made Bison Gear stand out to me was their overall design and build quality. Incorporating a healthy mix of mounting options such as rivet holes, slots, and, of course, MOLLE, they seemed to acknowledge that not all of us use our rigs for just overlanding or camping.
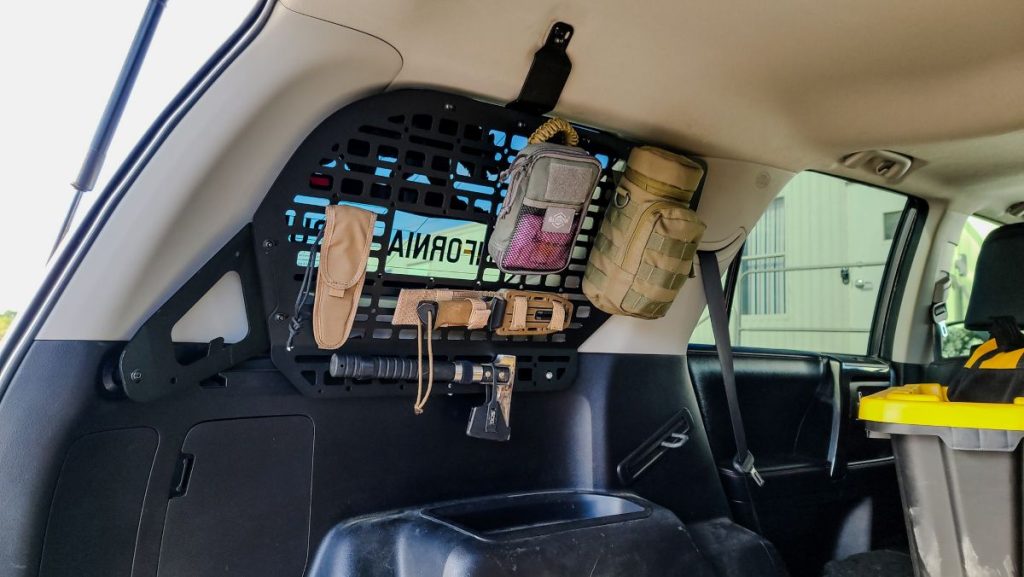
While you can easily mount camp gear to these panels, I found them extremely useful for my day-to-day items, which I grab, store, and grab again.

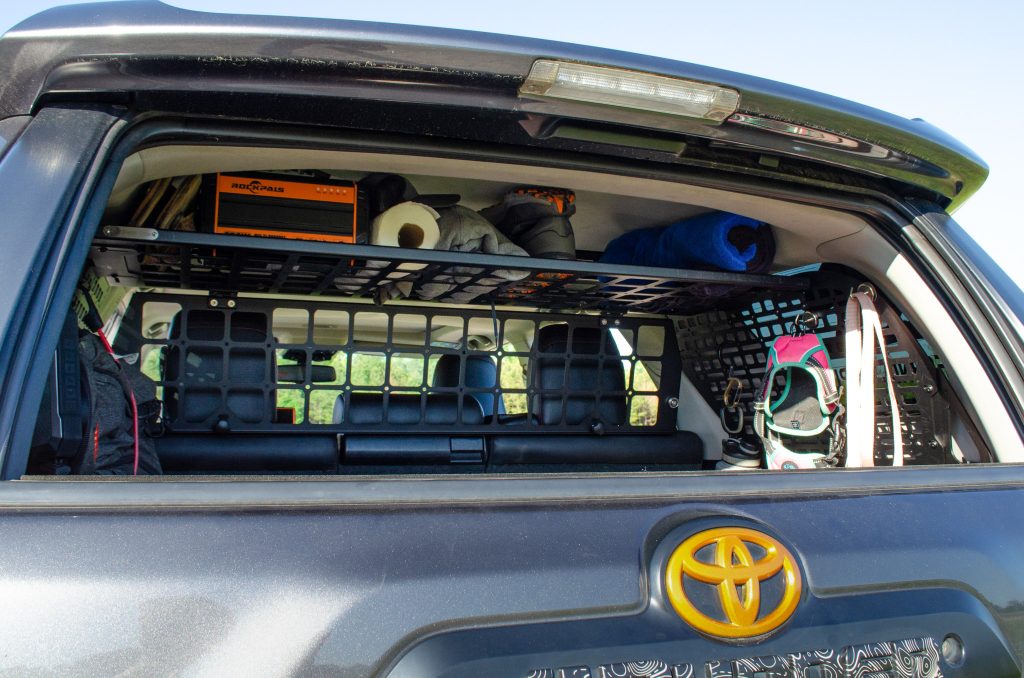
Being in construction management, I often bounce between boardroom meetings and the work site. Before installing these rear window MOLLE panels, I had to store my equipment in a bin or toss it in the back. This made for a constantly messy truck with smaller items rolling around. Or, at the very least, made it inconvenient to open the rear hatch whenever I needed to access a bin. Now, I can easily access these items from the rear window.
Utilizing the panel cutout, I can also store extra Hi-vis vests and safety glasses between the panel and the cargo window for any unprepared site visitors. In my opinion, this feature helps propel Bison Gear to the forefront of an industry already saturated with amazing options. The use of these panels helps me quickly and easily change the roles of my 4Runner from a daily driver to a trail machine.
Roof Shelf
As they say, one good piece of 4Runner gear deserves another…or something like that. The point is that we, as enthusiasts, always look to take our bad-ass buggies to the next level.
For as many items that can strap to your 4Runner’s MOLLE panels these days, let’s face it, sometimes you just need to throw something on a shelf. From beach towels to battery chargers, a shelf system at the rear of your rigged ride can stylishly simplify your stash and provide a practical storage option. Bison Gear has satisfied that need with their Roof Shelf system, which works in conjunction with their Rear Window MOLLE Panels.
Overview
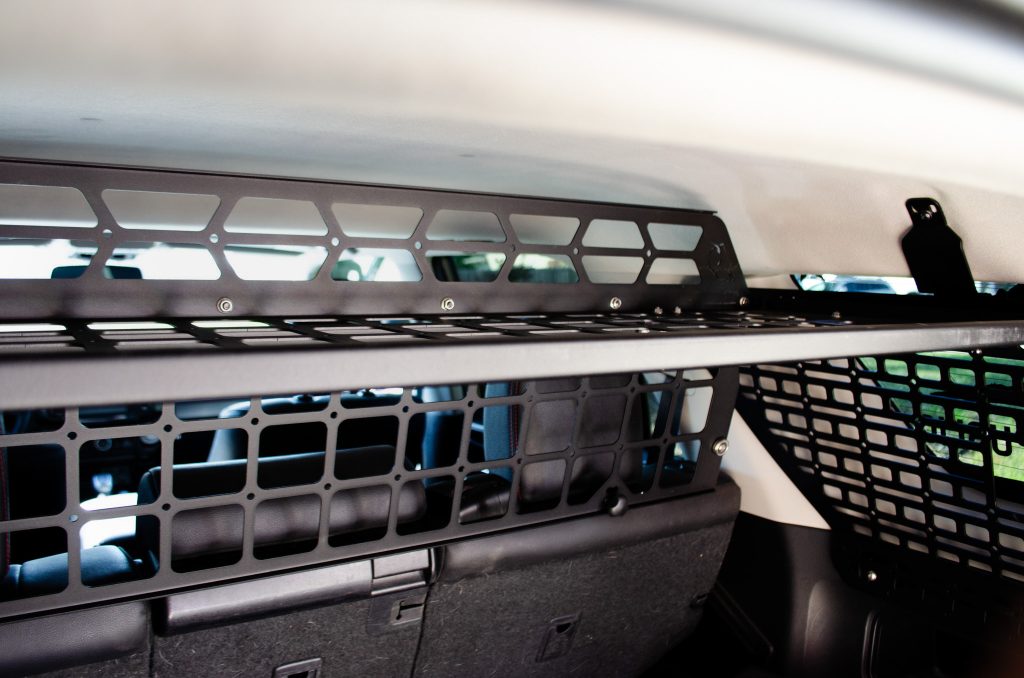
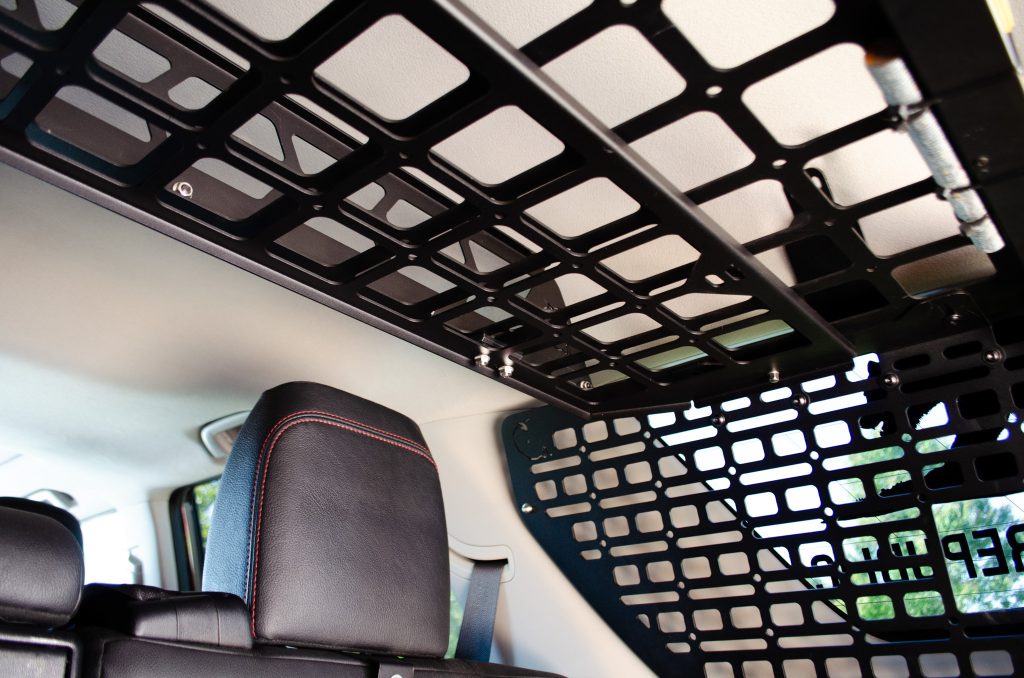
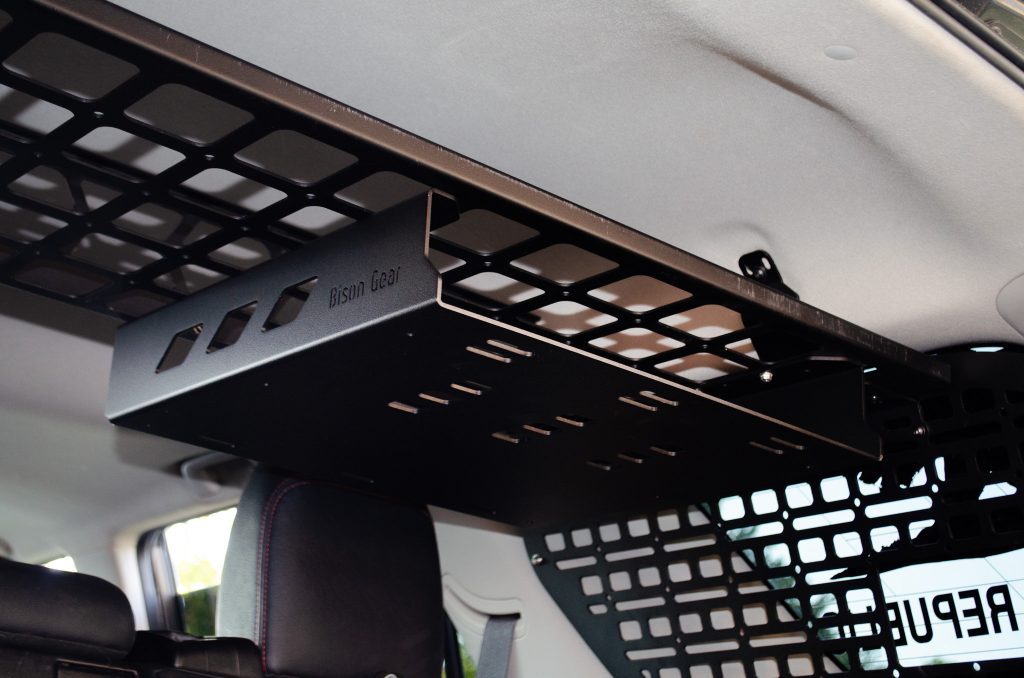
Bison Gear’s roof shelf is a two-piece, single-plate addition to their rear window panels, bringing your organization to a higher level. This MOLLE-style shelf mounts to your rear window panels and sits high enough that it won’t hinder your view from the rear window, but still provides enough space to easily place things such as sleeping bags, towels, or even smaller storage boxes.
The rectangular holes along the base also allow you to strap gear to the bottom, allowing you to grab what you need with ease. The shelf elevates the window panels from “cool” to “kick-ass,” and the whole system fits together easily.
Bison Gear also has accessories like their Cargo Barrier and Under the Shelf Compartment that help make this shelf system paramount for storage solutions. It’s important to note that this system is incompatible with the third row seating and can only be mounted to your Bison Gear Rear Window Panels.
Installation
Step 1. Attach the Rack
Bison Gear’s Shelf System installs in just a few steps and includes the hardware you’ll need to complete the job. First, you will need to attach the headache-rack safety panel to the shelf plate. This panel assembles on the shelf using the supplied 10mm nuts and bolts. Don’t leave this panel off, as it will prevent whatever is on the shelf from flying forward and clobbering someone on the head in the event of a sudden stop.
Step 2. Mount Side Brackets & Secure Shelf
After installing the safety panel, affix the (2) mounting brackets to the sides of the shelf. As with most installs, I kept my brackets slightly loose to allow me a little play as I aligned the mounting holes. This “give” allows a degree of adjustment while I thread all the fasteners into place, keeping the safety panel directed towards the front of the vehicle. Reaching behind the MOLLE to hold the nuts in place proves, once again, that the cut-out on the rear window panels comes in clutch.
After everything has been aligned and snugged down, your roof shelf system is ready to go!
Build Quality
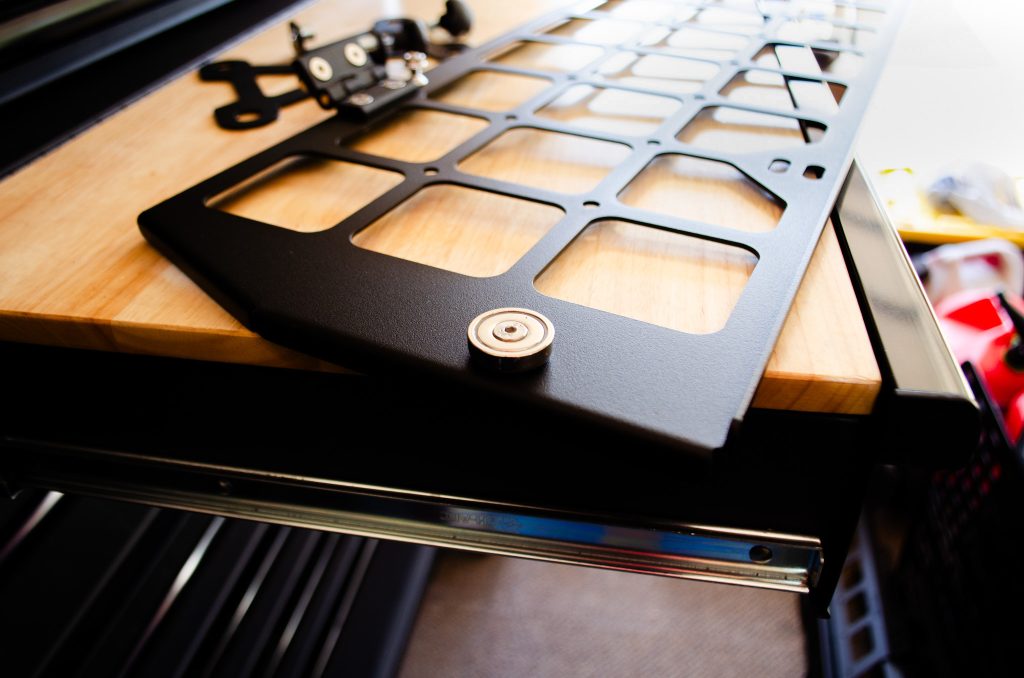
Bison Gear did not skimp out when manufacturing the Roof Shelf, which is constructed from high-quality steel and coated with a black powder-coat finish for maximum durability. The shelf also mounts high enough to allow ample room to see out of your rearview mirror without getting in the way. Even though this shelf mounts snugly in the upper area of your 4Runner’s headliner, it still leaves plenty of room to store and grab whatever items you may need.
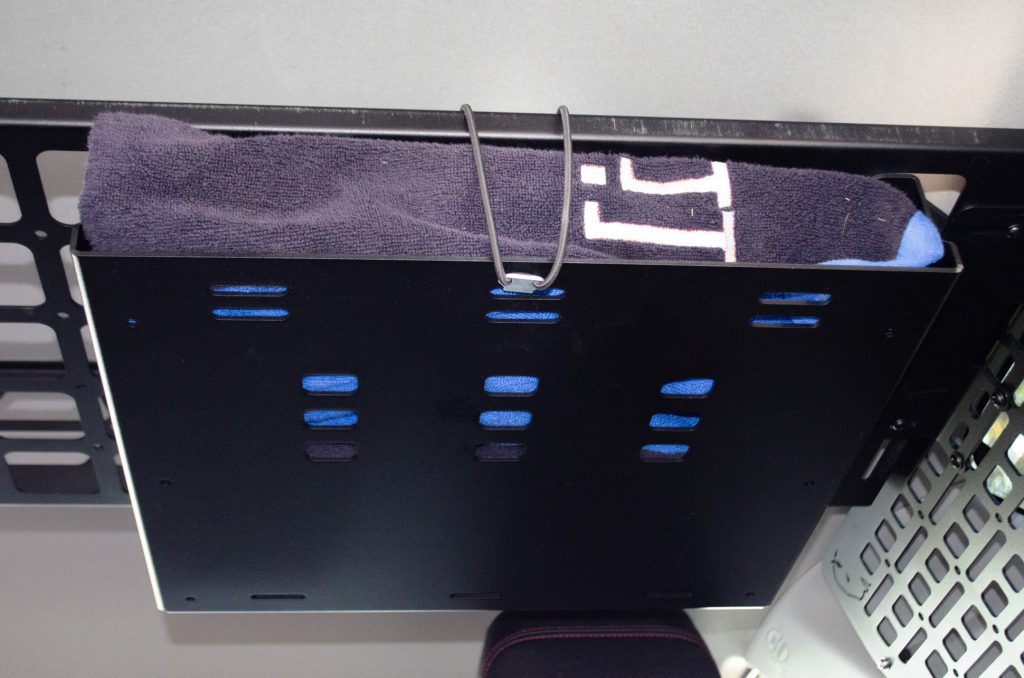
They have cut several rectangular holes on the bottom of the shelf that allow more options to mount items. You can easily strap sleeping bags, containers, or tools underneath the shelf. With a maximum payload rating of 66 lbs. static and 26 lbs. dynamic, this shelf provides quite a bit of storage options while still being strong enough to support some of your heavier gear. In the image above, you can see the slotted locations to mount the cargo barrier.
Cargo Barrier
As if you didn’t have enough utility between two MOLLE panels and a shelf, Bison Gear has developed a few accessories to spur this stunning shelf system into overdrive with their Cargo Barrier and Under Shelf Compartment.
Overview
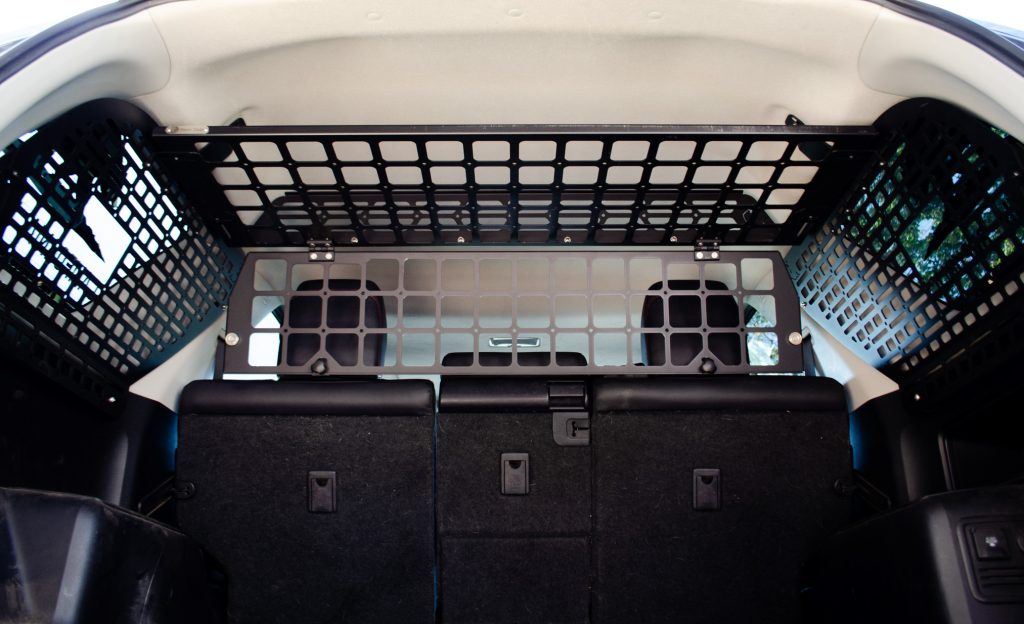
The Cargo Barrier attaches to the bottom of the shelf using a hinge set and folds up and out of the way with the included magnetic fasteners. This handy divider helps keep your animal adventurers from climbing over the rear seat while travelling or perhaps keeps your stored sweet treats safe from grubby little hands reaching over from the back seat.
Made of the same durable metal as the rest of the system, this single panel utilizes magnets to remain put in the stored position. When lowered into use, the panel will secure to mounting brackets that slide onto the headrest posts, ensuring your favorite feline or rascally road dog will stay safe and secure.
Installation
Installing the Cargo Barrier is easy enough, but requires a little more than a few nuts and bolts.
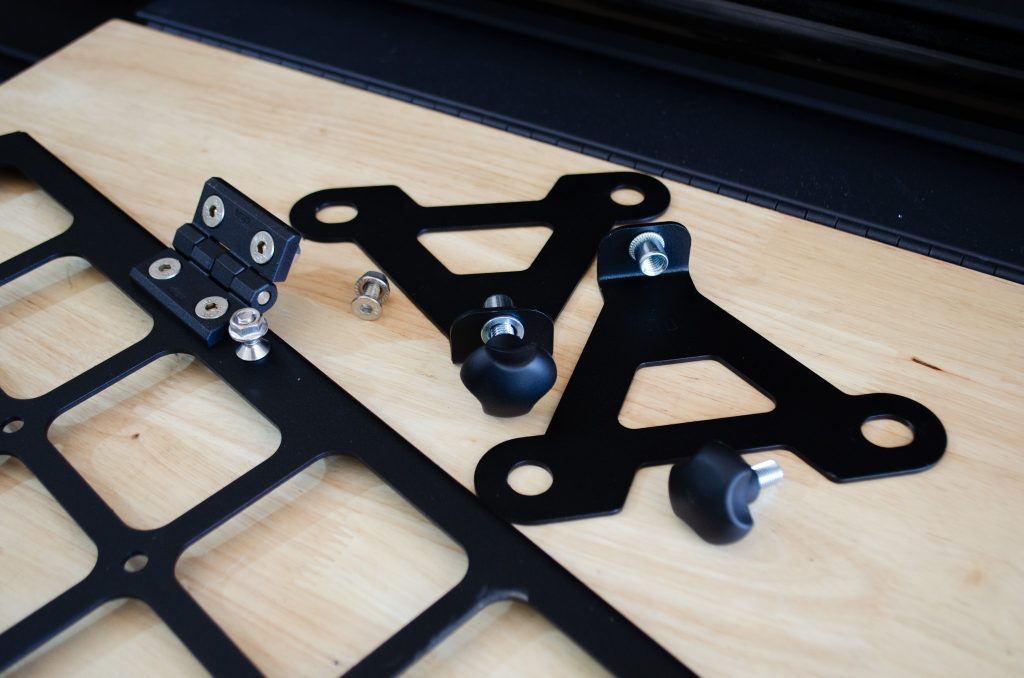
Step 1. Install Mounting Brackets
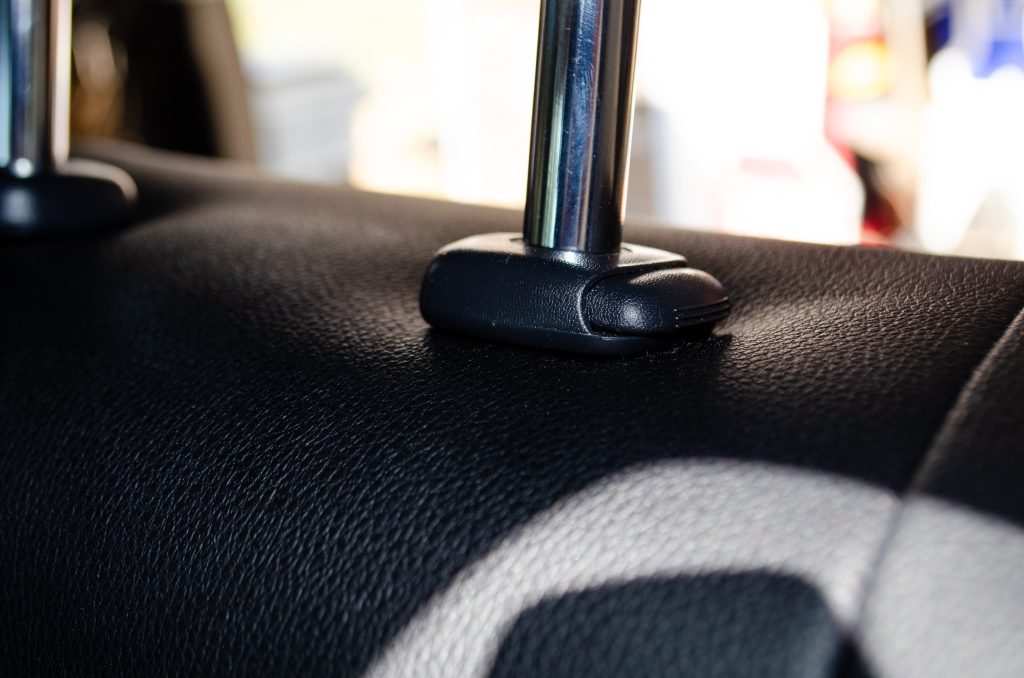
First, you’ll need to mount the brackets that secure the cargo barrier when it’s in its down position. Start by removing your rear seat headrests and pulling them up until they hit that lock position. Press the release button at the base of one of the posts, and pull the headrest off the seat.
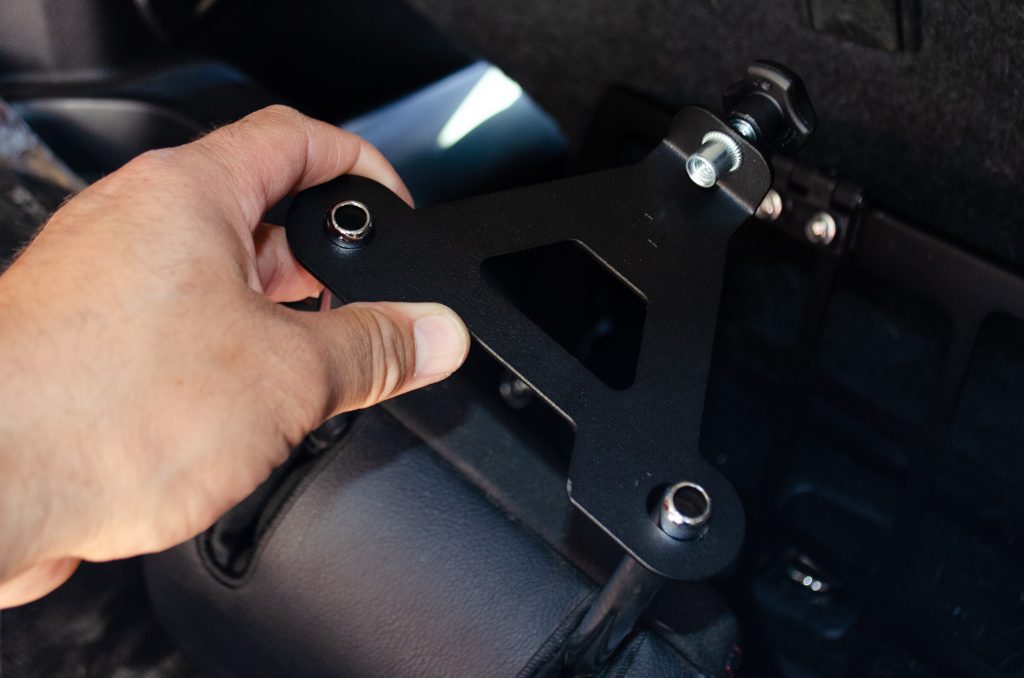
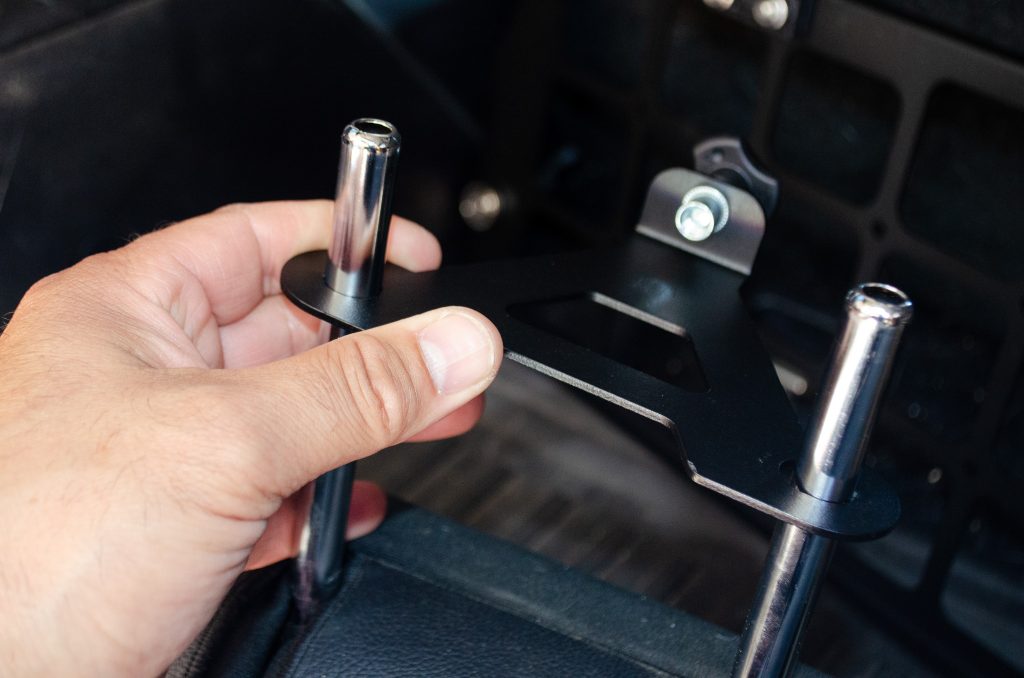
Next, slide the triangular Cargo Barrier headrest bracket onto the headrest posts. This is a very tight fit, but with a little work, the bracket should slide over both posts. The threaded nut that receives the security knob should be facing upward to better align with the bracket slots. As you can see in the photo, I learned that lesson the hard way.
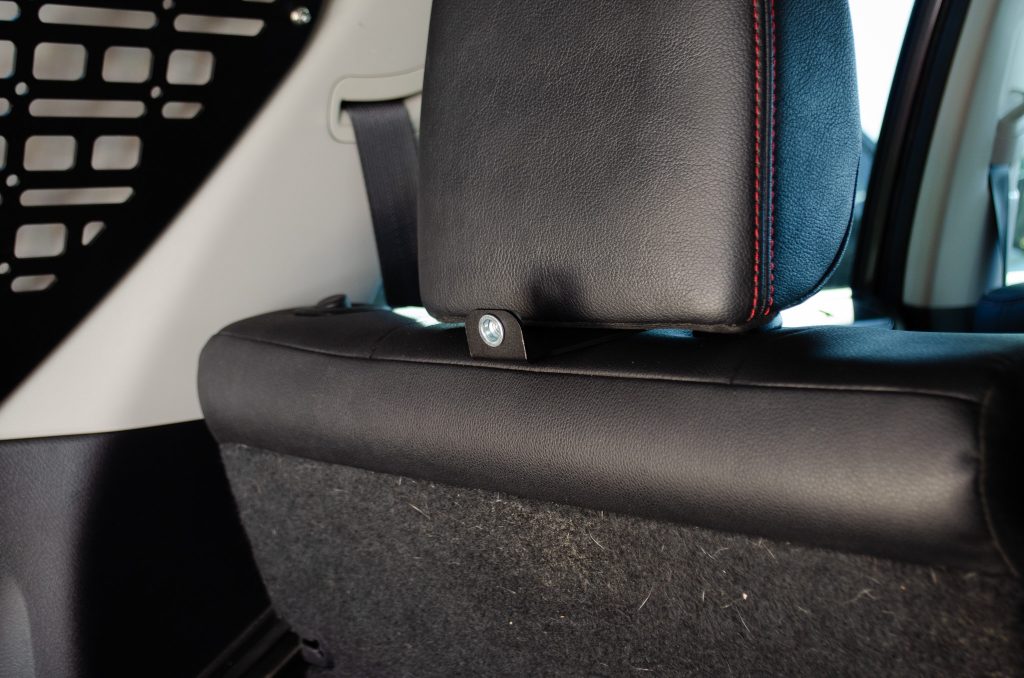
Step 2. Reinstall Headrests
After mounting both brackets to the headrests, you can reinstall them onto the seats. When the bracket is folded up to the shelf, that is to say, not in use, you can screw the security knobs onto the headrest brackets for storage.
Step 3. Secure Bottom Hinges
Secure the hinges to the bottom of the shelf using the provided hardware. Bison Gear provides several slotted locations to tweak your install according to your needs. Be sure to install the barrier so the magnets will contact the shelf plate when in the “up” position. You’re done after you’ve bolted the hinged barrier to the shelf!
“Down” Position
“Up” Position
Overall Impressions
This is an extremely useful and practical addition to this substantial cargo system. It can keep groceries, luggage, or pets secure in the rear of your 4Runner without disturbing passengers in the front. I found it especially useful when we take our dogs on hikes. I have all the storage I need to mount my backpack, walking shoes, towels to dry off the pups, in case they run through water, a Bluetooth speaker, and more.
Also, suppose you need to transport a wet dog back to the house. This is a fantastic way to contain your soggy companion and prevent them from bouncing around other areas of your ride, soaking everything- or everyone else.
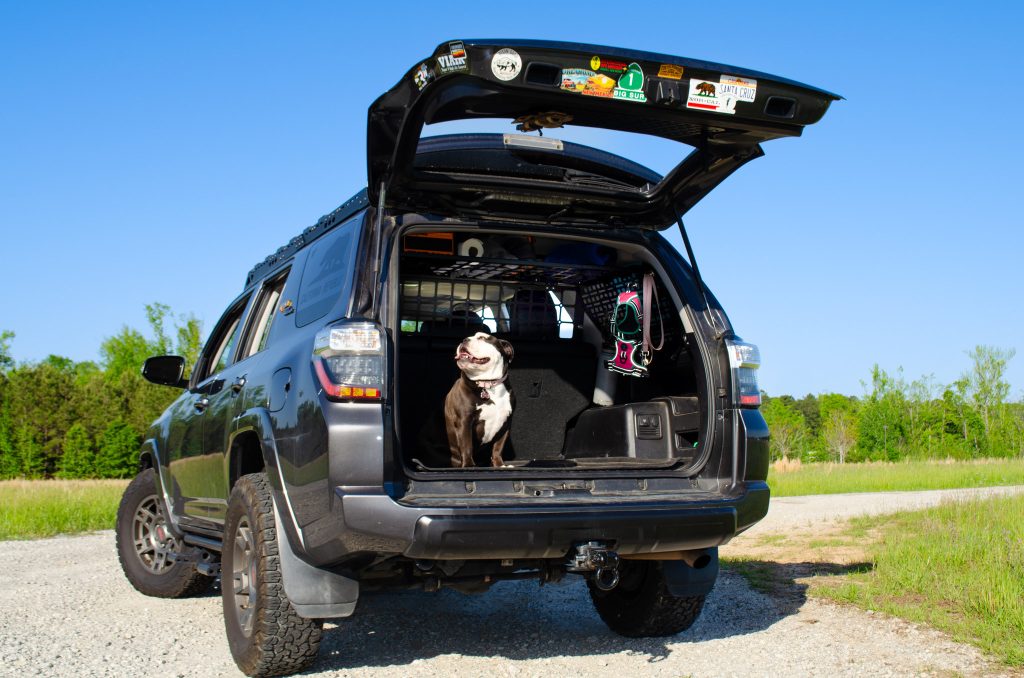
With the cargo barrier, you have essentially created a crate area for your furry passengers, complete with a roll-down window to access them, once parked (thank you, Toyota!). It makes a great staging area to get them geared up for a walkabout and to get them situated for the ride home.
If I need to pass things through to the passenger area, the barrier quickly frees up from the headrests and magnetically secures to the bottom of the shelf. I can screw the security knobs back into the headrest bracket for storage and fold down the headrests if I need the extra room.
This magnetic fold-up feature lets you capitalize on getting the most room from your cargo area, especially if you need to fold down your rear seats. Although I can’t say just how strong these magnets truly are, I can say that they held up nicely during my testing while mildly bouncing along local trails, without dropping.
Under Shelf Compartment
This compartment attaches underneath the shelf unit with the included hardware. It provides an ideal storage spot for a fold-out chair, picnic blanket, or another item you need to keep handy. Items are kept secured by a bungee chord and the compartment can be used solo, side-by-side with another or even double stacked if you happen to want two.
As seems to be the theme with all Bison Gear, the build quality feels solid, and the finish is very nice, with a power coat finish to minimize scuffs and scratches. The compartment measures about 17″ wide by 3″ high and 15″ deep, and it can be stacked with another compartment to give you that double-down take on things.
Bison Gear states they developed this compartment with Frontrunner’s Expanded Camping Chair in mind. If you run two of these units in your 4Runner, you’ll have a nice spot to store a set of camping chairs, keeping them from eating up valuable storage space while remaining easily accessible.
Final Thoughts
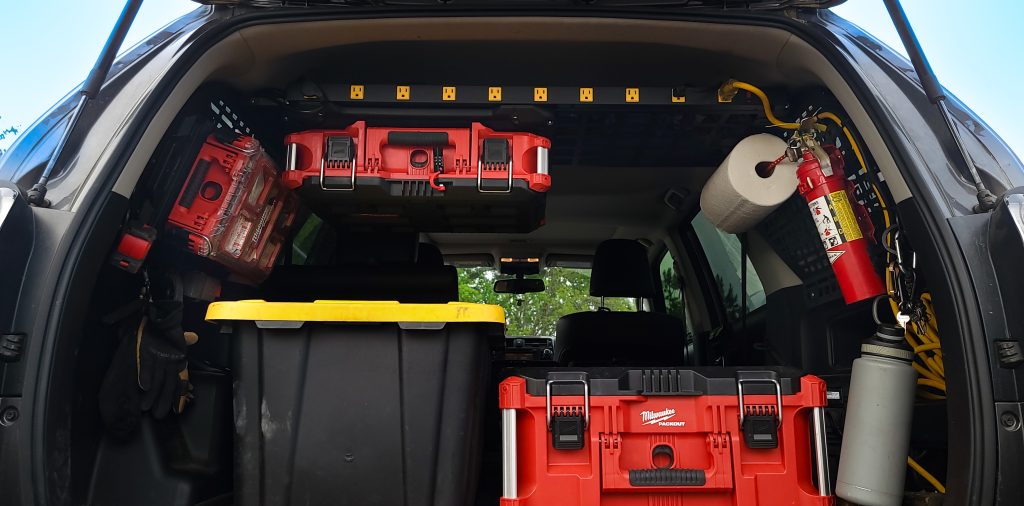
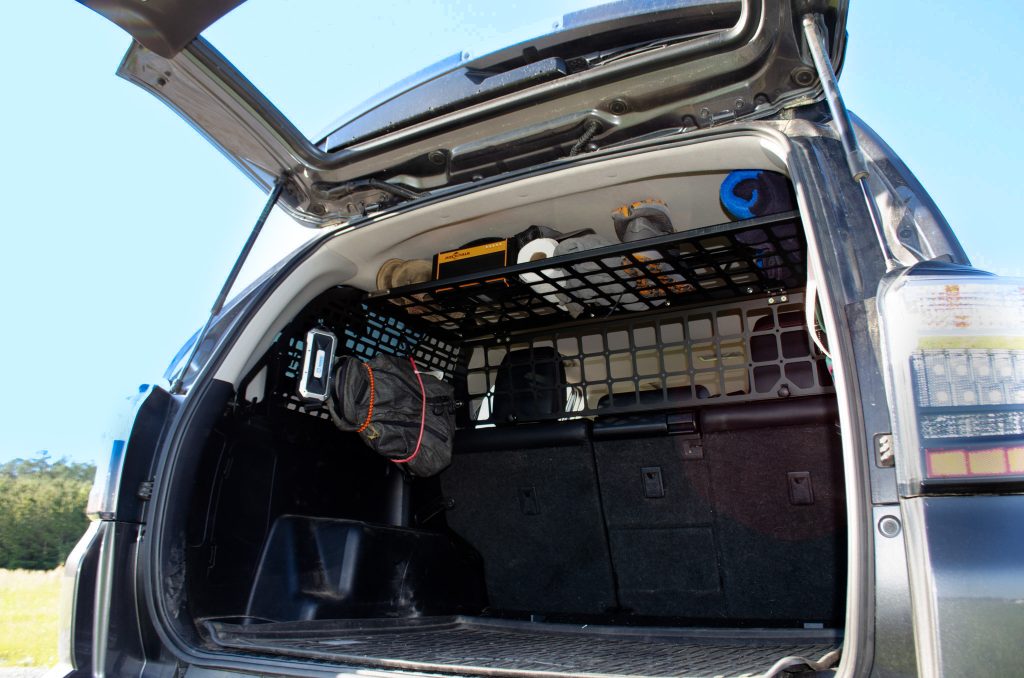
During my work week, I’ll keep everyday items such as flashlights, battery chargers, and tools at the ready. When the weekend hits and I have to change functions, this Bison Gear system makes swapping gear fast and easy. I can pack up the pups for a little trail riding or maybe take a road trip with the family. I’ll often have a few other items such as rolled towels for the kids, jumper cables, a battery jump box, and the ever-present first aid kit, to name a few.
The build quality has been fantastically durable, as I am constantly pulling out items and tossing them back in throughout the work day. The finish doesn’t scratch easily, which is also good when the dogs are back there. I love using carabiners and magnetic hooks to store and arrange gear for ease of use quickly, and this system is great at giving me options. When it does get dirty, the powder coating cleans up easily and comes back to life with little more than water and a paper towel.

In short, I’ve found these MOLLE panels and shelf system to allow me to outfit my rig for the versatility my life demands. Attaching gear, swapping items, and having a strong and secure location for anything I want to keep within the vehicle has been fantastic. The shelf gives me that on-the-go storage option to quickly place loose items or odd-sized things up and out of the way. I added a power distribution option to the panel on the front and rear of the shelf that ties into the 4Runner’s inverter.
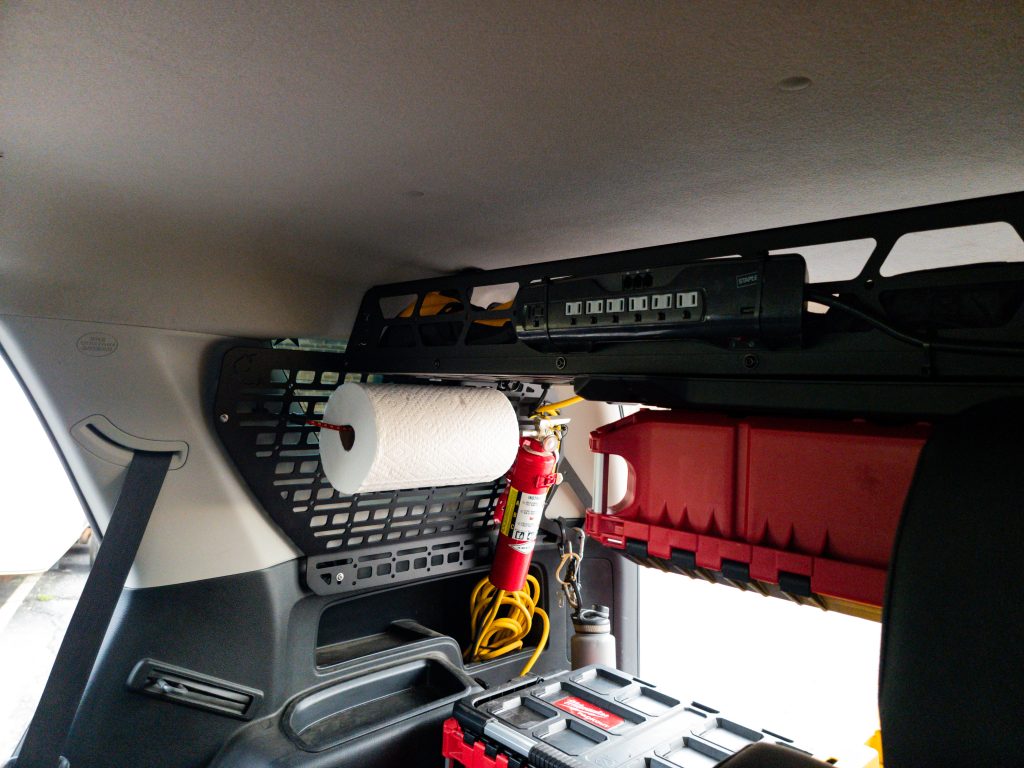
This allows me to place electronics on the shelf and charge whatever I need for the day. Having another power strip mounted to the front of the shelf allows my kids to charge their phones, tablets, or headphones during a road trip.
Overall, Bison Gear has developed a comprehensive yet affordable system that provides strength, durability, versatility, and utility to the 4Runner’s cargo area.
Where did you get that AC power distribution panel visible from the trunk lid side?
TIA
Hey Raf.
It’s been a while since I’ve bought that one, but it’s a general table-top power strip that I’ve attached to the Bison Gear shelf. I have the power wire running down the side MOLLE panel and into the inverter. Then everything else I use plugs into that strip, including my front seat extension that I use for other AC devices.
You can pretty much find these strips anywhere, but U-Line, Grainger and even Amazon would be great places to start. Also, try your local hardware stores like Home Depot or Lowe’s if you want it sooner.
My strip is just barely over 40″ long (3′ 4″), and that seems to fit nicely along that shelf. I use it constantly for both work and play.
Share some photos of your setup and what you might use it for!
I went with this due to the single piece roof shelf. Others have a bolt together solution, which I would think would rattle and/or not be nearly as strong. I have yet to install it after receiving it 3 weeks ago but look forward to getting it in and testing it out. This work thing gets in the way of a lot of personal free time! Haha!
Story of my life, Swanyz! You make a good point on the potential of noise for a multiple piece shelf. I can tell you that this system has been incredibly strong under the day-to-day abuse I send its way. Zero vibration issues across the board, even going from work, to trail and back. So far, I’ve been impressed.
As much as I like this concept offered by multiple companies, as a city dweller I absolutely can’t delete a cargo cover for my regular day-to-day metro area use because any cargo in sight will invite a smash and grab. The molle panel maker who also offers a quality cargo cover will finally meet the needs of the many people like me, who needs stealth in the city and can load up the molle panels for the camping trip.
Just to counter, if thieves see that you have reinforced windows and additional protection, then it will most likely detour those thieves.
Wishful thinking, a stack of bright red Packouts like in the article pics is begging for the rear window to be smashed and grabbed in the metro areas I deal with. Sad but it’s reality.
Paul, you and Josh both have valid points. Luckily I don’t have the same concerns as someone living in a heavily metro area, not to mention all the local construction guys that leave their Packout boxes just stacked in their truck beds for the world to see. I figure there’s lower hanging fruit than my rig.
But you did touch on a really interesting idea: A cargo covering that allows a molle system. Maybe a retractable shade over your rear window? …for all the manufacturers reading this, Paul may be on to something, here.
Or flip it around to say a molle system that also offers a cargo cover that attaches to their system near the lower edge of their side molle panels, which are already aligned with the factory cover since they use the same mounting points.
For me the best would be a retractable cover similar to the factory one, just needs to be a bit shorter width to fit between the molle panels. It could be at the same elevation as the factory cover or slightly higher, up to the bottom of the rear gate window. And keep it relatively easy to fully remove like the factory cover for when you need to haul something big and drop the rear seats.
Many people have rightly complained about the rather large gap between the factory cover and the rear gate allowing easy view under, I resolved that years ago with some black fabric clipped to the cargo cover back edge which hangs down (see pic).
Fully obscuring the rear gate window would impede my driving visibility more than I would prefer, but it might work for other people, YMMV.
I know what you mean about construction workers and their packout stacks in their trucks. I doubt any of them park like that at night outside their house. I know guys who went to Home Depot like that and came out and their tools were gone. I’ve had my own break-ins on my truck locked cargo box. Sadly that’s the kind of world we live in and I try to take precautions.
The Bison molle system seems fantastic to me, if they decide to offer a quality cargo cover option I’m in.
I hear ya. The best thing about this industry is that competition is still high. Manufacturers and design enthusiast are always looking to, not only reinvent the wheel, but how to make it better and shiny. Ideas are always flowing, as you yourself have illustrated, and I for one, can’t wait to see what develops from them!
I couldn’t agree more. The extensive 4Runner aftermarket is a big part of why we own a 4runner.